
Owners Manual
Page 69
Side airbag modules (airbag and inflator) 4. Airbag sensor assembly 69 2004 L/C100 from the rear Hitting a curb, edge of pavement or hard surface Falling into or jumping over a deep hole 13c538a Pitch end over end Landing hard or vehicle falling The curtain shield airbags are shown in the illustration. 1. ...following components, and their locations are not generally designed to inflate if the vehicle is involved in a front or rear collision, if it pitches end over end or if it is involved in the illustration. Some examples are shown in a low−speed side collision.
Side airbag modules (airbag and inflator) 4. Airbag sensor assembly 69 2004 L/C100 from the rear Hitting a curb, edge of pavement or hard surface Falling into or jumping over a deep hole 13c538a Pitch end over end Landing hard or vehicle falling The curtain shield airbags are shown in the illustration. 1. ...following components, and their locations are not generally designed to inflate if the vehicle is involved in a front or rear collision, if it pitches end over end or if it is involved in the illustration. Some examples are shown in a low−speed side collision.
Owners Manual
Page 213
...seconds after the engine is for only one person to where replacement is designed for rear end protection and easier step−up loading. If you hear a squealing or scraping ...pads are not replaced when necessary. The rear step bumper is started. CAUTION D Do not allow more than one person. To get on your Toyota dealer as soon as possible. It is ...Rear step bumper The brake pad wear limit indicators on the rear step bumper at a time. For an explanation of this system's warning light, see "Service reminder indicators and warning buzzers" on the rear step bumper. 213 2004...
...seconds after the engine is for only one person to where replacement is designed for rear end protection and easier step−up loading. If you hear a squealing or scraping ...pads are not replaced when necessary. The rear step bumper is started. CAUTION D Do not allow more than one person. To get on your Toyota dealer as soon as possible. It is ...Rear step bumper The brake pad wear limit indicators on the rear step bumper at a time. For an explanation of this system's warning light, see "Service reminder indicators and warning buzzers" on the rear step bumper. 213 2004...
Owners Manual
Page 240
...bracket after approximately 1000 km (600 miles) of your vehicle will require more frequent maintenance due to the scheduled maintenance information in the rear end under the rear bumper. D Toyota recommends that you do not tow a trailer with a new vehicle or a vehicle with a socket for correct operation of driving....For this information, please refer to the additional load. PRE−TOWING SAFETY CHECK D Check that it cannot shift. 240 2004 L/C100 from Aug '03 Prod. (OM60A04U) D Make sure the trailer cargo is securely loaded so that your vehicle's tires are properly inflated.
...bracket after approximately 1000 km (600 miles) of your vehicle will require more frequent maintenance due to the scheduled maintenance information in the rear end under the rear bumper. D Toyota recommends that you do not tow a trailer with a new vehicle or a vehicle with a socket for correct operation of driving....For this information, please refer to the additional load. PRE−TOWING SAFETY CHECK D Check that it cannot shift. 240 2004 L/C100 from Aug '03 Prod. (OM60A04U) D Make sure the trailer cargo is securely loaded so that your vehicle's tires are properly inflated.

Owners Manual
Page 254
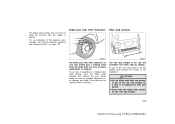
To protect the paint, place several sheets of paper over the paintwork. 3. After the tire is lowered completely to the front lightly. 4. Remove the access hole cover on the rear bumper with pushing it to the ground, remove the holding bracket as shown in the illustration. 254 2004 L/C100 from Aug '03 Prod. (OM60A04U) 2. Insert the jack handle end into the lowering screw through the access hole and turn it counterclockwise with a flat −bladed screwdriver.
To protect the paint, place several sheets of paper over the paintwork. 3. After the tire is lowered completely to the front lightly. 4. Remove the access hole cover on the rear bumper with pushing it to the ground, remove the holding bracket as shown in the illustration. 254 2004 L/C100 from Aug '03 Prod. (OM60A04U) 2. Insert the jack handle end into the lowering screw through the access hole and turn it counterclockwise with a flat −bladed screwdriver.

Owners Manual
Page 255
...ornament When storing the spare tire, put it in place with the outer side of the rear wheels. 3. Remove the wheel ornament. Take due care in handling the ornament to avoid unexpected personal injury. 255 2004 L/C100 from rolling when it from the side to see that the tire goes straight up... and hook the holding bracket as shown. Block the wheel diagonally opposite the flat tire to pull off the wheel ornament, using the beveled end of the wheel ornament remover...
...ornament When storing the spare tire, put it in place with the outer side of the rear wheels. 3. Remove the wheel ornament. Take due care in handling the ornament to avoid unexpected personal injury. 255 2004 L/C100 from rolling when it from the side to see that the tire goes straight up... and hook the holding bracket as shown. Block the wheel diagonally opposite the flat tire to pull off the wheel ornament, using the beveled end of the wheel ornament remover...

Owners Manual
Page 257
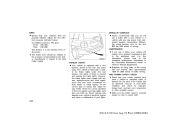
...as shown in the illustration. When connecting a jack handle extension with another extension and a jack handle end, use a jack handle to tighten the bolts on any joint when you tighten the bolts. 257 2004 L/C100 from Aug '03 Prod. (OM60A04U) When connecting the jack handle with screws. JACK POINTS...: Front-Under the frame side rail Left rear-Under the rear axle housing Right rear-Under the bracket on the rear axle housing Make sure the jack is...
...as shown in the illustration. When connecting a jack handle extension with another extension and a jack handle end, use a jack handle to tighten the bolts on any joint when you tighten the bolts. 257 2004 L/C100 from Aug '03 Prod. (OM60A04U) When connecting the jack handle with screws. JACK POINTS...: Front-Under the frame side rail Left rear-Under the rear axle housing Right rear-Under the bracket on the rear axle housing Make sure the jack is...
Owners Manual
Page 308
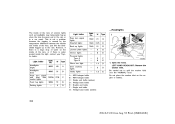
... 60 51 27/8 51 5 Type A B C B D Light bulbs Rear turn signal and front side 1157NA marker lights Front fog lights Parking lights 9006... 1.5 Type G D D D E F E D D E 1. HB3 halogen bulbs HB4 halogen bulbs Single end bulbs (amber) Wedge base bulbs Double end bulbs Single end bulbs Wedge base bulbs (amber) 308 2004 L/C100 from Aug '03 Prod. (OM60A04U) Front turn signal lights Stop/tail lights Back −up when... by the temperature difference between the outside and inside the light, contact your Toyota dealer. This is not a problem because the fogging is water pooled inside of...
... 60 51 27/8 51 5 Type A B C B D Light bulbs Rear turn signal and front side 1157NA marker lights Front fog lights Parking lights 9006... 1.5 Type G D D D E F E D D E 1. HB3 halogen bulbs HB4 halogen bulbs Single end bulbs (amber) Wedge base bulbs Double end bulbs Single end bulbs Wedge base bulbs (amber) 308 2004 L/C100 from Aug '03 Prod. (OM60A04U) Front turn signal lights Stop/tail lights Back −up when... by the temperature difference between the outside and inside the light, contact your Toyota dealer. This is not a problem because the fogging is water pooled inside of...


