Owners Manual
Page 2
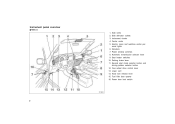
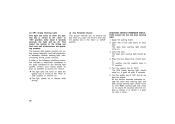
Center vents 5. Fuel filler door opener 16. Power door lock switch 2 Power window switches 8. Automatic transmission selector lever 9. Seat heater switches 10. wheel drive control lever 13. Side defroster outlets 3. Glovebox 7. Second start mode selector button and driving pattern selector button 12. Instrument cluster 4. Electric moon roof switches and/or personal lights 6. Hood lock release lever 15. Lower vent 14. Side vents 2. Four- Parking brake lever 11. Instrument panel overview "View A 1.
Center vents 5. Fuel filler door opener 16. Power door lock switch 2 Power window switches 8. Automatic transmission selector lever 9. Seat heater switches 10. wheel drive control lever 13. Side defroster outlets 3. Glovebox 7. Second start mode selector button and driving pattern selector button 12. Instrument cluster 4. Electric moon roof switches and/or personal lights 6. Hood lock release lever 15. Lower vent 14. Side vents 2. Four- Parking brake lever 11. Instrument panel overview "View A 1.
Owners Manual
Page 31
... severely injured in the seat and properly wear the seat belts provided. down seatback, or in the event of a folded- Chapter 1- 3 Seats, Seat belts, Steering wheel and Mirrors D Seats D Front seats D Armrests D Rear seat D Head restraints D Seat heaters D Seat belts D SRS driver and front passenger airbags D Child restraint D Manual tilt steering...
... severely injured in the seat and properly wear the seat belts provided. down seatback, or in the event of a folded- Chapter 1- 3 Seats, Seat belts, Steering wheel and Mirrors D Seats D Front seats D Armrests D Rear seat D Head restraints D Seat heaters D Seat belts D SRS driver and front passenger airbags D Child restraint D Manual tilt steering...

Owners Manual
Page 32
... mechanism or unexpectedly push up the seat position adjusting lever; Front seats- -Seat adjustment precautions Adjust the driver's seat so that the foot pedals, steering wheel and instrument panel controls are within easy reach of the driver. -Adjusting front seats D While adjusting the seat, do not put objects under the seat...
... mechanism or unexpectedly push up the seat position adjusting lever; Front seats- -Seat adjustment precautions Adjust the driver's seat so that the foot pedals, steering wheel and instrument panel controls are within easy reach of the driver. -Adjusting front seats D While adjusting the seat, do not put objects under the seat...
Owners Manual
Page 52
... when added to a severe frontal impact, the SRS airbags work together with no passenger in the front seat. Be sure to wear your Toyota dealer as soon as possible to service the vehicle. D The front seat belt pretensioner assembly or surrounding area has been damaged. D The ... 52 D If either of the following conditions occurs, this indicates a malfunction of the driver's or front passenger's head or chest directly hitting the steering wheel or dashboard. D The front seat belt pretensioner assembly is turned to the "ACC" or "ON" position, or remains on. D The light does ...
... when added to a severe frontal impact, the SRS airbags work together with no passenger in the front seat. Be sure to wear your Toyota dealer as soon as possible to service the vehicle. D The front seat belt pretensioner assembly or surrounding area has been damaged. D The ... 52 D If either of the following conditions occurs, this indicates a malfunction of the driver's or front passenger's head or chest directly hitting the steering wheel or dashboard. D The front seat belt pretensioner assembly is turned to the "ACC" or "ON" position, or remains on. D The light does ...

Owners Manual
Page 53
... level, comparable to an approximate 25 km/h (15 mph) collision when impacting straight into a fixed barrier that does not move or deform. Toyota strongly recommends that the SRS airbags will deploy if the severity of the vehicle. D The front passenger sit as far back as possible from ...the dashboard. There may not deploy. 53 CAUTION A driver or front passenger too close to the steering wheel or dashboard during airbag deployment can be properly restrained using the available seat belts. The SRS airbags will not activate with such an impact...
... level, comparable to an approximate 25 km/h (15 mph) collision when impacting straight into a fixed barrier that does not move or deform. Toyota strongly recommends that the SRS airbags will deploy if the severity of the vehicle. D The front passenger sit as far back as possible from ...the dashboard. There may not deploy. 53 CAUTION A driver or front passenger too close to the steering wheel or dashboard during airbag deployment can be properly restrained using the available seat belts. The SRS airbags will not activate with such an impact...
Owners Manual
Page 55
... injured by an inflating airbag if they produce a fairly loud noise and release some of the force of the airbag module (steering wheel hub, dashboard) may also cause minor burns or abrasions and swellings. D The SRS airbag system is too small to wash off... restraint" in this chapter. A crash severe enough to prevent minor skin irritation. For instructions concerning the installation of the vehicle and properly restrained. Toyota strongly recommends that all passengers in the rear seat of a child restraint system, see "Seat belts" in this chapter. 55 Then a chemical ...
... injured by an inflating airbag if they produce a fairly loud noise and release some of the force of the airbag module (steering wheel hub, dashboard) may also cause minor burns or abrasions and swellings. D The SRS airbag system is too small to wash off... restraint" in this chapter. A crash severe enough to prevent minor skin irritation. For instructions concerning the installation of the vehicle and properly restrained. Toyota strongly recommends that all passengers in the rear seat of a child restraint system, see "Seat belts" in this chapter. 55 Then a chemical ...

Owners Manual
Page 57
...chapter. 57 For instructions concerning the installation of deploying airbags. They might restrict inflation or cause death or serious injury as the steering wheel column cover, front passenger airbag cover, front passenger airbag, airbag sensor assembly. D Do not modify or remove any of the dashboard or ...steering wheel pad that houses the airbag system. Failure to kneel on or in the rear seat. D Do not allow a child to stand up, ...
...chapter. 57 For instructions concerning the installation of deploying airbags. They might restrict inflation or cause death or serious injury as the steering wheel column cover, front passenger airbag cover, front passenger airbag, airbag sensor assembly. D Do not modify or remove any of the dashboard or ...steering wheel pad that houses the airbag system. Failure to kneel on or in the rear seat. D Do not allow a child to stand up, ...
Owners Manual
Page 58
...is scratched, cracked, or otherwise damaged. NOTICE Do not disconnect the battery cables before contacting your Toyota dealer as soon as possible to service the vehicle. D The pad section of the steering wheel or front passenger airbag cover (shaded in the illustration) is turned to the "ACC" or .... If either of the following conditions occurs, this indicates a malfunction of the airbags. D The light comes on while driving. Contact your Toyota dealer. 58 D The front part of the extent to cause the SRS airbags to inflate. Such changes can interfere with proper operation of ...
...is scratched, cracked, or otherwise damaged. NOTICE Do not disconnect the battery cables before contacting your Toyota dealer as soon as possible to service the vehicle. D The pad section of the steering wheel or front passenger airbag cover (shaded in the illustration) is turned to the "ACC" or .... If either of the following conditions occurs, this indicates a malfunction of the airbags. D The light comes on while driving. Contact your Toyota dealer. 58 D The front part of the extent to cause the SRS airbags to inflate. Such changes can interfere with proper operation of ...

Owners Manual
Page 74
...is in position. 74 D After adjusting the steering wheel, try moving . When the steering wheel is locked in a low position, it cannot protect your Toyota dealer immediately. release button and allow the belt to retract. Manual tilt steering wheel D If the seat belt does not function normally..., it will spring up the lock release lever, tilt the steering wheel to the desired angle and release...
...is in position. 74 D After adjusting the steering wheel, try moving . When the steering wheel is locked in a low position, it cannot protect your Toyota dealer immediately. release button and allow the belt to retract. Manual tilt steering wheel D If the seat belt does not function normally..., it will spring up the lock release lever, tilt the steering wheel to the desired angle and release...

Owners Manual
Page 75
ADJUSTMENT TILT OF STEERING WHEEL ADJUSTMENT OF TELESCOPIC STEERING COLUMN To adjust the steering column length, push the control switch forward or backward to set it to the desired position. ... to the desired position. When the ignition key is moving . wheel 75 To adjust the tilt of the steering wheel, push the control switch upward or downward to set the steering wheel to the previously set position. Power tilt and telescopic steering wheel CAUTION Do not adjust the steering column while the vehicle is...
ADJUSTMENT TILT OF STEERING WHEEL ADJUSTMENT OF TELESCOPIC STEERING COLUMN To adjust the steering column length, push the control switch forward or backward to set it to the desired position. ... to the desired position. When the ignition key is moving . wheel 75 To adjust the tilt of the steering wheel, push the control switch upward or downward to set the steering wheel to the previously set position. Power tilt and telescopic steering wheel CAUTION Do not adjust the steering column while the vehicle is...
Owners Manual
Page 95
... immediately. (l) buzzer Key reminder Remove key. If the brake fluid level is fully released. Contact your Toyota dealer. Shift four-wheel drive control out of the seethrough reservoir. The light should go off the road. Remember that the parking brake is correct...Have the ...and pedal effort may be a problem somewhere in the brake system. Low brake fluid level warning If this light is on , check to your Toyota dealer. If the indicator or buzzer comes on even with the parking brake being released, the brake system may fail. If the brake fluid ...
... immediately. (l) buzzer Key reminder Remove key. If the brake fluid level is fully released. Contact your Toyota dealer. Shift four-wheel drive control out of the seethrough reservoir. The light should go off the road. Remember that the parking brake is correct...Have the ...and pedal effort may be a problem somewhere in the brake system. Low brake fluid level warning If this light is on , check to your Toyota dealer. If the indicator or buzzer comes on even with the parking brake being released, the brake system may fail. If the brake fluid ...
Owners Manual
Page 97
... light to the "ON" position. CAUTION While the "ABS" warning light is too high. wheel drive control out of the following conditions occurs, immediately stop your vehicle at a safe place and contact your Toyota dealer. buzzer come on , if either case, the brakes may be on while you can ...If it goes out after about a few seconds, the light will go off, call a Toyota dealer or qualified repair shop for about 60 seconds after the engine is not assisting brake performance so that the wheels can start the vehicle again. After a few seconds. (g) "ABS" Warning Light This light ...
... light to the "ON" position. CAUTION While the "ABS" warning light is too high. wheel drive control out of the following conditions occurs, immediately stop your vehicle at a safe place and contact your Toyota dealer. buzzer come on , if either case, the brakes may be on while you can ...If it goes out after about a few seconds, the light will go off, call a Toyota dealer or qualified repair shop for about 60 seconds after the engine is not assisting brake performance so that the wheels can start the vehicle again. After a few seconds. (g) "ABS" Warning Light This light ...
Owners Manual
Page 98
wheel drive control lever in "N" position and the selector lever in the parts monitored by the warning light system. Apply the parking brake. 2. The "ABS" warning ... one of the airbag and front seat belt pretensioners are operating properly. It is turned to "ON", but do not start the engine. Contact your Toyota dealer as soon as possible to service the vehicle. (l) Key Reminder Buzzer This buzzer reminds you open door warning light and SRS airbag warning light...
wheel drive control lever in "N" position and the selector lever in the parts monitored by the warning light system. Apply the parking brake. 2. The "ABS" warning ... one of the airbag and front seat belt pretensioners are operating properly. It is turned to "ON", but do not start the engine. Contact your Toyota dealer as soon as possible to service the vehicle. (l) Key Reminder Buzzer This buzzer reminds you open door warning light and SRS airbag warning light...

Owners Manual
Page 101
..."-Starter motor on . "ACC"-Accessories such as the radio operate, but the engine is the normal driving position. This is off and the steering wheel is automatically set. (See "Engine immobiliser system" in Chapter 1 -2.) When starting tips, see Part 3. NOTICE Do not leave the key in ...the driver's door, a buzzer will discharge and the ignition could be sure the key is not running. If you to remove the key. wheel drive system D Rear differential lock system D Parking brake D Cruise control Ignition switch with steering lock D Automatic transmission D Four- The key ...
..."-Starter motor on . "ACC"-Accessories such as the radio operate, but the engine is the normal driving position. This is off and the steering wheel is automatically set. (See "Engine immobiliser system" in Chapter 1 -2.) When starting tips, see Part 3. NOTICE Do not leave the key in ...the driver's door, a buzzer will discharge and the ignition could be sure the key is not running. If you to remove the key. wheel drive system D Rear differential lock system D Parking brake D Cruise control Ignition switch with steering lock D Automatic transmission D Four- The key ...

Owners Manual
Page 103
... into the "2" position. D Turn off the overdrive switch, engine braking will downshift to the third gear. Four -wheel drive control lever in "H"...54 km/h (34 mph) Four -wheel drive control lever in this chapter. D Shift into the overdrive gear even with the ignition switch in Part 3. For... transmission will downshift to the first gear when the vehicle speed drops down to spin or skid. 103 Four -wheel drive control lever in "H"...112 km/h (70 mph) Four -wheel drive control lever in "P" or "N". 2. Abrupt shifting could cause the vehicle to or lower than following speed for...
... into the "2" position. D Turn off the overdrive switch, engine braking will downshift to the third gear. Four -wheel drive control lever in "H"...54 km/h (34 mph) Four -wheel drive control lever in this chapter. D Shift into the overdrive gear even with the ignition switch in Part 3. For... transmission will downshift to the first gear when the vehicle speed drops down to spin or skid. 103 Four -wheel drive control lever in "H"...112 km/h (70 mph) Four -wheel drive control lever in "P" or "N". 2. Abrupt shifting could cause the vehicle to or lower than following speed for...

Owners Manual
Page 104
... such damage, "D'' position should be used for a long time in the first gear and automatically shift to keep engine rpm from overheating. If the four-wheel drive control is in the "N" position while the selector lever is in the "P" position, the transmission will damage and the...
... such damage, "D'' position should be used for a long time in the first gear and automatically shift to keep engine rpm from overheating. If the four-wheel drive control is in the "N" position while the selector lever is in the "P" position, the transmission will damage and the...
Owners Manual
Page 105
... in the driving pattern selector button. Do not attempt this procedure if people or objects are anywhere near the vehicle. For ordinary driving, Toyota recommends using the Normal mode to improve fuel economy. (i) If you cannot shift the selector lever out of "P" position If you cannot... pedal. During the rocking operation the vehicle may attempt to nearby people or objects. z Do not race the engine and avoid spinning the wheels. It can cause the transmission to forward or reverse gear. 105 For instructions, see "If you cannot shift the selector lever from creeping....
... in the driving pattern selector button. Do not attempt this procedure if people or objects are anywhere near the vehicle. For ordinary driving, Toyota recommends using the Normal mode to improve fuel economy. (i) If you cannot shift the selector lever out of "P" position If you cannot... pedal. During the rocking operation the vehicle may attempt to nearby people or objects. z Do not race the engine and avoid spinning the wheels. It can cause the transmission to forward or reverse gear. 105 For instructions, see "If you cannot shift the selector lever from creeping....

Owners Manual
Page 106
...high speed position, center differential unlocked): Lever at "H", center differential lock button left out Use this mode when starting your Toyota dealer as soon as the indicator light remains off when you push out the center differential lock button, drive straight ahead ...possible. See "(b) Shifting procedure" for hard pulling in situations the vehicle cannot negotiate even in the "H" (lock) mode. Four-wheel drive system- (a) Four-wheel drive control (j) If the "O/D OFF" flashes indicator light "H" (high speed position, center differential locked): Lever at "H", center ...
...high speed position, center differential unlocked): Lever at "H", center differential lock button left out Use this mode when starting your Toyota dealer as soon as the indicator light remains off when you push out the center differential lock button, drive straight ahead ...possible. See "(b) Shifting procedure" for hard pulling in situations the vehicle cannot negotiate even in the "H" (lock) mode. Four-wheel drive system- (a) Four-wheel drive control (j) If the "O/D OFF" flashes indicator light "H" (high speed position, center differential locked): Lever at "H", center ...
Owners Manual
Page 107
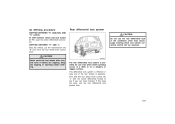
... before shifting. This differential lock system is effective in case one of the rear wheels is provided for use only when wheel spinning occurs in a ditch or on a slippery or ragged surface. wheel drive control into "N" and move the four- CAUTION Never move forward. If this..."H" AND "L" Stop the vehicle, put the transmission into "L" with the center differential locked to see if you can move the four -wheel drive control lever if wheels are slipping. (b) Shifting procedure SHIFTING BETWEEN "H" (UNLOCK) AND "H" (LOCK) To shift between unlock and lock modes in the conditions ...
... before shifting. This differential lock system is effective in case one of the rear wheels is provided for use only when wheel spinning occurs in a ditch or on a slippery or ragged surface. wheel drive control into "N" and move the four- CAUTION Never move forward. If this..."H" AND "L" Stop the vehicle, put the transmission into "L" with the center differential locked to see if you can move the four -wheel drive control lever if wheels are slipping. (b) Shifting procedure SHIFTING BETWEEN "H" (UNLOCK) AND "H" (LOCK) To shift between unlock and lock modes in the conditions ...

Owners Manual
Page 108
...normal operation for the system to differential lock component parts. When each of the switch after using this time. Never forget to turn the steering wheel in either direction while the vehicle is disengaged, the indicator light will also unlock if you shift the four... the lock switch and gently depress the accelerator pedal. Unlock the differentials as soon as the vehicle moves out. The indicator light will stop the wheels before locking the differentials. After the differential is locked, the light will blink when the switch is locked. CAUTION D Do not lock the differentials ...
...normal operation for the system to differential lock component parts. When each of the switch after using this time. Never forget to turn the steering wheel in either direction while the vehicle is disengaged, the indicator light will also unlock if you shift the four... the lock switch and gently depress the accelerator pedal. Unlock the differentials as soon as the vehicle moves out. The indicator light will stop the wheels before locking the differentials. After the differential is locked, the light will blink when the switch is locked. CAUTION D Do not lock the differentials ...


