
Owner's Manual
Page 148
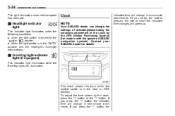
...ignition switch is in the " " or " " position . when the light switch is in the "AUTO" position and the headlights illuminate automatically You can adjust the illumination brightness for better visibility. 3-30 Instruments and controls Illumination brightness control NOTE . when the light switch is in the .... The front fog lights operate under the following conditions. . When the control dial is in the "AUTO" position and the headlights turn on the turn the control dial downward. Front fog light switch (if equipped) The illumination brightness of the clock display, ...
...ignition switch is in the " " or " " position . when the light switch is in the "AUTO" position and the headlights illuminate automatically You can adjust the illumination brightness for better visibility. 3-30 Instruments and controls Illumination brightness control NOTE . when the light switch is in the .... The front fog lights operate under the following conditions. . When the control dial is in the "AUTO" position and the headlights turn on the turn the control dial downward. Front fog light switch (if equipped) The illumination brightness of the clock display, ...

Owner's Manual
Page 154
...While the defogger and deicer system is on, the auto dimming indicator light (green) located to the windshield. . The night position reduces glare from headlights of vehicles behind you start driving. & Auto-dimming mirror/compass (if equipped) & Inside mirror 1) 2) 3) 4) Left button Auto dimming indicator .... . By pressing and releasing the right If the windshield is toggled on the defogger and deicer system if the wipers are properly adjusted before you . Pull the tab at 9 mph (15 km/h) or lower for 15 minutes, the windshield wiper deicer automatically stops operating...
...While the defogger and deicer system is on, the auto dimming indicator light (green) located to the windshield. . The night position reduces glare from headlights of vehicles behind you start driving. & Auto-dimming mirror/compass (if equipped) & Inside mirror 1) 2) 3) 4) Left button Auto dimming indicator .... . By pressing and releasing the right If the windshield is toggled on the defogger and deicer system if the wipers are properly adjusted before you . Pull the tab at 9 mph (15 km/h) or lower for 15 minutes, the windshield wiper deicer automatically stops operating...
Owner's Manual
Page 155
... illuminated compass reading will be displayed. 3. For this reason, use care not to read in the lower part of the mirror. Compass zone adjustment 1. Refer to the "Compass calibration zone" map attached to ensure good rearward visibility during reversing. ! This is now calibrated. 5. For optimum... to an open, level area away from the display (approximately two or three circles). Drive to help prevent you from the headlights of vehicles behind you encounter this has occurred if your geographical location. 2. Further calibration may be displayed. 4. Stop cycling when...
... illuminated compass reading will be displayed. 3. For this reason, use care not to read in the lower part of the mirror. Compass zone adjustment 1. Refer to the "Compass calibration zone" map attached to ensure good rearward visibility during reversing. ! This is now calibrated. 5. For optimum... to an open, level area away from the display (approximately two or three circles). Drive to help prevent you from the headlights of vehicles behind you encounter this has occurred if your geographical location. 2. Further calibration may be displayed. 4. Stop cycling when...
Owner's Manual
Page 387
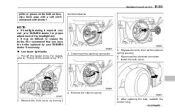
counterclockwise. Disconnect the electrical connector. 5. Replace the bulb, then set the retainer spring securely. 6. Remove the bulb cover, by your SUBARU dealer for proper adjustment of the headlight aim. . If headlight aiming is required, consult your SUBARU dealer if necessary. ! Low beam light bulbs 1. For details, refer to replace the bulbs. It may be difficult to...
counterclockwise. Disconnect the electrical connector. 5. Replace the bulb, then set the retainer spring securely. 6. Remove the bulb cover, by your SUBARU dealer for proper adjustment of the headlight aim. . If headlight aiming is required, consult your SUBARU dealer if necessary. ! Low beam light bulbs 1. For details, refer to replace the bulbs. It may be difficult to...
Owner's Manual
Page 437
...Storage compartment...6-5 Sun shade...2-30 Index 14-9 Headlight ...11-50 License plate light ...11-57 Map light...11-59 Rear combination light ...11-54 Tail and rear side marker light (Outback)...11-55 Tail/Back-up light (Outback) ...11-56 Trunk light ...11-60 ...Vanity mirror light ...11-59 Rocking the vehicle ...8-11 Roof rails with integrated cross bars...8-14 S Safety Precautions when driving ...4 Symbol ...2 Warnings ...2 Seat Fabric...10-5 Front ...1-2 Heater ...1-6 Height adjustment ...1-4 Rear...
...Storage compartment...6-5 Sun shade...2-30 Index 14-9 Headlight ...11-50 License plate light ...11-57 Map light...11-59 Rear combination light ...11-54 Tail and rear side marker light (Outback)...11-55 Tail/Back-up light (Outback) ...11-56 Trunk light ...11-60 ...Vanity mirror light ...11-59 Rocking the vehicle ...8-11 Roof rails with integrated cross bars...8-14 S Safety Precautions when driving ...4 Symbol ...2 Warnings ...2 Seat Fabric...10-5 Front ...1-2 Heater ...1-6 Height adjustment ...1-4 Rear...
Owner's Manual
Page 145
... for models with the genuine SUBARU navigation system). The clock shows the time while the ignition switch is in one -minute decrements. To adjust the time shown by the GPS (Global Positioning System) (for details. & Headlight indicator light This indicator light illuminates under the following ...will change the settings of activating/deactivating the automatic adjustment of the clock by the clock, press the "+" button or the "−" button. when the light switch is in the "AUTO" position and the headlights illuminate automatically indicated time will change in one -minute...
... for models with the genuine SUBARU navigation system). The clock shows the time while the ignition switch is in one -minute decrements. To adjust the time shown by the GPS (Global Positioning System) (for details. & Headlight indicator light This indicator light illuminates under the following ...will change the settings of activating/deactivating the automatic adjustment of the clock by the clock, press the "+" button or the "−" button. when the light switch is in the "AUTO" position and the headlights illuminate automatically indicated time will change in one -minute...

Owner's Manual
Page 151
... the control dial upward. when the light switch is in the "AUTO" position and the headlights illuminate automatically You can adjust the illumination brightness for better visibility. To turn off when the headlights are switched to the " " position. To brighten, turn the switch back down to the...at all. . 3-30 Instruments and controls Illumination brightness control NOTE . When the control dial is in the "AUTO" position and the headlights turn on the turn the control dial downward. The brightness setting is not canceled even when the ignition switch is in the " " ...
... the control dial upward. when the light switch is in the "AUTO" position and the headlights illuminate automatically You can adjust the illumination brightness for better visibility. To turn off when the headlights are switched to the " " position. To brighten, turn the switch back down to the...at all. . 3-30 Instruments and controls Illumination brightness control NOTE . When the control dial is in the "AUTO" position and the headlights turn on the turn the control dial downward. The brightness setting is not canceled even when the ignition switch is in the " " ...

Owner's Manual
Page 157
The night position reduces glare from headlights. 1) 2) 3) 4) 5) 6) 7) 8) 9) Electronic compass display Rear view image display HomeLink® button 1 HomeLink® button 2 Function indicator HomeLink® button 3 Photosensor Power button Compass ...the windshield wiper deicer works effectively. . 3-36 NOTE Instruments and controls . Turn on the defogger and deicer system if the wipers are properly adjusted before you for 15 minutes, the windshield wiper deicer automatically stops operating, though the rear window defogger and outside mirrors are frozen to the ...
The night position reduces glare from headlights. 1) 2) 3) 4) 5) 6) 7) 8) 9) Electronic compass display Rear view image display HomeLink® button 1 HomeLink® button 2 Function indicator HomeLink® button 3 Photosensor Power button Compass ...the windshield wiper deicer works effectively. . 3-36 NOTE Instruments and controls . Turn on the defogger and deicer system if the wipers are properly adjusted before you for 15 minutes, the windshield wiper deicer automatically stops operating, though the rear window defogger and outside mirrors are frozen to the ...

Owner's Manual
Page 166
...174; button 1 HomeLink® button 2 LED HomeLink® button 3 Sensor Automatic dimming on/off button, the automatic dimming function - CONTINUED - Compass zone adjustment 3. Press and hold the switch for 10 seconds will be calibrated. 2. If a "C" is displayed in compass and HomeLink® wireless control system. .... button Compass display The auto-dimming mirror has an anti-glare feature which automatically reduces glare coming from vehicle headlights behind you and automatically dim the mirror to eliminate glare and preserve your geographical location. 2. For this reason...
...174; button 1 HomeLink® button 2 LED HomeLink® button 3 Sensor Automatic dimming on/off button, the automatic dimming function - CONTINUED - Compass zone adjustment 3. Press and hold the switch for 10 seconds will be calibrated. 2. If a "C" is displayed in compass and HomeLink® wireless control system. .... button Compass display The auto-dimming mirror has an anti-glare feature which automatically reduces glare coming from vehicle headlights behind you and automatically dim the mirror to eliminate glare and preserve your geographical location. 2. For this reason...

Owner's Manual
Page 167
... seconds until the correct zone setting for your geographical location. 2. Releasing the button for your location is displayed. 4. Compass zone adjustment The mirror has a photosensor attached on the mirror as that the compass zone setting is correct for 5 seconds will be displayed ... mirror surface turns bright if the transmission is shifted into reverse. During nighttime driving, these sensors detect distracting glare from vehicle headlights behind you and automatically dim the mirror to ensure good rearward visibility during reversing. . When the automatic dimming function is on...
... seconds until the correct zone setting for your geographical location. 2. Releasing the button for your location is displayed. 4. Compass zone adjustment The mirror has a photosensor attached on the mirror as that the compass zone setting is correct for 5 seconds will be displayed ... mirror surface turns bright if the transmission is shifted into reverse. During nighttime driving, these sensors detect distracting glare from vehicle headlights behind you and automatically dim the mirror to ensure good rearward visibility during reversing. . When the automatic dimming function is on...
Owner's Manual
Page 400
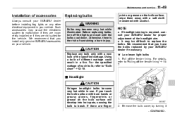
... headlight aim. . NOTE . It may cause the electronic system to "Pulling off the fender lining. We recommend that you install only genuine SUBARU accessories on the bulb surface, wipe them away with a soft cloth moistened with a new bulb of different wattage could result in your SUBARU..., refer to malfunction if they are incorrectly installed or if they are finger- 2. If there are not suited for proper adjustment of sustaining a burn injury. CAUTION Replace any other electrical equipment in a fire. Replacing bulbs WARNING Bulbs may become very hot while in...
... headlight aim. . NOTE . It may cause the electronic system to "Pulling off the fender lining. We recommend that you install only genuine SUBARU accessories on the bulb surface, wipe them away with a soft cloth moistened with a new bulb of different wattage could result in your SUBARU..., refer to malfunction if they are incorrectly installed or if they are finger- 2. If there are not suited for proper adjustment of sustaining a burn injury. CAUTION Replace any other electrical equipment in a fire. Replacing bulbs WARNING Bulbs may become very hot while in...

Owner's Manual
Page 447
14-6 Index Head restraint adjustment Front seat ...1-6 Rear seat...1-10 Headlight ...3-28, 11-49 Bulb wattage ...12-10 Control switch...3-27 Flasher ...3-29 Indicator light...3-24 Heater operation (manual climate control system) ...4-6 High beam... 3-22 Indicator light Coolant temperature low ...3-13 Cruise control ...3-23, 7-41 Cruise control set ...3-23, 7-42 Door open ...3-20 Front fog light...3-24 Headlight...3-24 High beam...3-23 Immobilizer ...3-22 Security...2-4, 3-22 Select lever/Gear position...3-22 Turn signal ...3-23 Vehicle Dynamics Control OFF...3-22, 7-31 Vehicle Dynamics Control...
14-6 Index Head restraint adjustment Front seat ...1-6 Rear seat...1-10 Headlight ...3-28, 11-49 Bulb wattage ...12-10 Control switch...3-27 Flasher ...3-29 Indicator light...3-24 Heater operation (manual climate control system) ...4-6 High beam... 3-22 Indicator light Coolant temperature low ...3-13 Cruise control ...3-23, 7-41 Cruise control set ...3-23, 7-42 Door open ...3-20 Front fog light...3-24 Headlight...3-24 High beam...3-23 Immobilizer ...3-22 Security...2-4, 3-22 Select lever/Gear position...3-22 Turn signal ...3-23 Vehicle Dynamics Control OFF...3-22, 7-31 Vehicle Dynamics Control...

Owner's Manual
Page 450
...11-57 Door step light ...11-58 Front fog light ...11-52 Front position light...11-52 Front turn signal light...11-51 Headlight ...11-49 License plate light ...11-56 Map light...11-57 Rear combination light ...11-53 Rear turn signal light (Sedan) ...) ...11-54 Tail/Back-up light (Outback) ...11-55 Trunk light...11-59 Vanity mirror light ...11-58 Rocking the vehicle ...8-11 Roof rails with integrated cross bars...8-14 S Safety Precautions when driving...4 Symbol...2 Warnings ...2 Seat Fabric ...10-5 Front...1-2 Heater...1-6 Height adjustment...1-4 Power ...1-4 Rear ...1-7 Seatbelt...4, 1-12 ...
...11-57 Door step light ...11-58 Front fog light ...11-52 Front position light...11-52 Front turn signal light...11-51 Headlight ...11-49 License plate light ...11-56 Map light...11-57 Rear combination light ...11-53 Rear turn signal light (Sedan) ...) ...11-54 Tail/Back-up light (Outback) ...11-55 Trunk light...11-59 Vanity mirror light ...11-58 Rocking the vehicle ...8-11 Roof rails with integrated cross bars...8-14 S Safety Precautions when driving...4 Symbol...2 Warnings ...2 Seat Fabric ...10-5 Front...1-2 Heater...1-6 Height adjustment...1-4 Power ...1-4 Rear ...1-7 Seatbelt...4, 1-12 ...


