Owner's Manual
Page 12
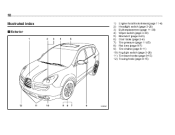
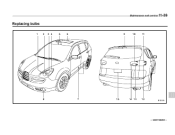
10 Illustrated index Exterior 1 2 3 4 5 1) 2) 3) 4) 5) 6) 7) 8) 9) 10) 11) 12) Engine hood lock release (page 11-4) Headlight switch (page 3-26) Bulb replacement (page 11-39) Wiper switch (page 3-30) Moonroof (page 2-23) Door locks (page 2-4) Tire pressure (page 11-25) Flat tires (page 9-7) Tire chains (page 8-11) Fog light switch (page 3-28) Tie-down hooks (page 9-15) Towing hook (page 9-15) 12 11 10 9 8 7 6 000085
10 Illustrated index Exterior 1 2 3 4 5 1) 2) 3) 4) 5) 6) 7) 8) 9) 10) 11) 12) Engine hood lock release (page 11-4) Headlight switch (page 3-26) Bulb replacement (page 11-39) Wiper switch (page 3-30) Moonroof (page 2-23) Door locks (page 2-4) Tire pressure (page 11-25) Flat tires (page 9-7) Tire chains (page 8-11) Fog light switch (page 3-28) Tie-down hooks (page 9-15) Towing hook (page 9-15) 12 11 10 9 8 7 6 000085
Owner's Manual
Page 13
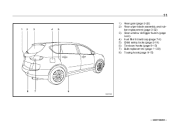
11 1) 2) 1 2 3 4 5 3) 4) 5) 6) 7) 8) Rear gate (page 2-22) Rear wiper blade assembly and rubber replacement (page 3-32) Rear window defogger button (page 3-33) Fuel filler lid and cap (page 7-3) Child safety locks (page 2-19) Tie-down hooks (page 9-15) Bulb replacement (page 11-39) Towing hook (page 9-15) 8 7 6 000105 - CONTINUED -
11 1) 2) 1 2 3 4 5 3) 4) 5) 6) 7) 8) Rear gate (page 2-22) Rear wiper blade assembly and rubber replacement (page 3-32) Rear window defogger button (page 3-33) Fuel filler lid and cap (page 7-3) Child safety locks (page 2-19) Tie-down hooks (page 9-15) Bulb replacement (page 11-39) Towing hook (page 9-15) 8 7 6 000105 - CONTINUED -

Owner's Manual
Page 129
... checking the operation of the range. Warning and indicator lights Several of emergency" in chapter 9. - CONTINUED - Instruments and controls 3-9 reaches near the middle of the bulbs. See the "In case of the warning and indicator lights come on momentarily and then go out when the ignition switch is not warmed up...
... checking the operation of the range. Warning and indicator lights Several of emergency" in chapter 9. - CONTINUED - Instruments and controls 3-9 reaches near the middle of the bulbs. See the "In case of the warning and indicator lights come on momentarily and then go out when the ignition switch is not warmed up...
Owner's Manual
Page 130
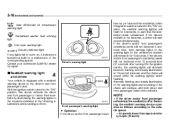
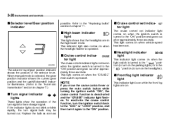
...ignition switch), the warning lights will alternate between flashing and steady illumination at the driver's and front passenger's seat. Consult your authorized SUBARU dealer for repair. 100372 Driver's warning light Seatbelt warning light and chime Your vehicle is not fastened, a chime will sound while the... fluid warning light : Door open warning light : Security indicator light If any lights fail to come on, it indicates a burned-out bulb or a malfunction of the chime will continue until both warning lights or the warning light for the unfastened seatbelt will flash for 6 seconds...
...ignition switch), the warning lights will alternate between flashing and steady illumination at the driver's and front passenger's seat. Consult your authorized SUBARU dealer for repair. 100372 Driver's warning light Seatbelt warning light and chime Your vehicle is not fastened, a chime will sound while the... fluid warning light : Door open warning light : Security indicator light If any lights fail to come on, it indicates a burned-out bulb or a malfunction of the chime will continue until both warning lights or the warning light for the unfastened seatbelt will flash for 6 seconds...
Owner's Manual
Page 140
...on while the front fog lights are in the high beam mode. The selector lever/gear position indicator shows the position of the turn signal bulb may be burned out. To reactivate the cruise control function, turn the ignition switch back to the "ACC" or "LOCK" position, ...is turned to the " " position (to turn on the parking lights) or to the " " position (to turn it again to the "Replacing bulbs" section in chapter 7.) The cruise control indicator light comes on the headlights). 3-20 Instruments and controls Selector lever/Gear position indicator possible. Cruise control set...
...on while the front fog lights are in the high beam mode. The selector lever/gear position indicator shows the position of the turn signal bulb may be burned out. To reactivate the cruise control function, turn the ignition switch back to the "ACC" or "LOCK" position, ...is turned to the " " position (to turn on the parking lights) or to the " " position (to turn it again to the "Replacing bulbs" section in chapter 7.) The cruise control indicator light comes on the headlights). 3-20 Instruments and controls Selector lever/Gear position indicator possible. Cruise control set...
Owner's Manual
Page 298
... window wiper blade assembly ...Rear window wiper blade rubber ...11-31 11-32 11-33 11-33 Battery ...Fuses ...Main fuse ...Installation of accessories ...Replacing bulbs ...Headlight ...Parking light ...Front turn signal light ...Front fog light ...Rear combination lights ...Backup light/Tail light ...Rear gate light ...License plate light ...Dome light...
... window wiper blade assembly ...Rear window wiper blade rubber ...11-31 11-32 11-33 11-33 Battery ...Fuses ...Main fuse ...Installation of accessories ...Replacing bulbs ...Headlight ...Parking light ...Front turn signal light ...Front fog light ...Rear combination lights ...Backup light/Tail light ...Rear gate light ...License plate light ...Dome light...
Owner's Manual
Page 335
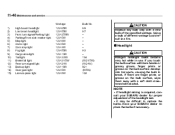
Maintenance and service 11-39 Replacing bulbs 1 2 3 4 5 6 9 10 11 8 7 15 14 13 12 B00339 - CONTINUED -
Maintenance and service 11-39 Replacing bulbs 1 2 3 4 5 6 9 10 11 8 7 15 14 13 12 B00339 - CONTINUED -
Owner's Manual
Page 336
.... NOTE If headlight aiming is required, consult your SUBARU dealer replace the bulbs if necessary. Have your SUBARU dealer for proper adjustment of the headlight aim. If there are finger prints or grease on the bulb surface develop into hot spots, causing the bulb to replace the bulbs. 11-40 Maintenance and service Wattage 1) 2) 3) 4) 5) 6) 7) 8) 9) 10) 11...
.... NOTE If headlight aiming is required, consult your SUBARU dealer replace the bulbs if necessary. Have your SUBARU dealer for proper adjustment of the headlight aim. If there are finger prints or grease on the bulb surface develop into hot spots, causing the bulb to replace the bulbs. 11-40 Maintenance and service Wattage 1) 2) 3) 4) 5) 6) 7) 8) 9) 10) 11...
Owner's Manual
Page 337
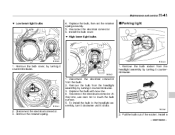
... securely. 5. At this time, use care not to the headlight assembly, turn it clockwise until it counterclockwise. 3. Maintenance and service 11-41 Low beam light bulbs 4. Reconnect the electrical connector. 6. Remove the bulb socket from the headlight assembly by turning it counterclockwise. 1. Reconnect the electrical connector. Install the...
... securely. 5. At this time, use care not to the headlight assembly, turn it clockwise until it counterclockwise. 3. Maintenance and service 11-41 Low beam light bulbs 4. Reconnect the electrical connector. 6. Remove the bulb socket from the headlight assembly by turning it counterclockwise. 1. Reconnect the electrical connector. Install the...
Owner's Manual
Page 338
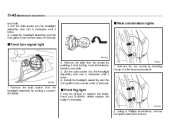
...turn it clockwise until it and turning counterclockwise. Set the bulb socket into the headlight assembly and turn signal light B00346 B00345 2. Remove the bulb from the headlight assembly by turning it locks. 4. Remove the bulb socket from the socket by inserting the tip of a flat...it counterclockwise. B00348 2. Using a Phillips screwdriver, remove the upper and lower screws. Install a new bulb. 3. Install the headlight assembly and the front grille in the reverse order of removal. Have your SUBARU dealer replace the bulbs if necessary. 11-42 Maintenance and service new...
...turn it clockwise until it and turning counterclockwise. Set the bulb socket into the headlight assembly and turn signal light B00346 B00345 2. Remove the bulb from the headlight assembly by turning it locks. 4. Remove the bulb socket from the socket by inserting the tip of a flat...it counterclockwise. B00348 2. Using a Phillips screwdriver, remove the upper and lower screws. Install a new bulb. 3. Install the headlight assembly and the front grille in the reverse order of removal. Have your SUBARU dealer replace the bulbs if necessary. 11-42 Maintenance and service new...
Owner's Manual
Page 339
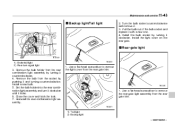
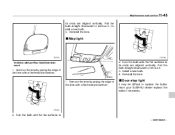
...the rear combination light assembly. 1. B00351 1) Tail light 2) Backup light - CONTINUED - Set the bulb holder into the rear combination light assembly and turn signal light B00350 3. Turn the bulb socket counterclockwise and remove it with a new one. 4. Install the light cover on the rear gate....counterclockwise. Close the cover and latch the lock. 7. Maintenance and service 11-43 Backup light/Tail light 1 2. Pull the bulb out of the bulb socket and replace it . 3. Use a flat-head screwdriver to remove the light cover from the socket by turning it counterclockwise....
...the rear combination light assembly. 1. B00351 1) Tail light 2) Backup light - CONTINUED - Set the bulb holder into the rear combination light assembly and turn signal light B00350 3. Turn the bulb socket counterclockwise and remove it with a new one. 4. Install the light cover on the rear gate....counterclockwise. Close the cover and latch the lock. 7. Maintenance and service 11-43 Backup light/Tail light 1 2. Pull the bulb out of the bulb socket and replace it . 3. Use a flat-head screwdriver to remove the light cover from the socket by turning it counterclockwise....
Owner's Manual
Page 340
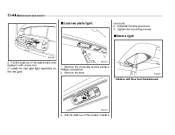
Dome light B00352 2. Remove the mounting screws using a Phillips screwdriver. 2. B00355 Vehicles with a new one. 3. Reinstall the lens and cover. 5. Pull the bulb out of the bulb socket and replace it with Rear Seat Entertainment B00354 3. Install the rear gate light assembly on the rear gate. B00353 1. Remove the lens. Install a Pull the bulb out of the socket. Tighten the mounting screws. 11-44 Maintenance and service License plate light 0 new bulb. 4.
Dome light B00352 2. Remove the mounting screws using a Phillips screwdriver. 2. B00355 Vehicles with a new one. 3. Reinstall the lens and cover. 5. Pull the bulb out of the bulb socket and replace it with Rear Seat Entertainment B00354 3. Install the rear gate light assembly on the rear gate. B00353 1. Remove the lens. Install a Pull the bulb out of the socket. Tighten the mounting screws. 11-44 Maintenance and service License plate light 0 new bulb. 4.
Owner's Manual
Page 341
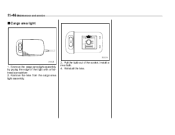
... the flat surfaces at - CONTINUED - Pull the bulb straight downward to replace the bulbs. Remove the lens by prying the edge of the lens with a flat-head screwdriver. Map light 0 700083 700084 Vehicles without Rear Seat Entertainment 1. Door step ...light It may be difficult to remove it . 3. Maintenance and service 11-45 its ends are aligned vertically. Pull the bulb straight downward to remove it . Remove the lens by prying the edge of the lens with a flat-head screwdriver. B00356 2. Turn the...
... the flat surfaces at - CONTINUED - Pull the bulb straight downward to replace the bulbs. Remove the lens by prying the edge of the lens with a flat-head screwdriver. Map light 0 700083 700084 Vehicles without Rear Seat Entertainment 1. Door step ...light It may be difficult to remove it . 3. Maintenance and service 11-45 its ends are aligned vertically. Pull the bulb straight downward to remove it . Remove the lens by prying the edge of the lens with a flat-head screwdriver. B00356 2. Turn the...
Owner's Manual
Page 342
Reinstall the lens. 11-46 Maintenance and service Cargo area light 700079 700078 1. Install a new bulb. 4. Pull the bulb out of the light with a flathead screwdriver. 2. Remove the lens from the cargo area light assembly. 3. Remove the cargo area light assembly by prying the edge of the socket.
Reinstall the lens. 11-46 Maintenance and service Cargo area light 700079 700078 1. Install a new bulb. 4. Pull the bulb out of the light with a flathead screwdriver. 2. Remove the lens from the cargo area light assembly. 3. Remove the cargo area light assembly by prying the edge of the socket.
Owner's Manual
Page 343
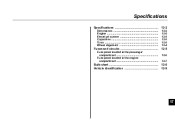
Specifications Specifications ...Dimensions ...Engine ...Electrical system ...Capacities ...Tires ...Wheel alignment ... 12-2 12-2 12-2 12-3 12-3 12-3 12-4 Fuses and circuits ...Fuse panel located in the passenger compartment ...Fuse panel located in the engine compartment ... 12-5 12-5 12-7 Bulb chart ...Vehicle identification ... 12-8 12-9 12
Specifications Specifications ...Dimensions ...Engine ...Electrical system ...Capacities ...Tires ...Wheel alignment ... 12-2 12-2 12-2 12-3 12-3 12-3 12-4 Fuses and circuits ...Fuse panel located in the passenger compartment ...Fuse panel located in the engine compartment ... 12-5 12-5 12-7 Bulb chart ...Vehicle identification ... 12-8 12-9 12
Owner's Manual
Page 350
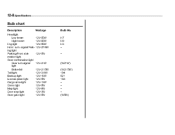
12-8 Specifications Bulb chart Description Headlight Low beam High beam Fog light Front turn signal/Parking light Parking/Front side marker light Rear combination light Rear turn signal light Brake/tail Tail light Backup light License plate light Cargo area light Dome light Map light Door step light Rear gate light Wattage 12V-55W 12V-65W 12V-55W 12V-27/8W 12V-5W Bulb No. H7 H9 H3 - - 12V-21W 12V-21/5W 12V-3.8W 12V-16W 12V-5W 12V-13W 12V-5W 12V-8W 12V-3W 12V-5W (W21W) (W21/5W) 194 921 168 W5W)
12-8 Specifications Bulb chart Description Headlight Low beam High beam Fog light Front turn signal/Parking light Parking/Front side marker light Rear combination light Rear turn signal light Brake/tail Tail light Backup light License plate light Cargo area light Dome light Map light Door step light Rear gate light Wattage 12V-55W 12V-65W 12V-55W 12V-27/8W 12V-5W Bulb No. H7 H9 H3 - - 12V-21W 12V-21/5W 12V-3.8W 12V-16W 12V-5W 12V-13W 12V-5W 12V-8W 12V-3W 12V-5W (W21W) (W21/5W) 194 921 168 W5W)

Owner's Manual
Page 368
...-21 Reserve distance ...11-21 Brake system ...7-15 Warning light ...3-16 Braking ...7-15 Breaking-in of new brake pads and linings ...11-22 Tips ...7-15 Bulb Chart ...12-8 Replacing ...11-39 C Capacities ...12-3 Cargo area Light ...6-2 Tie-down hooks ...6-12 Catalytic converter ...8-3 Center Console ...6-5 Ventilators ...4-4 Changing Flat tire ...9-7 Oil and oil...
...-21 Reserve distance ...11-21 Brake system ...7-15 Warning light ...3-16 Braking ...7-15 Breaking-in of new brake pads and linings ...11-22 Tips ...7-15 Bulb Chart ...12-8 Replacing ...11-39 C Capacities ...12-3 Cargo area Light ...6-2 Tie-down hooks ...6-12 Catalytic converter ...8-3 Center Console ...6-5 Ventilators ...4-4 Changing Flat tire ...9-7 Oil and oil...
Owner's Manual
Page 372
... ...11-22 Wiper blades ...11-31 Replacing Air cleaner element ...11-13 Battery (Remote keyless entry system) ...2-10 Lost transmitters (keyless entry system) ...2-11 Replacing bulbs ...11-39 Cargo area light ...11-46 Dome light ...11-44 Door step light ...11-45 Front fog light ...11-42 Front turn signal light...
... ...11-22 Wiper blades ...11-31 Replacing Air cleaner element ...11-13 Battery (Remote keyless entry system) ...2-10 Lost transmitters (keyless entry system) ...2-11 Replacing bulbs ...11-39 Cargo area light ...11-46 Dome light ...11-44 Door step light ...11-45 Front fog light ...11-42 Front turn signal light...

