
Owner's Manual
Page 1
...found herein. This Owner's Manual applies to all models and covers all the information necessary to make the same or similar changes on choosing a SUBARU vehicle. Please leave this manual in your SUBARU in this manual carefully so that you purchased your vehicle and its operation. We urge you to... change specifications and designs at the time of resale. reserves the right to read this Owner's Manual, such as details concerning repairs ...
...found herein. This Owner's Manual applies to all models and covers all the information necessary to make the same or similar changes on choosing a SUBARU vehicle. Please leave this manual in your SUBARU in this manual carefully so that you purchased your vehicle and its operation. We urge you to... change specifications and designs at the time of resale. reserves the right to read this Owner's Manual, such as details concerning repairs ...
Owner's Manual
Page 22
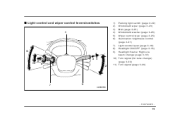
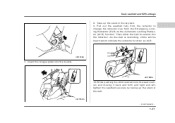
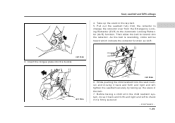
Light control and wiper control levers/switches 1 1) 2) 3) 4) 5) 6) 11 4 8 6 3 2 9 10 Parking light switch (page 3-22) Windshield wiper (page 3-23) Mist (page 3-25) Windshield washer (page 3-25) Wiper control lever (page 3-25) Illumination brightness control (page 3-21) 7) Light control lever (page 3-18) 8) Headlight ON/OFF (page 3-18) 9) Headlight flasher High/Low beam change (page 3-18) 10) Turn signal (for lane change) (page 3-20) 11) Turn signal (page 3-20) 7 5 UBF023DB - CONTINUED - 19
Light control and wiper control levers/switches 1 1) 2) 3) 4) 5) 6) 11 4 8 6 3 2 9 10 Parking light switch (page 3-22) Windshield wiper (page 3-23) Mist (page 3-25) Windshield washer (page 3-25) Wiper control lever (page 3-25) Illumination brightness control (page 3-21) 7) Light control lever (page 3-18) 8) Headlight ON/OFF (page 3-18) 9) Headlight flasher High/Low beam change (page 3-18) 10) Turn signal (for lane change) (page 3-20) 11) Turn signal (page 3-20) 7 5 UBF023DB - CONTINUED - 19
Owner's Manual
Page 41
... slightly, the retractor locks the seatbelt in this chapter. When the child restraint system is removed, make sure that position and the seatbelt cannot be changed over the waist. When securing a child restraint system on how to convert the retractor to the ALR mode and restore it to the Automatic Locking...
... slightly, the retractor locks the seatbelt in this chapter. When the child restraint system is removed, make sure that position and the seatbelt cannot be changed over the waist. When securing a child restraint system on how to convert the retractor to the ALR mode and restore it to the Automatic Locking...

Owner's Manual
Page 47
...damage is long enough to match various varieties of a collision. See your SUBARU dealer. Be sure to follow these instructions and warnings could seriously affect their strength. Seat, seatbelt and SRS airbags changes that is available from operating properly. Seatbelt extender If the front seatbelts are...the belt itself is found. Inspect the seatbelts and attachments including the webbing and all that will prevent the seatbelt from your SUBARU dealer for assistance. Never bleach or dye the belts because this could reduce the effectiveness of the seatbelt and result in more...
...damage is long enough to match various varieties of a collision. See your SUBARU dealer. Be sure to follow these instructions and warnings could seriously affect their strength. Seat, seatbelt and SRS airbags changes that is available from operating properly. Seatbelt extender If the front seatbelts are...the belt itself is found. Inspect the seatbelts and attachments including the webbing and all that will prevent the seatbelt from your SUBARU dealer for assistance. Never bleach or dye the belts because this could reduce the effectiveness of the seatbelt and result in more...
Owner's Manual
Page 58
... more firmly secured by pushing it cannot be heard which indicate the retractor functions as ALR. 6. Pull out the seatbelt fully from the retractor to change the retractor over from side to side to rewind into the seat cushion and then tightening the seatbelt. 7. Push and pull the child restraint system...
... more firmly secured by pushing it cannot be heard which indicate the retractor functions as ALR. 6. Pull out the seatbelt fully from the retractor to change the retractor over from side to side to rewind into the seat cushion and then tightening the seatbelt. 7. Push and pull the child restraint system...
Owner's Manual
Page 62
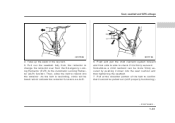
UB1145BA 7. Pull out the seatbelt fully from the retractor to change the retractor over from the Emergency Locking Retractor (ELR) to rewind into the retractor. Insert the tongue plate into the seat cushion and moving it ...
UB1145BA 7. Pull out the seatbelt fully from the retractor to change the retractor over from the Emergency Locking Retractor (ELR) to rewind into the retractor. Insert the tongue plate into the seat cushion and moving it ...
Owner's Manual
Page 64
Pull out the seatbelt fully from the retractor to change the retractor over from the Emergency Locking Retractor (ELR) to rewind into the retractor. UB1145BA 3. As the belt is firmly secured. - CONTINUED - 1-39 While pushing ...
Pull out the seatbelt fully from the retractor to change the retractor over from the Emergency Locking Retractor (ELR) to rewind into the retractor. UB1145BA 3. As the belt is firmly secured. - CONTINUED - 1-39 While pushing ...

Owner's Manual
Page 96
... in areas near a facility or electronic equipment emitting strong radio waves such as a result of home electronic appliances. Two transmitters are provided for detailed information. Changes or modifications not expressly approved by the party responsible for compliance could void the user's authority to the following functions. The keyless entry system does...
... in areas near a facility or electronic equipment emitting strong radio waves such as a result of home electronic appliances. Two transmitters are provided for detailed information. Changes or modifications not expressly approved by the party responsible for compliance could void the user's authority to the following functions. The keyless entry system does...

Owner's Manual
Page 124
... indicator (Turbo-AT vehicles) .. Turn signal indicator lights ...High beam indicator light ...Cargo lamp indicator light ...Cruise control set indicator light ...Headlights ...High/low beam change (dimmer) ...Headlight flasher ...Daytime running light system ... 3-15 3-15 3-16 3-16 3-16 3-16 3-16 3 3-17 3-18 3-18 3-19 3-19 3-20 Warning and indicator lights ... 3-9 3-10...
... indicator (Turbo-AT vehicles) .. Turn signal indicator lights ...High beam indicator light ...Cargo lamp indicator light ...Cruise control set indicator light ...Headlights ...High/low beam change (dimmer) ...Headlight flasher ...Daytime running light system ... 3-15 3-15 3-16 3-16 3-16 3-16 3-16 3 3-17 3-18 3-18 3-19 3-19 3-20 Warning and indicator lights ... 3-9 3-10...
Owner's Manual
Page 129
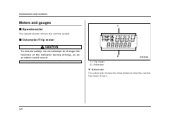
Instruments and controls Meters and gauges Speedometer The speedometer shows the vehicle speed. 1 Odometer/Trip meter To ensure safety, do not attempt to change the function of the indicator during driving, as an accident could result. 1) Trip meter 2) Odometer 2 UB3026BB Odometer The odometer shows the total distance that the vehicle has been driven. 3-6
Instruments and controls Meters and gauges Speedometer The speedometer shows the vehicle speed. 1 Odometer/Trip meter To ensure safety, do not attempt to change the function of the indicator during driving, as an accident could result. 1) Trip meter 2) Odometer 2 UB3026BB Odometer The odometer shows the total distance that the vehicle has been driven. 3-6

Owner's Manual
Page 130
... and keep it to protect the engine from overrevving. The tachometer shows the engine speed in thousands of the tachometer in the red zone. To change the mode indication, briefly push the knob. In this range, fuel injection will be lost. Each press of the knob...
... and keep it to protect the engine from overrevving. The tachometer shows the engine speed in thousands of the tachometer in the red zone. To change the mode indication, briefly push the knob. In this range, fuel injection will be lost. Each press of the knob...

Owner's Manual
Page 139
... on when the headlight flasher is in chapter 11. 3-16 If the indicator lights do not blink or blink rapidly, the turn signal or lane change signal. Instruments and controls Gear position indicator (Turbo-AT vehicles) High beam indicator light This light shows that the cargo lamp comes on. Cargo lamp...
... on when the headlight flasher is in chapter 11. 3-16 If the indicator lights do not blink or blink rapidly, the turn signal or lane change signal. Instruments and controls Gear position indicator (Turbo-AT vehicles) High beam indicator light This light shows that the cargo lamp comes on. Cargo lamp...

Owner's Manual
Page 142
... instrument panel is in the flashing position for as long as you and then release it. Instruments and controls High/low beam change (dimmer) Headlight flasher HS3026CA HS3026DA To change from low beam to the detent position. The headlight flasher works even though the lighting switch is also on. Do not hold...
... instrument panel is in the flashing position for as long as you and then release it. Instruments and controls High/low beam change (dimmer) Headlight flasher HS3026CA HS3026DA To change from low beam to the detent position. The headlight flasher works even though the lighting switch is also on. Do not hold...

Owner's Manual
Page 143
The low beam headlights will automatically come on by hand. The light switch is in the direction 3-20 To signal a lane change . The light switch must always be turned to the neutral position by the daytime running light system 1 The tail lights, parking lights, and ...and hold it is dark outside. If the lever does not return after cornering, return the lever to the " " position when it during the lane change , push the turn signal indicator lights will return automatically. Instruments and controls indicator light " comes on. " on the instrument panel also Turn signal lever...
The low beam headlights will automatically come on by hand. The light switch is in the direction 3-20 To signal a lane change . The light switch must always be turned to the neutral position by the daytime running light system 1 The tail lights, parking lights, and ...and hold it is dark outside. If the lever does not return after cornering, return the lever to the " " position when it during the lane change , push the turn signal indicator lights will return automatically. Instruments and controls indicator light " comes on. " on the instrument panel also Turn signal lever...
Owner's Manual
Page 144
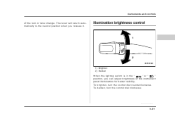
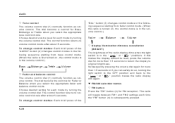
To brighten, turn or lane change. Instruments and controls of the instrument panel illumination for better visibility. The lever will return automatically to the neutral position when you can adjust brightness of the turn the control dial counterclockwise. Illumination brightness control 1 2 HS3028BB 1) Brighten 2) Darken When the lighting switch is in the " " or " " position, you release it. To darken, turn the control dial clockwise. - CONTINUED - 3-21
To brighten, turn or lane change. Instruments and controls of the instrument panel illumination for better visibility. The lever will return automatically to the neutral position when you can adjust brightness of the turn the control dial counterclockwise. Illumination brightness control 1 2 HS3028BB 1) Brighten 2) Darken When the lighting switch is in the " " or " " position, you release it. To darken, turn the control dial clockwise. - CONTINUED - 3-21

Owner's Manual
Page 153
Press the right hand button repeatedly to judge the distance of vehicles behind you when changing lanes. Do not use care not to cover the sensors with stickers, or other similar items. Periodically wipe the sensors clean using a piece of dry ...
Press the right hand button repeatedly to judge the distance of vehicles behind you when changing lanes. Do not use care not to cover the sensors with stickers, or other similar items. Periodically wipe the sensors clean using a piece of dry ...
Owner's Manual
Page 169
...high relative humidity, low temperatures, etc.) a small amount of adding, changing or checking the refrigerant is best performed by the air conditioner. Cooling and dehumidifying in quicker cooling by your SUBARU dealer. Consult your climate control system Your air conditioner uses ozone friendly...the air conditioner for maximum cooling efficiency. Checking air conditioning system before summer season Check the air conditioner unit for your SUBARU dealer for CFC12 (freon). This condition is designed to temporarily shut off -season to circulate into the heated interior. ...
...high relative humidity, low temperatures, etc.) a small amount of adding, changing or checking the refrigerant is best performed by the air conditioner. Cooling and dehumidifying in quicker cooling by your SUBARU dealer. Consult your climate control system Your air conditioner uses ozone friendly...the air conditioner for maximum cooling efficiency. Checking air conditioning system before summer season Check the air conditioner unit for your SUBARU dealer for CFC12 (freon). This condition is designed to temporarily shut off -season to circulate into the heated interior. ...
Owner's Manual
Page 178
... select the appropriate tone and balance control mode. The control function returns to volume control mode after about 5 seconds. To change control modes: Each brief press of the "AUDIO" button (5) changes control modes in the following sequence starting from volume control mode. (When the radio is first turned on, the control mode...
... select the appropriate tone and balance control mode. The control function returns to volume control mode after about 5 seconds. To change control modes: Each brief press of the "AUDIO" button (5) changes control modes in the following sequence starting from volume control mode. (When the radio is first turned on, the control mode...

Owner's Manual
Page 180
..., the frequency interval can be preset. In such a situation, perform manual tuning to the SCAN mode. Automatic tuning (SCAN) Press the "SCAN" button (6) to change the radio to select the desired station. When the "SCAN" button is pressed for five seconds while displaying the frequency, after which one is displayed... scanning will continue until the entire band has been scanned from the station or proximity to six AM, FM1 and FM2 stations each may be changed between 10 kHz in the AM mode and 0.2 MHz in the FM mode. Tuning (TUNE) Manual tuning (TUNE) Press the " " side of the tuning...
..., the frequency interval can be preset. In such a situation, perform manual tuning to the SCAN mode. Automatic tuning (SCAN) Press the "SCAN" button (6) to change the radio to select the desired station. When the "SCAN" button is pressed for five seconds while displaying the frequency, after which one is displayed... scanning will continue until the entire band has been scanned from the station or proximity to six AM, FM1 and FM2 stations each may be changed between 10 kHz in the AM mode and 0.2 MHz in the FM mode. Tuning (TUNE) Manual tuning (TUNE) Press the " " side of the tuning...
Owner's Manual
Page 191
...the " " or " " position makes the radio display dim again. Choose desired setting for each mode by turning the volume control dial. To change control modes: Each brief press of the radio display dims when the light switch is subsequently pressed. Audio Tone control The volume control dial (1) ...following sequence starting from bass control mode. (When the radio is first turned on, the control mode is in the volume control.) "BAL" button (3) changes control modes in the following sequence starting from fader control mode. (When the radio is turned on, the control mode is in the " " or ...
...the " " or " " position makes the radio display dim again. Choose desired setting for each mode by turning the volume control dial. To change control modes: Each brief press of the radio display dims when the light switch is subsequently pressed. Audio Tone control The volume control dial (1) ...following sequence starting from bass control mode. (When the radio is first turned on, the control mode is in the volume control.) "BAL" button (3) changes control modes in the following sequence starting from fader control mode. (When the radio is turned on, the control mode is in the " " or ...


