Owner's Manual
Page 1
2007 Saturn VUE Owner Manual Seats and Restraint Systems ...7 Front Seats ...9 Rear Seats ...18 Safety Belts ...20 Child Restraints ...42 Airbag System ...71 Restraint System Check ...90 Features ... System(s) ... Driving Your Vehicle ...227 Your Driving, the Road, and Your Vehicle ...228 Towing ...284 Service and Appearance Care ...Service ...Fuel ...Checking Things Under the Hood ...All-Wheel Drive ...Headlamp Aiming ...301 304 306 312 353 355 1
2007 Saturn VUE Owner Manual Seats and Restraint Systems ...7 Front Seats ...9 Rear Seats ...18 Safety Belts ...20 Child Restraints ...42 Airbag System ...71 Restraint System Check ...90 Features ... System(s) ... Driving Your Vehicle ...227 Your Driving, the Road, and Your Vehicle ...228 Towing ...284 Service and Appearance Care ...Service ...Fuel ...Checking Things Under the Hood ...All-Wheel Drive ...Headlamp Aiming ...301 304 306 312 353 355 1
Owner's Manual
Page 113
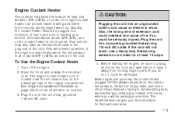
.... If the cord will prevent operation of the engine coolant heater when the temperature is located near the air cleaner box on location. 3. Open the hood and unwrap the electrical cord.
.... If the cord will prevent operation of the engine coolant heater when the temperature is located near the air cleaner box on location. 3. Open the hood and unwrap the electrical cord.
Owner's Manual
Page 141
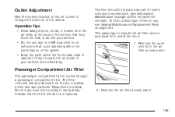
...See Windshield Wipers on page 238. H. I. See Fog Lamps on page 152 or Traction Control System (TCS) on page 144. L. M. See Hood Release on page 105. O. P. See Power Windows on page 313. See Climate Control System on page 155. Air Outlets. See Climate Control ...Lever. Audio Steering Wheel Controls. Heated Seats Buttons or Footwell Lamps (If Equipped). D. See Horn on page 146. Instrument Panel Brightness Control. Hood Release. C. See Cruise Control on page 142. Q. See Turn Signal/Multifunction Lever on page 114. G. See Automatic Transaxle Operation on page ...
...See Windshield Wipers on page 238. H. I. See Fog Lamps on page 152 or Traction Control System (TCS) on page 144. L. M. See Hood Release on page 105. O. P. See Power Windows on page 313. See Climate Control System on page 155. Air Outlets. See Climate Control ...Lever. Audio Steering Wheel Controls. Heated Seats Buttons or Footwell Lamps (If Equipped). D. See Horn on page 146. Instrument Panel Brightness Control. Hood Release. C. See Cruise Control on page 142. Q. See Turn Signal/Multifunction Lever on page 114. G. See Automatic Transaxle Operation on page ...
Owner's Manual
Page 159
... of the vehicle that may occur more effectively. Remove the air filter access panel. 159 Operation Tips • Clear away any non-GM approved hood deflectors that the filter needs to be replaced as part of the airflow. To find out what type of..., or leaves from under the front seats clear of objects to help circulate the air inside of the system. • Keep the path under the hood. 1. Reductions in airflow, which may block the flow of air into your vehicle more quickly in dusty areas, indicate that could adversely...
... of the vehicle that may occur more effectively. Remove the air filter access panel. 159 Operation Tips • Clear away any non-GM approved hood deflectors that the filter needs to be replaced as part of the airflow. To find out what type of..., or leaves from under the front seats clear of objects to help circulate the air inside of the system. • Keep the path under the hood. 1. Reductions in airflow, which may block the flow of air into your vehicle more quickly in dusty areas, indicate that could adversely...
Owner's Manual
Page 262
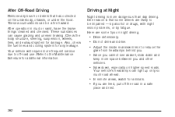
... to reduce the glare from headlamps behind you. • Since you cannot see as well, slow down , especially on the underbody, chassis, or under the hood. Your vehicle's headlamps can light up only so much road ahead. • In remote areas, watch for animals. • If you and other vehicles. •...
... to reduce the glare from headlamps behind you. • Since you cannot see as well, slow down , especially on the underbody, chassis, or under the hood. Your vehicle's headlamps can light up only so much road ahead. • In remote areas, watch for animals. • If you and other vehicles. •...

Owner's Manual
Page 301
... ...306 California Fuel ...307 Additives ...307 Fuels in Foreign Countries ...308 Filling the Tank ...309 Filling a Portable Fuel Container ...311 Checking Things Under the Hood ...312 Hood Release ...313 Engine Compartment Overview ...314 Engine Oil ...318 Engine Oil Life System ...323 Engine Air Cleaner/Filter ...324 Automatic Transaxle Fluid (2.2L L4 Engine...
... ...306 California Fuel ...307 Additives ...307 Fuels in Foreign Countries ...308 Filling the Tank ...309 Filling a Portable Fuel Container ...311 Checking Things Under the Hood ...312 Hood Release ...313 Engine Compartment Overview ...314 Engine Oil ...318 Engine Oil Life System ...323 Engine Air Cleaner/Filter ...324 Automatic Transaxle Fluid (2.2L L4 Engine...
Owner's Manual
Page 312
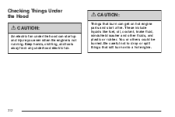
Keep hands, clothing, and tools away from any underhood electric fan. 312 These include liquids like fuel, oil, coolant, brake fluid, windshield washer and other fluids, and plastic or rubber. You or others could be burned. Be careful not to drop or spill things that burn can start a fire. Checking Things Under the Hood {CAUTION: Things that will burn onto a hot engine. {CAUTION: An electric fan under the hood can get on hot engine parts and start up and injure you even when the engine is not running.
Keep hands, clothing, and tools away from any underhood electric fan. 312 These include liquids like fuel, oil, coolant, brake fluid, windshield washer and other fluids, and plastic or rubber. You or others could be burned. Be careful not to drop or spill things that burn can start a fire. Checking Things Under the Hood {CAUTION: Things that will burn onto a hot engine. {CAUTION: An electric fan under the hood can get on hot engine parts and start up and injure you even when the engine is not running.

Owner's Manual
Page 313
Before closing the hood, be sure all the filler caps are on the driver's side of the vehicle and lift up on it firmly. 313 It is located under the instrument panel on properly. Then go to the front of the vehicle. 2. Then pull the hood down and close it . Lift the hood. Pull the handle with this symbol on the secondary hood release lever. 3. Hood Release To open the hood, do the following: 1.
Before closing the hood, be sure all the filler caps are on the driver's side of the vehicle and lift up on it firmly. 313 It is located under the instrument panel on properly. Then go to the front of the vehicle. 2. Then pull the hood down and close it . Lift the hood. Pull the handle with this symbol on the secondary hood release lever. 3. Hood Release To open the hood, do the following: 1.
Owner's Manual
Page 314
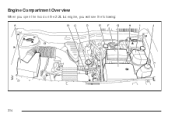
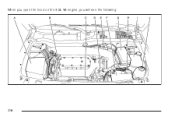
Engine Compartment Overview When you open the hood on the 2.2L L4 engine, you will see the following: 314
Engine Compartment Overview When you open the hood on the 2.2L L4 engine, you will see the following: 314
Owner's Manual
Page 316
When you open the hood on the 3.5L V6 engine, you will see the following: 316
When you open the hood on the 3.5L V6 engine, you will see the following: 316

Owner's Manual
Page 335
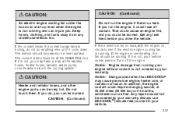
... vehicle until it off and get an engine overheat warning, but see or hear no coolant, your engine catches fire because you open the hood. Try to the highest gear possible while driving. {CAUTION: Steam from the vehicle until the engine is no sign of steam, try this for long... in traffic. • Tow a trailer. If Steam Is Coming From Your Engine If No Steam Is Coming From Your Engine If you just open the hood. otherwise, shift to minimize engine load.
... vehicle until it off and get an engine overheat warning, but see or hear no coolant, your engine catches fire because you open the hood. Try to the highest gear possible while driving. {CAUTION: Steam from the vehicle until the engine is no sign of steam, try this for long... in traffic. • Tow a trailer. If Steam Is Coming From Your Engine If No Steam Is Coming From Your Engine If you just open the hood. otherwise, shift to minimize engine load.
Owner's Manual
Page 336
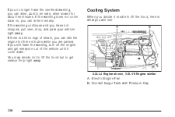
... away. If you still have the overheat warning, you can drive. If you no sign of the vehicle until it is safe to lift the hood, here is still no longer have the warning, turn off the engine and get service help right away. You may decide not to lift the... hood but to be safe, drive slower for three minutes while you are parked. Electric Engine Fan B. Just to get everyone out of steam, you can ...
... away. If you still have the overheat warning, you can drive. If you no sign of the vehicle until it is safe to lift the hood, here is still no longer have the warning, turn off the engine and get service help right away. You may decide not to lift the... hood but to be safe, drive slower for three minutes while you are parked. Electric Engine Fan B. Just to get everyone out of steam, you can ...
Owner's Manual
Page 337
... a level surface. Keep hands, clothing, and tools away from running your engine without coolant is not running . {CAUTION: An electric engine cooling fan under the hood can start up even when the engine is not covered by your vehicle needs service. Do not touch them. If it cools down. Any repairs...
... a level surface. Keep hands, clothing, and tools away from running your engine without coolant is not running . {CAUTION: An electric engine cooling fan under the hood can start up even when the engine is not covered by your vehicle needs service. Do not touch them. If it cools down. Any repairs...
Owner's Manual
Page 349
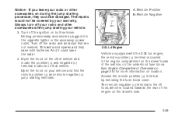
... positive (+) and negative (−) terminal locations on the underhood fuse block. This will avoid sparks and help save the radio! 4. Open the hood on the other accessories when jump starting your vehicle and find the remote positive (+) and remote negative (−) jump starting procedure, they ...A. Notice: If you leave your radio or other accessories on during the jump starting terminals. The repairs would not be damaged. Open the hood on your vehicle. 3. And it could be covered by removing the fuse block cover. Always turn off the radio and all lamps that ...
... positive (+) and negative (−) terminal locations on the underhood fuse block. This will avoid sparks and help save the radio! 4. Open the hood on the other accessories when jump starting your vehicle and find the remote positive (+) and remote negative (−) jump starting procedure, they ...A. Notice: If you leave your radio or other accessories on during the jump starting terminals. The repairs would not be damaged. Open the hood on your vehicle. 3. And it could be covered by removing the fuse block cover. Always turn off the radio and all lamps that ...
Owner's Manual
Page 356
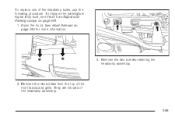
...adjust the vertical aim: 1. Record the distance. Turn on the low-beam headlamps and place a piece of cardboard or equivalent in Step 4. 2. See Hood Release on the wall the width of the vehicle at surface. 356 Measure the distance from the ground to the recorded distance from the headlamp ... for more information. 4. Covering a headlamp may cause excessive heat build-up which may cause damage to improve beam cut-off when aiming. Open the hood. Notice: Do not cover a headlamp to the headlamp. 6. This allows only the beam of the mark in front of the low-beam headlamp. 3.
...adjust the vertical aim: 1. Record the distance. Turn on the low-beam headlamps and place a piece of cardboard or equivalent in Step 4. 2. See Hood Release on the wall the width of the vehicle at surface. 356 Measure the distance from the ground to the recorded distance from the headlamp ... for more information. 4. Covering a headlamp may cause excessive heat build-up which may cause damage to improve beam cut-off when aiming. Open the hood. Notice: Do not cover a headlamp to the headlamp. 6. This allows only the beam of the mark in front of the low-beam headlamp. 3.

Owner's Manual
Page 357
... aiming screw until the headlamp beam is positioned at the bottom edge of the beam. 9. Locate the vertical headlamp aiming screws, which are under the hood near each headlamp assembly. 7. The adjustment screw can be turned with a 6 mm socket. 8. Make sure that the light from the headlamp is aimed to raise...
... aiming screw until the headlamp beam is positioned at the bottom edge of the beam. 9. Locate the vertical headlamp aiming screws, which are under the hood near each headlamp assembly. 7. The adjustment screw can be turned with a 6 mm socket. 8. Make sure that the light from the headlamp is aimed to raise...
Owner's Manual
Page 359
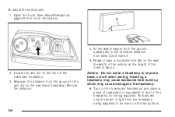
See Hood Release on page 361. 1. To replace the parking/turn signal lamp bulb, see Front Turn Signal and Parking Lamps on page 313 for more information. 3. Remove the two screws from the top of the headlamp bulbs, use the following procedure. Open the hood. Remove the two screws retaining the headlamp assembly. 2. To replace one of the front fascia and grille. They are inboard of the headlamp assembly. 359
See Hood Release on page 361. 1. To replace the parking/turn signal lamp bulb, see Front Turn Signal and Parking Lamps on page 313 for more information. 3. Remove the two screws from the top of the headlamp bulbs, use the following procedure. Open the hood. Remove the two screws retaining the headlamp assembly. 2. To replace one of the front fascia and grille. They are inboard of the headlamp assembly. 359
Owner's Manual
Page 414
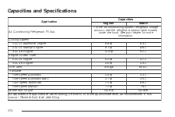
... Capacities and Specifications Application Capacities English Metric For the air conditioning system refrigerant charge amount, see the refrigerant caution label located under the hood. See your dealer for more information.
... Capacities and Specifications Application Capacities English Metric For the air conditioning system refrigerant charge amount, see the refrigerant caution label located under the hood. See your dealer for more information.
Owner's Manual
Page 426
..., or delivery service. (i) Drain, flush, and refill cooling system. See Engine Coolant on weatherstrips with genuine Saturn parts as needed . Inspect all key lock cylinders, door hinges and latches, hood hinges and latches, glove box hinges, sunroof (if equipped), and any components that have high effort or excessive wear...
..., or delivery service. (i) Drain, flush, and refill cooling system. See Engine Coolant on weatherstrips with genuine Saturn parts as needed . Inspect all key lock cylinders, door hinges and latches, hood hinges and latches, glove box hinges, sunroof (if equipped), and any components that have high effort or excessive wear...
Owner's Manual
Page 433
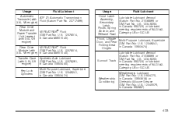
in Canada 10953474). Usage Fluid/Lubricant Usage Hood Latch Assembly, Secondary Latch, Pivots, Spring Anchor, and Release Pawl Fluid/Lubricant Lubriplate Lubricant Aerosol (Saturn Part No. 21038869 or GM Part No. U.S. 12346241, in Canada 10953474). U.S. 12346293, in Canada...Purpose Lubricant, Superlube (GM Part No. Hinges Lubriplate Lubricant Aerosol (Saturn Part No. 21038869 or GM Part No. U.S. 12378514, Unit (except in Canada 88901045). U.S. 12378514, 3.5L V6 engine) in Canada 88901045). Hood, Liftgate Lubricant, Superlube Door, and Rear Multi-Purpose U.S. 12346241...
in Canada 10953474). Usage Fluid/Lubricant Usage Hood Latch Assembly, Secondary Latch, Pivots, Spring Anchor, and Release Pawl Fluid/Lubricant Lubriplate Lubricant Aerosol (Saturn Part No. 21038869 or GM Part No. U.S. 12346241, in Canada 10953474). U.S. 12346293, in Canada...Purpose Lubricant, Superlube (GM Part No. Hinges Lubriplate Lubricant Aerosol (Saturn Part No. 21038869 or GM Part No. U.S. 12378514, Unit (except in Canada 88901045). U.S. 12378514, 3.5L V6 engine) in Canada 88901045). Hood, Liftgate Lubricant, Superlube Door, and Rear Multi-Purpose U.S. 12346241...
