Owner's Manual
Page 7
... Securing a Child Restraint in the Right Front Seat Position ...1-67 Built-In Child Restraint ...1-69 Front Seats ...1-3 Manual Seats ...1-3 Six-Way Power Seats ...1-4 Heated Seats ...1-5 Reclining Seatbacks ...1-5 Head Restraints ...1-7 Rear Seats ...1-7 Rear Seat Operation ...1-7 Second Row Safety Belt Stowage ...1-7 Flip and Fold Feature ...1-8 Split Bench Seats ...1-8 Bucket Seats ...1-16 Captain Chairs ...1-22 Stowable Seat ...1-26 Safety Belts ...1-30 Safety Belts: They...
... Securing a Child Restraint in the Right Front Seat Position ...1-67 Built-In Child Restraint ...1-69 Front Seats ...1-3 Manual Seats ...1-3 Six-Way Power Seats ...1-4 Heated Seats ...1-5 Reclining Seatbacks ...1-5 Head Restraints ...1-7 Rear Seats ...1-7 Rear Seat Operation ...1-7 Second Row Safety Belt Stowage ...1-7 Flip and Fold Feature ...1-8 Split Bench Seats ...1-8 Bucket Seats ...1-16 Captain Chairs ...1-22 Stowable Seat ...1-26 Safety Belts ...1-30 Safety Belts: They...
Owner's Manual
Page 13
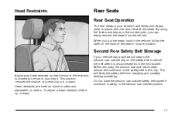
... of your head. To adjust a head restraint, slide it is disconnected from the mini-buckle. Second Row Safety Belt Stowage If your vehicle has a split bench seat in the second row, use the clip on the back of the restraint is closest to adjust, remove, and reinstall the... the belt after it up or down. 1-7 Head restraints are fixed on some models and adjustable on others. When removing the second row split bench seat, secure the loose end of a neck injury in a crash. This will keep the safety belt from the vehicle. Adjust your head restraint so that the...
... of your head. To adjust a head restraint, slide it is disconnected from the mini-buckle. Second Row Safety Belt Stowage If your vehicle has a split bench seat in the second row, use the clip on the back of the restraint is closest to adjust, remove, and reinstall the... the belt after it up or down. 1-7 Head restraints are fixed on some models and adjustable on others. When removing the second row split bench seat, secure the loose end of a neck injury in a crash. This will keep the safety belt from the vehicle. Adjust your head restraint so that the...
Owner's Manual
Page 14
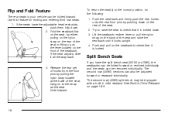
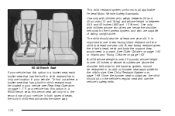
...until it all the way back. If the seat adjusts, slide it locks upright. 4. Release the rear set of hooks from the floor pins by pulling the nylon strap located at on the back of the seatback. If the seats have the split bench seat (50/50 or 40/60), the seatbacks can... be folded forward or reclined individually and the seats can also be removed individually. To return the seat(s) to the strap as the seat folds forward. 1-8 Lift the seatback recliner lever or ...
...until it all the way back. If the seat adjusts, slide it locks upright. 4. Release the rear set of hooks from the floor pins by pulling the nylon strap located at on the back of the seatback. If the seats have the split bench seat (50/50 or 40/60), the seatbacks can... be folded forward or reclined individually and the seats can also be removed individually. To return the seat(s) to the strap as the seat folds forward. 1-8 Lift the seatback recliner lever or ...

Owner's Manual
Page 15
Lift up either lever and slide the seat forward or rearward. Release the lever. Push and pull on the rear of the seat. There are adjustable. One is locked into place. The other lever is located on the seat to make sure it is located below the center, in the front of each section of the split bench seats to adjust the seat forward or rearward. Adjusting the Split Bench Seats (Second Row) The second row bench seats are two adjustment levers on each section of the split bench. 1-9
Lift up either lever and slide the seat forward or rearward. Release the lever. Push and pull on the rear of the seat. There are adjustable. One is locked into place. The other lever is located on the seat to make sure it is located below the center, in the front of each section of the split bench seats to adjust the seat forward or rearward. Adjusting the Split Bench Seats (Second Row) The second row bench seats are two adjustment levers on each section of the split bench. 1-9

Owner's Manual
Page 16
.... That could move forward in a sudden stop or crash. The seatback will lock into place. 1-10 Always press rearward on the front of the split bench seat can be sure it is not locked, it could cause injury to the person sitting there. Nylon Strap Recliner Lever To fold the seatback forward..., pull the nylon strap located on the rear of the seat or lift up on the recliner lever located on the seatback to fold or recline the seatbacks. Folding or Reclining the Seatbacks {CAUTION: If the...
.... That could move forward in a sudden stop or crash. The seatback will lock into place. 1-10 Always press rearward on the front of the split bench seat can be sure it is not locked, it could cause injury to the person sitting there. Nylon Strap Recliner Lever To fold the seatback forward..., pull the nylon strap located on the rear of the seat or lift up on the recliner lever located on the seatback to fold or recline the seatbacks. Folding or Reclining the Seatbacks {CAUTION: If the...

Owner's Manual
Page 17
...the safety belt. For the second row split bench, with a small pointed object to fold the seatback forward. 4. Push and pull on the back of the buckle with the seatback in the second row, lift one of the adjustment levers and slide the seat fully rearward. 1-11 Lift the seatback recliner ..., pull on the nylon strap or lift the recliner lever without putting any pressure on the right side of the seat. 2. If the seat is locked into place. Removing the Split Bench Seat Make sure the seatback is located on the seatback. To return the seatback to be sure it locks upright. This...
...the safety belt. For the second row split bench, with a small pointed object to fold the seatback forward. 4. Push and pull on the back of the buckle with the seatback in the second row, lift one of the adjustment levers and slide the seat fully rearward. 1-11 Lift the seatback recliner ..., pull on the nylon strap or lift the recliner lever without putting any pressure on the right side of the seat. 2. If the seat is locked into place. Removing the Split Bench Seat Make sure the seatback is located on the seatback. To return the seatback to be sure it locks upright. This...

Owner's Manual
Page 18
Repeat these steps for the other section of the strap until the seat is folded all the way forward. 6. Do not let go of the split bench seat. 1-12 To unlatch the front latches, squeeze the angled bar toward the rear of the seat to release the rear latches from the floor pins. Remove the seat by rocking it out. 5. From behind the bench seat, pull the nylon strap at the center of the base of the vehicle and then pulling it slightly forward, then toward the straight crossbar. 7.
Repeat these steps for the other section of the strap until the seat is folded all the way forward. 6. Do not let go of the split bench seat. 1-12 To unlatch the front latches, squeeze the angled bar toward the rear of the seat to release the rear latches from the floor pins. Remove the seat by rocking it out. 5. From behind the bench seat, pull the nylon strap at the center of the base of the vehicle and then pulling it slightly forward, then toward the straight crossbar. 7.

Owner's Manual
Page 19
... move forward in a sudden stop . Don't put the sections of the bench seat in a collision or sudden stop or crash. The seat must go. Be sure to be sure that way. That could be seriously injured. The split bench seats have seat position labels, located on the correct section of each section by sliding it... the safety belts are not twisted. A safety belt that is not locked into place properly when installing it could be injured. Replacing the Split Bench Seats {CAUTION: {CAUTION: If the seatback is not locked, it . 1-13 If you want more storage room behind the second row...
... move forward in a sudden stop . Don't put the sections of the bench seat in a collision or sudden stop or crash. The seat must go. Be sure to be sure that way. That could be seriously injured. The split bench seats have seat position labels, located on the correct section of each section by sliding it... the safety belts are not twisted. A safety belt that is not locked into place properly when installing it could be injured. Replacing the Split Bench Seats {CAUTION: {CAUTION: If the seatback is not locked, it . 1-13 If you want more storage room behind the second row...

Owner's Manual
Page 20
Squeeze the angled bar toward the solid crossbar while placing the front hooks of floor pins. 1. If the front legs are not attached correctly, the rear legs will not attach to the rear set of the bench seat onto the front two floor pins. 1-14 Make sure the bench seat is angled so that the front hooks clear the floor pins. 2.
Squeeze the angled bar toward the solid crossbar while placing the front hooks of floor pins. 1. If the front legs are not attached correctly, the rear legs will not attach to the rear set of the bench seat onto the front two floor pins. 1-14 Make sure the bench seat is angled so that the front hooks clear the floor pins. 2.

Owner's Manual
Page 21
Repeat these steps for use when a passenger uses the seat. Try to raise the seat to check that it is locked. 7. Push and pull on the seatback to check that it locks upright. 6. The buckle reattaches by ... recliner lever or pull the nylon strap on the rear of the seat. 4. 3. If you have the 40/60 seat, attach the mini-buckle so that the seat is ready for the other section of the seat and raise the seatback until the red center pops out again. If...floor pins by pushing the latch into the buckle until it is locked down on the back of the split bench seat. 1-15
Repeat these steps for use when a passenger uses the seat. Try to raise the seat to check that it is locked. 7. Push and pull on the seatback to check that it locks upright. 6. The buckle reattaches by ... recliner lever or pull the nylon strap on the rear of the seat. 4. 3. If you have the 40/60 seat, attach the mini-buckle so that the seat is ready for the other section of the seat and raise the seatback until the red center pops out again. If...floor pins by pushing the latch into the buckle until it is locked down on the back of the split bench seat. 1-15

Owner's Manual
Page 32
...door, pull up on the lever to release the seatback, then push up . The seatback has a patch of the seat, and push the seatback down until it is a full bench seat and comes with the convenience center. Push and pull on page 2-54 for more information. See Convenience Center on the seatback... to make sure that it is not locked, it can be sure it is locked into place. Stowable Seat Your vehicle may have a ...
...door, pull up on the lever to release the seatback, then push up . The seatback has a patch of the seat, and push the seatback down until it is a full bench seat and comes with the convenience center. Push and pull on page 2-54 for more information. See Convenience Center on the seatback... to make sure that it is not locked, it can be sure it is locked into place. Stowable Seat Your vehicle may have a ...

Owner's Manual
Page 33
...be done in the vehicle. Removing the Stowable Seat 1. See Convenience Center on page 2-54 for more information. 2. Use the crossbar located at the base of the stowable seat. 3. From behind the bench seat, push up the release handles at the seat bottom to release the latches from the &#...64258;oor pins. 5. Make sure all items are off of the seat to remove the seat. 1-27 Remove the convenience center, if it...
...be done in the vehicle. Removing the Stowable Seat 1. See Convenience Center on page 2-54 for more information. 2. Use the crossbar located at the base of the stowable seat. 3. From behind the bench seat, push up the release handles at the seat bottom to release the latches from the &#...64258;oor pins. 5. Make sure all items are off of the seat to remove the seat. 1-27 Remove the convenience center, if it...

Owner's Manual
Page 68
.... Do not secure a child restraint with a top strap in the right front passenger's position or at the third row driver's side position (vehicles with a full bench seat) if a national or local law requires that the top strap be anchored, or if the instructions that come with the child restraint say that the... top strap must lift the tray sill to make installation of the 60/40 split bench seat, and both second row captain's chairs. There is in the vehicle, you must be anchored. If the convenience center is no place to use the...
.... Do not secure a child restraint with a top strap in the right front passenger's position or at the third row driver's side position (vehicles with a full bench seat) if a national or local law requires that the top strap be anchored, or if the instructions that come with the child restraint say that the... top strap must lift the tray sill to make installation of the 60/40 split bench seat, and both second row captain's chairs. There is in the vehicle, you must be anchored. If the convenience center is no place to use the...
Owner's Manual
Page 70
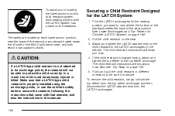
...child restraint is properly installed using the anchorage points, or use , where the bottom of the seatback meets the back of the 60/40 split bench seat, and both second row captain's chairs. {CAUTION: If a LATCH-type child restraint is not attached to its anchorage points, the restraint will ... unhook the top tether from the top tether anchorage and then disconnect the LATCH attachments from the LATCH anchorages. Also see Top Strap on the seat. 3. In a crash, the child could be seriously injured or killed. Securing a Child Restraint Designed for Children (LATCH System) on the child ...
...child restraint is properly installed using the anchorage points, or use , where the bottom of the seatback meets the back of the 60/40 split bench seat, and both second row captain's chairs. {CAUTION: If a LATCH-type child restraint is not attached to its anchorage points, the restraint will ... unhook the top tether from the top tether anchorage and then disconnect the LATCH attachments from the LATCH anchorages. Also see Top Strap on the seat. 3. In a crash, the child could be seriously injured or killed. Securing a Child Restraint Designed for Children (LATCH System) on the child ...

Owner's Manual
Page 71
... the top strap must be anchored, or if the instructions that came with a full bench seat in the third row, there is no top strap anchor in the driver's side position. Buckle the belt. Do not secure a child seat in this position if a national or local law requires that the top strap be...Anchorages and Top Tethers for Children (LATCH System) on page 1-62. The child restraint instructions will be able to . 1-65 Securing a Child Restraint in a Rear Seat Position If your child restraint does not have the LATCH system, you will show you ever had to unbuckle the safety belt quickly if you...
... the top strap must be anchored, or if the instructions that came with a full bench seat in the third row, there is no top strap anchor in the driver's side position. Buckle the belt. Do not secure a child seat in this position if a national or local law requires that the top strap be...Anchorages and Top Tethers for Children (LATCH System) on page 1-62. The child restraint instructions will be able to . 1-65 Securing a Child Restraint in a Rear Seat Position If your child restraint does not have the LATCH system, you will show you ever had to unbuckle the safety belt quickly if you...
Owner's Manual
Page 76
... Children on page 1-56. See Child Restraint Systems on page 1-52. If your vehicle has this option in a 60/40 bench seat, this option in a bucket seat, each bucket seat that has a built-in child restraint must be located in your vehicle. Use only with children who are below the shoulder belt... types of your vehicle. This child restraint system conforms to use the vehicle's safety belts. 60/40 Bench Seat If your vehicle has this bench seat will only fit in the second row of seats, the built-in child restraint works the same way. 1-70 Use only with children whose height is ...
... Children on page 1-56. See Child Restraint Systems on page 1-52. If your vehicle has this option in a 60/40 bench seat, this option in a bucket seat, each bucket seat that has a built-in child restraint must be located in your vehicle. Use only with children who are below the shoulder belt... types of your vehicle. This child restraint system conforms to use the vehicle's safety belts. 60/40 Bench Seat If your vehicle has this bench seat will only fit in the second row of seats, the built-in child restraint works the same way. 1-70 Use only with children whose height is ...

Owner's Manual
Page 83
... the child's shoulders. On each side of the harness on page 1-16. 1-77 You should be centered on the child's shoulder. See Split Bench Seats on page 1-8 or Bucket Seats on the child's shoulder by moving the clip along the harness until the harness is level with the child's armpits. Pull the shoulder...
... the child's shoulders. On each side of the harness on page 1-16. 1-77 You should be centered on the child's shoulder. See Split Bench Seats on page 1-8 or Bucket Seats on the child's shoulder by moving the clip along the harness until the harness is level with the child's armpits. Pull the shoulder...
Owner's Manual
Page 458
...5-44 5-46 5-44 5-44 5-50 5-48 5-61 B Battery ...5-38 Run-Down Protection ...3-21 Before Leaving on a Long Trip ...4-21 Bench Seat, Split ...1-8 Brake Anti-Lock Brake System (ABS) ...4-6 Emergencies ...4-7 Parking ...2-37 System Warning Light ...3-39 Brakes ...5-35 Braking ...4-5 Braking in... Emergencies ...4-7 Break-In, New Vehicle ...2-30 Bucket Seats, Rear ...1-16 Built-in Child Restraint ...1-69 C California Fuel ...5-6 Canadian Owners ...ii Capacities and Specifications ...5-99 Captain Chairs...
...5-44 5-46 5-44 5-44 5-50 5-48 5-61 B Battery ...5-38 Run-Down Protection ...3-21 Before Leaving on a Long Trip ...4-21 Bench Seat, Split ...1-8 Brake Anti-Lock Brake System (ABS) ...4-6 Emergencies ...4-7 Parking ...2-37 System Warning Light ...3-39 Brakes ...5-35 Braking ...4-5 Braking in... Emergencies ...4-7 Break-In, New Vehicle ...2-30 Bucket Seats, Rear ...1-16 Built-in Child Restraint ...1-69 C California Fuel ...5-6 Canadian Owners ...ii Capacities and Specifications ...5-99 Captain Chairs...
Owner's Manual
Page 467
... ...1-30 Shoulder Belt Height Adjuster ...1-43 Safety Warnings and Symbols ...iii Scheduled Maintenance ...6-4 Seats Bucket Seats, Rear ...1-16 Captain Chairs ...1-22 Flip and Fold Feature ...1-8 Head Restraints ...1-7 Heated Seats ...1-5 Manual ...1-3 Seats (cont.) Rear Seat Operation ...1-7 Reclining Seatbacks ...1-5 Six-Way Power Seats ...1-4 Split Bench Seats ...1-8 Stowable Seat ...1-26 Second Row Safety Belt Stowage ...1-7 Secondary Latch System ...5-78 Securing a Child Restraint...
... ...1-30 Shoulder Belt Height Adjuster ...1-43 Safety Warnings and Symbols ...iii Scheduled Maintenance ...6-4 Seats Bucket Seats, Rear ...1-16 Captain Chairs ...1-22 Flip and Fold Feature ...1-8 Head Restraints ...1-7 Heated Seats ...1-5 Manual ...1-3 Seats (cont.) Rear Seat Operation ...1-7 Reclining Seatbacks ...1-5 Six-Way Power Seats ...1-4 Split Bench Seats ...1-8 Stowable Seat ...1-26 Second Row Safety Belt Stowage ...1-7 Secondary Latch System ...5-78 Securing a Child Restraint...

Owner's Manual
Page 468
... Speedometer ...3-36 Split Bench Seats ...1-8 Starting Your Engine ...2-31 Steering ...4-9 Steering Wheel Controls, Audio ...3-115 Steering Wheel, Tilt Wheel ...3-6 Storage Areas ...2-48 Compact Overhead Console ...2-49 Convenience Center ...2-54 Convenience Net ...2-53 Cupholder(s) ...2-48 Front Seat Storage Net ...2-51 Glove... Box ...2-48 Luggage Carrier ...2-52 Overhead Console ...2-49 Rear Storage Area ...2-53 Stowable Seat ...1-26 Stuck in Sand, Mud, Ice or Snow ...4-28 Sun ...
... Speedometer ...3-36 Split Bench Seats ...1-8 Starting Your Engine ...2-31 Steering ...4-9 Steering Wheel Controls, Audio ...3-115 Steering Wheel, Tilt Wheel ...3-6 Storage Areas ...2-48 Compact Overhead Console ...2-49 Convenience Center ...2-54 Convenience Net ...2-53 Cupholder(s) ...2-48 Front Seat Storage Net ...2-51 Glove... Box ...2-48 Luggage Carrier ...2-52 Overhead Console ...2-49 Rear Storage Area ...2-53 Stowable Seat ...1-26 Stuck in Sand, Mud, Ice or Snow ...4-28 Sun ...


