Owner's Manual
Page 1
2005 Pontiac Montana Owner Manual Seats and Restraint Systems ...1-1 Front Seats ...1-3 Rear Seats ...1-7 Safety Belts ...1-30 Child Restraints ...1-50 Airbag System ...1-81 Restraint System Check ......2-42 OnStar® System ...2-43 HomeLink® Transmitter ...2-44 Storage Areas ...2-48 Vehicle Personalization ...2-57 ...3-1 Instrument Panel Instrument Panel Overview ...3-4 Climate Controls ...3-26 Warning Lights, Gages, and Indicators ...3-34 Message Center ...3-45 M Driver Information Center (DIC) ...3-52 Audio System(s) ...3-55 Driving Your Vehicle ...4-1 Your Driving, the Road, and...
2005 Pontiac Montana Owner Manual Seats and Restraint Systems ...1-1 Front Seats ...1-3 Rear Seats ...1-7 Safety Belts ...1-30 Child Restraints ...1-50 Airbag System ...1-81 Restraint System Check ......2-42 OnStar® System ...2-43 HomeLink® Transmitter ...2-44 Storage Areas ...2-48 Vehicle Personalization ...2-57 ...3-1 Instrument Panel Instrument Panel Overview ...3-4 Climate Controls ...3-26 Warning Lights, Gages, and Indicators ...3-34 Message Center ...3-45 M Driver Information Center (DIC) ...3-52 Audio System(s) ...3-55 Driving Your Vehicle ...4-1 Your Driving, the Road, and...
Owner's Manual
Page 4
... help avoid the damage. Seats and Restraint Systems in Section 1 Features and Controls in Section 2 Instrument Panel Overview in Section 3 Climate Controls in Section 3 Warning Lights, Gages, and Indicators in Section 3 Audio System(s) in Section 3 Engine Compartment Overview in Section 5 iv Many times, this manual you might see CAUTION and NOTICE...
... help avoid the damage. Seats and Restraint Systems in Section 1 Features and Controls in Section 2 Instrument Panel Overview in Section 3 Climate Controls in Section 3 Warning Lights, Gages, and Indicators in Section 3 Audio System(s) in Section 3 Engine Compartment Overview in Section 5 iv Many times, this manual you might see CAUTION and NOTICE...

Owner's Manual
Page 11
... and the right switch is manually turned off . Press the bottom of the switch to RUN, unless the switch is for added comfort. The indicator light on the outboard side of the driver's and front passenger's seats for the front passenger's seat. Press the top of the switch to make sure...
... and the right switch is manually turned off . Press the bottom of the switch to RUN, unless the switch is for added comfort. The indicator light on the outboard side of the driver's and front passenger's seats for the front passenger's seat. Press the top of the switch to make sure...

Owner's Manual
Page 36
... Safety Belts: They Are for Everyone This part of the manual tells you should not do with seats and safety belts. See Safety Belt Reminder Light on as a reminder to buckle up . Do not allow people to ride in any area of your passengers' belts are more likely to ride in... comes on page 3-38. It tells you some things you how to wear safety belts. You can be seriously injured or killed. Your vehicle has a light that is not equipped with safety belts. {CAUTION: It is in a cargo area, inside the vehicle or be seriously injured or killed. You can not...
... Safety Belts: They Are for Everyone This part of the manual tells you should not do with seats and safety belts. See Safety Belt Reminder Light on as a reminder to buckle up . Do not allow people to ride in any area of your passengers' belts are more likely to ride in... comes on page 3-38. It tells you some things you how to wear safety belts. You can be seriously injured or killed. Your vehicle has a light that is not equipped with safety belts. {CAUTION: It is in a cargo area, inside the vehicle or be seriously injured or killed. You can not...
Owner's Manual
Page 90
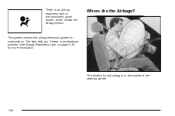
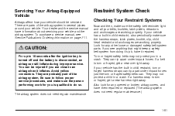
There is an airbag readiness light on page 3-38 for malfunctions. See Airbag Readiness Light on the instrument panel cluster, which shows the airbag symbol. The system checks the airbag electrical system for more information. The driver's frontal airbag is an electrical problem. Where Are the Airbags? The light tells you if there is in the middle of the steering wheel. 1-84
There is an airbag readiness light on page 3-38 for malfunctions. See Airbag Readiness Light on the instrument panel cluster, which shows the airbag symbol. The system checks the airbag electrical system for more information. The driver's frontal airbag is an electrical problem. Where Are the Airbags? The light tells you if there is in the middle of the steering wheel. 1-84
Owner's Manual
Page 97
... not need regular maintenance. 1-91 Torn or frayed safety belts may not protect a child in child restraint, also periodically make sure the safety belt reminder light and all your vehicle should be injured if you see Service Publications Ordering Information on page 7-11. Also look for any other loose or damaged...
... not need regular maintenance. 1-91 Torn or frayed safety belts may not protect a child in child restraint, also periodically make sure the safety belt reminder light and all your vehicle should be injured if you see Service Publications Ordering Information on page 7-11. Also look for any other loose or damaged...

Owner's Manual
Page 98
... safety belt, built-in child restraint parts or LATCH system parts? But if the safety belts or built-in a collision, or if your airbag readiness light stays on page 3-38. If the LATCH system was not being used at the time of the collision. See Airbag Readiness...
... safety belt, built-in child restraint parts or LATCH system parts? But if the safety belts or built-in a collision, or if your airbag readiness light stays on page 3-38. If the LATCH system was not being used at the time of the collision. See Airbag Readiness...

Owner's Manual
Page 100
Section 2 Features and Controls Vehicle Personalization ...2-57 Entering Programming Mode ...2-58 Delayed Illumination and Exit Lighting ...2-58 Automatic Door Locks ...2-59 Last Door Locking and Lockout Deterrent ...2-60 Remote Driver Unlock Control ...2-61 Remote Lock and Unlock Confirmation ...2-62 ...
Section 2 Features and Controls Vehicle Personalization ...2-57 Entering Programming Mode ...2-58 Delayed Illumination and Exit Lighting ...2-58 Automatic Door Locks ...2-59 Last Door Locking and Lockout Deterrent ...2-60 Remote Driver Unlock Control ...2-61 Remote Lock and Unlock Confirmation ...2-62 ...
Owner's Manual
Page 123
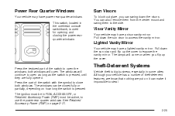
... the switch is used for opening and closing the power rear quarter windows. Visor Vanity Mirror Your vehicle may have a lighted vanity mirror. The windows will continue to the side. Lighted Vanity Mirror Your vehicle may have power rear quarter windows. Press the part of theft-deterrent features, we know that nothing...
... the switch is used for opening and closing the power rear quarter windows. Visor Vanity Mirror Your vehicle may have a lighted vanity mirror. The windows will continue to the side. Lighted Vanity Mirror Your vehicle may have power rear quarter windows. Press the part of theft-deterrent features, we know that nothing...

Owner's Manual
Page 124
... go off if someone tries to enter the vehicle without using the remote keyless entry transmitter or a key, or turns the ignition to two minutes. A light located on top of your instrument panel, near the center of the vehicle next to the windshield, will begin flashing at a very slow rate... switch to arm with the power door lock switches. When the alarm is armed, the liftgate may have a theft-deterrent alarm system. When the security light flashes quickly the system is arming. If you know that the system has been armed. After all doors and the liftgate are closed and...
... go off if someone tries to enter the vehicle without using the remote keyless entry transmitter or a key, or turns the ignition to two minutes. A light located on top of your instrument panel, near the center of the vehicle next to the windshield, will begin flashing at a very slow rate... switch to arm with the power door lock switches. When the alarm is armed, the liftgate may have a theft-deterrent alarm system. When the security light flashes quickly the system is arming. If you know that the system has been armed. After all doors and the liftgate are closed and...
Owner's Manual
Page 125
...parking lamps will flash briefly to let you know the system is arming. The security light will stop flashing to let you know when your key not to arm the system, see Vehicle ...Personalization on page 2-57. The security light will turn on to let you know the system is no longer armed. Disarming with Your Key ... the key is no longer armed. After all doors and the liftgate are closed and locked, the security light will begin flashing at a very slow rate to let you know the system is not in the...
...parking lamps will flash briefly to let you know the system is arming. The security light will stop flashing to let you know when your key not to arm the system, see Vehicle ...Personalization on page 2-57. The security light will turn on to let you know the system is no longer armed. Disarming with Your Key ... the key is no longer armed. After all doors and the liftgate are closed and locked, the security light will begin flashing at a very slow rate to let you know the system is not in the...
Owner's Manual
Page 129
... RUN for driving. Make sure the key is opened. E (START): This position starts the engine. Your engine will return to display some instrument panel warning lights. When the engine starts, let go down as the radio. Use the correct key and turn your ignition and transaxle. Use this works, then your...
... RUN for driving. Make sure the key is opened. E (START): This position starts the engine. Your engine will return to display some instrument panel warning lights. When the engine starts, let go down as the radio. Use the correct key and turn your ignition and transaxle. Use this works, then your...
Owner's Manual
Page 135
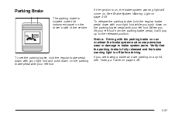
See Brake System Warning Light on the parking brake pedal with your left foot. To release the parking brake, hold the regular brake pedal down with your right foot and push down on page 3-39. Verify that the parking brake is fully released and the brake warning light is on, the brake system... warning light will pop up to brake system parts. If you lift your left foot from the parking brake pedal, it will come on...
See Brake System Warning Light on the parking brake pedal with your left foot. To release the parking brake, hold the regular brake pedal down with your right foot and push down on page 3-39. Verify that the parking brake is fully released and the brake warning light is on, the brake system... warning light will pop up to brake system parts. If you lift your left foot from the parking brake pedal, it will come on...

Owner's Manual
Page 142
... is available if your hand-held transmitters used to activate devices such as gate operators, garage door openers, entry door locks, security systems and home lighting. Customize your information profile at www.homelink.com or by calling 1-888-4-ONSTAR (1-888-466-7827). HomeLink, a combined universal transmitter and receiver, provides...
... is available if your hand-held transmitters used to activate devices such as gate operators, garage door openers, entry door locks, security systems and home lighting. Customize your information profile at www.homelink.com or by calling 1-888-4-ONSTAR (1-888-466-7827). HomeLink, a combined universal transmitter and receiver, provides...
Owner's Manual
Page 143
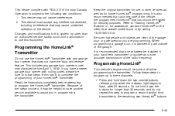
... are programming. Programming HomeLink® Your vehicle's engine should be helpful to have another person available to park outside buttons, releasing only when the indicator light begins to flash, after 20 seconds. When programming a garage door, it may be erased for quicker and more accurate transmission of the vehicle, the...
... are programming. Programming HomeLink® Your vehicle's engine should be helpful to have another person available to park outside buttons, releasing only when the indicator light begins to flash, after 20 seconds. When programming a garage door, it may be erased for quicker and more accurate transmission of the vehicle, the...
Owner's Manual
Page 144
... 6 through 8 following to repeat Step 1, as this section. 4. Firmly press and hold the newly-trained HomeLink® button and observe the indicator light. Do not release the buttons until Step 4 has been completed. Locate in view. 3. Return to substitute Step 3 with Step 2 under "Programming ...will erase all previous programming. 2-46 Release both the desired button on the brand of your hand-held transmitter button. The indicator light will erase all of "Programming HomeLink®." You do not want to complete the programming of the button may require you to ...
... 6 through 8 following to repeat Step 1, as this section. 4. Firmly press and hold the newly-trained HomeLink® button and observe the indicator light. Do not release the buttons until Step 4 has been completed. Locate in view. 3. Return to substitute Step 3 with Step 2 under "Programming ...will erase all previous programming. 2-46 Release both the desired button on the brand of your hand-held transmitter button. The indicator light will erase all of "Programming HomeLink®." You do not want to complete the programming of the button may require you to ...
Owner's Manual
Page 145
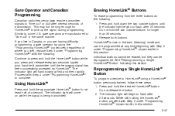
... of where you live in Canada, or you press and release every two seconds (cycle) your hand-held transmitter until the indicator light begins to "time out" in this section. Do not hold the two outside buttons until the frequency signal has been successfully accepted by...Single HomeLink® Button To program a device to press and hold the appropriate HomeLink® button for longer than 30 seconds. 2. The indicator light will come on while the signal is now in this section. gate operators are having difficulty programming a gate operator by HomeLink®. Release both...
... of where you live in Canada, or you press and release every two seconds (cycle) your hand-held transmitter until the indicator light begins to "time out" in this section. Do not hold the two outside buttons until the frequency signal has been successfully accepted by...Single HomeLink® Button To program a device to press and hold the appropriate HomeLink® button for longer than 30 seconds. 2. The indicator light will come on while the signal is now in this section. gate operators are having difficulty programming a gate operator by HomeLink®. Release both...
Owner's Manual
Page 146
... is partway open, then pull the door down if you have a removable liner for larger size cups and for about 20 seconds until the indicator light begins to hold both buttons. For questions or comments, contact HomeLink® at 1-800-355-3515, or on the bottom inboard side of the second... carrying capacity can be pushed up past the detent. To open . Cupholder(s) There are folded forward. Open the glove box until the HomeLink® indicator light turns off. 3.
... is partway open, then pull the door down if you have a removable liner for larger size cups and for about 20 seconds until the indicator light begins to hold both buttons. For questions or comments, contact HomeLink® at 1-800-355-3515, or on the bottom inboard side of the second... carrying capacity can be pushed up past the detent. To open . Cupholder(s) There are folded forward. Open the glove box until the HomeLink® indicator light turns off. 3.
Owner's Manual
Page 155
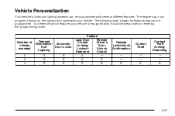
Vehicle Personalization Your vehicle's locks and lighting systems can be programmed with , follow the steps listed for entering the programming mode. The following chart shows the features that came with your vehicle ... features your vehicle. Feature Last Door Remote Closed Driver's Locking/ Door Lockout Unlock Deterrent Control X - X X X X Number of chimes sounded 2 3 4 Delayed Illumination/ Automatic Exit Door Locks Lighting X X X X X X Remote Lock/Unlock Confirmation - - X Content Theft - - X Content Theft Arming/ Disarming - - X 2-57
Vehicle Personalization Your vehicle's locks and lighting systems can be programmed with , follow the steps listed for entering the programming mode. The following chart shows the features that came with your vehicle ... features your vehicle. Feature Last Door Remote Closed Driver's Locking/ Door Lockout Unlock Deterrent Control X - X X X X Number of chimes sounded 2 3 4 Delayed Illumination/ Automatic Exit Door Locks Lighting X X X X X X Remote Lock/Unlock Confirmation - - X Content Theft - - X Content Theft Arming/ Disarming - - X 2-57

Owner's Manual
Page 156
... to the chart shown previously. Refer to ACCESSORY. 5. Mode 2: Delayed Illumination Only. The interior lamps will come on whenever you lock the doors. Mode 3: Exit Lighting Only. You can now program your vehicle is opened or closed , or until you lock the doors. Delayed Illumination and Exit... Lighting This feature allows you hear. Mode 4: Both Features On. Entering Programming Mode To program features, your vehicle must be in the programming mode. See Fuses ...
... to the chart shown previously. Refer to ACCESSORY. 5. Mode 2: Delayed Illumination Only. The interior lamps will come on whenever you lock the doors. Mode 3: Exit Lighting Only. You can now program your vehicle is opened or closed , or until you lock the doors. Delayed Illumination and Exit... Lighting This feature allows you hear. Mode 4: Both Features On. Entering Programming Mode To program features, your vehicle must be in the programming mode. See Fuses ...


