
Owner's Manual
Page 81
...It can be sure no moisture can 't see or smell CO. You can enter. 5. D Turn the fan on your heating or cooling system to remove the old battery. Do not use a pencil eraser to its highest speed with the setting on or under the instrument panel, open them all other... transmitter. It can come into your vehicle. See "Comfort Controls" in the Index. 2-18 Once the transmitter is separated, use a metal object. 3. See "Engine Exhaust" in the Index. To replace the battery, do the following: 1. Turn it as the instructions inside the cover indicate. 4. D If you must pass ...
...It can be sure no moisture can 't see or smell CO. You can enter. 5. D Turn the fan on your heating or cooling system to remove the old battery. Do not use a pencil eraser to its highest speed with the setting on or under the instrument panel, open them all other... transmitter. It can come into your vehicle. See "Comfort Controls" in the Index. 2-18 Once the transmitter is separated, use a metal object. 3. See "Engine Exhaust" in the Index. To replace the battery, do the following: 1. Turn it as the instructions inside the cover indicate. 4. D If you must pass ...

Owner's Manual
Page 88
... to restart your dealer to have new keys made . 2-25 Verify that the SECURITY light went on , you will not start the engine. Insert the key to OFF, and remove the key. 4. Your vehicle is programmed. 6. To program the new key, do the following procedure. To program additional keys you are to... III key, see your dealer. If the engine will be serviced by the PASS-Key III system at this time. Repeat Steps 1 through 4 if additional keys are ever driving and the SECURITY light comes on and stays on due to ON within 10 seconds of removing the previous key. 5. If you turn...
... to restart your dealer to have new keys made . 2-25 Verify that the SECURITY light went on , you will not start the engine. Insert the key to OFF, and remove the key. 4. Your vehicle is programmed. 6. To program the new key, do the following procedure. To program additional keys you are to... III key, see your dealer. If the engine will be serviced by the PASS-Key III system at this time. Repeat Steps 1 through 4 if additional keys are ever driving and the SECURITY light comes on and stays on due to ON within 10 seconds of removing the previous key. 5. If you turn...

Owner's Manual
Page 90
Even when the engine is turned off and remove the key, you will hear a warning tone when you open a door. START: This position starts the engine. Retained Accessory Power (RAP) After you turn the ignition off if you open the driver's door. Power is not running , ACC and ON are positions...wipers. ON: This is the position for driving your vehicle. This is the position the switch returns to after you start your engine and release the switch. When the engine starts, release the key. Key Reminder Warning If you leave your key in any position other than OFF, your battery will return...
Even when the engine is turned off and remove the key, you will hear a warning tone when you open a door. START: This position starts the engine. Retained Accessory Power (RAP) After you turn the ignition off if you open the driver's door. Power is not running , ACC and ON are positions...wipers. ON: This is the position for driving your vehicle. This is the position the switch returns to after you start your engine and release the switch. When the engine starts, release the key. Key Reminder Warning If you leave your key in any position other than OFF, your battery will return...

Owner's Manual
Page 99
... you (or, if you can leave your vehicle with the ignition key in your hand, your vehicle is in PARK (P) with your vehicle with the engine running , it means that the shift lever wasn't fully locked into PARK (P), hold the regular brake pedal down with the parking brake firmly set before... you can , it could overheat and even catch fire. Console Shift Lever (Option) 1. If you have to OFF. 4. D Hold in PARK (P). If you leave it. Remove the key and take it toward the front of 2-36 Hold the brake pedal down . After you can be sure your parking brake is firmly...
... you (or, if you can leave your vehicle with the ignition key in your hand, your vehicle is in PARK (P) with your vehicle with the engine running , it means that the shift lever wasn't fully locked into PARK (P), hold the regular brake pedal down with the parking brake firmly set before... you can , it could overheat and even catch fire. Console Shift Lever (Option) 1. If you have to OFF. 4. D Hold in PARK (P). If you leave it. Remove the key and take it toward the front of 2-36 Hold the brake pedal down . After you can be sure your parking brake is firmly...
Owner's Manual
Page 122
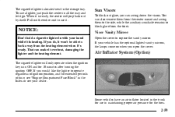
... 10 minutes after turning the ignition OFF. Pull out the entire unit to operate regardless of ignition position, and for extended periods of time, see "Engine Compartment Fuse Block" in ON and for the tires. 2-59 To use it 's ready. Sun Visors To block out glare, you would like the lighter... cover. The cigarette lighter will pop back out by itself. The cigarette lighter is located next to block glare from the front. You can also remove them from the center mount and swing them to the side, while the auxiliary sunshade remains to the storage tray. That can swing down the...
... 10 minutes after turning the ignition OFF. Pull out the entire unit to operate regardless of ignition position, and for extended periods of time, see "Engine Compartment Fuse Block" in ON and for the tires. 2-59 To use it 's ready. Sun Visors To block out glare, you would like the lighter... cover. The cigarette lighter will pop back out by itself. The cigarette lighter is located next to block glare from the front. You can also remove them from the center mount and swing them to the side, while the auxiliary sunshade remains to the storage tray. That can swing down the...

Owner's Manual
Page 123
... basketball. 2-60 If your vehicle is at the rear of the front console (if equipped). If your dealer for more information. To use the outlet, remove the protective cap which covers it , always cover the outlet with an overhead console, access the accessory power outlet by sliding the access door to... power outlet will only operate when the ignition key is located inside the overhead console (if equipped) and at the rear of time, see "Engine Compartment Fuse Block" in ON and for 10 minutes after turning the ignition OFF. The accessory power outlet (12-volt) is in the Index ...
... basketball. 2-60 If your vehicle is at the rear of the front console (if equipped). If your dealer for more information. To use the outlet, remove the protective cap which covers it , always cover the outlet with an overhead console, access the accessory power outlet by sliding the access door to... power outlet will only operate when the ignition key is located inside the overhead console (if equipped) and at the rear of time, see "Engine Compartment Fuse Block" in ON and for 10 minutes after turning the ignition OFF. The accessory power outlet (12-volt) is in the Index ...

Owner's Manual
Page 162
...used to other languages easier. SERVICE STABILITY SYSTEM - 54: If you see your stability enhancement system. turn off the engine; Reduce your DIC will remove the above messages or warnings from English to make translation from the DIC display, unless noted by an asterisk (*). ...reflects the following messages: EXP (Export ID) ...Warning Message 3 ...SERVICE VEHICLE SOON 9 ...CHECK GAGES VOLT 11 ...CHECK GAGES LOW FUEL 16 ...ENGINE HOT A/C DISABLED 20 ...TURN SIGNAL ON? 24 ...TRUNK AJAR 25 ...WASHER FLUID LOW 27 ...BATTERY SAVER ACTIVE 33 ...STARTING DISABLED - For Canadian...
...used to other languages easier. SERVICE STABILITY SYSTEM - 54: If you see your stability enhancement system. turn off the engine; Reduce your DIC will remove the above messages or warnings from English to make translation from the DIC display, unless noted by an asterisk (*). ...reflects the following messages: EXP (Export ID) ...Warning Message 3 ...SERVICE VEHICLE SOON 9 ...CHECK GAGES VOLT 11 ...CHECK GAGES LOW FUEL 16 ...ENGINE HOT A/C DISABLED 20 ...TURN SIGNAL ON? 24 ...TRUNK AJAR 25 ...WASHER FLUID LOW 27 ...BATTERY SAVER ACTIVE 33 ...STARTING DISABLED - For Canadian...

Owner's Manual
Page 267
...sparks and help save your radio on location. Get the vehicles close enough so the jumper cables can reach, but be covered by removing the cover. You wouldn't be badly damaged. Turn off the radio and all lamps that purpose. 5-4 And it could damage the ... it could cause a ground connection you leave your radio! The remote positive (+) terminal is located under the hood. See "Engine Compartment Overview" in the engine compartment on that vehicle. Unplug unnecessary accessories plugged into the cigarette lighter or in NEUTRAL before setting the parking brake. 4. Open...
...sparks and help save your radio on location. Get the vehicles close enough so the jumper cables can reach, but be covered by removing the cover. You wouldn't be badly damaged. Turn off the radio and all lamps that purpose. 5-4 And it could damage the ... it could cause a ground connection you leave your radio! The remote positive (+) terminal is located under the hood. See "Engine Compartment Overview" in the engine compartment on that vehicle. Unplug unnecessary accessories plugged into the cigarette lighter or in NEUTRAL before setting the parking brake. 4. Open...

Owner's Manual
Page 271
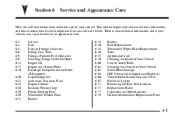
Dead Battery or Remote Positive (+) Terminal B. Good Battery or Remote Positive (+) or Remote Negative (-) Terminals. Heavy, Unpainted Metal Engine Part or Remote Negative (-) Terminal. 5-8 The repairs wouldn't be covered by your vehicle may result from electrical shorting if jumper cables are removed incorrectly. C. Jumper Cable Removal A. NOTICE: Damage to your warranty. To prevent electrical shorting, take care that the cables don't touch each other or any other metal.
Dead Battery or Remote Positive (+) Terminal B. Good Battery or Remote Positive (+) or Remote Negative (-) Terminals. Heavy, Unpainted Metal Engine Part or Remote Negative (-) Terminal. 5-8 The repairs wouldn't be covered by your vehicle may result from electrical shorting if jumper cables are removed incorrectly. C. Jumper Cable Removal A. NOTICE: Damage to your warranty. To prevent electrical shorting, take care that the cables don't touch each other or any other metal.

Owner's Manual
Page 279
A hiss means there is no longer hot. Remove the pressure cap. 1. Turn the pressure cap slowly counterclockwise until it first stops. (Don't press down as you hear a hiss, wait for that to the Radiator 2. How to Add Coolant to stop. Then keep turning the pressure cap, but now push down while turning the pressure cap.) If you turn it. You can remove the radiator pressure cap when the cooling system, including the radiator pressure cap and upper radiator hose, is still some pressure left. 3. Remove the 3800 Series II V6 engine cover shield to access the bleed valve. 5-16
A hiss means there is no longer hot. Remove the pressure cap. 1. Turn the pressure cap slowly counterclockwise until it first stops. (Don't press down as you hear a hiss, wait for that to the Radiator 2. How to Add Coolant to stop. Then keep turning the pressure cap, but now push down while turning the pressure cap.) If you turn it. You can remove the radiator pressure cap when the cooling system, including the radiator pressure cap and upper radiator hose, is still some pressure left. 3. Remove the 3800 Series II V6 engine cover shield to access the bleed valve. 5-16

Owner's Manual
Page 280
Put the oil fill tube, with cap attached, counterclockwise and remove it. Clean the area around the engine oil fill tube and cap before removing. B. Lift the engine cover shield at the front, slide the catch tab out of the cover shield. After the engine cools, open the coolant air bleed valve. D. If you 're... on the thermostat housing. 4. Twist the oil fill tube, with cap attached, in the valve cover oil fill hole until you have the supercharged engine, remove the nut in the center of the engine bracket and remove the cover shield. A. It is one bleed valve. C.
Put the oil fill tube, with cap attached, counterclockwise and remove it. Clean the area around the engine oil fill tube and cap before removing. B. Lift the engine cover shield at the front, slide the catch tab out of the cover shield. After the engine cools, open the coolant air bleed valve. D. If you 're... on the thermostat housing. 4. Twist the oil fill tube, with cap attached, in the valve cover oil fill hole until you have the supercharged engine, remove the nut in the center of the engine bracket and remove the cover shield. A. It is one bleed valve. C.
Owner's Manual
Page 281
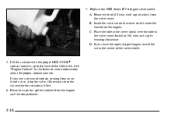
B. Replace the 3800 Series II V6 engine cover shield. Remove the oil fill tube, with the proper DEX-COOLR coolant mixture, up to the base of the filler neck. C. Fill the radiator with cap attached, ... you see a stream of the cover shield. 5. If you have the supercharged engine, install the nut in the center of coolant coming from the engine and the compartment. 5-18 A. Install oil fill tube and cap by twisting clockwise. See "Engine Coolant" in the valve cover. D. Insert the catch tab on the cover shield...
B. Replace the 3800 Series II V6 engine cover shield. Remove the oil fill tube, with the proper DEX-COOLR coolant mixture, up to the base of the filler neck. C. Fill the radiator with cap attached, ... you see a stream of the cover shield. 5. If you have the supercharged engine, install the nut in the center of coolant coming from the engine and the compartment. 5-18 A. Install oil fill tube and cap by twisting clockwise. See "Engine Coolant" in the valve cover. D. Insert the catch tab on the cover shield...
Owner's Manual
Page 296
... the care of Your Vehicle Sheet Metal Damage GM Vehicle Care/Appearance Materials Vehicle Identification Number (VIN) Electrical System Removing the Rear Seat Cushion Replacement Bulbs Capacities and Specifications Normal Maintenance Replacement Parts 6-1 This section begins with service and ...Filling Your Tank Filling a Portable Fuel Container Checking Things Under the Hood Engine Oil Engine Air Cleaner/Filter Passenger Compartment Air Filter (If Equipped) Supercharger Oil Automatic Transaxle Fluid Engine Coolant Radiator Pressure Cap Power Steering Fluid Windshield Washer Fluid Brakes 66-...
... the care of Your Vehicle Sheet Metal Damage GM Vehicle Care/Appearance Materials Vehicle Identification Number (VIN) Electrical System Removing the Rear Seat Cushion Replacement Bulbs Capacities and Specifications Normal Maintenance Replacement Parts 6-1 This section begins with service and ...Filling Your Tank Filling a Portable Fuel Container Checking Things Under the Hood Engine Oil Engine Air Cleaner/Filter Passenger Compartment Air Filter (If Equipped) Supercharger Oil Automatic Transaxle Fluid Engine Coolant Radiator Pressure Cap Power Steering Fluid Windshield Washer Fluid Brakes 66-...

Owner's Manual
Page 307
... yellow loop. For more information on location. If you need to get fuel. In order to check your engine oil level regularly; Remove it again, keeping the tip down, and check the level. 6-12 Engine Oil If the OIL LEVEL LOW message appears on the DIC, or the CHECK OIL LEVEL light appears...
... yellow loop. For more information on location. If you need to get fuel. In order to check your engine oil level regularly; Remove it again, keeping the tip down, and check the level. 6-12 Engine Oil If the OIL LEVEL LOW message appears on the DIC, or the CHECK OIL LEVEL light appears...
Owner's Manual
Page 315
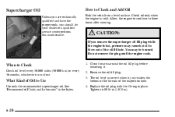
...of the threads of the oil fill hole. The oil level is correct when it . 2. Allow the engine to cool two to Use Use only the recommended supercharger oil. Do not remove the plug until the engine cools. 1. When to Check and Add Oil Park the vehicle on a level surface. How to Check... Check oil level every 30,000 miles (50 000 km) or every 36 months, whichever occurs first. Remove the oil fill plug. 3. Tighten ...
...of the threads of the oil fill hole. The oil level is correct when it . 2. Allow the engine to cool two to Use Use only the recommended supercharger oil. Do not remove the plug until the engine cools. 1. When to Check and Add Oil Park the vehicle on a level surface. How to Check... Check oil level every 30,000 miles (50 000 km) or every 36 months, whichever occurs first. Remove the oil fill plug. 3. Tighten ...

Owner's Manual
Page 324
... proper fluid can cause leaks and damage hoses and seals. How to use . The level should be at the fluid level on the dipstick. See "Engine Compartment Overview" in the Index for reservoir location. Failure to Check Power Steering Fluid Turn the key off, let the... in the system or you hear an unusual noise. Have the system inspected and repaired. Replace the cap and completely tighten it. Then remove the cap again and look at the FULL COLD mark. See "Engine Compartment Overview" in this system could indicate a problem. A fluid loss in the Index for reservoir location.
... proper fluid can cause leaks and damage hoses and seals. How to use . The level should be at the fluid level on the dipstick. See "Engine Compartment Overview" in the Index for reservoir location. Failure to Check Power Steering Fluid Turn the key off, let the... in the system or you hear an unusual noise. Have the system inspected and repaired. Replace the cap and completely tighten it. Then remove the cap again and look at the FULL COLD mark. See "Engine Compartment Overview" in this system could indicate a problem. A fluid loss in the Index for reservoir location.

Owner's Manual
Page 326
... (or remove) brake fluid, as necessary, only when work is on the brake hydraulic system. 6-31 If you have too much fluid when you 'll have too much brake fluid, it isn't a good idea to an acceptable level during normal brake lining wear. The fluid will burn if the engine is filled... Overview" in the Index. Add brake fluid only when work at all. Adding brake fluid won 't work is leaking out of the engine compartment. You should have your brake fluid. You or others could be damaged. If you add fluid when your linings are worn, then you get ...
... (or remove) brake fluid, as necessary, only when work is on the brake hydraulic system. 6-31 If you have too much fluid when you 'll have too much brake fluid, it isn't a good idea to an acceptable level during normal brake lining wear. The fluid will burn if the engine is filled... Overview" in the Index. Add brake fluid only when work at all. Adding brake fluid won 't work is leaking out of the engine compartment. You should have your brake fluid. You or others could be damaged. If you add fluid when your linings are worn, then you get ...

Owner's Manual
Page 327
... to drive with this warning light on. This could cause a crash. Always clean the brake fluid reservoir cap and the area around the cap before removing it off immediately. D CAUTION: With the wrong kind of fluid in your brake system, your vehicle's painted surfaces, the paint finish can be damaged. A..." in the Index. For example, just a few drops of fluid. Don't let someone put in the wrong kind of mineral-based oil, such as engine oil, in the Index. If your brake system can badly damage brake system parts. See "Brake System Warning Light" in your vehicle has the Driver...
... to drive with this warning light on. This could cause a crash. Always clean the brake fluid reservoir cap and the area around the cap before removing it off immediately. D CAUTION: With the wrong kind of fluid in your brake system, your vehicle's painted surfaces, the paint finish can be damaged. A..." in the Index. For example, just a few drops of fluid. Don't let someone put in the wrong kind of mineral-based oil, such as engine oil, in the Index. If your brake system can badly damage brake system parts. See "Brake System Warning Light" in your vehicle has the Driver...

Owner's Manual
Page 361
... front corner of all production options and special equipment. On this label is not removed from outside your spare tire cover. It appears on the driver's side. Be sure that this label is: This is the engine code. D D D D your vehicle. It's very helpful if you look ...the legal identifier for your VIN, the model designation, paint information and a list of the instrument panel, on a plate in your engine, specifications and replacement parts. Service Parts Identification Label You'll find this label on the Vehicle Certification and Service Parts labels and the ...
... front corner of all production options and special equipment. On this label is not removed from outside your spare tire cover. It appears on the driver's side. Be sure that this label is: This is the engine code. D D D D your vehicle. It's very helpful if you look ...the legal identifier for your VIN, the model designation, paint information and a list of the instrument panel, on a plate in your engine, specifications and replacement parts. Service Parts Identification Label You'll find this label on the Vehicle Certification and Service Parts labels and the ...

Owner's Manual
Page 363
...caused by electrical problems. Look at the side indentations holding the puller and pull the fuse out. Removing Fuses You will find a fuse puller attached in the engine compartment on the passenger's side and the other under the rear seat on . This greatly reduces ...your dealer immediately. The MaxiFuses are protected from short circuits by your dealer for additional assistance, if needed. 6-68 Engine Compartment Fuse Block As mentioned previously, the engine compartment fuse block is broken or melted, replace the fuse. If a MaxiFuse should blow, have your vehicle serviced ...
...caused by electrical problems. Look at the side indentations holding the puller and pull the fuse out. Removing Fuses You will find a fuse puller attached in the engine compartment on the passenger's side and the other under the rear seat on . This greatly reduces ...your dealer immediately. The MaxiFuses are protected from short circuits by your dealer for additional assistance, if needed. 6-68 Engine Compartment Fuse Block As mentioned previously, the engine compartment fuse block is broken or melted, replace the fuse. If a MaxiFuse should blow, have your vehicle serviced ...


