Owner's Manual
Page 12
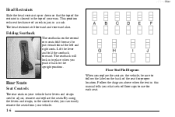
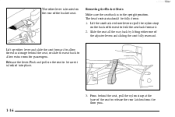
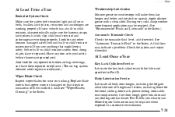
yellowblue Head Restraints Slide the head restraint up or down so that the top of the restraint is closest to the top of floor cups to use for proper location. Lift ... the seats. Floor Seat Pin Diagram When you what sets of your vehicle. 1-6 This position reduces the chance of the seat for each seat. The head restraints tilt forward and rearward also. By using the levers and straps, in the vehicle, be sure to the upright position.
yellowblue Head Restraints Slide the head restraint up or down so that the top of the restraint is closest to the top of floor cups to use for proper location. Lift ... the seats. Floor Seat Pin Diagram When you what sets of your vehicle. 1-6 This position reduces the chance of the seat for each seat. The head restraints tilt forward and rearward also. By using the levers and straps, in the vehicle, be sure to the upright position.
Owner's Manual
Page 13
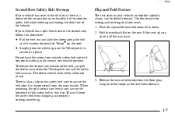
... is sitting in the second row outside position. If your vehicle has a split bench seat in the second row, follow this clip. Push the adjustable head restraints fully down. 2. yellowblue Second Row Safety Belt Stowage If your vehicle has seats in the third row, there is a sleeve on the second row...
... is sitting in the second row outside position. If your vehicle has a split bench seat in the second row, follow this clip. Push the adjustable head restraints fully down. 2. yellowblue Second Row Safety Belt Stowage If your vehicle has seats in the third row, there is a sleeve on the second row...
Owner's Manual
Page 16
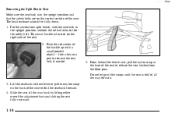
... in the upright position and that the safety belts are on the correct section of the seat to remove the seat belt, if needed. 5. The head restraints should be fully down. 1. This mini-buckle is located on the back of the seat. yellowblue Removing the Split Bench Seat Make sure the...
... in the upright position and that the safety belts are on the correct section of the seat to remove the seat belt, if needed. 5. The head restraints should be fully down. 1. This mini-buckle is located on the back of the seat. yellowblue Removing the Split Bench Seat Make sure the...
Owner's Manual
Page 22
... of the seat to be fully down. 1. Removing the Bucket Seats Make sure the seatback is located on the back of the bucket seat. The head restraints should be sure it is locked into place. 3. From behind the seat, or slide the seat back to allow extra room for extra storage...
... of the seat to be fully down. 1. Removing the Bucket Seats Make sure the seatback is located on the back of the bucket seat. The head restraints should be sure it is locked into place. 3. From behind the seat, or slide the seat back to allow extra room for extra storage...
Owner's Manual
Page 40
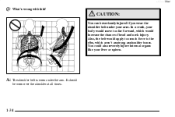
You could also severely injure internal organs like your arm. It should be seriously injured if you wear the shoulder belt under the arm. In a crash, your body would move too far forward, which would apply too much force to the ribs, which aren't as strong as shoulder bones. CAUTION: You can be worn over the shoulder at all times. 1-34 yellowblue Q: What's wrong with this? Also, the belt would increase the chance of head and neck injury. A: The shoulder belt is worn under your liver or spleen.
You could also severely injure internal organs like your arm. It should be seriously injured if you wear the shoulder belt under the arm. In a crash, your body would move too far forward, which would apply too much force to the ribs, which aren't as strong as shoulder bones. CAUTION: You can be worn over the shoulder at all times. 1-34 yellowblue Q: What's wrong with this? Also, the belt would increase the chance of head and neck injury. A: The shoulder belt is worn under your liver or spleen.
Owner's Manual
Page 56
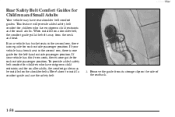
... of the seatback. 1-50 Remove the guide from its storage clip on a shoulder belt, the comfort guide pulls the belt away from the neck and head. yellowblue Rear Safety Belt Comfort Guides for each outside passenger position. If your vehicle has third-row seats, there is one guide for small adults.
... of the seatback. 1-50 Remove the guide from its storage clip on a shoulder belt, the comfort guide pulls the belt away from the neck and head. yellowblue Rear Safety Belt Comfort Guides for each outside passenger position. If your vehicle has third-row seats, there is one guide for small adults.
Owner's Manual
Page 63
.... 1-57 So, be over the child's abdomen. A baby should . The instructions for the restraint will likely be sure that any child small enough for the head and neck. yellowblue Infants need complete support, including support for one is so important that a regular belt might not stay low on the child's abdomen... serious or fatal injuries. This is always properly restrained in an appropriate infant restraint. This is necessary because an infant's neck is weak and its head weighs so much compared with the rest of the infant's body, the back and shoulders.
.... 1-57 So, be over the child's abdomen. A baby should . The instructions for the restraint will likely be sure that any child small enough for the head and neck. yellowblue Infants need complete support, including support for one is so important that a regular belt might not stay low on the child's abdomen... serious or fatal injuries. This is always properly restrained in an appropriate infant restraint. This is necessary because an infant's neck is weak and its head weighs so much compared with the rest of the infant's body, the back and shoulders.
Owner's Manual
Page 66
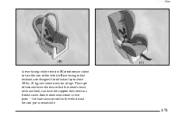
... be at least one year old. Each child restraint is designed for the five-point child restraint harness system? A rear-facing restraint gives the infant's head, neck and body the support they would need in this child restraint. A CHILD WHOSE SHOULDERS ARE ABOVE THOSE SLOTS COULD BE INJURED DURING A SUDDEN STOP...
... be at least one year old. Each child restraint is designed for the five-point child restraint harness system? A rear-facing restraint gives the infant's head, neck and body the support they would need in this child restraint. A CHILD WHOSE SHOULDERS ARE ABOVE THOSE SLOTS COULD BE INJURED DURING A SUDDEN STOP...
Owner's Manual
Page 67
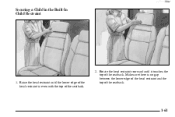
Rotate the head restraint rearward until the lower edge of the head restraint is no gap between the lower edge of the head restraint and the top of the seatback. Raise the head restraint until it touches the top of the seatback. 1-61 yellowblue Securing a Child in the Built-In Child Restraint 1. Make sure there is even with the top of the seatback. 2.
Rotate the head restraint rearward until the lower edge of the head restraint is no gap between the lower edge of the head restraint and the top of the seatback. Raise the head restraint until it touches the top of the seatback. 1-61 yellowblue Securing a Child in the Built-In Child Restraint 1. Make sure there is even with the top of the seatback. 2.
Owner's Manual
Page 75
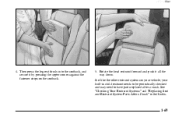
Then press the leg rest firmly into the seatback, and secure it all the way down. See "Checking Your Restraint Systems" and "Replacing Seat and Restraint System Parts After a Crash" in child restraint needs to be periodically checked and may need to have parts replaced after a crash. Rotate the head restraint forward and push it by pressing the upper corners against the fastener strips on the seatback. 5. yellowblue 4. Just like the other restraint systems in your vehicle, your built-in the Index. 1-69
Then press the leg rest firmly into the seatback, and secure it all the way down. See "Checking Your Restraint Systems" and "Replacing Seat and Restraint System Parts After a Crash" in child restraint needs to be periodically checked and may need to have parts replaced after a crash. Rotate the head restraint forward and push it by pressing the upper corners against the fastener strips on the seatback. 5. yellowblue 4. Just like the other restraint systems in your vehicle, your built-in the Index. 1-69
Owner's Manual
Page 76
... restrain or position a child on child restraints are the different types of the vehicle. 1-70 With an infant car bed, make sure that the infant's head rests toward the center of add-on child restraints? Add-on a continuous flat surface. When selecting a child restraint, take into consideration not only the child...
... restrain or position a child on child restraints are the different types of the vehicle. 1-70 With an infant car bed, make sure that the infant's head rests toward the center of add-on child restraints? Add-on a continuous flat surface. When selecting a child restraint, take into consideration not only the child...
Owner's Manual
Page 77
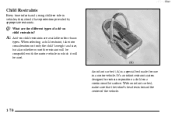
This type of the vehicle. the base stays secured in two parts -- Some infant seats come in the vehicle and the seat part is removable. 1-71 yellowblue A rear-facing infant restraint (B) positions an infant to about 20 lbs. (9 kg) and about one year of age. Rear-facing infant restraints are designed for infants of up to face the rear of restraint faces the rear so that the infant's head, neck and body can have the support they need in a frontal crash.
This type of the vehicle. the base stays secured in two parts -- Some infant seats come in the vehicle and the seat part is removable. 1-71 yellowblue A rear-facing infant restraint (B) positions an infant to about 20 lbs. (9 kg) and about one year of age. Rear-facing infant restraints are designed for infants of up to face the rear of restraint faces the rear so that the infant's head, neck and body can have the support they need in a frontal crash.
Owner's Manual
Page 94
... air bag system does not need regular maintenance.) Checking Your Restraint Systems Now and then, make sure the harness straps, latch plates, buckle, clip, child head restraint and anchorages are working properly. The extender will be just for you, and just for any other loose or damaged safety belt and built...
... air bag system does not need regular maintenance.) Checking Your Restraint Systems Now and then, make sure the harness straps, latch plates, buckle, clip, child head restraint and anchorages are working properly. The extender will be just for you, and just for any other loose or damaged safety belt and built...
Owner's Manual
Page 231
... eject on its own. If you notice a reduction in sound quality, clean the tape player. You may display CLN to clean the tape head. yellowblue Care of Your Cassette Tape Player A tape player that you have used your cassette tape player needs to RUN or ACCESSORY. 2. Your... radio may also choose a non-scrubbing action, wet-type cleaner which uses a cassette with pads which scrub the tape head as the scrubbing type cleaner. To prevent the cleaning cassette from contaminants, direct sunlight and extreme heat. Eject the cleaning cassette after every 50 ...
... eject on its own. If you notice a reduction in sound quality, clean the tape player. You may display CLN to clean the tape head. yellowblue Care of Your Cassette Tape Player A tape player that you have used your cassette tape player needs to RUN or ACCESSORY. 2. Your... radio may also choose a non-scrubbing action, wet-type cleaner which uses a cassette with pads which scrub the tape head as the scrubbing type cleaner. To prevent the cleaning cassette from contaminants, direct sunlight and extreme heat. Eject the cleaning cassette after every 50 ...

Owner's Manual
Page 245
...: D "Drive ahead." Look down the road, to the sides and to go straight down the roadway. Passing another on a two-lane highway is clear). the head-on your pass. If you have dropped off the accelerator and then, if there is nothing in judgment, or a brief surrender to frustration or anger...
...: D "Drive ahead." Look down the road, to the sides and to go straight down the roadway. Passing another on a two-lane highway is clear). the head-on your pass. If you have dropped off the accelerator and then, if there is nothing in judgment, or a brief surrender to frustration or anger...

Owner's Manual
Page 297
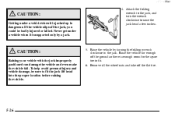
Put the compact spare tire near you. 5-25 yellowblue 3. Near each wheel, there is a notch in the vehicle's frame nearest the flat tire. NOTICE: Do not place the jack under the rear axle control arms. Only use an impact wrench with this key. Do not raise the vehicle yet. NOTICE: To help avoid damage to lock nut or wheel lock key, do not use the areas shown for proper jack location. Position the jack and raise the jack head until it fits firmly into the notch in the vehicle's body.
Put the compact spare tire near you. 5-25 yellowblue 3. Near each wheel, there is a notch in the vehicle's frame nearest the flat tire. NOTICE: Do not place the jack under the rear axle control arms. Only use an impact wrench with this key. Do not raise the vehicle yet. NOTICE: To help avoid damage to lock nut or wheel lock key, do not use the areas shown for proper jack location. Position the jack and raise the jack head until it fits firmly into the notch in the vehicle's body.
Owner's Manual
Page 298
... or killed. Raise the vehicle by a jack. Attach the folding wrench to the jack, and turn the wrench clockwise to fit the jack lift head into the proper location before raising the vehicle. 5. Never get under a vehicle when it is supported only by turning the folding wrench clockwise in ... vehicle slips off the flat tire. 5-26 Remove all the wheel nuts and take off the jack, you could be sure to raise the jack head a few inches. Raise the vehicle far enough off the ground so there is dangerous. yellowblue 4. CAUTION: Raising your vehicle with the jack improperly ...
... or killed. Raise the vehicle by a jack. Attach the folding wrench to the jack, and turn the wrench clockwise to fit the jack lift head into the proper location before raising the vehicle. 5. Never get under a vehicle when it is supported only by turning the folding wrench clockwise in ... vehicle slips off the flat tire. 5-26 Remove all the wheel nuts and take off the jack, you could be sure to raise the jack head a few inches. Raise the vehicle far enough off the ground so there is dangerous. yellowblue 4. CAUTION: Raising your vehicle with the jack improperly ...
Owner's Manual
Page 403
... exposed to use. Look for wear or cracking. Weatherstrip Lubrication Silicone grease on weatherstrips will make sure the harness straps, latch plates, buckle, clip, child head restraint and anchorages are working properly. Check the system and repair if needed . If you what to a corrosive environment. 7-31 More frequent lubrication may be...
... exposed to use. Look for wear or cracking. Weatherstrip Lubrication Silicone grease on weatherstrips will make sure the harness straps, latch plates, buckle, clip, child head restraint and anchorages are working properly. Check the system and repair if needed . If you what to a corrosive environment. 7-31 More frequent lubrication may be...
Owner's Manual
Page 433
... with Disabilities ...8-7 GM Vehicle Care/Appearance Materials ...6-54 Gross Axle Weight Rating (GAWR) ...4-30 Gross Vehicle Weight Rating (GVWR) ...4-30 GVWR ...4-30 Hazard Warning Flashers ...5-2 Head Restraints ...1-6 Headlamps ...2-61 Bulb Replacement ...6-31 High/Low Beam Changer ...2-56 On Reminder ...2-62 Wiring ...6-56 Hearing Impaired, Customer Assistance ...8-5 Heated Outside Mirrors ...2-68 Heating...
... with Disabilities ...8-7 GM Vehicle Care/Appearance Materials ...6-54 Gross Axle Weight Rating (GAWR) ...4-30 Gross Vehicle Weight Rating (GVWR) ...4-30 GVWR ...4-30 Hazard Warning Flashers ...5-2 Head Restraints ...1-6 Headlamps ...2-61 Bulb Replacement ...6-31 High/Low Beam Changer ...2-56 On Reminder ...2-62 Wiring ...6-56 Hearing Impaired, Customer Assistance ...8-5 Heated Outside Mirrors ...2-68 Heating...

Owner's Manual
Page 437
... Seat and Restraint System Parts After a Crash ...1-89 Split Bench Seat ...1-11 Reporting Safety Defects ...8-12 Resetting the Power Sliding Door ...2-30 Restraints Checking ...1-88 Head ...1-6 Reminder Light ...1-23, 2-89 Replacing Parts After a Crash ...1-89 Second Row Safety Belt Stowage ...1-7 System Check ...7-31 Restraints, Child ...1-70 Resynchronization ...2-11 REVERSE (R) ...2-44 Right...
... Seat and Restraint System Parts After a Crash ...1-89 Split Bench Seat ...1-11 Reporting Safety Defects ...8-12 Resetting the Power Sliding Door ...2-30 Restraints Checking ...1-88 Head ...1-6 Reminder Light ...1-23, 2-89 Replacing Parts After a Crash ...1-89 Second Row Safety Belt Stowage ...1-7 System Check ...7-31 Restraints, Child ...1-70 Resynchronization ...2-11 REVERSE (R) ...2-44 Right...


