
Owner's Manual
Page 4
Please read their owner's manual beginning from to end when they first receive their new vehicle. of the manual. Index A good place to look what the hazard is f o r o t h y e . iii These mean there something that ...
Please read their owner's manual beginning from to end when they first receive their new vehicle. of the manual. Index A good place to look what the hazard is f o r o t h y e . iii These mean there something that ...

Owner's Manual
Page 22
To make sure it the latch plate and keep pulling until can buckle you the belt. if 5. on the buckle end of the belt as you ever had to unbuckle the safety belt quickly you pull upon the shoulder belt. 1-15 If the belt stops before reaches the buckle, tilt it is positioned so you would be able to . Pull up on the latch plateto make the lap part tight, pull down on Make sure the release button the buckle is secure.If the belt isn't long enough, see "Safety Belt Extender" at the endof this section.
To make sure it the latch plate and keep pulling until can buckle you the belt. if 5. on the buckle end of the belt as you ever had to unbuckle the safety belt quickly you pull upon the shoulder belt. 1-15 If the belt stops before reaches the buckle, tilt it is positioned so you would be able to . Pull up on the latch plateto make the lap part tight, pull down on Make sure the release button the buckle is secure.If the belt isn't long enough, see "Safety Belt Extender" at the endof this section.

Owner's Manual
Page 36
To make the lap part tight, pull down on the buckle end of the belt as pull up on latch plate to make sureis secure. you ever had to unbuckle the safety belt quickly if you 1-29 Make sure the release button on the shoulder part. the it . Pull up on the buckle is not long enough, see "Safety Belt Extender" at the endof this section. If the belt stops before reaches the buckle, tilt it the latch plateand keep pulling until you can buckle it If the belt is positioned so you would be able to . 3.
To make the lap part tight, pull down on the buckle end of the belt as pull up on latch plate to make sureis secure. you ever had to unbuckle the safety belt quickly if you 1-29 Make sure the release button on the shoulder part. the it . Pull up on the buckle is not long enough, see "Safety Belt Extender" at the endof this section. If the belt stops before reaches the buckle, tilt it the latch plateand keep pulling until you can buckle it If the belt is positioned so you would be able to . 3.
Owner's Manual
Page 105
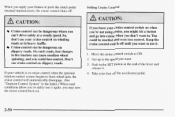
... at a steady speed.So, don't use it . Take your cruise control on slippery roads. Setting Cruise Control A -CAUTION: Cruise control can 't drive safely at the end of the lever and release it . When you want to safely use cruise controlon slippery roads. - Get up to the speed you apply your brakes...
... at a steady speed.So, don't use it . Take your cruise control on slippery roads. Setting Cruise Control A -CAUTION: Cruise control can 't drive safely at the end of the lever and release it . When you want to safely use cruise controlon slippery roads. - Get up to the speed you apply your brakes...
Owner's Manual
Page 106
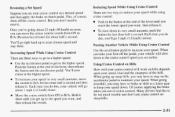
... or clutch pedal. Passing Another Vehicle While Using Cruise Control Use the accelerator pedal increase your speed, load and steepness of the lever, then release end the button and the accelerator pedal. you don't need to release it . You'll now cruise atthe higher speed. 0 To increase your speed in very... to But reset it . Hold it there until you get to keep your speed down tothe cruise control speed you set your cruise control at end of the lever until you the reach the lower speed you want , and up to your cruise control will work on steep hills. 2-51 Using...
... or clutch pedal. Passing Another Vehicle While Using Cruise Control Use the accelerator pedal increase your speed, load and steepness of the lever, then release end the button and the accelerator pedal. you don't need to release it . You'll now cruise atthe higher speed. 0 To increase your speed in very... to But reset it . Hold it there until you get to keep your speed down tothe cruise control speed you set your cruise control at end of the lever until you the reach the lower speed you want , and up to your cruise control will work on steep hills. 2-51 Using...
Owner's Manual
Page 107
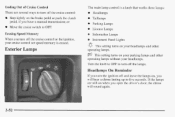
Headlamps On Reminder If you turn the ignitionoff and leave the lamps on, you will soundagain. 2-52 Turn theknob to OFF to five seconds. Ending Out of Cruise Control There are still on when open the driver's door, the chime you will hear a chime lastingup to turnoff the lamps. or ...
Headlamps On Reminder If you turn the ignitionoff and leave the lamps on, you will soundagain. 2-52 Turn theknob to OFF to five seconds. Ending Out of Cruise Control There are still on when open the driver's door, the chime you will hear a chime lastingup to turnoff the lamps. or ...
Owner's Manual
Page 114
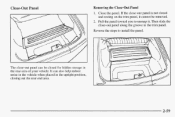
Pull the panel toward you to install panel. It can be removed. 2. Close-Out Panel Removing the Close-Out Panel 1. Reverse the steps to unsnap it cannot be closed and restingon the trim panel,it . Close the panel.If the close-out panel is not closed for hidden storage in closing out the rear end area. 2-59 Then slide the close -out panel can alsohelp reduce noise in the vehicle when placed the upright position, in of the rear area your vehicle. the The close -out panel alongthe groove inthe trim panel.
Pull the panel toward you to install panel. It can be removed. 2. Close-Out Panel Removing the Close-Out Panel 1. Reverse the steps to unsnap it cannot be closed and restingon the trim panel,it . Close the panel.If the close-out panel is not closed for hidden storage in closing out the rear end area. 2-59 Then slide the close -out panel can alsohelp reduce noise in the vehicle when placed the upright position, in of the rear area your vehicle. the The close -out panel alongthe groove inthe trim panel.
Owner's Manual
Page 154
... show which side the tape is playing. The tape player automatically begins playing the other side when it extends. Hold the tape with the open end down to work. h s h these knobs back into their stored positions when 0 Ell: The tape is tight and the player can 't be used in this knob... lightly it reaches theof end the tape. The display will mute during PREV or SEEK operation. Remove the tape. Turn the tape and repeat. over If the hubsdo not turn...
... show which side the tape is playing. The tape player automatically begins playing the other side when it extends. Hold the tape with the open end down to work. h s h these knobs back into their stored positions when 0 Ell: The tape is tight and the player can 't be used in this knob... lightly it reaches theof end the tape. The display will mute during PREV or SEEK operation. Remove the tape. Turn the tape and repeat. over If the hubsdo not turn...
Owner's Manual
Page 171
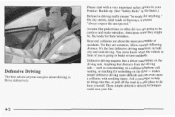
... requires thata driver concentrate on proper defensivedriving more difficult and can is going to be ready anything." for Rear-end collisionsare about driving can even cause a collision, with a very important safety device your Pontiac: Buckle up. (See "Safety Belts" the Index.) in a safe place to brake or suddenly. Anythmg that pedestrians or...
... requires thata driver concentrate on proper defensivedriving more difficult and can is going to be ready anything." for Rear-end collisionsare about driving can even cause a collision, with a very important safety device your Pontiac: Buckle up. (See "Safety Belts" the Index.) in a safe place to brake or suddenly. Anythmg that pedestrians or...
Owner's Manual
Page 172
... medical, psychological and developmental reasonsfor these deaths are the resultof someone Judgment who drinks three 12-ounce (355 ml) bottles of beer inan hour will end up with drinking and driving a is what if people do? The person would reach the adult population-- alcohol. How much "if the national tragedy. and...
... medical, psychological and developmental reasonsfor these deaths are the resultof someone Judgment who drinks three 12-ounce (355 ml) bottles of beer inan hour will end up with drinking and driving a is what if people do? The person would reach the adult population-- alcohol. How much "if the national tragedy. and...
Owner's Manual
Page 215
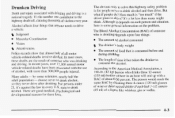
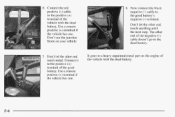
Now connect the black negative (-) cable to the dead battery. 7. Don't let the other end touch anything until the next step.The other end touch metal. I ~ to the positive(+) terminal of the vehicle with the dead battery. 5-6 has Don't use the junction block on the ...dead battery. It goes toa heavy unpainted metal on your vehicle. 8. Connect it to the positive (+) terminal of the good battery. Don't let the other end of the negative(-) cable doesn't go to the good battery's negative (-) terminal. Use a remote positive (+) terminal if the vehicle one . Usea remote ...
Now connect the black negative (-) cable to the dead battery. 7. Don't let the other end touch anything until the next step.The other end touch metal. I ~ to the positive(+) terminal of the vehicle with the dead battery. 5-6 has Don't use the junction block on the ...dead battery. It goes toa heavy unpainted metal on your vehicle. 8. Connect it to the positive (+) terminal of the good battery. Don't let the other end of the negative(-) cable doesn't go to the good battery's negative (-) terminal. Use a remote positive (+) terminal if the vehicle one . Usea remote ...

Owner's Manual
Page 221
Attach a separate safety chain around outboard end of each lower control arm. I 5-12 Damage can occur from vehicle to ground or vehicle to damage the brake and pipes hoses or the ABS sensor andwiring. To help avoid damage, install a towing dolly and raisevehicle until adequate clearance is obtained between the ground and/orwheel-lift equipment. I NOTICE: ~~~~~~~~~~ Take care not to wheel lift equipment contact. NOTICE: Towing a vehicle over rough surfaces could damage a vehicle.
Attach a separate safety chain around outboard end of each lower control arm. I 5-12 Damage can occur from vehicle to ground or vehicle to damage the brake and pipes hoses or the ABS sensor andwiring. To help avoid damage, install a towing dolly and raisevehicle until adequate clearance is obtained between the ground and/orwheel-lift equipment. I NOTICE: ~~~~~~~~~~ Take care not to wheel lift equipment contact. NOTICE: Towing a vehicle over rough surfaces could damage a vehicle.

Owner's Manual
Page 223
Attach a separate safety chain around each outboard end of frame rail on both sides. NOTICE: W e care not to damage the brake pipes and cables. 5- 14 Attach T-hook chains in frontof rear wheels in bottom of the rear axle.
Attach a separate safety chain around each outboard end of frame rail on both sides. NOTICE: W e care not to damage the brake pipes and cables. 5- 14 Attach T-hook chains in frontof rear wheels in bottom of the rear axle.
Owner's Manual
Page 236
... fails, the flat tire will create a drag that side. Thevehicle Steer to maintain lane position, and then gently brake to can putblocks at the opposite end. 5-27 A To help A rear blowout, particularly on the other roll a stop well off the engine. Gently FIRST (1) or REVERSE ( ) R. brake to a stop well out the...
... fails, the flat tire will create a drag that side. Thevehicle Steer to maintain lane position, and then gently brake to can putblocks at the opposite end. 5-27 A To help A rear blowout, particularly on the other roll a stop well off the engine. Gently FIRST (1) or REVERSE ( ) R. brake to a stop well out the...

Owner's Manual
Page 240
The jack has a bolt at the end. Attach the wheel wrench to raise the lift head a little. 5-31 Turn the wheel wrench to the right to the jack bolt. If your wheel has a bolt-on center cap, loosen the plastic caps using thewheel wrench.
The jack has a bolt at the end. Attach the wheel wrench to raise the lift head a little. 5-31 Turn the wheel wrench to the right to the jack bolt. If your wheel has a bolt-on center cap, loosen the plastic caps using thewheel wrench.

Owner's Manual
Page 295
Press the lockingclip in different ways. Rear Sidemarker To replace a rear sidemarker bulb: 1. To pull out the bulb housing, tilt the housing to remove the end with new bulb. Turn the bulb and socket counterclockwise and gently pull out. 4. Reverse the steps with the tab. 3. To remove the wiper blade assembly: 1. a Windshield Wiper Blade Replacement Replacement bladescome in different types and are removed in while sliding theblade assembly down. 6-42 Remove the screw from the sidemarker assembly. 2. Lift the wiper ann until it locks into an upright position. 2.
Press the lockingclip in different ways. Rear Sidemarker To replace a rear sidemarker bulb: 1. To pull out the bulb housing, tilt the housing to remove the end with new bulb. Turn the bulb and socket counterclockwise and gently pull out. 4. Reverse the steps with the tab. 3. To remove the wiper blade assembly: 1. a Windshield Wiper Blade Replacement Replacement bladescome in different types and are removed in while sliding theblade assembly down. 6-42 Remove the screw from the sidemarker assembly. 2. Lift the wiper ann until it locks into an upright position. 2.

Owner's Manual
Page 296
... wiper blade assembly on windshield wiperblade replacement type and length, see "Capacities and Specifications" in are the slots of the blade element. 4. Make sure that end has the two notches held the wiper blade claw. replace the To element, follow these Do caps before the element is fully inserted. by 6-43...
... wiper blade assembly on windshield wiperblade replacement type and length, see "Capacities and Specifications" in are the slots of the blade element. 4. Make sure that end has the two notches held the wiper blade claw. replace the To element, follow these Do caps before the element is fully inserted. by 6-43...

Owner's Manual
Page 298
... cold inflation pressures shown on the tire's sidewall, in small letters, near the 0 Bad handling rim flange. See the example below. 0 Bad wear When you end this example, would set 0 Too much air (overinflation), Example: you more than I mile (1.6 km). Press. 0 Needless damage from road hazards. Inflation -- Information label. For this...
... cold inflation pressures shown on the tire's sidewall, in small letters, near the 0 Bad handling rim flange. See the example below. 0 Bad wear When you end this example, would set 0 Too much air (overinflation), Example: you more than I mile (1.6 km). Press. 0 Needless damage from road hazards. Inflation -- Information label. For this...


