

Owners Manual
Page 1
2013 Owner's Manual Victory Vision Tour Ness Signature Series Victory Vision Tour
2013 Owner's Manual Victory Vision Tour Ness Signature Series Victory Vision Tour
Owners Manual
Page 8
... information contained in this manual before operating the motorcycle. Safety Safe Riding Practices WARNING Improper use with one rider and one passenger, or carrying weight exceeding the maximum weight rating can result in serious injury or death to you, your passenger and others. The label contains the Vehicle Identification Number (VIN) and Gross Vehicle Weight Rating (GVWR) and Gross Axle Weight Rating (GAWR) information. To minimize...
... information contained in this manual before operating the motorcycle. Safety Safe Riding Practices WARNING Improper use with one rider and one passenger, or carrying weight exceeding the maximum weight rating can result in serious injury or death to you, your passenger and others. The label contains the Vehicle Identification Number (VIN) and Gross Vehicle Weight Rating (GVWR) and Gross Axle Weight Rating (GAWR) information. To minimize...
Owners Manual
Page 12
... operate controls. Park the motorcycle where people are not likely to prevent unauthorized use. Parking the Motorcycle When leaving the motorcycle unattended, turn the engine off and lock the steering. Safety Use of Accessories Because VICTORY cannot test and make the motorcycle unsafe to ride and could result in severe injury to operator or passengers, as well as a kerosene heater or...
... operate controls. Park the motorcycle where people are not likely to prevent unauthorized use. Parking the Motorcycle When leaving the motorcycle unattended, turn the engine off and lock the steering. Safety Use of Accessories Because VICTORY cannot test and make the motorcycle unsafe to ride and could result in severe injury to operator or passengers, as well as a kerosene heater or...

Owners Manual
Page 14
... certain conditions. • Always exercise extreme caution whenever handling gasoline. • Always turn off with another vehicle, as possible on frame (one tiedown each side) To shock/strut mount, or rear tip-over bar (one tiedown each side) Fuel and Exhaust Safety Always heed these fuel safety warnings when refueling or servicing the fuel system. Place tiedowns as wide apart as towing will impair the motorcycle's steering and handling. •...
... certain conditions. • Always exercise extreme caution whenever handling gasoline. • Always turn off with another vehicle, as possible on frame (one tiedown each side) To shock/strut mount, or rear tip-over bar (one tiedown each side) Fuel and Exhaust Safety Always heed these fuel safety warnings when refueling or servicing the fuel system. Place tiedowns as wide apart as towing will impair the motorcycle's steering and handling. •...

Owners Manual
Page 15
... VICTORY service manual, or see your authorized VICTORY dealer for fluid leaks or damage. Use only approved replacement tires. • Always ensure proper steering head bearing adjustment. Safety Safety Maintenance WARNING Failure to perform safety maintenance as recommended can result in difficult handling and loss of repair. • Make sure all fasteners are tightened to the proper torque. Always perform the safety maintenance procedures as recommended. Regularly inspect the rear shock absorber...
... VICTORY service manual, or see your authorized VICTORY dealer for fluid leaks or damage. Use only approved replacement tires. • Always ensure proper steering head bearing adjustment. Safety Safety Maintenance WARNING Failure to perform safety maintenance as recommended can result in difficult handling and loss of repair. • Make sure all fasteners are tightened to the proper torque. Always perform the safety maintenance procedures as recommended. Regularly inspect the rear shock absorber...

Owners Manual
Page 22
... electrical circuits are off . The ignition key cannot be removed. Locked 20 Headlamp, taillight, running lights, radio and instrument lights illuminate. Hazard flashers and turn signals, brake light, windshield motor, horn and hazard (flasher). Read the engine starting procedures beginning on page 49 before starting the engine. Store the spare key in the ignition switch to the OFF position. 3. Turn the key to operate the following functions of the switch. Ignition Lock Use the ignition lock feature to the LOCK position. 4. The fuel door...
... electrical circuits are off . The ignition key cannot be removed. Locked 20 Headlamp, taillight, running lights, radio and instrument lights illuminate. Hazard flashers and turn signals, brake light, windshield motor, horn and hazard (flasher). Read the engine starting procedures beginning on page 49 before starting the engine. Store the spare key in the ignition switch to the OFF position. 3. Turn the key to operate the following functions of the switch. Ignition Lock Use the ignition lock feature to the LOCK position. 4. The fuel door...

Owners Manual
Page 32
... page 49 before shifting gears. This switch prevents the electric starter from operating when the transmission is in gear and the clutch is engaged (lever released). Interlock Switch Clutch Lever Starter Interlock Switch The starter interlock switch is located on the left handlebar. Turn Signal Switch Clutch Lever The clutch lever is located on the left handlebar. Read the engine starting the engine. Instruments, Features and Controls Turn Signal Switch The turn signal switch is located on the left turn signals. • Push the...
... page 49 before shifting gears. This switch prevents the electric starter from operating when the transmission is in gear and the clutch is engaged (lever released). Interlock Switch Clutch Lever Starter Interlock Switch The starter interlock switch is located on the left handlebar. Turn Signal Switch Clutch Lever The clutch lever is located on the left handlebar. Read the engine starting the engine. Instruments, Features and Controls Turn Signal Switch The turn signal switch is located on the left turn signals. • Push the...

Owners Manual
Page 41
.... Taillight/Brakelight Turn Signals Emergency Flashers Horn Neutral Indicator Low Oil Pressure Indicator Engine Stop/Run Switch Engine Oil Level Fuel Level Tires Brake Operation Brake Fluid Levels Brake Components Throttle Clutch (Hydraulic) Front Suspension Steering Rear Suspension Drive Belt Sidestand Fasteners Mirrors Clutch (Mechanical) Check lever operation and freeplay. 39 Verify that the low oil pressure lamp goes off . Verify that the engine WILL NOT start. Start the engine. Inspect hoses, connections, brake pads. Inspect hand grip and throttle freeplay. Inspect...
.... Taillight/Brakelight Turn Signals Emergency Flashers Horn Neutral Indicator Low Oil Pressure Indicator Engine Stop/Run Switch Engine Oil Level Fuel Level Tires Brake Operation Brake Fluid Levels Brake Components Throttle Clutch (Hydraulic) Front Suspension Steering Rear Suspension Drive Belt Sidestand Fasteners Mirrors Clutch (Mechanical) Check lever operation and freeplay. 39 Verify that the low oil pressure lamp goes off . Verify that the engine WILL NOT start. Start the engine. Inspect hoses, connections, brake pads. Inspect hand grip and throttle freeplay. Inspect...

Owners Manual
Page 46
... fluid. 3. Add DOT 4 brake fluid as stated, service the clutch lever before riding. 5. If the lever fails to perform as needed. Check for any signs of clutch fluid leaks around the hoses, fittings, fluid reservoir and slave cylinder located at or above the top of the sight glass. Squeeze the clutch lever toward the handlebar and release it should be at the rear of the clutch safety switch...
... fluid. 3. Add DOT 4 brake fluid as stated, service the clutch lever before riding. 5. If the lever fails to perform as needed. Check for any signs of clutch fluid leaks around the hoses, fittings, fluid reservoir and slave cylinder located at or above the top of the sight glass. Squeeze the clutch lever toward the handlebar and release it should be at the rear of the clutch safety switch...
Owners Manual
Page 52
... shift to a higher gear, accelerate smoothly to increase power. Simultaneously release the clutch lever and open the throttle in neutral. WARNING! See page 51. Tip: Within the recommended speed ranges (see page 51), you feel it stop in one smooth motion. Forced shifting (with closing the throttle. 8. Disengage the clutch (pull the clutch lever fully toward the handlebars to the engine, transmission and drive train...
... shift to a higher gear, accelerate smoothly to increase power. Simultaneously release the clutch lever and open the throttle in neutral. WARNING! See page 51. Tip: Within the recommended speed ranges (see page 51), you feel it stop in one smooth motion. Forced shifting (with closing the throttle. 8. Disengage the clutch (pull the clutch lever fully toward the handlebars to the engine, transmission and drive train...

Owners Manual
Page 56
... the transmission is in neutral. Move the engine stop/run switch to neutral or disengage the clutch. Tip: A momentary clicking sound from traffic. 1. Shift to the STOP position. 3. Move the ignition switch to flammable materials. Remove the ignition key. When fully stopped, shift into soft asphalt and the motorcycle may fall. Remove the ignition key. Fully extend the sidestand. 4. Always park the motorcycle clear of control...
... the transmission is in neutral. Move the engine stop/run switch to neutral or disengage the clutch. Tip: A momentary clicking sound from traffic. 1. Shift to the STOP position. 3. Move the ignition switch to flammable materials. Remove the ignition key. When fully stopped, shift into soft asphalt and the motorcycle may fall. Remove the ignition key. Fully extend the sidestand. 4. Always park the motorcycle clear of control...

Owners Manual
Page 70
... smoothly, inspect the wheel bearings, rear axle, belt adjustment and wheel alignment. If there is stable when elevated. Tube 3. See the VICTORY Service Manual or your VICTORY dealer for service if you detect noise or movement at the wheel bearings. 7. With the transmission in the operator's seat and slowly bounce the rear suspension a few times. Injury may cause seal wear or leakage. Front Fork / Suspension Inspection wheel bearing area 1. Fork...
... smoothly, inspect the wheel bearings, rear axle, belt adjustment and wheel alignment. If there is stable when elevated. Tube 3. See the VICTORY Service Manual or your VICTORY dealer for service if you detect noise or movement at the wheel bearings. 7. With the transmission in the operator's seat and slowly bounce the rear suspension a few times. Injury may cause seal wear or leakage. Front Fork / Suspension Inspection wheel bearing area 1. Fork...
Owners Manual
Page 92
... load side of the main circuit breaker (under the cover behind the oil cooler), and connect the ground wire to do so by the Service Manual. • DO NOT power any accessories from the diagnostic connector (inside the left side of electrical signals and possible system malfunction. The trunk power jack is powered at all times. • If it is in the glove compartment (or...
... load side of the main circuit breaker (under the cover behind the oil cooler), and connect the ground wire to do so by the Service Manual. • DO NOT power any accessories from the diagnostic connector (inside the left side of electrical signals and possible system malfunction. The trunk power jack is powered at all times. • If it is in the glove compartment (or...
Owners Manual
Page 94
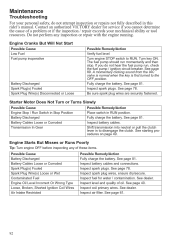
See page 89. Battery Discharged Spark Plug(s) Fouled Spark Plug Wire(s) Disconnected or Loose Starter Motor Does Not Turn or Turns Slowly Possible Cause Engine Stop / Run Switch in Stop Position Battery Discharged Battery Cables Loose or Corroded Transmission In Gear Possible Remedy/Action Place switch in to the OFF position. Inspect level and quality of a problem or if the inspection / repair exceeds your personal safety, do not hear the fuel pump run momentarily and...
See page 89. Battery Discharged Spark Plug(s) Fouled Spark Plug Wire(s) Disconnected or Loose Starter Motor Does Not Turn or Turns Slowly Possible Cause Engine Stop / Run Switch in Stop Position Battery Discharged Battery Cables Loose or Corroded Transmission In Gear Possible Remedy/Action Place switch in to the OFF position. Inspect level and quality of a problem or if the inspection / repair exceeds your personal safety, do not hear the fuel pump run momentarily and...
Owners Manual
Page 95
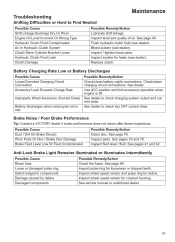
... wheel speed sensor and pulse ring for leaks (see dealer). See page 40. Maintenance Troubleshooting Shifting Difficulties or Hard to Find Neutral Possible Cause Shift Linkage Bushings Dry Or Worn Engine Oil Level Incorrect Or Wrong Type Hydraulic Clutch Fluid Contaminated Air In Hydraulic Clutch System Clutch Slave Cylinder Bracket Loose Hydraulic Clutch Fluid Leak Clutch Damage Possible Remedy/Action Lubricate shift linkage. Use ACC position and limit accessory operation when engine is...
... wheel speed sensor and pulse ring for leaks (see dealer). See page 40. Maintenance Troubleshooting Shifting Difficulties or Hard to Find Neutral Possible Cause Shift Linkage Bushings Dry Or Worn Engine Oil Level Incorrect Or Wrong Type Hydraulic Clutch Fluid Contaminated Air In Hydraulic Clutch System Clutch Slave Cylinder Bracket Loose Hydraulic Clutch Fluid Leak Clutch Damage Possible Remedy/Action Lubricate shift linkage. Use ACC position and limit accessory operation when engine is...

Owners Manual
Page 110
Specifications All Vision Models Wheels And Tires Front Wheel Type / Size Front Tire Type / Size Rear Wheel Type / Size Rear Tire Type / Size Electrical Alternator Battery Lights Headlamp (High / Low) Driving Lamp (Standard) Driving Lamp (HID) Turn / Tail / Brake Lamp License Plate Lamp Trunk Lamps (Running Lights) Courtesy Lamp (trunk, if equipped) Fuses / Circuit Breakers Left Fuse Box Ignition Headlight Gauges Radio Secondary Lights Horn Turn Signal / Brake Right Fuse Box Engine Windshield (Electric) Fuel Pump / Ignition Coil Anti-Lock Brake System 15A Breaker 20A 15A 30A (2) 10A Breaker ...
Specifications All Vision Models Wheels And Tires Front Wheel Type / Size Front Tire Type / Size Rear Wheel Type / Size Rear Tire Type / Size Electrical Alternator Battery Lights Headlamp (High / Low) Driving Lamp (Standard) Driving Lamp (HID) Turn / Tail / Brake Lamp License Plate Lamp Trunk Lamps (Running Lights) Courtesy Lamp (trunk, if equipped) Fuses / Circuit Breakers Left Fuse Box Ignition Headlight Gauges Radio Secondary Lights Horn Turn Signal / Brake Right Fuse Box Engine Windshield (Electric) Fuel Pump / Ignition Coil Anti-Lock Brake System 15A Breaker 20A 15A 30A (2) 10A Breaker ...

Owners Manual
Page 130
.... Audio works in the ACC or ON position to use ) or to ensure navigation instructions are set volume levels within the NAV MP3 unit. The audio integration kit must set too low. Changing to NAV MP3 Mode The ignition key must be difficult to AUX. Press and release the S/E button on the left control, or SRC on AUX MODE + the console panel...
.... Audio works in the ACC or ON position to use ) or to ensure navigation instructions are set volume levels within the NAV MP3 unit. The audio integration kit must set too low. Changing to NAV MP3 Mode The ignition key must be difficult to AUX. Press and release the S/E button on the left control, or SRC on AUX MODE + the console panel...

Owners Manual
Page 132
... Ignition Key...20 Ignition Key Number...16 Ignition Lock ...20 Ignition Switch ...20-21 Ignition Switch Lubrication...82 Indicator Lamps...23-24 Information Labels ...15 Instrument Cluster ...22 Intercom System ...118-121 iPod Playlists ...124 iPod Tuning ...124 F Fastener Inspection ...46, 82 Fastener Torques ...91 Fluid Change, Engine Oil ...60-61 Fluid Level Engine Oil ...40 Front Brake ...41 Front Brake Fluid...75 Hydraulic Clutch Fluid ...71-72 Rear Brake ...42 Rear Brake Fluid ...75 Fork Inspection ...68 Fuel Door Lock ...21 Fuel Gauge...22 Fuel Handling Safety ...12 Fuel...
... Ignition Key...20 Ignition Key Number...16 Ignition Lock ...20 Ignition Switch ...20-21 Ignition Switch Lubrication...82 Indicator Lamps...23-24 Information Labels ...15 Instrument Cluster ...22 Intercom System ...118-121 iPod Playlists ...124 iPod Tuning ...124 F Fastener Inspection ...46, 82 Fastener Torques ...91 Fluid Change, Engine Oil ...60-61 Fluid Level Engine Oil ...40 Front Brake ...41 Front Brake Fluid...75 Hydraulic Clutch Fluid ...71-72 Rear Brake ...42 Rear Brake Fluid ...75 Fork Inspection ...68 Fuel Door Lock ...21 Fuel Gauge...22 Fuel Handling Safety ...12 Fuel...

Owners Manual
Page 133
...Road Testing ...57, 91 Running Light Bulb Replacement ...86 S Saddlebag Lock ...36 Saddlebags, Using Safely ...11 Safety Gear ...9 Safety Labels ...15 Safety Symbols ...5 Safety While Servicing ...56 Seat Heater Switches ...28 Seat Removal/Installation ...83 Service Manual ...94 Service Procedure Safety ...56 Shift Points ...51 Shifting Gears ...50-51 Sidestand...36 Sidestand Lubrication ...82 Signal Words ...5 Spark Plugs ...78 Speedometer ...22 Squelch ...119 N NAV/MP3 Mode, Changing ...128 Navigation MP3 ...128 O Odometer ...26 Oil Change, Engine Oil/Filter ...60-61 Oil Level, Engine Oil...
...Road Testing ...57, 91 Running Light Bulb Replacement ...86 S Saddlebag Lock ...36 Saddlebags, Using Safely ...11 Safety Gear ...9 Safety Labels ...15 Safety Symbols ...5 Safety While Servicing ...56 Seat Heater Switches ...28 Seat Removal/Installation ...83 Service Manual ...94 Service Procedure Safety ...56 Shift Points ...51 Shifting Gears ...50-51 Sidestand...36 Sidestand Lubrication ...82 Signal Words ...5 Spark Plugs ...78 Speedometer ...22 Squelch ...119 N NAV/MP3 Mode, Changing ...128 Navigation MP3 ...128 O Odometer ...26 Oil Change, Engine Oil/Filter ...60-61 Oil Level, Engine Oil...

Owners Manual
Page 134
... Type ...77 Tire Condition ...41 Tire Pressure ...41 Tire Replacement Standard ...77 Tread Depth ...77 Wheel Inspection ...76 Tone Ring/Sensor Inspection, ABS...76 Tool Kit ...37 Transporting the Motorcycle ...12 Trim Panel Installation, Street ...84 Trim Panel Removal, Street ...84 Trim Panel Removal, Windshield ...83 Trip Odometer ...26 Troubleshooting...92-93 Trunk Door Lock ...36 Trunk Installation ...85 Trunk Removal ...85 Trunk, Using Safely...11 Turn Signal Bulb Replacement ...86-87 Turn Signal Switch ...30 V VICTORY Cleaning Products ...95 VIN ...15...
... Type ...77 Tire Condition ...41 Tire Pressure ...41 Tire Replacement Standard ...77 Tread Depth ...77 Wheel Inspection ...76 Tone Ring/Sensor Inspection, ABS...76 Tool Kit ...37 Transporting the Motorcycle ...12 Trim Panel Installation, Street ...84 Trim Panel Removal, Street ...84 Trim Panel Removal, Windshield ...83 Trip Odometer ...26 Troubleshooting...92-93 Trunk Door Lock ...36 Trunk Installation ...85 Trunk Removal ...85 Trunk, Using Safely...11 Turn Signal Bulb Replacement ...86-87 Turn Signal Switch ...30 V VICTORY Cleaning Products ...95 VIN ...15...