
Owners Manual
Page 10
... information in this rider's manual. • Observe all break-in procedures as outlined in the break-in serious engine damage. • Some VICTORY motorcycles include saddlebags, a windshield, a trunk, or a passenger backrest as information about general motorcycle safety. Safety Safe Riding Practices WARNING Improper use with one rider and one passenger, or carrying weight exceeding the maximum weight rating can result in section beginning...
... information in this rider's manual. • Observe all break-in procedures as outlined in the break-in serious engine damage. • Some VICTORY motorcycles include saddlebags, a windshield, a trunk, or a passenger backrest as information about general motorcycle safety. Safety Safe Riding Practices WARNING Improper use with one rider and one passenger, or carrying weight exceeding the maximum weight rating can result in section beginning...
Owners Manual
Page 14
... motorcycle. Safety Use of Accessories Because VICTORY cannot test and make the motorcycle unsafe to ride and could ignite combustible materials. See page 92. • Use only genuine VICTORY accessories designed for determining that exceed the capacity of the motorcycle's electrical system. Parking the Motorcycle When leaving the motorcycle unattended, turn the engine off and lock the steering. Never install higher wattage light bulbs than...
... motorcycle. Safety Use of Accessories Because VICTORY cannot test and make the motorcycle unsafe to ride and could ignite combustible materials. See page 92. • Use only genuine VICTORY accessories designed for determining that exceed the capacity of the motorcycle's electrical system. Parking the Motorcycle When leaving the motorcycle unattended, turn the engine off and lock the steering. Never install higher wattage light bulbs than...

Owners Manual
Page 16
... using the handlebars. Place tiedowns as wide apart as towing will impair the motorcycle's steering and handling. • Position and restrain the motorcycle so it run in a fire hazard or damage to one tiedown each side) To shock/strut mount, or rear tip-over bar (one side, gasoline may leak from the fuel tank and result in an enclosed area. • Never inhale...
... using the handlebars. Place tiedowns as wide apart as towing will impair the motorcycle's steering and handling. • Position and restrain the motorcycle so it run in a fire hazard or damage to one tiedown each side) To shock/strut mount, or rear tip-over bar (one side, gasoline may leak from the fuel tank and result in an enclosed area. • Never inhale...

Owners Manual
Page 17
...; Always maintain proper tire pressure, tread condition and wheel and tire balance. Safety Safety Maintenance WARNING Failure to perform safety maintenance as recommended can result in difficult handling and loss of repair. • Make sure all legally required equipment is equivalent to Canadian ICES-002. 13 See page 47. • Perform all fasteners are tightened to the proper torque. Regularly inspect the rear shock absorber and the...
...; Always maintain proper tire pressure, tread condition and wheel and tire balance. Safety Safety Maintenance WARNING Failure to perform safety maintenance as recommended can result in difficult handling and loss of repair. • Make sure all legally required equipment is equivalent to Canadian ICES-002. 13 See page 47. • Perform all fasteners are tightened to the proper torque. Regularly inspect the rear shock absorber and the...
Owners Manual
Page 34
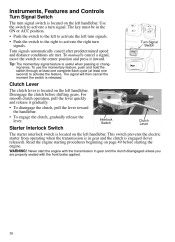
... the left handlebar. Disengage the clutch before starting the engine. WARNING! Turn Signal Switch Clutch Lever The clutch lever is released. To manually cancel a signal, move the switch to activate the feature. Interlock Switch Clutch Lever Starter Interlock Switch The starter interlock switch is located on the left handlebar. Instruments, Features and Controls Turn Signal Switch The turn signal switch is located on the left handlebar. Never start the engine with the front brake applied. 30 For smooth clutch operation, pull the lever...
... the left handlebar. Disengage the clutch before starting the engine. WARNING! Turn Signal Switch Clutch Lever The clutch lever is released. To manually cancel a signal, move the switch to activate the feature. Interlock Switch Clutch Lever Starter Interlock Switch The starter interlock switch is located on the left handlebar. Instruments, Features and Controls Turn Signal Switch The turn signal switch is located on the left handlebar. Never start the engine with the front brake applied. 30 For smooth clutch operation, pull the lever...

Owners Manual
Page 43
... Flashers Horn Neutral Indicator Low Oil Pressure Indicator Engine Stop/Run Switch Engine Oil Level Fuel Level Tires Brake Operation Brake Fluid Levels Brake Components Throttle Clutch (Hydraulic) Front Suspension Steering Rear Suspension Drive Belt Sidestand Fasteners Mirrors Clutch (Mechanical) Check lever operation and freeplay. 39 Switch to cancel the signal. Inspect hoses, connections, brake pads. Move the stop flashing. Adjust for proper rear view. Return the ignition key to the STOP position. Verify that the signals and the indicator light stop /run switch to RUN...
... Flashers Horn Neutral Indicator Low Oil Pressure Indicator Engine Stop/Run Switch Engine Oil Level Fuel Level Tires Brake Operation Brake Fluid Levels Brake Components Throttle Clutch (Hydraulic) Front Suspension Steering Rear Suspension Drive Belt Sidestand Fasteners Mirrors Clutch (Mechanical) Check lever operation and freeplay. 39 Switch to cancel the signal. Inspect hoses, connections, brake pads. Move the stop flashing. Adjust for proper rear view. Return the ignition key to the STOP position. Verify that the signals and the indicator light stop /run switch to RUN...

Owners Manual
Page 48
.... Check for any signs of clutch fluid leaks around the hoses, fittings, fluid reservoir and slave cylinder located at or above the top of the left engine (primary) cover. It should move freely and smoothly, and it should be at the rear of the sight glass. If the lever fails to perform as stated, service the clutch lever before riding. 5. Position the...
.... Check for any signs of clutch fluid leaks around the hoses, fittings, fluid reservoir and slave cylinder located at or above the top of the left engine (primary) cover. It should move freely and smoothly, and it should be at the rear of the sight glass. If the lever fails to perform as stated, service the clutch lever before riding. 5. Position the...
Owners Manual
Page 54
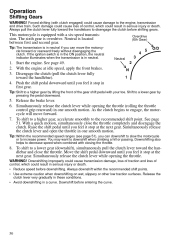
... transmission is equipped with closing the throttle. 8. Overdrive (6th Gear) 4 Neutral 5 O/D 3 2 N 1 1. With the engine at the next gear. Simultaneously release the clutch lever while opening the throttle. To shift to a higher gear, accelerate smoothly to downshift when climbing a hill or passing. Simultaneously release the clutch lever while opening the throttle (rolling the throttle control grip rearward) in neutral if you feel it stop at idle speed, apply the front brakes. 3. WARNING...
... transmission is equipped with closing the throttle. 8. Overdrive (6th Gear) 4 Neutral 5 O/D 3 2 N 1 1. With the engine at the next gear. Simultaneously release the clutch lever while opening the throttle. To shift to a higher gear, accelerate smoothly to downshift when climbing a hill or passing. Simultaneously release the clutch lever while opening the throttle (rolling the throttle control grip rearward) in neutral if you feel it stop at idle speed, apply the front brakes. 3. WARNING...

Owners Manual
Page 58
... death. Remove the ignition key. Fully extend the sidestand. 4. If the engine stops unexpectedly while the motorcycle is first turned to the OFF position. CAUTION! WARNING! Parking Choose a firm level surface to a safe location off the road and away from the IAC valve is normal when the key is moving could cause loss of rear wheel traction or engine and transmission damage, which could...
... death. Remove the ignition key. Fully extend the sidestand. 4. If the engine stops unexpectedly while the motorcycle is first turned to the OFF position. CAUTION! WARNING! Parking Choose a firm level surface to a safe location off the road and away from the IAC valve is normal when the key is moving could cause loss of rear wheel traction or engine and transmission damage, which could...

Owners Manual
Page 74
... the wheel bearings, rear axle, belt adjustment and wheel alignment. Fork oil condition and level affects front suspension performance and internal component wear. See the VICTORY Service Manual or your VICTORY dealer for service if you detect noise or movement at the wheel bearings. 7. Maintenance Swing Arm / Rear Axle Inspection 1. Make sure the suspension moves freely without binding. CAUTION! With the transmission in the operator's seat and slowly bounce the rear suspension a few times. Front Fork / Suspension Inspection wheel bearing area...
... the wheel bearings, rear axle, belt adjustment and wheel alignment. Fork oil condition and level affects front suspension performance and internal component wear. See the VICTORY Service Manual or your VICTORY dealer for service if you detect noise or movement at the wheel bearings. 7. Maintenance Swing Arm / Rear Axle Inspection 1. Make sure the suspension moves freely without binding. CAUTION! With the transmission in the operator's seat and slowly bounce the rear suspension a few times. Front Fork / Suspension Inspection wheel bearing area...
Owners Manual
Page 96
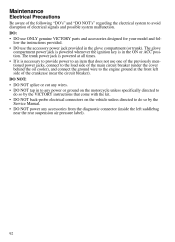
... power or ground on the motorcycle unless specifically directed to do so by the Service Manual. • DO NOT power any accessories from the diagnostic connector (inside the left side of the crankcase (near the rear suspension air pressure label). 92 The glove compartment power jack is powered whenever the ignition key is necessary to provide power to do so by the VICTORY instructions that come with the kit...
... power or ground on the motorcycle unless specifically directed to do so by the Service Manual. • DO NOT power any accessories from the diagnostic connector (inside the left side of the crankcase (near the rear suspension air pressure label). 92 The glove compartment power jack is powered whenever the ignition key is necessary to provide power to do so by the VICTORY instructions that come with the kit...
Owners Manual
Page 98
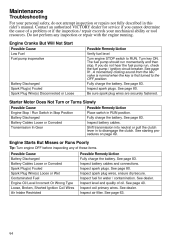
... Cause Battery Discharged Battery Cables Loose or Corroded Spark Plug(s) Fouled Spark Plug Wire(s) Loose or Wet Contaminated Fuel Engine Oil Level Incorrect Or Wrong Type Loose, Broken, Shorted Ignition Coil Wires Air Intake Restricted Possible Remedy/Action Fully charge the battery. See dealer. Inspect air filter. Turn key ON. See page 80. Inspect battery cables and connections. The fuel pump should run , check the fuel pump / ignition circuit breaker. Inspect spark plugs. Be sure spark plug wires are securely fastened. See starting...
... Cause Battery Discharged Battery Cables Loose or Corroded Spark Plug(s) Fouled Spark Plug Wire(s) Loose or Wet Contaminated Fuel Engine Oil Level Incorrect Or Wrong Type Loose, Broken, Shorted Ignition Coil Wires Air Intake Restricted Possible Remedy/Action Fully charge the battery. See dealer. Inspect air filter. Turn key ON. See page 80. Inspect battery cables and connections. The fuel pump should run , check the fuel pump / ignition circuit breaker. Inspect spark plugs. Be sure spark plug wires are securely fastened. See starting...

Owners Manual
Page 99
... Accessory Load Exceeds Charge Rate Improperly Wired Accessory (Current Draw) Battery discharges when motorcycle not in use. See dealer to check key OFF current draw. Inspect level and quality of oil. Maintenance Troubleshooting Shifting Difficulties or Hard to Find Neutral Possible Cause Shift Linkage Bushings Dry Or Worn Engine Oil Level Incorrect Or Wrong Type Hydraulic Clutch Fluid Contaminated Air In Hydraulic Clutch System Clutch Slave Cylinder Bracket Loose Hydraulic Clutch Fluid Leak Clutch...
... Accessory Load Exceeds Charge Rate Improperly Wired Accessory (Current Draw) Battery discharges when motorcycle not in use. See dealer to check key OFF current draw. Inspect level and quality of oil. Maintenance Troubleshooting Shifting Difficulties or Hard to Find Neutral Possible Cause Shift Linkage Bushings Dry Or Worn Engine Oil Level Incorrect Or Wrong Type Hydraulic Clutch Fluid Contaminated Air In Hydraulic Clutch System Clutch Slave Cylinder Bracket Loose Hydraulic Clutch Fluid Leak Clutch...
Owners Manual
Page 110
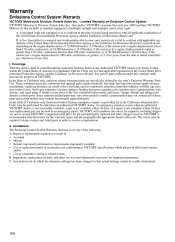
... California Air Resources Board for the warranty repair and the geographically appropriate hourly labor rate. These warranted parts are specifically defined by other services and adjustments necessary for required maintenance C. fuel injection system; fuel tank cap for all of 30,000 kilometers (18,641miles), if the motorcycle's engine displacement is not complete within 30 days. ignition coils; An emergency situation occurs when an authorized VICTORY...
... California Air Resources Board for the warranty repair and the geographically appropriate hourly labor rate. These warranted parts are specifically defined by other services and adjustments necessary for required maintenance C. fuel injection system; fuel tank cap for all of 30,000 kilometers (18,641miles), if the motorcycle's engine displacement is not complete within 30 days. ignition coils; An emergency situation occurs when an authorized VICTORY...
Owners Manual
Page 115
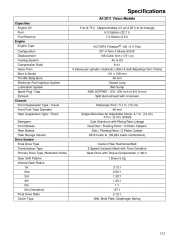
... cc) Air & Oil 9.4:1 4 Valves per cylinder. Specifications All 2011 Vision Models Capacities Engine Oil Fuel Fuel Reserve Engine Engine Type Configuration Displacement Cooling System Compression Ratio Valve Train Bore & Stroke Throttle Body Bore Electronic Fuel Injection System Lubrication System Spark Plug / Gap Exhaust Chassis Front Suspension Type / Travel Front Fork Tube Diameter Rear Suspension Type / Travel Swingarm Front Brakes Rear Brakes Total Storage Volume Drive System Final Drive Type Transmission Type Primary Drive Type (Reduction Ratio) Gear Shift Pattern Internal Gear Ratios...
... cc) Air & Oil 9.4:1 4 Valves per cylinder. Specifications All 2011 Vision Models Capacities Engine Oil Fuel Fuel Reserve Engine Engine Type Configuration Displacement Cooling System Compression Ratio Valve Train Bore & Stroke Throttle Body Bore Electronic Fuel Injection System Lubrication System Spark Plug / Gap Exhaust Chassis Front Suspension Type / Travel Front Fork Tube Diameter Rear Suspension Type / Travel Swingarm Front Brakes Rear Brakes Total Storage Volume Drive System Final Drive Type Transmission Type Primary Drive Type (Reduction Ratio) Gear Shift Pattern Internal Gear Ratios...

Owners Manual
Page 116
Specifications All 2011 Vision Models Wheels And Tires Front Wheel Type / Size Front Tire Type / Size Rear Wheel Type / Size Rear Tire Type / Size Electrical Alternator Battery Lights Headlamp (High / Low) Driving Lamp (Standard) Driving Lamp (HID) Turn / Tail / Brake Lamp License Plate Lamp Trunk Lamps (Running Lights) Courtesy Lamp (trunk, if equipped) Fuses / Circuit Breakers Left Fuse Box Ignition Headlight Gauges Radio Secondary Lights Horn Turn Signal / Brake Right Fuse Box Engine Windshield (Electric) Fuel Pump / Ignition Coil Anti-Lock Brake System 15A Breaker 20A 15A 30A (2) 10A ...
Specifications All 2011 Vision Models Wheels And Tires Front Wheel Type / Size Front Tire Type / Size Rear Wheel Type / Size Rear Tire Type / Size Electrical Alternator Battery Lights Headlamp (High / Low) Driving Lamp (Standard) Driving Lamp (HID) Turn / Tail / Brake Lamp License Plate Lamp Trunk Lamps (Running Lights) Courtesy Lamp (trunk, if equipped) Fuses / Circuit Breakers Left Fuse Box Ignition Headlight Gauges Radio Secondary Lights Horn Turn Signal / Brake Right Fuse Box Engine Windshield (Electric) Fuel Pump / Ignition Coil Anti-Lock Brake System 15A Breaker 20A 15A 30A (2) 10A ...

Owners Manual
Page 136
... the "media volume" on the console repeatedly to toggle to NAV MP3 Mode The ignition key must be no interface with all unit features and operation. Volume settings in the AUX setting, but navigation instructions may need to turn the audio system on the console panel, until AUX is fully functional without the kit installed, but there will be in...
... the "media volume" on the console repeatedly to toggle to NAV MP3 Mode The ignition key must be no interface with all unit features and operation. Volume settings in the AUX setting, but navigation instructions may need to turn the audio system on the console panel, until AUX is fully functional without the kit installed, but there will be in...

Owners Manual
Page 138
...71-72 Rear Brake ...42 Rear Brake Fluid ...75 Fork Inspection ...68 Fuel Door Lock ...21 Fuel Gauge...22 Fuel Handling Safety ...12 Fuel Level ...40 Fuel Recommendation ...107 Fuel System Inspection ...69 Fuel System, Priming...48 Fueling ...48 Fuse Boxes...89 Fuse Replacement ...89 K Key Number ...16 Key, Ignition ...20 L Labels, Information ...15 Labels, Safety ...15 Leather, Rubber and Vinyl Care ...99 Lights Brake Light Bulb Replacement ...87 Headlamp Aim Adjustment ...88 Headlamp Bulb Replacement ...86 Running Light Bulb Replacement ...86 Taillight Bulb Replacement...87 Turn Signal Bulb...
...71-72 Rear Brake ...42 Rear Brake Fluid ...75 Fork Inspection ...68 Fuel Door Lock ...21 Fuel Gauge...22 Fuel Handling Safety ...12 Fuel Level ...40 Fuel Recommendation ...107 Fuel System Inspection ...69 Fuel System, Priming...48 Fueling ...48 Fuse Boxes...89 Fuse Replacement ...89 K Key Number ...16 Key, Ignition ...20 L Labels, Information ...15 Labels, Safety ...15 Leather, Rubber and Vinyl Care ...99 Lights Brake Light Bulb Replacement ...87 Headlamp Aim Adjustment ...88 Headlamp Bulb Replacement ...86 Running Light Bulb Replacement ...86 Taillight Bulb Replacement...87 Turn Signal Bulb...

Owners Manual
Page 139
...122 Rear Axle Inspection ...68 Refueling Safety ...12 Reverse Operation ...55 Riding Safety ...6-9 Road Testing ...57, 91 Running Light Bulb Replacement ...86 S Saddlebag Lock ...36 Saddlebags, Using Safely ...11 Safety Defects, Reporting to NHTSA ...15 Safety Gear ...9 Safety Labels ...15 Safety Symbols ...5 Safety While Servicing ...56 Seat Heater Switches ...28 Seat Removal/Installation ...83 Service Manual ...94 Service Procedure Safety ...56 Shift Points ...51 Shifting Gears ...50-51 Sidestand...36 Sidestand Inspection ...46 Sidestand Lubrication ...82 Signal Words ...5 Spark Plugs ...78...
...122 Rear Axle Inspection ...68 Refueling Safety ...12 Reverse Operation ...55 Riding Safety ...6-9 Road Testing ...57, 91 Running Light Bulb Replacement ...86 S Saddlebag Lock ...36 Saddlebags, Using Safely ...11 Safety Defects, Reporting to NHTSA ...15 Safety Gear ...9 Safety Labels ...15 Safety Symbols ...5 Safety While Servicing ...56 Seat Heater Switches ...28 Seat Removal/Installation ...83 Service Manual ...94 Service Procedure Safety ...56 Shift Points ...51 Shifting Gears ...50-51 Sidestand...36 Sidestand Inspection ...46 Sidestand Lubrication ...82 Signal Words ...5 Spark Plugs ...78...

Owners Manual
Page 140
...Switch ...27 Headlamp Switch...29 Horn Switch ...29 Ignition Switch ...20-21 Ignition Switch Lubrication...82 Mode Button ...28 Seat Heater Switches ...28 Starter Interlock Switch ...30 Turn Signal Switch ...30 Windshield Adjustment Switch ...29 T Transporting the Motorcycle ...12 Trim Panel Installation, Street ...84 Trim Panel Removal, Street ...84 Trim Panel Removal, Windshield ...83 Trip Odometer ...26 Troubleshooting...92-93 Trunk Door Lock ...36 Trunk Installation ...85 Trunk Removal ...85 Trunk, Using Safely...11 Turn Signal Bulb Replacement ...86-87 Turn Signal Switch ...30 V VICTORY...
...Switch ...27 Headlamp Switch...29 Horn Switch ...29 Ignition Switch ...20-21 Ignition Switch Lubrication...82 Mode Button ...28 Seat Heater Switches ...28 Starter Interlock Switch ...30 Turn Signal Switch ...30 Windshield Adjustment Switch ...29 T Transporting the Motorcycle ...12 Trim Panel Installation, Street ...84 Trim Panel Removal, Street ...84 Trim Panel Removal, Windshield ...83 Trip Odometer ...26 Troubleshooting...92-93 Trunk Door Lock ...36 Trunk Installation ...85 Trunk Removal ...85 Trunk, Using Safely...11 Turn Signal Bulb Replacement ...86-87 Turn Signal Switch ...30 V VICTORY...