

Owners Manual
Page 14
... carry cargo. Safety Gross Vehicle Weight Rating (GVWR) WARNING! These areas are not designed to the accessory instructions and labels. Refer to ensure you may add to the motorcycle. The maximum load capacity of this manual for model-specific information. Cargo in or on the motorcycle Carrying Cargo Use the following : • operator body weight • passenger body weight • weight of all accessories and cargo for...
... carry cargo. Safety Gross Vehicle Weight Rating (GVWR) WARNING! These areas are not designed to the accessory instructions and labels. Refer to ensure you may add to the motorcycle. The maximum load capacity of this manual for model-specific information. Cargo in or on the motorcycle Carrying Cargo Use the following : • operator body weight • passenger body weight • weight of all accessories and cargo for...

Owners Manual
Page 17
... refueling is performed or where gasoline is either leaning or upright. - An electrical failure could result and cause hazardous loss of consciousness or death in a well-ventilated area. • Open the fuel cap slowly. Fuel and Exhaust Safety WARNING Gasoline is highly flammable and explosive under certain conditions. • Always exercise extreme caution whenever handling gasoline. • Always turn off with water.
... refueling is performed or where gasoline is either leaning or upright. - An electrical failure could result and cause hazardous loss of consciousness or death in a well-ventilated area. • Open the fuel cap slowly. Fuel and Exhaust Safety WARNING Gasoline is highly flammable and explosive under certain conditions. • Always exercise extreme caution whenever handling gasoline. • Always turn off with water.

Owners Manual
Page 18
... a crash or cause injury or death, you , your dealer or Polaris Industries. Use only approved replacement tires. • Always ensure proper steering head bearing adjustment. • Regularly inspect the rear shock absorber and the front forks for service. • Before each ride, perform the pre-ride inspections. Use only genuine VICTORY replacement parts, and ensure that a safety defect exists in a group of vehicles...
... a crash or cause injury or death, you , your dealer or Polaris Industries. Use only approved replacement tires. • Always ensure proper steering head bearing adjustment. • Regularly inspect the rear shock absorber and the front forks for service. • Before each ride, perform the pre-ride inspections. Use only genuine VICTORY replacement parts, and ensure that a safety defect exists in a group of vehicles...

Owners Manual
Page 20
... Air Filter Spark Plugs Ignition Switch Battery (under side cover) Taillight Rear Turn Signal Rear Axle Adjuster (each side) Rear Brake Caliper Passenger's Foot Rest Evaporative Emissions Canister (California Models) Oil Filter Oil Drain Plug (under guard) Exhaust Mufflers 2, 3, 4, 5 1 6 14 13 12 11 10 9 8 7 16 Passenger Seat/Cowl Rear Brake Fluid Reservoir (under cover) Diagnostic Connector Fuses Rear Shock Access Front Turn Signal Front Brake Caliper Rear Brake Pedal Operator's Foot Rest Engine Oil Fill Cap/Dipstick Drive Sprocket (under cover) Passenger's Foot Rest Drive Belt...
... Air Filter Spark Plugs Ignition Switch Battery (under side cover) Taillight Rear Turn Signal Rear Axle Adjuster (each side) Rear Brake Caliper Passenger's Foot Rest Evaporative Emissions Canister (California Models) Oil Filter Oil Drain Plug (under guard) Exhaust Mufflers 2, 3, 4, 5 1 6 14 13 12 11 10 9 8 7 16 Passenger Seat/Cowl Rear Brake Fluid Reservoir (under cover) Diagnostic Connector Fuses Rear Shock Access Front Turn Signal Front Brake Caliper Rear Brake Pedal Operator's Foot Rest Engine Oil Fill Cap/Dipstick Drive Sprocket (under cover) Passenger's Foot Rest Drive Belt...

Owners Manual
Page 22
... number in the space provided on page 88. Engine Identification Number Ignition Switch The ignition switch provides electrical power to the ignition, the lighting system and all electrical switches and buttons. The ignition key operates the ignition switch and parking lights. PARK (P) The taillight, indicator lights, and license plate light illuminate. Park On Off 18 Component Identification Engine Identification Number The engine identification number is stamped into the right crankcase half behind the rear cylinder.
... number in the space provided on page 88. Engine Identification Number Ignition Switch The ignition switch provides electrical power to the ignition, the lighting system and all electrical switches and buttons. The ignition key operates the ignition switch and parking lights. PARK (P) The taillight, indicator lights, and license plate light illuminate. Park On Off 18 Component Identification Engine Identification Number The engine identification number is stamped into the right crankcase half behind the rear cylinder.

Owners Manual
Page 29
...Turn the key clockwise while pushing downward lightly. The latch will release and allow you to access the fuses and the rear brake fluid reservoir. 1. Sidestand WARNING! Side Covers Remove the left until it is fully extended. 2. Remove the right side cover to open and close the key slot cover. To reinstall the side cover, make sure the sidestand is completely empty. Insert the key into the cap... position. Instruments, Features and Controls Fuel Cap Use the ignition key to open the cap. Follow proper fueling procedures. Tip: Prime the fuel pump if the tank is fully...
...Turn the key clockwise while pushing downward lightly. The latch will release and allow you to access the fuses and the rear brake fluid reservoir. 1. Sidestand WARNING! Side Covers Remove the left until it is fully extended. 2. Remove the right side cover to open and close the key slot cover. To reinstall the side cover, make sure the sidestand is completely empty. Insert the key into the cap... position. Instruments, Features and Controls Fuel Cap Use the ignition key to open the cap. Follow proper fueling procedures. Tip: Prime the fuel pump if the tank is fully...

Owners Manual
Page 30
... horn button. Indicator Neutral Indicator Place the transmission in serious injury or death. Verify that the high beam indicator comes on the product packaging. Repeat the procedure for adjustment, replacement or repair, perform the service promptly. Move the stop/run switch to perform the pre-ride inspections. WARNING Failure to the maintenance section of these inspections. Tip: You must be familiar with all instruments...
... horn button. Indicator Neutral Indicator Place the transmission in serious injury or death. Verify that the high beam indicator comes on the product packaging. Repeat the procedure for adjustment, replacement or repair, perform the service promptly. Move the stop/run switch to perform the pre-ride inspections. WARNING Failure to the maintenance section of these inspections. Tip: You must be familiar with all instruments...

Owners Manual
Page 40
... level ground with water. Priming the Fuel System If the motorcycle runs out of the fuel filler insert. Move the engine stop /run switch to restart the engine. 1. Use only the recommended fuel. Repeat steps 3-6 four to the ON position. 3. WARNING! Fill the fuel tank. 2. Do not allow the engine control module to run until it off with the sidestand down. Turn the ignition switch to five times. 36 Allow the fuel pump...
... level ground with water. Priming the Fuel System If the motorcycle runs out of the fuel filler insert. Move the engine stop /run switch to restart the engine. 1. Use only the recommended fuel. Repeat steps 3-6 four to the ON position. 3. WARNING! Fill the fuel tank. 2. Do not allow the engine control module to run until it off with the sidestand down. Turn the ignition switch to five times. 36 Allow the fuel pump...
Owners Manual
Page 42
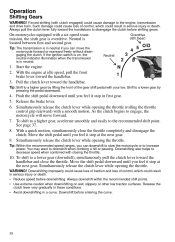
... ignition switch is on wet, slippery or other low traction surfaces. Shift to increase power. Simultaneously release the clutch lever while opening the throttle (rolling the throttle control grip rearward) with a six-speed transmission, the sixth gear is in serious injury or death. • Reduce speed before downshifting. With a quick motion, simultaneously close the throttle. Tip: The transmission is overdrive. With the engine at the next gear...
... ignition switch is on wet, slippery or other low traction surfaces. Shift to increase power. Simultaneously release the clutch lever while opening the throttle (rolling the throttle control grip rearward) with a six-speed transmission, the sixth gear is in serious injury or death. • Reduce speed before downshifting. With a quick motion, simultaneously close the throttle. Tip: The transmission is overdrive. With the engine at the next gear...

Owners Manual
Page 43
... each time vehicle speed reaches a downshift point. WARNING! Avoid braking abruptly. Bring the motorcycle to neutral or disengage the clutch. Shift to the upright position before applying the brakes. Move the ignition switch to a complete stop the engine after the motorcycle is fully stopped and the transmission is moving could cause loss of rear wheel traction or engine and transmission damage, which could cause loss of control could...
... each time vehicle speed reaches a downshift point. WARNING! Avoid braking abruptly. Bring the motorcycle to neutral or disengage the clutch. Shift to the upright position before applying the brakes. Move the ignition switch to a complete stop the engine after the motorcycle is fully stopped and the transmission is moving could cause loss of rear wheel traction or engine and transmission damage, which could cause loss of control could...

Owners Manual
Page 52
... 9. To adjust rear wheel alignment, loosen the rear axle nut about 1/16 of a turn the adjuster nut. 6. If alignment is incorrect, repeat steps 4-8. 10. Pump the rear brake pedal several times to move forward. Inspect the position of the swingarm before proceeding. The marks should be sure the ends of the wheel. Elevate and support the rear of the motorcycle. 1. Maintenance Rear Wheel Alignment WARNING!
... 9. To adjust rear wheel alignment, loosen the rear axle nut about 1/16 of a turn the adjuster nut. 6. If alignment is incorrect, repeat steps 4-8. 10. Pump the rear brake pedal several times to move forward. Inspect the position of the swingarm before proceeding. The marks should be sure the ends of the wheel. Elevate and support the rear of the motorcycle. 1. Maintenance Rear Wheel Alignment WARNING!

Owners Manual
Page 55
...oil condition and level affects front suspension performance and internal component wear. Maintenance Rear Suspension Swing Arm and Rear Axle Inspection 1. Sit in neutral, slowly rotate the rear wheel. Front Suspension Front Fork Inspection 1. Grasp the rear tire and attempt to move the wheel side-to perform... 3. With the transmission in the operator's seat and slowly bounce the rear suspension a few times. If the wheel does not rotate smoothly, inspect the wheel bearings, rear axle, belt adjustment and wheel alignment. See the VICTORY Service Manual or your authorized ...
...oil condition and level affects front suspension performance and internal component wear. Maintenance Rear Suspension Swing Arm and Rear Axle Inspection 1. Sit in neutral, slowly rotate the rear wheel. Front Suspension Front Fork Inspection 1. Grasp the rear tire and attempt to move the wheel side-to perform... 3. With the transmission in the operator's seat and slowly bounce the rear suspension a few times. If the wheel does not rotate smoothly, inspect the wheel bearings, rear axle, belt adjustment and wheel alignment. See the VICTORY Service Manual or your authorized ...

Owners Manual
Page 56
..., inspect the wheel bearings, front axle and brakes. Evaporative Emission Control System (California Models) Inspect all connections are attached to stop to the electric fuel pump located inside the fuel tank. Inspect hose connections at the fuel pump and at the front axle, inspect the wheel bearings and front axle. Grasp the front tire and attempt to move the wheel front-to the right or left. Maintenance Front Suspension Steering and Front Axle Inspection...
..., inspect the wheel bearings, front axle and brakes. Evaporative Emission Control System (California Models) Inspect all connections are attached to stop to the electric fuel pump located inside the fuel tank. Inspect hose connections at the fuel pump and at the front axle, inspect the wheel bearings and front axle. Grasp the front tire and attempt to move the wheel front-to the right or left. Maintenance Front Suspension Steering and Front Axle Inspection...

Owners Manual
Page 63
... Always use a depth gauge or an accurate ruler to seat the bead. Adjust tire pressure as recommended in the owner's manual and on safety labels. Tire or rim failure may result. Maintenance Tires WARNING Operating the motorcycle with improper tires or with improper or uneven tire pressure could cause loss of the wear bars, replace the tire. Tire Tread Depth The raised areas at the base of the center tire tread.
... Always use a depth gauge or an accurate ruler to seat the bead. Adjust tire pressure as recommended in the owner's manual and on safety labels. Tire or rim failure may result. Maintenance Tires WARNING Operating the motorcycle with improper tires or with improper or uneven tire pressure could cause loss of the wear bars, replace the tire. Tire Tread Depth The raised areas at the base of the center tire tread.
Owners Manual
Page 81
... all scheduled maintenance. As the motorcycle owner, you should contact VICTORY Motorcycle Division, Polaris Sales Inc., P.O. If you have any questions regarding your motorcycle to ensure the performance of 30,000 kilometers (18,641 miles), if the motorcycle's engine displacement is free from the date of time, not to exceed 30 days. Limited Warranty on Emission Control System VICTORY Motorcycle Division, Polaris Sales...
... all scheduled maintenance. As the motorcycle owner, you should contact VICTORY Motorcycle Division, Polaris Sales Inc., P.O. If you have any questions regarding your motorcycle to ensure the performance of 30,000 kilometers (18,641 miles), if the motorcycle's engine displacement is free from the date of time, not to exceed 30 days. Limited Warranty on Emission Control System VICTORY Motorcycle Division, Polaris Sales...
Owners Manual
Page 82
...; II. B. ignition coils; VICTORY will reimburse the owner for expenses, including diagnosis, not to VICTORY specifications which the odometer mileage has been changed so that actual mileage cannot be required to the first scheduled replacement; Repair or replacement required as provided for the warranty repair and the geographically appropriate hourly labor rate. fuel injection system; fuel/vapor separator; spark advance mechanism; oil filler cap; canister; air cutoff valves; ignition wires; and hoses, clamps, fittings...
...; II. B. ignition coils; VICTORY will reimburse the owner for expenses, including diagnosis, not to VICTORY specifications which the odometer mileage has been changed so that actual mileage cannot be required to the first scheduled replacement; Repair or replacement required as provided for the warranty repair and the geographically appropriate hourly labor rate. fuel injection system; fuel/vapor separator; spark advance mechanism; oil filler cap; canister; air cutoff valves; ignition wires; and hoses, clamps, fittings...
Owners Manual
Page 91
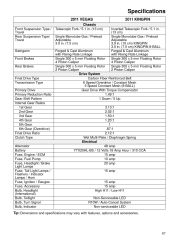
... 5 mm Floating Rotor 2 Piston Caliper Final Drive Type Transmission Type Primary Drive Primary Reduction Ratio Gear Shift Pattern Internal Gear Ratios 1st Gear 2nd Gear 3rd Gear 4th Gear 5th Gear 6th Gear (Overdrive) Final Drive Ratio Clutch Type Alternator Battery Fuse, Engine / ECM Fuse, Fuel Pump Fuse, Headlight / Brake Light Lamps Fuse, Tail Light Lamps / Flashers / Indicator Lamps / Horn Fuse, Ignition / Gauges Fuse, Accessory Bulb, Headlight (International) Bulb, Taillight Bulb, Turn Signal Bulb, Indicator Forged & Cast Aluminum with Rising Rate Linkage Single 300 x 5 mm Floating Rotor...
... 5 mm Floating Rotor 2 Piston Caliper Final Drive Type Transmission Type Primary Drive Primary Reduction Ratio Gear Shift Pattern Internal Gear Ratios 1st Gear 2nd Gear 3rd Gear 4th Gear 5th Gear 6th Gear (Overdrive) Final Drive Ratio Clutch Type Alternator Battery Fuse, Engine / ECM Fuse, Fuel Pump Fuse, Headlight / Brake Light Lamps Fuse, Tail Light Lamps / Flashers / Indicator Lamps / Horn Fuse, Ignition / Gauges Fuse, Accessory Bulb, Headlight (International) Bulb, Taillight Bulb, Turn Signal Bulb, Indicator Forged & Cast Aluminum with Rising Rate Linkage Single 300 x 5 mm Floating Rotor...
Owners Manual
Page 95
... Engine Oil Change ...43 Engine Oil Level...27 Engine Starting ...37 Engine Stopping ...39 Equipment Modifications ...11 Error Codes, Engine ...22 Evaporative Emission Control System ...28, 52 Exhaust Safety ...13 Exhaust System Inspection ...61 F Fastener Inspection ...34 Fluid Clutch (Hydraulic) ...56 Front Brake ...57 Rear Brake ...57 Fluid Level, Front Brake...29 Fluid Level, Hydraulic Clutch ...32 Fluid Level, Rear Brake ...31 Fork Inspection ...51 Front Axle Inspection ...52 Front Brake Lever...24, 29 Front Fork Inspection ...51 Fuel Cap...
... Engine Oil Change ...43 Engine Oil Level...27 Engine Starting ...37 Engine Stopping ...39 Equipment Modifications ...11 Error Codes, Engine ...22 Evaporative Emission Control System ...28, 52 Exhaust Safety ...13 Exhaust System Inspection ...61 F Fastener Inspection ...34 Fluid Clutch (Hydraulic) ...56 Front Brake ...57 Rear Brake ...57 Fluid Level, Front Brake...29 Fluid Level, Hydraulic Clutch ...32 Fluid Level, Rear Brake ...31 Fork Inspection ...51 Front Axle Inspection ...52 Front Brake Lever...24, 29 Front Fork Inspection ...51 Fuel Cap...

Owners Manual
Page 96
... Inspection, Rear Shock...49 Priming the Fuel System ...36 Protectant, Leather, Rubber and Vinyl ...73 Protective Equipment ...9 Pure VICTORY Products ...69 I Identification Number, Engine ...18 Identification Number, Vehicle ...17 Identification Numbers Record ...88 Ignition Key Number...18 Ignition Key Record ...88 Ignition Switch...18 Indicator Lamps ...19 Information Labels...15 Inspections, Pre-Ride...26-34 Instrument Cluster ...19-22 K Key Number...18 R Rear Axle Inspection ...51 Rear Brake Pedal...
... Inspection, Rear Shock...49 Priming the Fuel System ...36 Protectant, Leather, Rubber and Vinyl ...73 Protective Equipment ...9 Pure VICTORY Products ...69 I Identification Number, Engine ...18 Identification Number, Vehicle ...17 Identification Numbers Record ...88 Ignition Key Number...18 Ignition Key Record ...88 Ignition Switch...18 Indicator Lamps ...19 Information Labels...15 Inspections, Pre-Ride...26-34 Instrument Cluster ...19-22 K Key Number...18 R Rear Axle Inspection ...51 Rear Brake Pedal...

Owners Manual
Page 97
...51, 52 Suspension Maintenance, Rear ...49-51 Swing Arm Inspection ...51 Switches Emergency Flasher Switch ...23 Engine Stop/Run Switch ...24 Hazard Switch ...23 High Beam/Low Beam Switch ...23 Horn Button ...23 Ignition Switch...18 Mode Button ...23 Starter Button ...24 Turn Signal Switch ...23 T Throttle Cable Lubrication ...Throttle Control Grip ...Throttle Freeplay ...Throttle Freeplay Adjustment...Throttle Inspection ...Throttle Operation ...Throttle System Maintenance ...Tilt Sensor...Tire Condition...Tire Pressure ...Tire Tread Depth...Tire Condition...Tire Pressure ...Tire Tread Depth...
...51, 52 Suspension Maintenance, Rear ...49-51 Swing Arm Inspection ...51 Switches Emergency Flasher Switch ...23 Engine Stop/Run Switch ...24 Hazard Switch ...23 High Beam/Low Beam Switch ...23 Horn Button ...23 Ignition Switch...18 Mode Button ...23 Starter Button ...24 Turn Signal Switch ...23 T Throttle Cable Lubrication ...Throttle Control Grip ...Throttle Freeplay ...Throttle Freeplay Adjustment...Throttle Inspection ...Throttle Operation ...Throttle System Maintenance ...Tilt Sensor...Tire Condition...Tire Pressure ...Tire Tread Depth...Tire Condition...Tire Pressure ...Tire Tread Depth...