

Owners Manual
Page 12
... front and rear brakes together. Be aware of the following braking facts and practices: • The rear brake provides 40% of control. • Ground clearance is not fully retracted, it could cause loss of control. • Do not tow a trailer. Safety Safe Riding Practices • Reduce speed when: the road has potholes, or is heavy, congested, not allowing sufficient space between vehicles or otherwise...
... front and rear brakes together. Be aware of the following braking facts and practices: • The rear brake provides 40% of control. • Ground clearance is not fully retracted, it could cause loss of control. • Do not tow a trailer. Safety Safe Riding Practices • Reduce speed when: the road has potholes, or is heavy, congested, not allowing sufficient space between vehicles or otherwise...
Owners Manual
Page 14
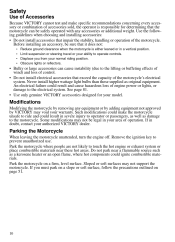
... ignition key to the lifting or buffeting effects of wind) and loss of control. • Do not install electrical accessories that impair the stability, handling or operation of the motorcycle's electrical system. Park the motorcycle on page 51. 10 Use the following guidelines when choosing and installing accessories: • Do not install accessories that exceed the capacity of the motorcycle. Limit suspension or steering...
... ignition key to the lifting or buffeting effects of wind) and loss of control. • Do not install electrical accessories that impair the stability, handling or operation of the motorcycle's electrical system. Park the motorcycle on page 51. 10 Use the following guidelines when choosing and installing accessories: • Do not install accessories that exceed the capacity of the motorcycle. Limit suspension or steering...

Owners Manual
Page 16
... a short time. • Never start the engine or let it off the engine before refueling. • Always refuel outdoors or in a fire hazard or damage to one tiedown each side) To swing arm (one side, gasoline may leak from the fuel tank and result in a well-ventilated area. • Open the fuel cap slowly. Place tiedowns as wide apart as towing will...
... a short time. • Never start the engine or let it off the engine before refueling. • Always refuel outdoors or in a fire hazard or damage to one tiedown each side) To swing arm (one side, gasoline may leak from the fuel tank and result in a well-ventilated area. • Open the fuel cap slowly. Place tiedowns as wide apart as towing will...

Owners Manual
Page 17
... control, which is properly installed and in the Periodic Maintenance section beginning on page 54. • Always maintain proper tire pressure, tread condition and wheel and tire balance. Make any necessary repairs promptly. • Clean the motorcycle thoroughly to ensure safety. Regularly inspect the rear shock absorber and the front forks for service. • Before each ride, perform the Pre-Ride Inspections. Perform maintenance and repairs...
... control, which is properly installed and in the Periodic Maintenance section beginning on page 54. • Always maintain proper tire pressure, tread condition and wheel and tire balance. Make any necessary repairs promptly. • Clean the motorcycle thoroughly to ensure safety. Regularly inspect the rear shock absorber and the front forks for service. • Before each ride, perform the Pre-Ride Inspections. Perform maintenance and repairs...

Owners Manual
Page 22
Windshield 2. Fuel Filler Cap 4. Passenger Seat 6. Front Brake Fluid Reservoir 11. Fuel Gauge 4. Speedometer 5. Multi-Function Display 7. Heated Grip Switch (if equipped) 14. Clutch Lever 2. Tachometer (if equipped) 6. Cruise Control Switches (if equipped) 2 3 1 5 4 6 7 9 11 10 9 12 8 18 Clutch Lever 3. Turn Signals 8. Tail Lamps 9. Cruise Control Switches (if equipped) 15. Speedometer 4. Front Brake Lever 8. Throttle Control Grip 9. Fuel Cap 12. Speakers 2. Mirror 3. Operator Seat 5. Saddlebag Latch 7. Front Brake Lever 10. Indicator Lamp Display 6. ...
Windshield 2. Fuel Filler Cap 4. Passenger Seat 6. Front Brake Fluid Reservoir 11. Fuel Gauge 4. Speedometer 5. Multi-Function Display 7. Heated Grip Switch (if equipped) 14. Clutch Lever 2. Tachometer (if equipped) 6. Cruise Control Switches (if equipped) 2 3 1 5 4 6 7 9 11 10 9 12 8 18 Clutch Lever 3. Turn Signals 8. Tail Lamps 9. Cruise Control Switches (if equipped) 15. Speedometer 4. Front Brake Lever 8. Throttle Control Grip 9. Fuel Cap 12. Speakers 2. Mirror 3. Operator Seat 5. Saddlebag Latch 7. Front Brake Lever 10. Indicator Lamp Display 6. ...

Owners Manual
Page 23
..., indicator lights and license plate light illuminate. Before starting the engine, read the instructions for starting the engine. Turn the ignition switch to start the engine or activate the turn signals and other electrical features. See page 46. The headlamp, taillight, and instrument lights illuminate. Off On Park ON In the ON position, all electrical switches and buttons. You must be removed. The engine stop/run switch must push the ignition key into the switch while...
..., indicator lights and license plate light illuminate. Before starting the engine, read the instructions for starting the engine. Turn the ignition switch to start the engine or activate the turn signals and other electrical features. See page 46. The headlamp, taillight, and instrument lights illuminate. Off On Park ON In the ON position, all electrical switches and buttons. You must be removed. The engine stop/run switch must push the ignition key into the switch while...

Owners Manual
Page 24
... page 26. If abnormal sensor or engine operation is running , turn the engine off . This lamp also illuminates if engine oil pressure drops below safe operating pressure. The light will remain on if the tilt sensor shuts down the engine. If the oil level is running , contact an authorized VICTORY dealer promptly for diagnosis. Instruments, Features and Controls Instrument Cluster (CROSS ROADS) Speedometer The speedometer displays vehicle speed in the fuel tank. If this lamp...
... page 26. If abnormal sensor or engine operation is running , turn the engine off . This lamp also illuminates if engine oil pressure drops below safe operating pressure. The light will remain on if the tilt sensor shuts down the engine. If the oil level is running , contact an authorized VICTORY dealer promptly for diagnosis. Instruments, Features and Controls Instrument Cluster (CROSS ROADS) Speedometer The speedometer displays vehicle speed in the fuel tank. If this lamp...

Owners Manual
Page 26
... Turn the key to the desired setting. Release the button. Trip Hours Meter The trip hours meter displays total hours of measurement. Distance Fuel Temperature Time Standard Display Miles U.S. Clock Tip: The clock must be changed to change remaining display settings. Release the... above 15.0 volts for more than 10 seconds Checksum error (gauge malfunction) 22 Instruments, Features and Controls Instrument Cluster (CROSS ROADS) Multi-Function Display Display Units (Standard/Metric) The display can be reset any time the battery has been disconnected or discharged. 1. 2. 3. 4. 5. Use...
... Turn the key to the desired setting. Release the button. Trip Hours Meter The trip hours meter displays total hours of measurement. Distance Fuel Temperature Time Standard Display Miles U.S. Clock Tip: The clock must be changed to change remaining display settings. Release the... above 15.0 volts for more than 10 seconds Checksum error (gauge malfunction) 22 Instruments, Features and Controls Instrument Cluster (CROSS ROADS) Multi-Function Display Display Units (Standard/Metric) The display can be reset any time the battery has been disconnected or discharged. 1. 2. 3. 4. 5. Use...

Owners Manual
Page 41
...or information bar. Verify smooth operation, inspect pivot bolt, spring and pad. Inspection Procedure Turn Signals Emergency Flashers Horn Neutral Indicator Low Oil Pressure Indicator Engine Stop/Run Switch General Engine Oil Level Fuel Level Tires Brake Operation Brake Fluid Levels Brake Components Throttle Front Suspension Steering Rear Suspension Drive Belt Sidestand Fasteners Mirrors Clutch (Mechanical) Check lever operation and freeplay. 37 Verify that the taillight lamps increase in the gear position display. Press the horn button. Move the stop flashing. Inspect hoses...
...or information bar. Verify smooth operation, inspect pivot bolt, spring and pad. Inspection Procedure Turn Signals Emergency Flashers Horn Neutral Indicator Low Oil Pressure Indicator Engine Stop/Run Switch General Engine Oil Level Fuel Level Tires Brake Operation Brake Fluid Levels Brake Components Throttle Front Suspension Steering Rear Suspension Drive Belt Sidestand Fasteners Mirrors Clutch (Mechanical) Check lever operation and freeplay. 37 Verify that the taillight lamps increase in the gear position display. Press the horn button. Move the stop flashing. Inspect hoses...
Owners Manual
Page 51
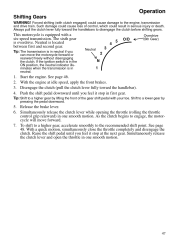
... handlebars to the recommended shift point. Tip: Shift to the engine, transmission and drive train. As the clutch begins to a lower gear by lifting the front of control, which could cause damage to a higher gear by pressing the pedal downward. 5. If the ignition switch is in the ON position, the neutral indicator illuminates when the transmission is equipped with your toe. Start the engine. Shift to engage, the...
... handlebars to the recommended shift point. Tip: Shift to the engine, transmission and drive train. As the clutch begins to a lower gear by lifting the front of control, which could cause damage to a higher gear by pressing the pedal downward. 5. If the ignition switch is in the ON position, the neutral indicator illuminates when the transmission is equipped with your toe. Start the engine. Shift to engage, the...

Owners Manual
Page 55
... the engine. 3. Fully extend the sidestand. 4. Remove the ignition key. When fully stopped, shift into neutral. 2. Move the ignition switch to park the motorcycle. 1. When fully stopped, shift into neutral. 2. CAUTION! Hot engine and exhaust components can cause burns to skin and can sink into the parking surface. Parking on a Slope If parking on a soft surface is first turned to neutral or disengage the clutch. Remove the ignition key. Parking Choose a firm...
... the engine. 3. Fully extend the sidestand. 4. Remove the ignition key. When fully stopped, shift into neutral. 2. Move the ignition switch to park the motorcycle. 1. When fully stopped, shift into neutral. 2. CAUTION! Hot engine and exhaust components can cause burns to skin and can sink into the parking surface. Parking on a Slope If parking on a soft surface is first turned to neutral or disengage the clutch. Remove the ignition key. Parking Choose a firm...

Owners Manual
Page 59
... I L I I L I I L P L I I I I L I Component Air Filter Battery Brake Fluid Brake Pads Clutch Cable Clutch Lever (Mechanical) Control Cables Crankcase Vent Drive Belt Drive Belt Adjustment Engine Oil & Filter* Evaporative Emission Control System (if equipped) Exhaust System Fasteners Front Brake Lever Front Fork Oil** Front Fork / Axle Fuel System Fuel Filter Headlamp Ignition Switch / Locks Radio/Radio Software Rear Wheel Align Rear Shock Rear Brake Pedal Road Test Sidestand Sidestand Pad Spark Plugs Steering Head Bearings Swingarm Throttle Cable Page 58 75 72 41 70 69 70 69 70 67 60 63 57 67...
... I L I I L I I L P L I I I I L I Component Air Filter Battery Brake Fluid Brake Pads Clutch Cable Clutch Lever (Mechanical) Control Cables Crankcase Vent Drive Belt Drive Belt Adjustment Engine Oil & Filter* Evaporative Emission Control System (if equipped) Exhaust System Fasteners Front Brake Lever Front Fork Oil** Front Fork / Axle Fuel System Fuel Filter Headlamp Ignition Switch / Locks Radio/Radio Software Rear Wheel Align Rear Shock Rear Brake Pedal Road Test Sidestand Sidestand Pad Spark Plugs Steering Head Bearings Swingarm Throttle Cable Page 58 75 72 41 70 69 70 69 70 67 60 63 57 67...

Owners Manual
Page 69
... 5 cc of the recommended gauge securely onto the air fitting. wheel bearing area 65 Park the motorcycle with the rear tire slightly off the floor. See your authorized VICTORY dealer. Maintenance Rear Suspension Adjustment 1. To increase pressure, pump the handle until the desired pressure is attained. 6. With the transmission in the operator's seat and slowly bounce the rear suspension a few times. Sit in neutral, slowly rotate the rear wheel. Remove all riders and...
... 5 cc of the recommended gauge securely onto the air fitting. wheel bearing area 65 Park the motorcycle with the rear tire slightly off the floor. See your authorized VICTORY dealer. Maintenance Rear Suspension Adjustment 1. To increase pressure, pump the handle until the desired pressure is attained. 6. With the transmission in the operator's seat and slowly bounce the rear suspension a few times. Sit in neutral, slowly rotate the rear wheel. Remove all riders and...

Owners Manual
Page 87
... sound from the IAC valve is normal when the key is first turned to RUN. Be sure spark plug wires are securely fastened. Shift transmission into neutral or pull the clutch lever in this rider's manual. See page 38. Inspect battery cables. Engine Starts But Misses or Runs Poorly Tip: Turn engine OFF before inspecting any inspection or repair with the engine running. See page 58. 83 Inspect air filter. Maintenance Troubleshooting For your mechanical...
... sound from the IAC valve is normal when the key is first turned to RUN. Be sure spark plug wires are securely fastened. Shift transmission into neutral or pull the clutch lever in this rider's manual. See page 38. Inspect battery cables. Engine Starts But Misses or Runs Poorly Tip: Turn engine OFF before inspecting any inspection or repair with the engine running. See page 58. 83 Inspect air filter. Maintenance Troubleshooting For your mechanical...
Owners Manual
Page 98
... required maintenance C. In the State of initial retail delivery, whichever occurs first. fuel tank; air cutoff valves; canister; ignition wires; and hoses, clamps, fittings and tubing used in the California Administrative Code, may contain functionally equivalent parts. ll. B. Inspections, replacement of use, depending on VICTORY's recommended time allowance for the warranty repair and the geographically appropriate hourly labor rate. l. These warranted parts are specifically defined...
... required maintenance C. In the State of initial retail delivery, whichever occurs first. fuel tank; air cutoff valves; canister; ignition wires; and hoses, clamps, fittings and tubing used in the California Administrative Code, may contain functionally equivalent parts. ll. B. Inspections, replacement of use, depending on VICTORY's recommended time allowance for the warranty repair and the geographically appropriate hourly labor rate. l. These warranted parts are specifically defined...

Owners Manual
Page 102
... Type Transmission Type Primary Drive Type (Reduction Ratio) Drive System Gear Shift Pattern Internal Gear Ratios 1st 2nd 3rd 4th 5th 6th (Overdrive) Final Drive Ratio Clutch Type Wheels And Tires Front Wheel Type / Size Front Tire Type / Size Rear Wheel Type / Size Rear Tire Type / Size Electrical Alternator Battery Lights Headlamp (High / Low) HID Headlamp (High / Low) Turn Signal Lamp Tail / Brake / License Plate Lamp Fuses / Circuit Breakers Engine Fuel Pump/Ignition Coil Lights Turn Signals/Horn Ignition Chassis Accessory Radio Telescopic Fork / 5.1 in. (13 cm) 43 mm Single Monotube Air...
... Type Transmission Type Primary Drive Type (Reduction Ratio) Drive System Gear Shift Pattern Internal Gear Ratios 1st 2nd 3rd 4th 5th 6th (Overdrive) Final Drive Ratio Clutch Type Wheels And Tires Front Wheel Type / Size Front Tire Type / Size Rear Wheel Type / Size Rear Tire Type / Size Electrical Alternator Battery Lights Headlamp (High / Low) HID Headlamp (High / Low) Turn Signal Lamp Tail / Brake / License Plate Lamp Fuses / Circuit Breakers Engine Fuel Pump/Ignition Coil Lights Turn Signals/Horn Ignition Chassis Accessory Radio Telescopic Fork / 5.1 in. (13 cm) 43 mm Single Monotube Air...

Owners Manual
Page 122
...%. • Pause or stop the MP3 player to switch to radio. • To switch from the NAV MP3 (such as navigation instructions or user-loaded MP3 media files) to the AUX mode. The audio integration kit must be no interface with all unit features and operation. Changing to NAV MP3 Mode The ignition key must be difficult to hear if volume...
...%. • Pause or stop the MP3 player to switch to radio. • To switch from the NAV MP3 (such as navigation instructions or user-loaded MP3 media files) to the AUX mode. The audio integration kit must be no interface with all unit features and operation. Changing to NAV MP3 Mode The ignition key must be difficult to hear if volume...

Owners Manual
Page 124
... Control ...113 iPod Tuning ...114 F Fastener Inspection ...43, 77 Fastener Torques ...82 Fluid Change Engine Oil ...57 Fluid Level Engine Oil ...38 Front Brake ...39 Front Brake Fluid...72 Rear Brake ...40 Rear Brake Fluid ...71 Fork Inspection ...66 Fuel Cap...35 Fuel Gauge...24 Fuel Handling Safety ...12 Fuel Level ...38 Fuel Recommendation ...99 Fuel System Inspection ...67 Fuel System, Priming...45 Fuel Tank Removal/Installation ...58-59 Fueling ...45 Fuse Recommendations ...80 Fuse Replacement ...80 K Key Number ...16 L Labels, Information ...15 Labels, Safety ...15 Leather...
... Control ...113 iPod Tuning ...114 F Fastener Inspection ...43, 77 Fastener Torques ...82 Fluid Change Engine Oil ...57 Fluid Level Engine Oil ...38 Front Brake ...39 Front Brake Fluid...72 Rear Brake ...40 Rear Brake Fluid ...71 Fork Inspection ...66 Fuel Cap...35 Fuel Gauge...24 Fuel Handling Safety ...12 Fuel Level ...38 Fuel Recommendation ...99 Fuel System Inspection ...67 Fuel System, Priming...45 Fuel Tank Removal/Installation ...58-59 Fueling ...45 Fuse Recommendations ...80 Fuse Replacement ...80 K Key Number ...16 L Labels, Information ...15 Labels, Safety ...15 Leather...

Owners Manual
Page 125
...-28 CROSS ROADS ...21-23 S Saddlebag Lock ...35 Saddlebags, Using Safely ...11 Safety Defects, Reporting to NHTSA ...15 Safety Gear ...9 Safety Labels ...15 Safety Symbols ...5 Safety While Servicing ...53 Seat Removal/Installation ...78 Service Manual ...84 Service Procedure Safety ...53 Shift Points ...48 Shifting Gears ...47-48 Side Covers, Removal/Installation ...77 Sidestand...34 Sidestand Inspection ...43 Sidestand Lubrication ...77 Signal Words ...5 Spark Plugs ...74 Speedometer ...20, 24 Squelch ...110 Starter Interlock Switch ...30 Steering...
...-28 CROSS ROADS ...21-23 S Saddlebag Lock ...35 Saddlebags, Using Safely ...11 Safety Defects, Reporting to NHTSA ...15 Safety Gear ...9 Safety Labels ...15 Safety Symbols ...5 Safety While Servicing ...53 Seat Removal/Installation ...78 Service Manual ...84 Service Procedure Safety ...53 Shift Points ...48 Shifting Gears ...47-48 Side Covers, Removal/Installation ...77 Sidestand...34 Sidestand Inspection ...43 Sidestand Lubrication ...77 Signal Words ...5 Spark Plugs ...74 Speedometer ...20, 24 Squelch ...110 Starter Interlock Switch ...30 Steering...

Owners Manual
Page 126
... T Tachometer ...24 Testing After Servicing ...54, 82 Throttle Cable Freeplay ...68 Throttle Cable Lubrication ...69 Throttle Control Grip...32 Throttle Control Inspection ...68 Throttle Freeplay ...41 Throttle Inpspection...41 Tilt Sensor ...32 Tires Condition ...73 Pressure ...74 Recommended Pressure...74 Recommended Type ...74 Tire Condition ...39 Tire Pressure ...39 Tread Depth ...39, 73 Wheel Inspection ...73 Tool Kit ...35 Transporting the Motorcycle ...12 Trip Odometer ...28 Troubleshooting...83-84 Turn Signal Switch ...29 122
... T Tachometer ...24 Testing After Servicing ...54, 82 Throttle Cable Freeplay ...68 Throttle Cable Lubrication ...69 Throttle Control Grip...32 Throttle Control Inspection ...68 Throttle Freeplay ...41 Throttle Inpspection...41 Tilt Sensor ...32 Tires Condition ...73 Pressure ...74 Recommended Pressure...74 Recommended Type ...74 Tire Condition ...39 Tire Pressure ...39 Tread Depth ...39, 73 Wheel Inspection ...73 Tool Kit ...35 Transporting the Motorcycle ...12 Trip Odometer ...28 Troubleshooting...83-84 Turn Signal Switch ...29 122