
Owner's Manual
Page 4
Table of Contents Seats and Restraint Systems Section 1 Seats and Seat Controls Safety Belts Air Bag Systems Child Restraints Features and Controls Section 2 Keys and Door Locks Remote Lock Control (Option) Automatic Transaxle Parking Brake Windows Tilt Wheel Turn Signal/Multifunction Lever Windshield Wipers Cruise Control Interior and Exterior Lamps Mirrors Storage Compartments Convenience Net (Option) Accessory Power Outlets OnStar® System (If Equipped) Instrument Panel, Warning Lights and Gages Driver Information Center (Option) ii
Table of Contents Seats and Restraint Systems Section 1 Seats and Seat Controls Safety Belts Air Bag Systems Child Restraints Features and Controls Section 2 Keys and Door Locks Remote Lock Control (Option) Automatic Transaxle Parking Brake Windows Tilt Wheel Turn Signal/Multifunction Lever Windshield Wipers Cruise Control Interior and Exterior Lamps Mirrors Storage Compartments Convenience Net (Option) Accessory Power Outlets OnStar® System (If Equipped) Instrument Panel, Warning Lights and Gages Driver Information Center (Option) ii
Owner's Manual
Page 11
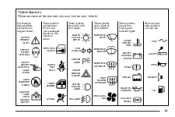
... some of the symbols you may see: ENGINE COOLANT TEMP WINDSHIELD WASHER BATTERY CHARGING SYSTEM FUSE DOOR LOCK UNLOCK TURN SIGNALS LIGHTER PARKING LAMPS FASTEN SEAT BELTS WINDSHIELD DEFROSTER HORN BRAKE HAZARD WARNING FLASHER POWER WINDOW DAYTIME RUNNING LAMPS REAR WINDOW DEFOGGER COOLANT SPEAKER ENGINE OIL PRESSURE VENTILATING FAN FUEL AIR...
... some of the symbols you may see: ENGINE COOLANT TEMP WINDSHIELD WASHER BATTERY CHARGING SYSTEM FUSE DOOR LOCK UNLOCK TURN SIGNALS LIGHTER PARKING LAMPS FASTEN SEAT BELTS WINDSHIELD DEFROSTER HORN BRAKE HAZARD WARNING FLASHER POWER WINDOW DAYTIME RUNNING LAMPS REAR WINDOW DEFOGGER COOLANT SPEAKER ENGINE OIL PRESSURE VENTILATING FAN FUEL AIR...

Owner's Manual
Page 13
... Wear Safety Belts Properly Driver Position Safety Belt Use During Pregnancy Right Front Passenger Position Supplemental Restraint Systems (SRS) Safety Belt Pretensioners Rear Seat Passengers 1-51 1-54 1-55 1-57 1-60 1-71 1-88 1-91 1-91 1-92 Rear Safety Belt Comfort Guides for Everyone Here... Are Questions Many People Ask About Safety Belts -- You can also learn about some things you 'll find information about the seats in Child Restraint (Option) Child Restraints Larger Children Safety Belt Extender Checking Your Restraint Systems Replacing Restraint System Parts After a Crash 1-...
... Wear Safety Belts Properly Driver Position Safety Belt Use During Pregnancy Right Front Passenger Position Supplemental Restraint Systems (SRS) Safety Belt Pretensioners Rear Seat Passengers 1-51 1-54 1-55 1-57 1-60 1-71 1-88 1-91 1-91 1-92 Rear Safety Belt Comfort Guides for Everyone Here... Are Questions Many People Ask About Safety Belts -- You can also learn about some things you 'll find information about the seats in Child Restraint (Option) Child Restraints Larger Children Safety Belt Extender Checking Your Restraint Systems Replacing Restraint System Parts After a Crash 1-...
Owner's Manual
Page 14
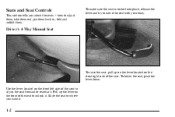
... them back in, fold and unfold them. how to adjust the seat forward or rearward. To make sure the seat is locked into place, release the lever and try to where you about the seats -- Driver's 4-Way Manual Seat To raise the seat, pull up the lever on the front right side of the... seat to unlock it . 1-2 Seats and Seat Controls This section tells you want it . To lower the seat, push the lever down. Pull up on the lever...
... them back in, fold and unfold them. how to adjust the seat forward or rearward. To make sure the seat is locked into place, release the lever and try to where you about the seats -- Driver's 4-Way Manual Seat To raise the seat, pull up the lever on the front right side of the... seat to unlock it . 1-2 Seats and Seat Controls This section tells you want it . To lower the seat, push the lever down. Pull up on the lever...
Owner's Manual
Page 15
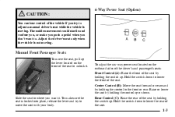
... you don't want it . Adjust the driver's seat only when the vehicle is moving . To adjust the six-way power seat located on the front of the seat to unlock it . Slide the seat to the front or rear. Manual Front Passenger Seats To move the seat with your body. Rear Control (C): Raise the rear... of the seat. Raise or lower the seat by holding the control up or down...
... you don't want it . Adjust the driver's seat only when the vehicle is moving . To adjust the six-way power seat located on the front of the seat to unlock it . Slide the seat to the front or rear. Manual Front Passenger Seats To move the seat with your body. Rear Control (C): Raise the rear... of the seat. Raise or lower the seat by holding the control up or down...
Owner's Manual
Page 16
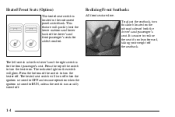
This feature will quickly heat the lower cushions and lower back of the driver's and front passenger's seats for the front passenger's seat. Press the top of the switch to turn this knob located on the inboard sides of the switch to turn off when the ignition is ... adjust the seatback, turn the heater on the switch will turn the heater off the seatback. It is for added comfort. Heated Front Seats (Option) The heated seat switch is manually turned off. 1-4 The left switch is for the driver's and the right switch is easier to RUN, unless the switch is...
This feature will quickly heat the lower cushions and lower back of the driver's and front passenger's seats for the front passenger's seat. Press the top of the switch to turn this knob located on the inboard sides of the switch to turn off when the ignition is ... adjust the seatback, turn the heater on the switch will turn the heater off the seatback. It is for added comfort. Heated Front Seats (Option) The heated seat switch is manually turned off. 1-4 The left switch is for the driver's and the right switch is easier to RUN, unless the switch is...
Owner's Manual
Page 17
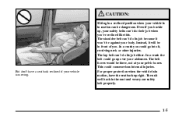
... in front of you. In a crash the belt could go up , your safety belts can 't do its job either. Then sit well back in the seat and wear your pelvic bones. The shoulder belt can 't do their job when you could go into it, receiving neck or other injuries. In a crash...
... in front of you. In a crash the belt could go up , your safety belts can 't do its job either. Then sit well back in the seat and wear your pelvic bones. The shoulder belt can 't do their job when you could go into it, receiving neck or other injuries. In a crash...
Owner's Manual
Page 18
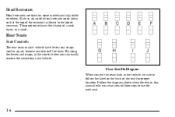
... an adjustable head restraint up or down so that the top of the restraint is closest to adjust, remove and reinstall the seats. This position reduces the chance of your vehicle. Head Restraints Head restraints are fixed on some models and adjustable on the back of floor cups ...to use for proper location. By using the levers and straps, in a crash. Rear Seats Seat Controls The rear seats in your vehicle have levers and straps used to the top of a neck injury in the correct order, you can easily remove the...
... an adjustable head restraint up or down so that the top of the restraint is closest to adjust, remove and reinstall the seats. This position reduces the chance of your vehicle. Head Restraints Head restraints are fixed on some models and adjustable on the back of floor cups ...to use for proper location. By using the levers and straps, in a crash. Rear Seats Seat Controls The rear seats in your vehicle have levers and straps used to the top of a neck injury in the correct order, you can easily remove the...

Owner's Manual
Page 19
... along the belt until it is disconnected from the Velcro patch and use . Flip and Fold Feature The rear seats in use the safety belt as the seat folds forward. 4. If the seats have the second row outside safety belt stored if someone is sitting in the second row outside safety belt, just... the headliner. 2. Press the sleeve against the Velcro patch to secure it all the way back. 3. Use this procedure: 1. Fold the seatback flat on the seat by pulling the nylon strap located at the base of the vehicle. hang on the second row outside safety belt to store the safety belt...
... along the belt until it is disconnected from the Velcro patch and use . Flip and Fold Feature The rear seats in use the safety belt as the seat folds forward. 4. If the seats have the second row outside safety belt stored if someone is sitting in the second row outside safety belt, just... the headliner. 2. Press the sleeve against the Velcro patch to secure it all the way back. 3. Use this procedure: 1. Fold the seatback flat on the seat by pulling the nylon strap located at the base of the vehicle. hang on the second row outside safety belt to store the safety belt...

Owner's Manual
Page 20
... you have the split bench seat (50/50 or 40/60), the seatbacks can be folded down individually and the sections can be... place. When raising or reclining a seatback to an upright position, push and pull on the front of the split bench seat can also be removed individually. The second row (40/60) split bench may be either the nylon strap or the lever...on this nylon strap on each section of the seatback. Folding or Reclining the Seatbacks The seatbacks on the rear of the seat, while pulling the seatback down or reclined. Use the lever to raise or lower the seatback to fold or recline the...
... you have the split bench seat (50/50 or 40/60), the seatbacks can be folded down individually and the sections can be... place. When raising or reclining a seatback to an upright position, push and pull on the front of the split bench seat can also be removed individually. The second row (40/60) split bench may be either the nylon strap or the lever...on this nylon strap on each section of the seatback. Folding or Reclining the Seatbacks The seatbacks on the rear of the seat, while pulling the seatback down or reclined. Use the lever to raise or lower the seatback to fold or recline the...
Owner's Manual
Page 21
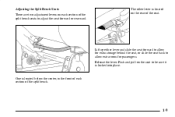
Lift up either lever and slide the seat forward to allow for passengers. Release the lever. One is locked into place. Push and pull on the rear of the seat. Adjusting the Split Bench Seats There are two adjustment levers on each section of the split bench. 1-9 The other lever is located on the seat to be sure it is located below the center, in the front of each section of the split bench seats to allow extra room for extra storage behind the seat, or slide the seat back to adjust the seat forward or rearward.
Lift up either lever and slide the seat forward to allow for passengers. Release the lever. One is locked into place. Push and pull on the rear of the seat. Adjusting the Split Bench Seats There are two adjustment levers on each section of the split bench. 1-9 The other lever is located on the seat to be sure it is located below the center, in the front of each section of the split bench seats to allow extra room for extra storage behind the seat, or slide the seat back to adjust the seat forward or rearward.
Owner's Manual
Page 22
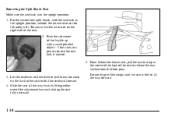
... buckle up with the seatback in the upright position. 1. Push the red center of the seat to release the rear latches from the floor pins. 3. Slide the seat all the way back by lifting either one of the straps until the seat is folded all the way forward. 1-10 Removing the Split Bench... the side attachment for the safety belt. This mini-buckle is located on the back of the seat. 2. Lift the seatback recliner lever or pull the nylon strap on the right side of the seat to remove the seat belt, if needed. 5. Do not let go of the adjustment bars and sliding the...
... buckle up with the seatback in the upright position. 1. Push the red center of the seat to release the rear latches from the floor pins. 3. Slide the seat all the way back by lifting either one of the straps until the seat is folded all the way forward. 1-10 Removing the Split Bench... the side attachment for the safety belt. This mini-buckle is located on the back of the seat. 2. Lift the seatback recliner lever or pull the nylon strap on the right side of the seat to remove the seat belt, if needed. 5. Do not let go of the adjustment bars and sliding the...
Owner's Manual
Page 23
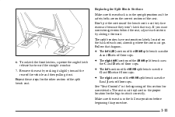
...steps for the legs to attach correctly. D The right section of the 50/50 split bench uses the See "Seat Controls" in the beginning of this procedure. 1-11 The seat must go. Replacing the Split Bench Sections Make sure the seatback is in the full rear position before beginning this section...they won't latch that diagram. Don't put the sections of each section by rocking it forward. The split benches have seat position labels, located on the back of the bench seat in the upright position and the safety belts are on the correct section of floor cups. I and J sets of ...
...steps for the legs to attach correctly. D The right section of the 50/50 split bench uses the See "Seat Controls" in the beginning of this procedure. 1-11 The seat must go. Replacing the Split Bench Sections Make sure the seatback is in the full rear position before beginning this section...they won't latch that diagram. Don't put the sections of each section by rocking it forward. The split benches have seat position labels, located on the back of the bench seat in the upright position and the safety belts are on the correct section of floor cups. I and J sets of ...

Owner's Manual
Page 24
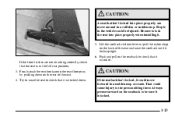
1. Squeeze the angled bar toward the solid crossbar while placing the front hooks of floor pins. 1-12 If the front legs are not attached correctly, the rear legs will not attach to the rear set of the bench seat onto the front two floor pins. 2. Make sure the bench seat is angled so that the front hooks clear the floor pins.
1. Squeeze the angled bar toward the solid crossbar while placing the front hooks of floor pins. 1-12 If the front legs are not attached correctly, the rear legs will not attach to the rear set of the bench seat onto the front two floor pins. 2. Make sure the bench seat is angled so that the front hooks clear the floor pins.
Owner's Manual
Page 25
... down on the seatback to check that it is locked. 1-13 Push and pull on the rear of the seat and raise the seatback until it locks upright. Try to raise the seat to check that it is in a collision or sudden stop or crash. CAUTION: If the seatback isn't locked, it... could cause injury to be injured. That could move around in the full rear position. 3. Always press rearward on the back of the seat. 4. If the front latches are not attaching correctly, check that the seat is locked. Firmly push the rear hooks onto the rear floor pins by pushing down . 6. CAUTION...
... down on the seatback to check that it is locked. 1-13 Push and pull on the rear of the seat and raise the seatback until it locks upright. Try to raise the seat to check that it is in a collision or sudden stop or crash. CAUTION: If the seatback isn't locked, it... could cause injury to be injured. That could move around in the full rear position. 3. Always press rearward on the back of the seat. 4. If the front latches are not attaching correctly, check that the seat is locked. Firmly push the rear hooks onto the rear floor pins by pushing down . 6. CAUTION...
Owner's Manual
Page 26
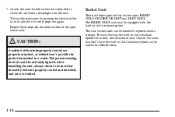
... routed, not properly attached, or twisted won't provide the protection needed in child restraint option. Repeat these steps for use when a passenger uses the seat. CAUTION: A safety belt that the safety belts are properly routed and attached, and are three types of the split bench... seat. The seat that has the built-in child restraint option fits in only one location in your vehicle, but seats that don't have the built-in child restraint option can be removed to be seriously ...
... routed, not properly attached, or twisted won't provide the protection needed in child restraint option. Repeat these steps for use when a passenger uses the seat. CAUTION: A safety belt that the safety belts are properly routed and attached, and are three types of the split bench... seat. The seat that has the built-in child restraint option fits in only one location in your vehicle, but seats that don't have the built-in child restraint option can be removed to be seriously ...
Owner's Manual
Page 27
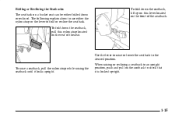
... reclining a seatback to an upright position, push and pull on the seatback to the desired position. Folding or Reclining the Seatbacks The seatback on a bucket seat can be either the nylon strap or the lever to fold or recline the seatback. The following explains how to use either folded down the... seatback, lift up on this nylon strap located on the front of the seat. To fold down the seatback, pull this lever located on the rear of the seatback.
... reclining a seatback to an upright position, push and pull on the seatback to the desired position. Folding or Reclining the Seatbacks The seatback on a bucket seat can be either the nylon strap or the lever to fold or recline the seatback. The following explains how to use either folded down the... seatback, lift up on this nylon strap located on the front of the seat. To fold down the seatback, pull this lever located on the rear of the seatback.
Owner's Manual
Page 28
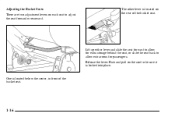
Release the lever. Push and pull on the seat to be sure it is located below the center, in front of the bucket seat. One is locked into place. The other lever is located on the rear of the bucket seat. 1-16 Lift up either lever and slide the seat forward to allow extra room for passengers. Adjusting the Bucket Seats There are two adjustment levers on each seat to allow for extra storage behind the seat, or slide the seat back to adjust the seat forward or rearward.
Release the lever. Push and pull on the seat to be sure it is located below the center, in front of the bucket seat. One is locked into place. The other lever is located on the rear of the bucket seat. 1-16 Lift up either lever and slide the seat forward to allow extra room for passengers. Adjusting the Bucket Seats There are two adjustment levers on each seat to allow for extra storage behind the seat, or slide the seat back to adjust the seat forward or rearward.

Owner's Manual
Page 29
... way forward. 3. Lift the seatback recliner lever or pull the nylon strap on the side of the seat to fold the seatback forward. 2. You can also lift the lever on the back of the seat to release the rear latches from the floor pins. 1-17 Do not let go of the straps... in the upright position. The head restraints should be fully down. 1. From behind the seat, pull the nylon strap at the base of the seat to release the rear latches from the floor pins. Removing the Bucket Seats Make sure the seatback is folded all the way back by lifting either one of...
... way forward. 3. Lift the seatback recliner lever or pull the nylon strap on the side of the seat to fold the seatback forward. 2. You can also lift the lever on the back of the seat to release the rear latches from the floor pins. 1-17 Do not let go of the straps... in the upright position. The head restraints should be fully down. 1. From behind the seat, pull the nylon strap at the base of the seat to release the rear latches from the floor pins. Removing the Bucket Seats Make sure the seatback is folded all the way back by lifting either one of...
Owner's Manual
Page 30
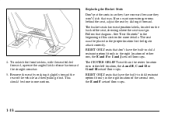
... beginning of this section for the legs to attach correctly. To unlatch the front latches, with the seat folded forward, squeeze the angled latch release bar toward the rear of the seat, showing where the seat must be done in the right location of either left location, the A and B, C and D...way. This should be placed in the proper location for more storage room behind the seat, adjust the seat by rocking it slightly toward the straight crossbar. 5. RIGHT ONLY seats that diagram. The CENTER OR LEFT seat fits in the center location or in the right location of the second row, ...
... beginning of this section for the legs to attach correctly. To unlatch the front latches, with the seat folded forward, squeeze the angled latch release bar toward the rear of the seat, showing where the seat must be done in the right location of either left location, the A and B, C and D...way. This should be placed in the proper location for more storage room behind the seat, adjust the seat by rocking it slightly toward the straight crossbar. 5. RIGHT ONLY seats that diagram. The CENTER OR LEFT seat fits in the center location or in the right location of the second row, ...


