Owner's Manual
Page 8
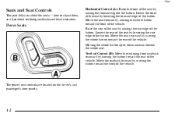
... of the seat by moving the whole button toward the front of the vehicle. The power seat controls are located on the driver's and passenger's door panels. 1-2 yellowblue Seats and Seat Controls This part tells you about reclining seatbacks and head restraints. Move the seatback forward by raising the rear edge of...
... of the seat by moving the whole button toward the front of the vehicle. The power seat controls are located on the driver's and passenger's door panels. 1-2 yellowblue Seats and Seat Controls This part tells you about reclining seatbacks and head restraints. Move the seatback forward by raising the rear edge of...
Owner's Manual
Page 9
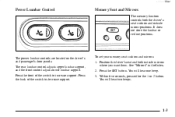
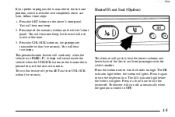
... outside mirrors where you want them. Within five seconds, press either the 1 or 2 button. The power lumbar controls are located on the driver's and passenger's door panels. Press the back of the switch to decrease support. Press the SET button. yellowblue Power Lumbar Control Memory Seat and Mirrors The memory function controls...
... outside mirrors where you want them. Within five seconds, press either the 1 or 2 button. The power lumbar controls are located on the driver's and passenger's door panels. Press the back of the switch to decrease support. Press the SET button. yellowblue Power Lumbar Control Memory Seat and Mirrors The memory function controls...
Owner's Manual
Page 10
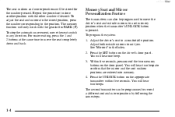
... transmitters can be programmed to move the driver's seat and outside mirrors to suit you. Press the UNLOCK button on the driver's door panel. Adjust both outside mirrors to store another position with the gearshift in PARK (P). Press the SET button on the appropriate transmitter within five... seconds. You will hear one of the two memory buttons on the door panel. To program the system: 1. Repeat the procedure to a set memory position when the transmitter's UNLOCK button is pressed. See "Mirrors" in...
... transmitters can be programmed to move the driver's seat and outside mirrors to suit you. Press the UNLOCK button on the driver's door panel. Adjust both outside mirrors to store another position with the gearshift in PARK (P). Press the SET button on the appropriate transmitter within five... seconds. You will hear one of the two memory buttons on the door panel. To program the system: 1. Repeat the procedure to a set memory position when the transmitter's UNLOCK button is pressed. See "Mirrors" in...
Owner's Manual
Page 11
... The heater will sound inside the vehicle when the UNLOCK button on low. Press the button once to turn the heater on the driver's door panel. Press it again to turn the heater on the transmitter is in PARK (P). This feature will hear two beeps. The HI indicator light ...time to OFF. To turn the heater off. The LO indicator light below the button will glow. Press the UNLOCK button on the driver's door panel. This personalization feature will not move the seat and mirrors. yellowblue If you prefer to program the transmitter to move at this feature off ...
... The heater will sound inside the vehicle when the UNLOCK button on low. Press the button once to turn the heater on the driver's door panel. Press it again to turn the heater on the transmitter is in PARK (P). This feature will hear two beeps. The HI indicator light ...time to OFF. To turn the heater off. The LO indicator light below the button will glow. Press the UNLOCK button on the driver's door panel. This personalization feature will not move the seat and mirrors. yellowblue If you prefer to program the transmitter to move at this feature off ...

Owner's Manual
Page 31
Some components of the vehicle after an air bag inflates? the steering wheel hub for the driver's air bag, or the instrument panel for service. The parts of the bag that your air bag system won 't be warm, but can mean that come into contact with you may ... you 'll need to replace other parts. D Your vehicle is equipped with a history of the system, when the sensors are broken by opening a window or door. system. If you have breathing problems but not too hot to touch. This dust could cause breathing problems for your air bag 1-25 In many...
Some components of the vehicle after an air bag inflates? the steering wheel hub for the driver's air bag, or the instrument panel for service. The parts of the bag that your air bag system won 't be warm, but can mean that come into contact with you may ... you 'll need to replace other parts. D Your vehicle is equipped with a history of the system, when the sensors are broken by opening a window or door. system. If you have breathing problems but not too hot to touch. This dust could cause breathing problems for your air bag 1-25 In many...
Owner's Manual
Page 59
...you have a problem. 2-2 2-4 2-9 2-14 2-15 2-16 2-18 2-19 2-20 2-21 2-23 2-24 2-27 2-28 2-30 2-31 Keys Door Locks Remote Lock Control Trunk Theft Universal Theft-Deterrent PASS-KeyRII New Vehicle "Break-In" Ignition Positions Starting Your Engine Engine Coolant Heater (Option) Automatic .../Multifunction Lever Exterior Lamps Interior Lamps Mirrors Storage Compartments Accessory Power Outlet OnStarR System (Option) Sunroof (Option) Universal Transmitter The Instrument Panel - and what to do if you can learn about the many standard and optional features on your vehicle, and information on starting...
...you have a problem. 2-2 2-4 2-9 2-14 2-15 2-16 2-18 2-19 2-20 2-21 2-23 2-24 2-27 2-28 2-30 2-31 Keys Door Locks Remote Lock Control Trunk Theft Universal Theft-Deterrent PASS-KeyRII New Vehicle "Break-In" Ignition Positions Starting Your Engine Engine Coolant Heater (Option) Automatic .../Multifunction Lever Exterior Lamps Interior Lamps Mirrors Storage Compartments Accessory Power Outlet OnStarR System (Option) Sunroof (Option) Universal Transmitter The Instrument Panel - and what to do if you can learn about the many standard and optional features on your vehicle, and information on starting...
Owner's Manual
Page 72
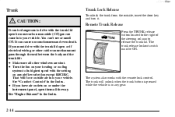
If you have air outlets on or under the instrument panel, open because carbon monoxide (CO) gas can come into your vehicle. D If you must drive with the trunk lid open or if electrical wiring or ... unlock the trunk from the outside air into your heating or cooling system to release the trunk lid. The trunk will force outside , insert the door key and turn it. That will unlock when the trunk button is pressed while the vehicle is in any airflow selection except RECIRC. It can...
If you have air outlets on or under the instrument panel, open because carbon monoxide (CO) gas can come into your vehicle. D If you must drive with the trunk lid open or if electrical wiring or ... unlock the trunk from the outside air into your heating or cooling system to release the trunk lid. The trunk will force outside , insert the door key and turn it. That will unlock when the trunk button is pressed while the vehicle is in any airflow selection except RECIRC. It can...

Owner's Manual
Page 79
...leave your key in any other position than LOCK, your battery will discharge prematurely. START (E): This position starts your shift lever to display some instrument panel warning lights. When the engine starts, release the key. If none of this works, then your hand. If it could break the key or ... your key in LOCK and you are using the correct key; Your engine won't start your engine and release the switch. But if you open a door, power is not running, you 're already moving, use RUN to such accessories as the radio, power windows, and sunroof (option) for normal driving....
...leave your key in any other position than LOCK, your battery will discharge prematurely. START (E): This position starts your shift lever to display some instrument panel warning lights. When the engine starts, release the key. If none of this works, then your hand. If it could break the key or ... your key in LOCK and you are using the correct key; Your engine won't start your engine and release the switch. But if you open a door, power is not running, you 're already moving, use RUN to such accessories as the radio, power windows, and sunroof (option) for normal driving....
Owner's Manual
Page 102
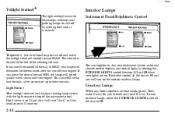
... instrument cluster, radio and climate control displays and control lights by sensing how dark it is located to the left of the instrument panel. Light Sensor Your twilight sentinel and daytime running lamps work with the light sensor on . yellowblue Twilight SentinelR Twilight sentinel turns the headlamps...this delay time for you will go on top of the steering column. Interior Lamps Instrument Panel Brightness Control To operate it easy for only a few seconds or up . Courtesy Lamps When any door is opened, several lamps go off your engine. If you turn on . They make it...
... instrument cluster, radio and climate control displays and control lights by sensing how dark it is located to the left of the instrument panel. Light Sensor Your twilight sentinel and daytime running lamps work with the light sensor on . yellowblue Twilight SentinelR Twilight sentinel turns the headlamps...this delay time for you will go on top of the steering column. Interior Lamps Instrument Panel Brightness Control To operate it easy for only a few seconds or up . Courtesy Lamps When any door is opened, several lamps go off your engine. If you turn on . They make it...
Owner's Manual
Page 103
... fully automatic. Exit Lighting With this procedure. When you close the door with the ignition off . Note that locking the doors with the light sensor for a three to enter your instrument panel displays once again. This feature operates with the power door lock switch will override the delayed illumination feature and the lights will...
... fully automatic. Exit Lighting With this procedure. When you close the door with the ignition off . Note that locking the doors with the light sensor for a three to enter your instrument panel displays once again. This feature operates with the power door lock switch will override the delayed illumination feature and the lights will...
Owner's Manual
Page 119
Fog Lamp Switch C. Driver Information Center I. Instrument Panel Intensity Control/Interior Lamp Control M. Tilt Steering Wheel Lever P. Fuel Door Release Switch T. Ashtray and Lighter U. Selectable Shift W. Climate Controls J. Steering Wheel Touch Controls for Climate Control System O. Trunk Release Switch S. Ignition ... Warning Flashers Switch F. Glove Box (Remote Trunk Release Lockout Switch inside) L. Instrument Cluster/Gages E. yellowblue The main components of your instrument panel are: A. Power Mirrors Control Switch B. Accessory Power Outlet 2-61
Fog Lamp Switch C. Driver Information Center I. Instrument Panel Intensity Control/Interior Lamp Control M. Tilt Steering Wheel Lever P. Fuel Door Release Switch T. Ashtray and Lighter U. Selectable Shift W. Climate Controls J. Steering Wheel Touch Controls for Climate Control System O. Trunk Release Switch S. Ignition ... Warning Flashers Switch F. Glove Box (Remote Trunk Release Lockout Switch inside) L. Instrument Cluster/Gages E. yellowblue The main components of your instrument panel are: A. Power Mirrors Control Switch B. Accessory Power Outlet 2-61
Owner's Manual
Page 146
... automatic airflow distribution by turning off the automatic fan mode and changing the fan speed. HEAT: This setting directs most of the instrument panel that detect direct sunlight. yellowblue In cold weather, the system will be displayed. The length of the delay depends on the top of...seconds, then the outside temperature. After you turn the AUTO FAN knob to a metric display, push the OFF button located in the instrument panel and door panels. Turning the AUTO FAN knob will override this knob, the comfort setting will be displayed for two seconds. There is also a small ...
... automatic airflow distribution by turning off the automatic fan mode and changing the fan speed. HEAT: This setting directs most of the instrument panel that detect direct sunlight. yellowblue In cold weather, the system will be displayed. The length of the delay depends on the top of...seconds, then the outside temperature. After you turn the AUTO FAN knob to a metric display, push the OFF button located in the instrument panel and door panels. Turning the AUTO FAN knob will override this knob, the comfort setting will be displayed for two seconds. There is also a small ...
Owner's Manual
Page 277
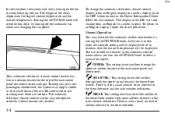
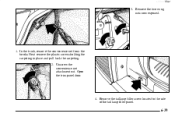
Remove the two wing nuts now exposed. 1. Next remove the plastic screws holding the carpeting in place and pull back the carpeting. 2. In the trunk, remove the convenience net from the hooks. Remove the taillamp filler screw located to the side of the taillamp filler panel. 6-39 Open the trim panel door. 4. Unscrew the convenience net attachment nut. yellowblue 3.
Remove the two wing nuts now exposed. 1. Next remove the plastic screws holding the carpeting in place and pull back the carpeting. 2. In the trunk, remove the convenience net from the hooks. Remove the taillamp filler screw located to the side of the taillamp filler panel. 6-39 Open the trim panel door. 4. Unscrew the convenience net attachment nut. yellowblue 3.
Owner's Manual
Page 296
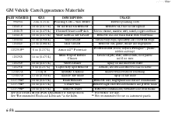
.... (0.473 L) Finish Enhancer 12377966* 16 oz. (0.473 L) Cleaner Wax 12377984* 16 oz. (0.473 L) Surface Cleaner See your General Motors Parts Department for use on instrument panels. x 25 in. 16 oz. (0.473 L) 16 oz. (0.473 L) 16 oz. (0.473 L) 32 oz. (0.946 L) 23 oz. (0.680 L) 8 oz. (0.237 L) 16... dirt, grime, smoke and fingerprints Protects leather, wood, acrylics, Plexiglas , plastic, rubber and vinyl Cleans carpets, seats, interior trim, door panels and floor mats Spray on and rinse with water Attracts, absorbs and removes soils on fabric Shines vehicle without scratching Spray on tire shine ...
.... (0.473 L) Finish Enhancer 12377966* 16 oz. (0.473 L) Cleaner Wax 12377984* 16 oz. (0.473 L) Surface Cleaner See your General Motors Parts Department for use on instrument panels. x 25 in. 16 oz. (0.473 L) 16 oz. (0.473 L) 16 oz. (0.473 L) 32 oz. (0.946 L) 23 oz. (0.680 L) 8 oz. (0.237 L) 16... dirt, grime, smoke and fingerprints Protects leather, wood, acrylics, Plexiglas , plastic, rubber and vinyl Cleans carpets, seats, interior trim, door panels and floor mats Spray on and rinse with water Attracts, absorbs and removes soils on fabric Shines vehicle without scratching Spray on tire shine ...
Owner's Manual
Page 300
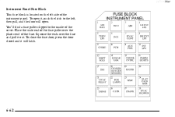
You'll find a fuse puller clipped to the left side of the cover. yellowblue Instrument Panel Fuse Block This fuse block is located on the left , then pull, and the door will latch. 6-62 Squeeze the ends over the plastic end of the fuse. Place the wide end of the fuse puller over the fuse and pull it will open. To open it, push the latch to the inside of the instrument panel. To close the fuse door, press the door closed and it out.
You'll find a fuse puller clipped to the left side of the cover. yellowblue Instrument Panel Fuse Block This fuse block is located on the left , then pull, and the door will latch. 6-62 Squeeze the ends over the plastic end of the fuse. Place the wide end of the fuse puller over the fuse and pull it will open. To open it, push the latch to the inside of the instrument panel. To close the fuse door, press the door closed and it out.
Owner's Manual
Page 306
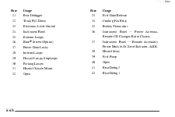
Remote Accessory Power Module, Oil Level Indicator, ALDL Heated Seats Fuel Pump Open Rear Defog 2 Rear Defog 1 6-68 yellowblue Fuse 21 22 23 24 25 26 27 28 29 30 31 32 Usage Rear Defogger Trunk Pull Down Electronic Level Control Instrument Panel Exterior Lamps BoseR Stereo (Option) Power Door Locks Interior Lamps Hazard Lamps, Stoplamps Parking Lamps Heated Outside Mirror Open 38 39 40 41 42 Fuse 33 34 35 36 37 Usage Fuel Door Release Cooling Fan Relay Battery Thermistor Instrument Panel -- Power Antenna, Remote CD Changer, Radio Chassis Instrument Panel --
Remote Accessory Power Module, Oil Level Indicator, ALDL Heated Seats Fuel Pump Open Rear Defog 2 Rear Defog 1 6-68 yellowblue Fuse 21 22 23 24 25 26 27 28 29 30 31 32 Usage Rear Defogger Trunk Pull Down Electronic Level Control Instrument Panel Exterior Lamps BoseR Stereo (Option) Power Door Locks Interior Lamps Hazard Lamps, Stoplamps Parking Lamps Heated Outside Mirror Open 38 39 40 41 42 Fuse 33 34 35 36 37 Usage Fuel Door Release Cooling Fan Relay Battery Thermistor Instrument Panel -- Power Antenna, Remote CD Changer, Radio Chassis Instrument Panel --
Owner's Manual
Page 350
...Cassette Deck Service ...7-14 Cassette Tape Player ...3-10, 3-13 Care ...3-24 Errors ...3-13 Cellular Telephone ...2-54 Center Passenger Position ...1-32 Central Door Unlocking System ...2-4 Certification Label ...4-30 Chains, Safety ...4-35 Chains, Tire ...6-50 Change Oil Soon Message ...2-78 Changing a Flat Tire ...5-19...15 Cleaning Aluminum or Chrome-Plated Wheels ...6-56 Fabric ...6-51 Glass Surfaces ...6-54 Inside of Your Vehicle ...6-51 Instrument Panel ...6-53 Leather ...6-53 Outside of Your Vehicle ...6-55 Special Problems ...6-52 Stains ...6-51 Tires ...6-56 Vinyl ...6-53 Wheels ...6-...
...Cassette Deck Service ...7-14 Cassette Tape Player ...3-10, 3-13 Care ...3-24 Errors ...3-13 Cellular Telephone ...2-54 Center Passenger Position ...1-32 Central Door Unlocking System ...2-4 Certification Label ...4-30 Chains, Safety ...4-35 Chains, Tire ...6-50 Change Oil Soon Message ...2-78 Changing a Flat Tire ...5-19...15 Cleaning Aluminum or Chrome-Plated Wheels ...6-56 Fabric ...6-51 Glass Surfaces ...6-54 Inside of Your Vehicle ...6-51 Instrument Panel ...6-53 Leather ...6-53 Outside of Your Vehicle ...6-55 Special Problems ...6-52 Stains ...6-51 Tires ...6-56 Vinyl ...6-53 Wheels ...6-...
Owner's Manual
Page 353
...Range Display ...2-77 Used Display ...2-77 Used Reset, (DIC) ...2-77 Fuses and Circuit Breakers ...6-61 Engine Coolant Temperature ...2-70 Fuel ...2-74 Garage Door Opener ...2-56 Garment Hook ...2-54 GAWR ...4-30 Glove Box ...2-51 GM Mobility Program ...8-5 Gross Axle Weight Rating (GAWR) ...4-30 Gross Vehicle Weight... System ...Engine Cooling System ...Exhaust Systems ...Front-Wheel-Drive Axle Boot and Seal ...Steering ...Suspension ...Throttle System ...Instrument Panel ...Brightness Control ...Cleaning ... 2-20 7-17 2-45 2-47 6-44 7-18 7-19 7-18 7-18 7-18 7-18 7-18 7-19 2-60 2-44 6-53 9-5
...Range Display ...2-77 Used Display ...2-77 Used Reset, (DIC) ...2-77 Fuses and Circuit Breakers ...6-61 Engine Coolant Temperature ...2-70 Fuel ...2-74 Garage Door Opener ...2-56 Garment Hook ...2-54 GAWR ...4-30 Glove Box ...2-51 GM Mobility Program ...8-5 Gross Axle Weight Rating (GAWR) ...4-30 Gross Vehicle Weight... System ...Engine Cooling System ...Exhaust Systems ...Front-Wheel-Drive Axle Boot and Seal ...Steering ...Suspension ...Throttle System ...Instrument Panel ...Brightness Control ...Cleaning ... 2-20 7-17 2-45 2-47 6-44 7-18 7-19 7-18 7-18 7-18 7-18 7-18 7-19 2-60 2-44 6-53 9-5
Owner's Manual
Page 354
... Locks ...2-4 Anti-Lockout Feature ...2-9 Cylinders ...7-15 Delayed Locking ...2-6 Door ...2-4 Ignition Transaxle Lock Check ...7-17 Key Lock Cylinder Service ...7-15 Memory Door ...2-5, 2-11 Power Door ...2-5 Programmable Automatic Door ...2-5 Rear Door Security ...2-7 Trunk ...2-14 Window ...2-33 Lubricants and Fluids ...7-20...30 Vehicle Identification Number ...6-59 Lamps ...2-42 Cornering ...2-43 Courtesy ...2-44 Interior ...2-44 On Reminder ...2-37 Panel ...2-44 Leaving Your Vehicle ...2-9 Leaving Your Vehicle with the Engine Running ...2-29 Level Control, Electronic ...4-31 Light Sensor...
... Locks ...2-4 Anti-Lockout Feature ...2-9 Cylinders ...7-15 Delayed Locking ...2-6 Door ...2-4 Ignition Transaxle Lock Check ...7-17 Key Lock Cylinder Service ...7-15 Memory Door ...2-5, 2-11 Power Door ...2-5 Programmable Automatic Door ...2-5 Rear Door Security ...2-7 Trunk ...2-14 Window ...2-33 Lubricants and Fluids ...7-20...30 Vehicle Identification Number ...6-59 Lamps ...2-42 Cornering ...2-43 Courtesy ...2-44 Interior ...2-44 On Reminder ...2-37 Panel ...2-44 Leaving Your Vehicle ...2-9 Leaving Your Vehicle with the Engine Running ...2-29 Level Control, Electronic ...4-31 Light Sensor...


