Owner's Manual
Page 59
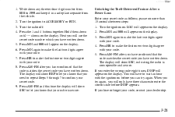
... 2-47 2-51 2-54 2-54 2-55 2-56 2-60 2-64 2-75 Engine Exhaust Windows Tilt Wheel Turn Signal/Multifunction Lever Exterior Lamps Interior Lamps Mirrors Storage Compartments Accessory Power Outlet OnStarR System (Option) Sunroof (Option) Universal Transmitter The Instrument Panel - and what to do if you can learn about the many standard and...
... 2-47 2-51 2-54 2-54 2-55 2-56 2-60 2-64 2-75 Engine Exhaust Windows Tilt Wheel Turn Signal/Multifunction Lever Exterior Lamps Interior Lamps Mirrors Storage Compartments Accessory Power Outlet OnStarR System (Option) Sunroof (Option) Universal Transmitter The Instrument Panel - and what to do if you can learn about the many standard and...
Owner's Manual
Page 78
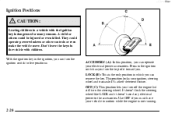
...They could be injured or even killed. With the ignition key in the ignition, you can turn the ignition switch to the accessories. This position locks your electrical power accessories. Use OFF if you must have your vehicle in the ignition switch as you turn the steering wheel. OFF (C): This position...'t leave the keys in which you turn off the engine but still turn the top of it doesn't send any electrical power to five positions: ACCESSORY (A): In this position, you . LOCK (B): This is the only position in the vehicle with the ignition key is not running. 2-20 It's a theft-...
...They could be injured or even killed. With the ignition key in the ignition, you can turn the ignition switch to the accessories. This position locks your electrical power accessories. Use OFF if you must have your vehicle in the ignition switch as you turn the steering wheel. OFF (C): This position...'t leave the keys in which you turn off the engine but still turn the top of it doesn't send any electrical power to five positions: ACCESSORY (A): In this position, you . LOCK (B): This is the only position in the vehicle with the ignition key is not running. 2-20 It's a theft-...

Owner's Manual
Page 79
...the key, you leave your key in LOCK and you are using the correct key; If none of this works, then your engine. Retained Accessory Power After you can 't turn the key hard. If it all the way in any other position -- When the engine starts, release the ...key. But if you open the driver's door. Your engine won't start your electrical power accessories and to RUN for normal driving. But turn the ignition off , you will discharge prematurely. Key Reminder Warning If you will return to display...
...the key, you leave your key in LOCK and you are using the correct key; If none of this works, then your engine. Retained Accessory Power After you can 't turn the key hard. If it all the way in any other position -- When the engine starts, release the ...key. But if you open the driver's door. Your engine won't start your electrical power accessories and to RUN for normal driving. But turn the ignition off , you will discharge prematurely. Key Reminder Warning If you will return to display...
Owner's Manual
Page 80
.... 2-22 NOTICE: Holding your engine gets warm. NOTICE: Don't try to be flooded with the electronics in the Index. If you add electrical parts or accessories, you don't, your vehicle. Wait about 15 seconds between each try to shift to help avoid draining your battery or damaging your vehicle. If you...
.... 2-22 NOTICE: Holding your engine gets warm. NOTICE: Don't try to be flooded with the electronics in the Index. If you add electrical parts or accessories, you don't, your vehicle. Wait about 15 seconds between each try to shift to help avoid draining your battery or damaging your vehicle. If you...

Owner's Manual
Page 88
... the shift lever -- Shift to the OFF ignition position. Start the vehicle and then shift to fully apply your vehicle to turn off the retained accessory power feature. 2. You have left the engine running, the vehicle can roll. Then move suddenly. Turn the key to NEUTRAL (N). 4. You or others could be...
... the shift lever -- Shift to the OFF ignition position. Start the vehicle and then shift to fully apply your vehicle to turn off the retained accessory power feature. 2. You have left the engine running, the vehicle can roll. Then move suddenly. Turn the key to NEUTRAL (N). 4. You or others could be...
Owner's Manual
Page 91
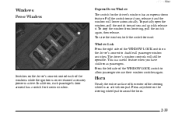
... yellowblue Windows Power Windows Express-Down Window The switch for its own window. Press the left side of the WINDOW LOCK switch on or retained accessory power is an active horn pad. Pull the switch toward you , release it . To partially open the window, pull the switch toward you and quickly...
... yellowblue Windows Power Windows Express-Down Window The switch for its own window. Press the left side of the WINDOW LOCK switch on or retained accessory power is an active horn pad. Pull the switch toward you , release it . To partially open the window, pull the switch toward you and quickly...

Owner's Manual
Page 111
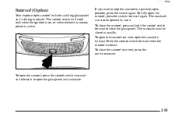
... swing down . 2-53 If you may press and release the cover. If you do , it won't be able to reveal the front ashtray, lighter and accessory power outlet. To extend the visor at the sides, pull out the extension.
... swing down . 2-53 If you may press and release the cover. If you do , it won't be able to reveal the front ashtray, lighter and accessory power outlet. To extend the visor at the sides, pull out the extension.

Owner's Manual
Page 112
Follow the proper installation instructions that are included with Location D Emergency Services Button D Remote Door Unlock 2-54 The accessory power outlet is off . D Theft Detection/Notification and Stolen-Vehicle Tracking D Automatic Notification of Air Bag Deployment D Concierge/...any electrical equipment should not exceed 15 amps. The following services are not designed to support clothing bars. NOTICE: When using the accessory power outlet, the maximum load of any electrical equipment you will not be compatible with the OnStar communications service. Garment hooks are ...
Follow the proper installation instructions that are included with Location D Emergency Services Button D Remote Door Unlock 2-54 The accessory power outlet is off . D Theft Detection/Notification and Stolen-Vehicle Tracking D Automatic Notification of Air Bag Deployment D Concierge/...any electrical equipment should not exceed 15 amps. The following services are not designed to support clothing bars. NOTICE: When using the accessory power outlet, the maximum load of any electrical equipment you will not be compatible with the OnStar communications service. Garment hooks are ...
Owner's Manual
Page 113
... sunroof rear vent, open the sunroof, press the switch rearward again. The control switch will work only when the ignition is on, or when retained accessory power is closed manually. To fully open the sunshade by hand. The sunshade can also be closed . To close the glass panel. To open the...
... sunroof rear vent, open the sunroof, press the switch rearward again. The control switch will work only when the ignition is on, or when retained accessory power is closed manually. To fully open the sunshade by hand. The sunshade can also be closed . To close the glass panel. To open the...

Owner's Manual
Page 117
... and release the button again (you may need to train the garage door opener motor head unit to recognize the Universal Transmitter. Release both buttons. Accessories Accessories for two to three seconds. yellowblue "Rolling Code" Programming (If Equipped) If you have not previously programmed the hand-held transmitter to open the garage...
... and release the button again (you may need to train the garage door opener motor head unit to recognize the Universal Transmitter. Release both buttons. Accessories Accessories for two to three seconds. yellowblue "Rolling Code" Programming (If Equipped) If you have not previously programmed the hand-held transmitter to open the garage...
Owner's Manual
Page 119
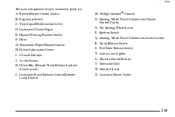
... Lever X. Hazard Warning Flashers Switch F. Instrument Panel Intensity Control/Interior Lamp Control M. Driver Information Center I. Ignition Switch Q. Ashtray and Lighter U. Traction Control Button V. Selectable Shift W. Accessory Power Outlet 2-61 Fog Lamp Switch C. Instrument Cluster/Gages E. Glove Box (Remote Trunk Release Lockout Switch inside) L. Tilt Steering Wheel Lever P. yellowblue The main components...
... Lever X. Hazard Warning Flashers Switch F. Instrument Panel Intensity Control/Interior Lamp Control M. Driver Information Center I. Ignition Switch Q. Ashtray and Lighter U. Traction Control Button V. Selectable Shift W. Accessory Power Outlet 2-61 Fog Lamp Switch C. Instrument Cluster/Gages E. Glove Box (Remote Trunk Release Lockout Switch inside) L. Tilt Steering Wheel Lever P. yellowblue The main components...
Owner's Manual
Page 124
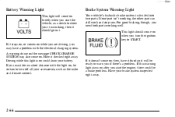
... the radio and climate control. If this light is on , be certain to turn the ignition key to show you if there's a problem. Have your accessories, such as a check to START. If it stays on, or comes on when you . For good braking, though, you need both parts working , the other...
... the radio and climate control. If this light is on , be certain to turn the ignition key to show you if there's a problem. Have your accessories, such as a check to START. If it stays on, or comes on when you . For good braking, though, you need both parts working , the other...
Owner's Manual
Page 163
... down any three or four-digit number from 000 to make the first one or two digits agree with your code. 5. Press MN again to 1999 and keep it in a safe place separate from the vehicle. 2. Press MN and 000 will appear on the display. 2. Press AM-FM after you have... wrong code eight times, INOP will appear on before INOP appears. The display will show SEC to confirm your dealership. 3-21 Press MN again to ACCESSORY or RUN. 3. Press AM-FM and this time the display will have written down . You will show SEC, indicating the radio is secure. shows on...
... down any three or four-digit number from 000 to make the first one or two digits agree with your code. 5. Press MN again to 1999 and keep it in a safe place separate from the vehicle. 2. Press MN and 000 will appear on the display. 2. Press AM-FM after you have... wrong code eight times, INOP will appear on before INOP appears. The display will show SEC to confirm your dealership. 3-21 Press MN again to ACCESSORY or RUN. 3. Press AM-FM and this time the display will have written down . You will show SEC, indicating the radio is secure. shows on...

Owner's Manual
Page 164
... to make the last two digits agree with your code. 6. Press MN and 000 will appear on your secret code as follows; Press HR to ACCESSORY or RUN. 2. To unlock a secured radio, see "Unlocking the Theft-Deterrent Feature After a Power Loss" earlier in this feature, you can control certain radio functions...
... to make the last two digits agree with your code. 6. Press MN and 000 will appear on your secret code as follows; Press HR to ACCESSORY or RUN. 2. To unlock a secured radio, see "Unlocking the Theft-Deterrent Feature After a Power Loss" earlier in this feature, you can control certain radio functions...

Owner's Manual
Page 212
Open the hoods and locate the other . Unplug unnecessary accessories plugged into the cigarette lighter or accessory power outlet. If they are, it could save both batteries. This will avoid sparks and help save your warranty. The repairs wouldn't be covered by ...
Open the hoods and locate the other . Unplug unnecessary accessories plugged into the cigarette lighter or accessory power outlet. If they are, it could save both batteries. This will avoid sparks and help save your warranty. The repairs wouldn't be covered by ...

Owner's Manual
Page 298
... the overload is caused by your vehicle, see "Servicing Your Air Bag-Equipped Vehicle" in the fuse panel protect the power windows and other power accessories. Your vehicle has an air bag system. yellowblue Electrical System Add-On Electrical Equipment Headlamp Wiring The headlamp wiring is protected by an internal circuit...
... the overload is caused by your vehicle, see "Servicing Your Air Bag-Equipped Vehicle" in the fuse panel protect the power windows and other power accessories. Your vehicle has an air bag system. yellowblue Electrical System Add-On Electrical Equipment Headlamp Wiring The headlamp wiring is protected by an internal circuit...

Owner's Manual
Page 304
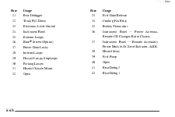
Accessory Relay Open 6-66 yellowblue Fuse 1 2 3 4 5 6 7-10 11 12 13 14 15 16 17-22 23 24 Usage Open Electronic Level Control Relay Trunk Release Relay Open Fuel Pump Relay Driver Door Unlock Relay Open Rear Defogger Relay (Upper Zone) Rear Defogger Relay (Lower Zone) Open Spare Spare Spare Open Direct Accessory Power --
Accessory Relay Open 6-66 yellowblue Fuse 1 2 3 4 5 6 7-10 11 12 13 14 15 16 17-22 23 24 Usage Open Electronic Level Control Relay Trunk Release Relay Open Fuel Pump Relay Driver Door Unlock Relay Open Rear Defogger Relay (Upper Zone) Rear Defogger Relay (Lower Zone) Open Spare Spare Spare Open Direct Accessory Power --
Owner's Manual
Page 306
Power Antenna, Remote CD Changer, Radio Chassis Instrument Panel -- Remote Accessory Power Module, Oil Level Indicator, ALDL Heated Seats Fuel Pump Open Rear Defog 2 Rear Defog 1 6-68 yellowblue Fuse 21 22 23 24 25 26 27 28 29 30 31 32 Usage Rear Defogger Trunk Pull Down Electronic Level Control Instrument Panel Exterior Lamps BoseR Stereo (Option) Power Door Locks Interior Lamps Hazard Lamps, Stoplamps Parking Lamps Heated Outside Mirror Open 38 39 40 41 42 Fuse 33 34 35 36 37 Usage Fuel Door Release Cooling Fan Relay Battery Thermistor Instrument Panel --
Power Antenna, Remote CD Changer, Radio Chassis Instrument Panel -- Remote Accessory Power Module, Oil Level Indicator, ALDL Heated Seats Fuel Pump Open Rear Defog 2 Rear Defog 1 6-68 yellowblue Fuse 21 22 23 24 25 26 27 28 29 30 31 32 Usage Rear Defogger Trunk Pull Down Electronic Level Control Instrument Panel Exterior Lamps BoseR Stereo (Option) Power Door Locks Interior Lamps Hazard Lamps, Stoplamps Parking Lamps Heated Outside Mirror Open 38 39 40 41 42 Fuse 33 34 35 36 37 Usage Fuel Door Release Cooling Fan Relay Battery Thermistor Instrument Panel --

Owner's Manual
Page 310
... (189.0 cm) Height ...55.4 inches (141.0 cm) Wheelbase ...113.8 inches (289.1 cm) Front Tread ...62.5 inches (159.0 cm) Rear Tread ...62.5 inches (159.0 cm) Engine Accessory Belt Routing The 4.0 L V8 engine uses an engine...
... (189.0 cm) Height ...55.4 inches (141.0 cm) Wheelbase ...113.8 inches (289.1 cm) Front Tread ...62.5 inches (159.0 cm) Rear Tread ...62.5 inches (159.0 cm) Engine Accessory Belt Routing The 4.0 L V8 engine uses an engine...

Owner's Manual
Page 320
... oil and filter change). (See footnote #.) j Rotate tires. j Inspect fuel tank, cap and lines for proper rotation pattern and additional information. (See footnote +.) j Inspect engine accessory drive belt. yellowblue Scheduled Maintenance 60,000 Miles (100 000 km) (Continued) Inspect throttle body bore and valve plates for deposits, open the throttle valve...
... oil and filter change). (See footnote #.) j Rotate tires. j Inspect fuel tank, cap and lines for proper rotation pattern and additional information. (See footnote +.) j Inspect engine accessory drive belt. yellowblue Scheduled Maintenance 60,000 Miles (100 000 km) (Continued) Inspect throttle body bore and valve plates for deposits, open the throttle valve...
