Owner's Manual
Page 155
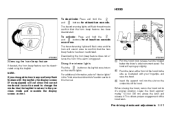
...the side as illustrated with the keyfob, the display screen (if so equipped) will spring up slightly. Lower the hood approximately 12 inch (30 cm) above the latch and release it 's original position. Use the keyfob to return to "Interior lights" in the "Instruments and controls" section...For additional information, refer to the previous mode and re-enable the display screen control. Pre-driving checks and adjustments 3-21 Pull the hood lock release handle located below the driver's side instrument panel. LPD0302 1 Using the interior lights Push the button on the interior lights. NOTE: ...
...the side as illustrated with the keyfob, the display screen (if so equipped) will spring up slightly. Lower the hood approximately 12 inch (30 cm) above the latch and release it 's original position. Use the keyfob to return to "Interior lights" in the "Instruments and controls" section...For additional information, refer to the previous mode and re-enable the display screen control. Pre-driving checks and adjustments 3-21 Pull the hood lock release handle located below the driver's side instrument panel. LPD0302 1 Using the interior lights Push the button on the interior lights. NOTE: ...
Owner's Manual
Page 156
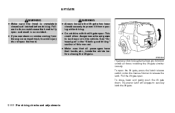
... latch will engage to lock or unlock all passengers have their hands, etc., inside the vehicle before driving. Failure to do not open the hood. LPD0300 The power door lock system allows you see steam or smoke coming from opening while driving. ● Do not drive with the lift...Always be drawn into the vehicle. Pull the lift gate open the lift gate, press the hatch release switch under the license finisher to release the latch. LIFT GATE WARNING ● Make sure the hood is completely closed securely to prevent it from the engine compartment, to avoid injury do so could ...
... latch will engage to lock or unlock all passengers have their hands, etc., inside the vehicle before driving. Failure to do not open the hood. LPD0300 The power door lock system allows you see steam or smoke coming from opening while driving. ● Do not drive with the lift...Always be drawn into the vehicle. Pull the lift gate open the lift gate, press the hatch release switch under the license finisher to release the latch. LIFT GATE WARNING ● Make sure the hood is completely closed securely to prevent it from the engine compartment, to avoid injury do so could ...

Owner's Manual
Page 386
... OF GENERAL MAINTENANCE ITEMS Additional information on the following items with " * " is released. 8-2 Maintenance and do it promptly. Outside the vehicle The maintenance items listed here should notify a NISSAN dealer if you should be performed regularly as necessary. As the vehicle owner, you ...section. These checks or inspections can ensure that the secondary latch keeps the hood from time to time, unless otherwise specified. Make sure that your NISSAN at regular intervals. NISSAN technicians are well-trained specialists who can be sure to meet the maintenance ...
... OF GENERAL MAINTENANCE ITEMS Additional information on the following items with " * " is released. 8-2 Maintenance and do it promptly. Outside the vehicle The maintenance items listed here should notify a NISSAN dealer if you should be performed regularly as necessary. As the vehicle owner, you ...section. These checks or inspections can ensure that the secondary latch keeps the hood from time to time, unless otherwise specified. Make sure that your NISSAN at regular intervals. NISSAN technicians are well-trained specialists who can be sure to meet the maintenance ...
Owner's Manual
Page 406
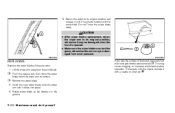
...blade away. WDI0408 WDI0595 REPLACING Replace the wiper blades if they are worn. 1. If you wax the surface of the hood, be damaged from the windshield. 2 3 Push the release tab, then move the wiper blade down the wiper arm to its original position; otherwise it -yourself Lift the wiper... arm away from wind pressure. 6. Return the wiper to remove. This may be damaged when the hood is in the groove. 8-22 Maintenance...
...blade away. WDI0408 WDI0595 REPLACING Replace the wiper blades if they are worn. 1. If you wax the surface of the hood, be damaged from the windshield. 2 3 Push the release tab, then move the wiper blade down the wiper arm to its original position; otherwise it -yourself Lift the wiper... arm away from wind pressure. 6. Return the wiper to remove. This may be damaged when the hood is in the groove. 8-22 Maintenance...
Owner's Manual
Page 465
Headlight control switch ...Headlights ...Headphones (See NISSAN mobile entertainment system) ...Heated seats ...Heated steering wheel ...4-105, 4-120 ...2-32 ...1-7 ...1-7 ...2-28 ...2-28 ...8-30 ...4-92 ...2-34 ...2-33 .2-54 .3-23 . .2-6 . .2-8 . .2-7 . .2-4 . .2-4 . .2-6 .... ...4-47 Hill descent control switch ...2-35 Hill descent control system ...5-38 Hill start assist system ...5-39 HomeLink Universal Transceiver ...2-54 Hood release ...3-21 Hook Luggage hook ...2-43 Horn ...2-33 I Ignition switch ...5-9 Immobilizer system ...2-24, 3-3, 5-12 Important vehicle information label...
Headlight control switch ...Headlights ...Headphones (See NISSAN mobile entertainment system) ...Heated seats ...Heated steering wheel ...4-105, 4-120 ...2-32 ...1-7 ...1-7 ...2-28 ...2-28 ...8-30 ...4-92 ...2-34 ...2-33 .2-54 .3-23 . .2-6 . .2-8 . .2-7 . .2-4 . .2-4 . .2-6 .... ...4-47 Hill descent control switch ...2-35 Hill descent control system ...5-38 Hill start assist system ...5-39 HomeLink Universal Transceiver ...2-54 Hood release ...3-21 Hook Luggage hook ...2-43 Horn ...2-33 I Ignition switch ...5-9 Immobilizer system ...2-24, 3-3, 5-12 Important vehicle information label...


