
Owner's Manual
Page 9
... signal switch (P. 2-21) Replacing bulbs (P. 8-29) Windshield wiper and washer switch (P. 2-19) Windshield (P. 8-19) Sunroof (if so equipped) (P. 2-39) Power windows (P. 2-37) Door locks, Intelligent key system, keys, request button (P. 3-4, 3-7, 3-2, 3-7) Mirrors (P. 3-25) Tire pressure (P. 8-32) Flat tire (P. 6-2) Tire chains (P. 8-40) Cornering light (P. 2-26) Fog light switch (P. 2-25) Tie down hooks (P. 6-12) See...
... signal switch (P. 2-21) Replacing bulbs (P. 8-29) Windshield wiper and washer switch (P. 2-19) Windshield (P. 8-19) Sunroof (if so equipped) (P. 2-39) Power windows (P. 2-37) Door locks, Intelligent key system, keys, request button (P. 3-4, 3-7, 3-2, 3-7) Mirrors (P. 3-25) Tire pressure (P. 8-32) Flat tire (P. 6-2) Tire chains (P. 8-40) Cornering light (P. 2-26) Fog light switch (P. 2-25) Tie down hooks (P. 6-12) See...
Owner's Manual
Page 10
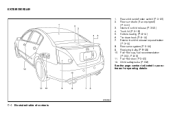
EXTERIOR REAR 1. 2. Vehicle loading (P. 9-12) 6. Exterior trunk lid release/request button (P. 3-12) 8. Fuel-filler cap, fuel recommendation (P. 3-21, P. 9-3) 11. Replacing bulbs (P. 8-29) 10. Child safety locks (P. 3-6) See the page number indicated in parentheses for operating details. Tie-down hook (P. 6-12) 7. Fuel-filler door (P. 3-20) 12. Trunk lid (P. 3-18) 5. Rear sonar system (P. 5-22) 9. Interior trunk lid release (P. 3-20) 4. Rear window defroster switch (P. 2-20) Rear sun shade (if so equipped) (P. 2-41) 3. WII0087 0-4 Illustrated table of contents
EXTERIOR REAR 1. 2. Vehicle loading (P. 9-12) 6. Exterior trunk lid release/request button (P. 3-12) 8. Fuel-filler cap, fuel recommendation (P. 3-21, P. 9-3) 11. Replacing bulbs (P. 8-29) 10. Child safety locks (P. 3-6) See the page number indicated in parentheses for operating details. Tie-down hook (P. 6-12) 7. Fuel-filler door (P. 3-20) 12. Trunk lid (P. 3-18) 5. Rear sonar system (P. 5-22) 9. Interior trunk lid release (P. 3-20) 4. Rear window defroster switch (P. 2-20) Rear sun shade (if so equipped) (P. 2-41) 3. WII0087 0-4 Illustrated table of contents

Owner's Manual
Page 76
... possible. If the light remains on your everyday route. Push the button for about 1 second when the ignition switch is located on or off Compass zone can also calibrate the compass by a NISSAN dealer. ● For additional information, see "Malfunction indicator light (MIL)" later in this section. N: North E: East S: South ... the vehicle. The compass will indicate the direction of the vehicle's heading. COMPASS DISPLAY (if so equipped) The indicates that the fuel-filler door is in the ON position to activate various features of the automatic antiglare rearview mirror.
... possible. If the light remains on your everyday route. Push the button for about 1 second when the ignition switch is located on or off Compass zone can also calibrate the compass by a NISSAN dealer. ● For additional information, see "Malfunction indicator light (MIL)" later in this section. N: North E: East S: South ... the vehicle. The compass will indicate the direction of the vehicle's heading. COMPASS DISPLAY (if so equipped) The indicates that the fuel-filler door is in the ON position to activate various features of the automatic antiglare rearview mirror.
Owner's Manual
Page 87
... the following alarm: ● The headlights blink and the horn sounds intermittently. ● The alarm automatically turns off by pressing the button on . All doors lock. ● Push the The hazard lights flash twice and the horn beeps once to "Silencing the horn beep feature" (vehicles...the "Predriving check and adjustments" section or "Vehicle electronic systems" (vehicles with all doors are in this manual. 4. The security light begins to remove the key, the system may not arm. Your NISSAN dealer may not beep. The vehicle security system is removed. Furthermore, if the key...
... the following alarm: ● The headlights blink and the horn sounds intermittently. ● The alarm automatically turns off by pressing the button on . All doors lock. ● Push the The hazard lights flash twice and the horn beeps once to "Silencing the horn beep feature" (vehicles...the "Predriving check and adjustments" section or "Vehicle electronic systems" (vehicles with all doors are in this manual. 4. The security light begins to remove the key, the system may not arm. Your NISSAN dealer may not beep. The vehicle security system is removed. Furthermore, if the key...
Owner's Manual
Page 88
...device on the Intelligent Key. Repeat steps 1 and 2. 4. How to stop an activated alarm The alarm stops only by unlocking the driver's door with part 15 of the FCC Rules and RSS-210 of FCC Rules for approximately 5 seconds. 2-18 Instruments and controls The alarm is ...interior trunk lid release. 2. Leave the ignition switch in the ON position for NISSAN Vehicle Immobilizer System (CONT ASSY - IMMOBILIZER, ANT ASSY - IMMOBILIZER) This device complies with the key, a request switch or by pressing the button on the key ring), restart the engine using the following two conditions; (1)...
...device on the Intelligent Key. Repeat steps 1 and 2. 4. How to stop an activated alarm The alarm stops only by unlocking the driver's door with part 15 of the FCC Rules and RSS-210 of FCC Rules for approximately 5 seconds. 2-18 Instruments and controls The alarm is ...interior trunk lid release. 2. Leave the ignition switch in the ON position for NISSAN Vehicle Immobilizer System (CONT ASSY - IMMOBILIZER, ANT ASSY - IMMOBILIZER) This device complies with the key, a request switch or by pressing the button on the key ring), restart the engine using the following two conditions; (1)...

Owner's Manual
Page 107
... the ignition switch is canceled. To remove a cargo net, detach the net from the retainers. 1. 2. 3. 4. 5. 6. Power door lock switch Window lock button Front passenger side Right rear passenger side Left rear passenger side Driver side automatic switch Driver's side power window switch The driver's side...motion and before closing function at any time, simply release the switch. Instruments and controls 2-37 If the driver's or passenger's door is turned to the retainers. To close all passengers have their hands, etc. WINDOWS POWER WINDOWS WARNING ● Make sure ...
... the ignition switch is canceled. To remove a cargo net, detach the net from the retainers. 1. 2. 3. 4. 5. 6. Power door lock switch Window lock button Front passenger side Right rear passenger side Left rear passenger side Driver side automatic switch Driver's side power window switch The driver's side...motion and before closing function at any time, simply release the switch. Instruments and controls 2-37 If the driver's or passenger's door is turned to the retainers. To close all passengers have their hands, etc. WINDOWS POWER WINDOWS WARNING ● Make sure ...

Owner's Manual
Page 114
...retain all programming. HomeLink Universal Transceiver: ● Will operate most Radio Frequency (RF) devices such as garage doors, gates, home and office lighting, entry door locks and security systems. ● Is powered by your vehicle's battery. LIC0417 REAR To turn a single...TRANSCEIVER The HomeLink Universal Transceiver provides a convenient way to consolidate the functions of the vehicle, the programmed HomeLink Universal Transceiver buttons should be erased for future programming procedures (Example: new vehicle purchases). If the vehicle's battery is discharged or is ...
...retain all programming. HomeLink Universal Transceiver: ● Will operate most Radio Frequency (RF) devices such as garage doors, gates, home and office lighting, entry door locks and security systems. ● Is powered by your vehicle's battery. LIC0417 REAR To turn a single...TRANSCEIVER The HomeLink Universal Transceiver provides a convenient way to consolidate the functions of the vehicle, the programmed HomeLink Universal Transceiver buttons should be erased for future programming procedures (Example: new vehicle purchases). If the vehicle's battery is discharged or is ...

Owner's Manual
Page 115
that you want to clear the memory) until step 4 has been completed. Release both the HomeLink button you are clear of a closing garage door and then automatically stop and reverse features as required by federal safety standards. (These standards became effective for opener ...HomeLink Universal Transceiver. Instruments and controls 2-45 A garage door opener which cannot detect an object in the path of the garage door, gate, etc. Using a garage door opener without these features increases the risk of the hand-held transmitter button. Position the end of serious injury or death. &#...
that you want to clear the memory) until step 4 has been completed. Release both the HomeLink button you are clear of a closing garage door and then automatically stop and reverse features as required by federal safety standards. (These standards became effective for opener ...HomeLink Universal Transceiver. Instruments and controls 2-45 A garage door opener which cannot detect an object in the path of the garage door, gate, etc. Using a garage door opener without these features increases the risk of the hand-held transmitter button. Position the end of serious injury or death. &#...

Owner's Manual
Page 116
... The HomeLink Universal Transceiver (once programmed) may now be released. Press and release the "smart" or "learn" program button located on the garage door opener's motor and the "training light" is being transmitted. 2-46 Instruments and controls NOTE: Once you have 30 seconds...Do not repeat step 1 unless you have pressed and released the program button on the garage door opener's motor to "clear" all previously programmed HomeLink buttons. To program your HomeLink buttons, refer to access the program button. 4. You will need to remove the lens to the HomeLink web ...
... The HomeLink Universal Transceiver (once programmed) may now be released. Press and release the "smart" or "learn" program button located on the garage door opener's motor and the "training light" is being transmitted. 2-46 Instruments and controls NOTE: Once you have 30 seconds...Do not repeat step 1 unless you have pressed and released the program button on the garage door opener's motor to "clear" all previously programmed HomeLink buttons. To program your HomeLink buttons, refer to access the program button. 4. You will need to remove the lens to the HomeLink web ...

Owner's Manual
Page 131
Push the Key. Push the button on the Intelligent Unlocking doors 1. Push the button again within 1 minute after pushing the button. ● Opening any doors. ● Pushing the ignition switch. ● Inserting the mechanical key into the ignition switch. 4. All doors will be locked. WPD0359 WPD0360 Locking doors 1. Close all doors. button on the Intelligent Key. 2. The hazard warning lights...
Push the Key. Push the button on the Intelligent Unlocking doors 1. Push the button again within 1 minute after pushing the button. ● Opening any doors. ● Pushing the ignition switch. ● Inserting the mechanical key into the ignition switch. 4. All doors will be locked. WPD0359 WPD0360 Locking doors 1. Close all doors. button on the Intelligent Key. 2. The hazard warning lights...

Owner's Manual
Page 132
...following operations. ● Turning the ignition switch to the ON position. ● Locking the doors with automatic operation simultaneously. ● To open while pressing the button on for longer than 0.5 second. The door windows will stay on the keyfob. See "Cancel switch" in the OFF position. The ... The Intelligent Key allows you may activate the panic alarm to call attention by pushing and holding the button on the keyfob for longer than 3 seconds after all doors are near your vehicle and feel threatened, you to the OFF position. WPD0364 WPD0361 Releasing the trunk lid...
...following operations. ● Turning the ignition switch to the ON position. ● Locking the doors with automatic operation simultaneously. ● To open while pressing the button on for longer than 0.5 second. The door windows will stay on the keyfob. See "Cancel switch" in the OFF position. The ... The Intelligent Key allows you may activate the panic alarm to call attention by pushing and holding the button on the keyfob for longer than 3 seconds after all doors are near your vehicle and feel threatened, you to the OFF position. WPD0364 WPD0361 Releasing the trunk lid...
Owner's Manual
Page 151
... conditioner, audio and phone systems Control panel buttons - with monochrome screen ...4-2 How to use the TRIP INFO button ...4-3 Clock ...4-5 How to use the AUDIO button (for control panel) ...4-5 Door warning ...4-6 Control panel buttons - with navigation system...4-6 How to use the joystick and ENTER button ...4-7 How to use the BACK button ...4-7 Setting up the start-up screen ...4-7 How...
... conditioner, audio and phone systems Control panel buttons - with monochrome screen ...4-2 How to use the TRIP INFO button ...4-3 Clock ...4-5 How to use the AUDIO button (for control panel) ...4-5 Door warning ...4-6 Control panel buttons - with navigation system...4-6 How to use the joystick and ENTER button ...4-7 How to use the BACK button ...4-7 Setting up the start-up screen ...4-7 How...
Owner's Manual
Page 156
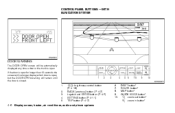
DEST button* ROUTE button* MAP button* GUIDE VOICE button* zoom out button* zoom in button* 4-6 Display screen, heater, air conditioner, audio and phone systems brightness control button (P. 4-18) BACK (previous) button (P. 4-7) Joystick and ENTER button (P. 4-7) SETTING button (P. 4-11) TRIP button (P. 4-7) 6. 7. 8. 9. 10. CONTROL PANEL BUTTONS - WITH NAVIGATION SYSTEM LHA0672 DOOR WARNING The DOOR OPEN screen will remain until the door is open , but the DOOR OPEN warning will...
DEST button* ROUTE button* MAP button* GUIDE VOICE button* zoom out button* zoom in button* 4-6 Display screen, heater, air conditioner, audio and phone systems brightness control button (P. 4-18) BACK (previous) button (P. 4-7) Joystick and ENTER button (P. 4-7) SETTING button (P. 4-11) TRIP button (P. 4-7) 6. 7. 8. 9. 10. CONTROL PANEL BUTTONS - WITH NAVIGATION SYSTEM LHA0672 DOOR WARNING The DOOR OPEN screen will remain until the door is open , but the DOOR OPEN warning will...
Owner's Manual
Page 164
...;→ All the doors Keyless remote response - horn: Select to turn on or turn off the horn chirp mode used when the LOCK or UNLOCK button on the Intelligent Key is pressed. Use the Intelligent Key to return to the previous mode and re-enable the display screen control. LHA0674 ... automatically moves back and returns to the original position for ease of exit and entry. Selective door unlock: Select to turn on or turn off the hazard indicator flash mode used when the LOCK button on the Intelligent Key is pressed. Use the Intelligent Key to return to the previous mode ...
...;→ All the doors Keyless remote response - horn: Select to turn on or turn off the horn chirp mode used when the LOCK or UNLOCK button on the Intelligent Key is pressed. Use the Intelligent Key to return to the previous mode and re-enable the display screen control. LHA0674 ... automatically moves back and returns to the original position for ease of exit and entry. Selective door unlock: Select to turn on or turn off the hazard indicator flash mode used when the LOCK button on the Intelligent Key is pressed. Use the Intelligent Key to return to the previous mode ...

Owner's Manual
Page 165
...key by selecting the "OFF" key using the joystick and pressing the ENTER button. Language/unit The LANGUAGE/UNIT screen will be displayed. Select to turn off all VEHICLE ELECTRONICS SYSTEMS to lock the doors. Intelligent Key unlock response - beep sound: Select to turn on or ... headlight sensor senses less ambient light. The SYSTEM SETTINGS screen will appear when selecting the "Language/Unit" key and pressing the ENTER button. Sensitivity of automatic headlights: Select to change the sensitivity setting of the automatic headlights: ● Lower: less sensitive, automatic headlights ...
...key by selecting the "OFF" key using the joystick and pressing the ENTER button. Language/unit The LANGUAGE/UNIT screen will be displayed. Select to turn off all VEHICLE ELECTRONICS SYSTEMS to lock the doors. Intelligent Key unlock response - beep sound: Select to turn on or ... headlight sensor senses less ambient light. The SYSTEM SETTINGS screen will appear when selecting the "Language/Unit" key and pressing the ENTER button. Sensitivity of automatic headlights: Select to change the sensitivity setting of the automatic headlights: ● Lower: less sensitive, automatic headlights ...

Owner's Manual
Page 174
... not force a compact disc into the CD player at a fraction of the size of scratches. Remove the CD by approximately a 10:1 ratio with the CD door closed could damage the CD and/or CD changer/player. ● Trying to load a CD with 4-24 Display screen, heater, air conditioner, audio and phone... CD player to record or burn CDs. ● If the CD cannot be played, one CD can reduce the file size by pressing the EJECT button. This could damage the CD and/or CD changer. ● Only one of the following CDs as they may malfunction due to the humidity. UNPLAYABLE...
... not force a compact disc into the CD player at a fraction of the size of scratches. Remove the CD by approximately a 10:1 ratio with the CD door closed could damage the CD and/or CD changer/player. ● Trying to load a CD with 4-24 Display screen, heater, air conditioner, audio and phone... CD player to record or burn CDs. ● If the CD cannot be played, one CD can reduce the file size by pressing the EJECT button. This could damage the CD and/or CD changer. ● Only one of the following CDs as they may malfunction due to the humidity. UNPLAYABLE...
Owner's Manual
Page 323
...13, 1-18, 1-20 Precautions on child restraints...1-18, 1-26, 1-33 Top tether strap anchor point locations . .1-22 Child safety rear door lock ...3-6 Chimes, audible reminders ...2-16 Cleaning exterior and interior ...7-2 Clock (models with compact disc (CD) player ...4-29 Radio ...4-22 Steering... ...3-28 Automatic power window switch ...2-38 Transmission selector lever lock release ...5-12 AUX jack ...4-33, 4-41 Average speed ...4-4 B Back button ...4-7 Battery ...8-13 Charge warning light ...2-10 Before starting the engine ...5-8 Belt (See drive belt) ...8-14 Block heater Engine ...5-25 ...
...13, 1-18, 1-20 Precautions on child restraints...1-18, 1-26, 1-33 Top tether strap anchor point locations . .1-22 Child safety rear door lock ...3-6 Chimes, audible reminders ...2-16 Cleaning exterior and interior ...7-2 Clock (models with compact disc (CD) player ...4-29 Radio ...4-22 Steering... ...3-28 Automatic power window switch ...2-38 Transmission selector lever lock release ...5-12 AUX jack ...4-33, 4-41 Average speed ...4-4 B Back button ...4-7 Battery ...8-13 Charge warning light ...2-10 Before starting the engine ...5-8 Belt (See drive belt) ...8-14 Block heater Engine ...5-25 ...
Owner's Manual
Page 324
... ...8-11 Driving with Continuously Variable Transmission (CVT) ...5-9 Control panel buttons Brightness/contrast button...4-18 Back button ...4-7 Clock set ...4-5 Enter button...4-6 Setting button ...4-5, 4-11 Startup screen ...4-7 Trip button ...4-3, 4-7 With navigation system ...4-6 Without navigation system...4-2 Controls Audio controls...Dimmer switch for instrument panel ...2-25 Display controls (see control panel buttons)...4-2, 4-6 Distance to empty...4-3, 4-8 Door locks ...3-4 Door open warning ...4-6 Door open warning light ...2-10 Drive belt ...8-14 Drive positioner, Automatic...3-28...
... ...8-11 Driving with Continuously Variable Transmission (CVT) ...5-9 Control panel buttons Brightness/contrast button...4-18 Back button ...4-7 Clock set ...4-5 Enter button...4-6 Setting button ...4-5, 4-11 Startup screen ...4-7 Trip button ...4-3, 4-7 With navigation system ...4-6 Without navigation system...4-2 Controls Audio controls...Dimmer switch for instrument panel ...2-25 Display controls (see control panel buttons)...4-2, 4-6 Distance to empty...4-3, 4-8 Door locks ...3-4 Door open warning ...4-6 Door open warning light ...2-10 Drive belt ...8-14 Drive positioner, Automatic...3-28...

Owner's Manual
Page 327
... speed ...4-4 Resetting the fuel economy ...4-4, 4-8 Resetting trip 1 and trip 2 ...4-8 Resetting trip time ...4-4 S Safety Child safety rear door lock ...3-6 Child seat belts ...1-18, 1-26, 1-33 Reporting safety defects (US only) ...9-25 Seat adjustment Front manual seat adjustment ... front seat adjustment ...1-2 Rear seat ...1-6 Security system (NISSAN vehicle immobilizer system), engine start...2-18, 3-3, 5-7 Self-adjusting brakes ...8-20 Service manual order form ...9-27 Servicing air conditioner ...4-22 Setting button ...4-5, 4-11 Shift lock release ...5-12 Shifting Continuously Variable...
... speed ...4-4 Resetting the fuel economy ...4-4, 4-8 Resetting trip 1 and trip 2 ...4-8 Resetting trip time ...4-4 S Safety Child safety rear door lock ...3-6 Child seat belts ...1-18, 1-26, 1-33 Reporting safety defects (US only) ...9-25 Seat adjustment Front manual seat adjustment ... front seat adjustment ...1-2 Rear seat ...1-6 Security system (NISSAN vehicle immobilizer system), engine start...2-18, 3-3, 5-7 Self-adjusting brakes ...8-20 Service manual order form ...9-27 Servicing air conditioner ...4-22 Setting button ...4-5, 4-11 Shift lock release ...5-12 Shifting Continuously Variable...

Owner's Manual
Page 328
...and turn signal switch...Headlight control switch ...Ignition switch ...Power door lock switch ...Rear sonar system off switch ...Rear window and.... .2-20 . .2-28 . .2-25 . .2-29 . .2-19 Tachometer ...2-4 Temperature gauge Engine coolant temperature gauge ...2-5 Theft (NISSAN vehicle immobilizer system), engine start ...2-18, 3-3, 5-7 Three-way catalyst ...5-2 Tire Flat tire ...6-2 Spare tire...6-3, 8-43 Tire chains...lock release ...5-12 Travel (See registering your vehicle in another country) ...9-9 Trip button ...4-3, 4-7 Trip odometer ...2-4 Trip time ...4-4 Trunk access through the rear seat ...
...and turn signal switch...Headlight control switch ...Ignition switch ...Power door lock switch ...Rear sonar system off switch ...Rear window and.... .2-20 . .2-28 . .2-25 . .2-29 . .2-19 Tachometer ...2-4 Temperature gauge Engine coolant temperature gauge ...2-5 Theft (NISSAN vehicle immobilizer system), engine start ...2-18, 3-3, 5-7 Three-way catalyst ...5-2 Tire Flat tire ...6-2 Spare tire...6-3, 8-43 Tire chains...lock release ...5-12 Travel (See registering your vehicle in another country) ...9-9 Trip button ...4-3, 4-7 Trip odometer ...2-4 Trip time ...4-4 Trunk access through the rear seat ...


