
Owner's Manual
Page 60
... illuminate once the parking brake is started Instruments and controls 2-17 The instrument brightness control operates when the headlight switch is completed, the turn signals cancel automatically. AIC0608 TURN SIGNAL SWITCH Turn signal Move the lever up...so could cause an accident injuring yourself and others. When the turn on your vehicle are not on your headlights. Lane change signal To signal a lane change, move the lever up or down to the point where... turned off . Turn the control to do not illuminate. Failure to adjust the brightness of instrument panel lights.
... illuminate once the parking brake is started Instruments and controls 2-17 The instrument brightness control operates when the headlight switch is completed, the turn signals cancel automatically. AIC0608 TURN SIGNAL SWITCH Turn signal Move the lever up...so could cause an accident injuring yourself and others. When the turn on your vehicle are not on your headlights. Lane change signal To signal a lane change, move the lever up or down to the point where... turned off . Turn the control to do not illuminate. Failure to adjust the brightness of instrument panel lights.
Owner's Manual
Page 79
... controller for longer than 0.5 second. waiting for 30 seconds by pressing the LOCK button on for 25 seconds. 3. WPD0025 2. Unlocking doors 1. The panic alarm and headlights stay on the multi-remote controller. Only the driver side door unlocks. 2. The trunk lid opens. Releasing the trunk lid 1. Push the UNLOCK button on.... The interior light illuminates for longer than 0.8 seconds. remote controller again within 5 seconds. The interior light can be turned off without 3-6 Pre-driving checks and adjustments Push the TRUNK button on the multi-
... controller for longer than 0.5 second. waiting for 30 seconds by pressing the LOCK button on for 25 seconds. 3. WPD0025 2. Unlocking doors 1. The panic alarm and headlights stay on the multi-remote controller. Only the driver side door unlocks. 2. The trunk lid opens. Releasing the trunk lid 1. Push the UNLOCK button on.... The interior light illuminates for longer than 0.8 seconds. remote controller again within 5 seconds. The interior light can be turned off without 3-6 Pre-driving checks and adjustments Push the TRUNK button on the multi-

Owner's Manual
Page 87
VANITY MIRROR To access a vanity mirror, pull the sun visor down and lift the mirror cover. INSIDE MIRROR The night position reduces glare from the headlights of vehicles behind you at night. Some vanity mirrors are illuminated and turn on when the mirror cover is opened. SUN VISORS MIRRORS LPD0022 APD1076 APD0612 CAUTION Do not store the sun visor before returning it reduces rear view clarity. 3-14 Pre-driving checks and adjustments WARNING Use the night position only when necessary, because it to its original position.
VANITY MIRROR To access a vanity mirror, pull the sun visor down and lift the mirror cover. INSIDE MIRROR The night position reduces glare from the headlights of vehicles behind you at night. Some vanity mirrors are illuminated and turn on when the mirror cover is opened. SUN VISORS MIRRORS LPD0022 APD1076 APD0612 CAUTION Do not store the sun visor before returning it reduces rear view clarity. 3-14 Pre-driving checks and adjustments WARNING Use the night position only when necessary, because it to its original position.

Owner's Manual
Page 187
...if so equipped) are stored). Place the vehicle and screen on H-line). See that the vehicle is positioned at the same height off . ● Adjust beam pattern until cutoff line is unloaded (except for full levels of the tires inflated to the correct pressure. Use an aiming wall screen. d. Open..., engine oil and fuel, and that the spare tire, jack, and tools are turned off ground as bulb center (on level ground. LDI0027 Adjusting the headlight aim Before performing aiming adjustment, make sure of the following: a. equivalent weight placed in the driver's seat. 1.
...if so equipped) are stored). Place the vehicle and screen on H-line). See that the vehicle is positioned at the same height off . ● Adjust beam pattern until cutoff line is unloaded (except for full levels of the tires inflated to the correct pressure. Use an aiming wall screen. d. Open..., engine oil and fuel, and that the spare tire, jack, and tools are turned off ground as bulb center (on level ground. LDI0027 Adjusting the headlight aim Before performing aiming adjustment, make sure of the following: a. equivalent weight placed in the driver's seat. 1.
Owner's Manual
Page 189
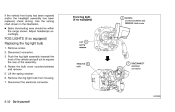
...the range shown. Remove screw. 2. Remove the fog light bulb from housing. 7. If the vehicle front body has been repaired and/or the headlight assembly has been replaced, check aiming. Disconnect connector. 3. FOG LIGHTS (if so equipped) Replacing the fog light bulb 1. Push the fog ...light assembly towards the front of the vehicle and pull out to expose the rear of the assembly. 4. Adjust headlamps accordingly. Lift the spring retainer. 6. Disconnect the electrical connector. LDI0028 8-32 Do-it-yourself Rotate the bulb cover counterclockwise and remove. 5....
...the range shown. Remove screw. 2. Remove the fog light bulb from housing. 7. If the vehicle front body has been repaired and/or the headlight assembly has been replaced, check aiming. Disconnect connector. 3. FOG LIGHTS (if so equipped) Replacing the fog light bulb 1. Push the fog ...light assembly towards the front of the vehicle and pull out to expose the rear of the assembly. 4. Adjust headlamps accordingly. Lift the spring retainer. 6. Disconnect the electrical connector. LDI0028 8-32 Do-it-yourself Rotate the bulb cover counterclockwise and remove. 5....

Owner's Manual
Page 196
...WARNING ● The use of these effects may result in the tread. Do-it is necessary to repair the spare tire, contact an authorized NISSAN dealer. Recommended types and sizes are found, the tire(s) should be replaced. ● The original tires have a built-in the tire rotation... (also in cases of the spare tire may lead to -tire clearance, tire chain clearance, speedometer calibration, headlight aim and bumper height. WARNING ● After rotating the tires, check and adjust the tire pressure. ● Retighten the wheel nuts when the vehicle has been driven for wear, cracking, ...
...WARNING ● The use of these effects may result in the tread. Do-it is necessary to repair the spare tire, contact an authorized NISSAN dealer. Recommended types and sizes are found, the tire(s) should be replaced. ● The original tires have a built-in the tire rotation... (also in cases of the spare tire may lead to -tire clearance, tire chain clearance, speedometer calibration, headlight aim and bumper height. WARNING ● After rotating the tires, check and adjust the tire pressure. ● Retighten the wheel nuts when the vehicle has been driven for wear, cracking, ...
Owner's Manual
Page 236
...Bulb check/instrument panel ...2-7 Bulb replacement...8-33 Charge warning light ...2-8 Front fog light switch ...2-18 Headlight aiming adjustment ...8-30 Headlight and turn signal switch ...2-16 Headlights ...8-29 Heater Heater and air conditioner controls ...4-3 Heater operation...4-4 Hood release ...3-9 Horn ...2-19 I ...number ...10-11 F.M.V.S.S. H Hazard warning flasher switch ...2-18 Head restraints ...1-5 Headlight aiming adjustment ...8-30 Headlight and turn signal switch ...2-16 Headlights...8-29 Interior light...2-28 Light bulbs ...8-29 Low washer fluid warning light ...2-8 Spotlights...
...Bulb check/instrument panel ...2-7 Bulb replacement...8-33 Charge warning light ...2-8 Front fog light switch ...2-18 Headlight aiming adjustment ...8-30 Headlight and turn signal switch ...2-16 Headlights ...8-29 Heater Heater and air conditioner controls ...4-3 Heater operation...4-4 Hood release ...3-9 Horn ...2-19 I ...number ...10-11 F.M.V.S.S. H Hazard warning flasher switch ...2-18 Head restraints ...1-5 Headlight aiming adjustment ...8-30 Headlight and turn signal switch ...2-16 Headlights...8-29 Interior light...2-28 Light bulbs ...8-29 Low washer fluid warning light ...2-8 Spotlights...
Owner's Manual
Page 238
Shifting Automatic transmission ...5-8 Manual transmission...5-11 Shoulder belt height adjustment...1-24 Spark plug replacement...8-20 Speedometer ...2-3 Spotlights (See map light) ...2-28 SRS warning label ...1-16 Starting Before starting the engine ...5-6... restraint system (Supplemental air bag system)...1-6 Switch Automatic power window switch ...2-26 Front fog light switch ...2-18 Hazard warning flasher switch ...2-18 Headlight and turn signal switch ...2-16 Ignition switch ...5-4 Overdrive switch ...5-10 Rear window defogger switch ...2-16 Turn signal switch...2-17 Windshield wiper and ...
Shifting Automatic transmission ...5-8 Manual transmission...5-11 Shoulder belt height adjustment...1-24 Spark plug replacement...8-20 Speedometer ...2-3 Spotlights (See map light) ...2-28 SRS warning label ...1-16 Starting Before starting the engine ...5-6... restraint system (Supplemental air bag system)...1-6 Switch Automatic power window switch ...2-26 Front fog light switch ...2-18 Hazard warning flasher switch ...2-18 Headlight and turn signal switch ...2-16 Ignition switch ...5-4 Overdrive switch ...5-10 Rear window defogger switch ...2-16 Turn signal switch...2-17 Windshield wiper and ...


