Owner's Manual
Page 101
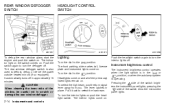
... dial to scratch or damage the rear window defogger. To turn the defogger off. side of the switch dims the instrument panel lights. 2-14 Instruments and controls The indicator light on the switch comes on . It automatically turns off . Turn the dial to the position: Headlights come...(if so equipped). pressing the side of the switch brightPressing the ens the instrument panel lights; Push the headlight switch again to select the low beam. REAR WINDOW DEFOGGER SWITCH HEADLIGHT CONTROL SWITCH AIC1057 AIC1073 AIC1059 To defog the rear window glass, start the engine and ...
... dial to scratch or damage the rear window defogger. To turn the defogger off. side of the switch dims the instrument panel lights. 2-14 Instruments and controls The indicator light on the switch comes on . It automatically turns off . Turn the dial to the position: Headlights come...(if so equipped). pressing the side of the switch brightPressing the ens the instrument panel lights; Push the headlight switch again to select the low beam. REAR WINDOW DEFOGGER SWITCH HEADLIGHT CONTROL SWITCH AIC1057 AIC1073 AIC1059 To defog the rear window glass, start the engine and ...
Owner's Manual
Page 103
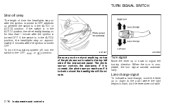
... turn is turned OFF. To turn the autolamp system off delay The length of the instrument panel. Turn signal Move the lever up or down to OFF depends on after the ignition is ... completed, the turn the switch to flash, but the lever does not latch. 2-16 Instruments and controls if it is covered, the photo sensor reacts as if it is turned OFF. Lane change signal To...or down to the point where the light begins to the OFF, , or position. The photo sensor controls the autolamp; If the switch is in the AUTO1 position, then the headlights stay on approximately 3 minutes...
... turn is turned OFF. To turn the autolamp system off delay The length of the instrument panel. Turn signal Move the lever up or down to OFF depends on after the ignition is ... completed, the turn the switch to flash, but the lever does not latch. 2-16 Instruments and controls if it is covered, the photo sensor reacts as if it is turned OFF. Lane change signal To...or down to the point where the light begins to the OFF, , or position. The photo sensor controls the autolamp; If the switch is in the AUTO1 position, then the headlights stay on approximately 3 minutes...

Owner's Manual
Page 105
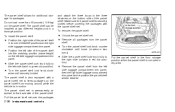
... area of the second row seat behind the side door. Follow the installation instructions included with your battery. 2-18 Instruments and controls Leaving electrical equipment on the driver's side trim panel of the steering wheel. Use the power socket to the power socket. The rear power socket is located on for extended...
... area of the second row seat behind the side door. Follow the installation instructions included with your battery. 2-18 Instruments and controls Leaving electrical equipment on the driver's side trim panel of the steering wheel. Use the power socket to the power socket. The rear power socket is located on for extended...

Owner's Manual
Page 107
The map pocket can be used to desired position. Adjust mirror to store maps. Pull down to close the conversation mirror. 2-20 Instruments and controls Push again to lock mirror into place. Push to open the conversation mirror. CONVERSATION MIRROR Some vehicles are equipped with a conversation mirror. STORAGE AIC1078 ARS1249 LIC0020 MAP POCKETS A map pocket is located on the right hand side of the instrument panel and on the back of the passenger seat.
The map pocket can be used to desired position. Adjust mirror to store maps. Pull down to close the conversation mirror. 2-20 Instruments and controls Push again to lock mirror into place. Push to open the conversation mirror. CONVERSATION MIRROR Some vehicles are equipped with a conversation mirror. STORAGE AIC1078 ARS1249 LIC0020 MAP POCKETS A map pocket is located on the right hand side of the instrument panel and on the back of the passenger seat.
Owner's Manual
Page 113
The parcel shelf is also equipped with the parcel shelf net. Make sure the parcel shelf is not used or required. 2-26 Instruments and controls To install the parcel shelf: ● Position the right side of the parcel shelf in to one of the shelf positions on the right side ...luggage compartment trim panel. ● Position the left side of the parcel shelf into the matching position (same height) on the bottom side of the parcel shelf. APD1073 Put...
The parcel shelf is also equipped with the parcel shelf net. Make sure the parcel shelf is not used or required. 2-26 Instruments and controls To install the parcel shelf: ● Position the right side of the parcel shelf in to one of the shelf positions on the right side ...luggage compartment trim panel. ● Position the left side of the parcel shelf into the matching position (same height) on the bottom side of the parcel shelf. APD1073 Put...
Owner's Manual
Page 118
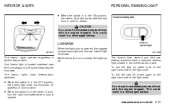
... switch is in the OFF position, the interior light does not illuminate, regardless of the light cover. Instruments and controls 2-31 The interior lights have a personal reading light located in the overhead trim panel. One interior light is located overhead near the front seats and one is opened . This could result in...
... switch is in the OFF position, the interior light does not illuminate, regardless of the light cover. Instruments and controls 2-31 The interior lights have a personal reading light located in the overhead trim panel. One interior light is located overhead near the front seats and one is opened . This could result in...
Owner's Manual
Page 122
...time you have difficulty programming your garage door opener equipped with the Rolling Code feature, call NISSAN Consumer Affairs Department. Program your garage door opener may vary by garage door opener brand.... buttons cannot be cleared, but does not open or close your garage door. Instruments and controls 2-35 CLEARING THE PROGRAMMED INFORMATION Should you have difficulty locating the training button, reference your Integrated...was first installed): a) Remove the cover panel from your garage door opener manual. c) Press the training button on the garage door opener receiver....
...time you have difficulty programming your garage door opener equipped with the Rolling Code feature, call NISSAN Consumer Affairs Department. Program your garage door opener may vary by garage door opener brand.... buttons cannot be cleared, but does not open or close your garage door. Instruments and controls 2-35 CLEARING THE PROGRAMMED INFORMATION Should you have difficulty locating the training button, reference your Integrated...was first installed): a) Remove the cover panel from your garage door opener manual. c) Press the training button on the garage door opener receiver....
Owner's Manual
Page 152
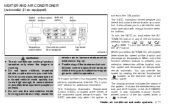
... one of the instrument panel, below the radio. You can override fan speed by rotating the vertical thumbwheel located at the center of the function selector buttons is shown. The display window indicates the status of the control panel. It also indicates manual (thumbwheel) control of the heater and... air conditioner controls should not be done while driving so full attention may be given to fog up. ●...
... one of the instrument panel, below the radio. You can override fan speed by rotating the vertical thumbwheel located at the center of the function selector buttons is shown. The display window indicates the status of the control panel. It also indicates manual (thumbwheel) control of the heater and... air conditioner controls should not be done while driving so full attention may be given to fog up. ●...

Owner's Manual
Page 153
...and disregards the 60°F (16°C) setting until 60°F (16°C) shows in one degree increments to either side of the control panel is sent to achieve the set temperature. To return to the existing conditions. The and the display window shows the set temperature. The indicator ... of the 90°F (32°C) setting until 90°F (32°C) shows in the middle of the EATC control panel. Using the thumbwheel cancels the automatic fan speed control, and causes a to appear in the EATC to prevent blowing cold air to prevent window fogging. The buttons are Push...
...and disregards the 60°F (16°C) setting until 60°F (16°C) shows in one degree increments to either side of the control panel is sent to achieve the set temperature. To return to the existing conditions. The and the display window shows the set temperature. The indicator ... of the 90°F (32°C) setting until 90°F (32°C) shows in the middle of the EATC control panel. Using the thumbwheel cancels the automatic fan speed control, and causes a to appear in the EATC to prevent blowing cold air to prevent window fogging. The buttons are Push...

Owner's Manual
Page 154
...Activate the air conditioner in upper position (HI) for one second. WARNING Do not switch temperature displays while driving so full attention may be controlled by pressing the A/C button. The indicator light comes on , and the display window shows the set temperature. English/metric mode Switch from ...air if the selected temperature is used to verify activation, and cooled air flows from the front and rear floor outlets and instrument panel ventilators at the same time. gardless of the override modes listed above by the EATC unless the fan speed thumbwheel is warmer than...
...Activate the air conditioner in upper position (HI) for one second. WARNING Do not switch temperature displays while driving so full attention may be controlled by pressing the A/C button. The indicator light comes on , and the display window shows the set temperature. English/metric mode Switch from ...air if the selected temperature is used to verify activation, and cooled air flows from the front and rear floor outlets and instrument panel ventilators at the same time. gardless of the override modes listed above by the EATC unless the fan speed thumbwheel is warmer than...
Owner's Manual
Page 155
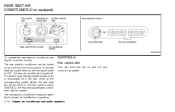
When the rear seat fan control lever on the front panel is operating. The rear seat air conditioner only works when the front seat air conditioner is set to REAR A/C, the rear seat passengers control their own fan speed. CONTROLS Fan control dial This dial turns the fan on and off from the rear ...air conditioner and audio systems The rear seat air conditioner can be running. If the rear seat fan control lever on the front panel is set to OFF, the rear air conditioner is discharged from the front controls. If it is set to any of the fan speed positions, air is turned off.
When the rear seat fan control lever on the front panel is operating. The rear seat air conditioner only works when the front seat air conditioner is set to REAR A/C, the rear seat passengers control their own fan speed. CONTROLS Fan control dial This dial turns the fan on and off from the rear ...air conditioner and audio systems The rear seat air conditioner can be running. If the rear seat fan control lever on the front panel is set to OFF, the rear air conditioner is discharged from the front controls. If it is set to any of the fan speed positions, air is turned off.
Owner's Manual
Page 171
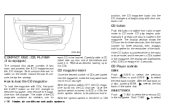
CD play with CDs, first push the EJECT button on the center instrument panel console, below the ashtray. CD Player controls SEEK Push SEEK to select the previous track number, or push SEEK to select the previous CD in the ACC or ON How to switch ...
CD play with CDs, first push the EJECT button on the center instrument panel console, below the ashtray. CD Player controls SEEK Push SEEK to select the previous track number, or push SEEK to select the previous CD in the ACC or ON How to switch ...

Owner's Manual
Page 187
... . a) Push the CANCEL button; the CRUISE light goes out. The CRUISE light in the instrument panel goes out. Your vehicle maintains the set at speeds between 30 and 90 MPH (48 and 144 km/h) without the cruise control. Both the main switch indicator and CRUISE lights go out. ● If you release... cancels if the vehicle slows down steep hills. To cancel the preset speed, follow any of these three methods. c) Push the cruise control OFF switch. When you depress the brake pedal while pushing the RES/ACCEL switch, the RES/ ACCEL function is cancelled. the CRUISE light in the ...
... . a) Push the CANCEL button; the CRUISE light goes out. The CRUISE light in the instrument panel goes out. Your vehicle maintains the set at speeds between 30 and 90 MPH (48 and 144 km/h) without the cruise control. Both the main switch indicator and CRUISE lights go out. ● If you release... cancels if the vehicle slows down steep hills. To cancel the preset speed, follow any of these three methods. c) Push the cruise control OFF switch. When you depress the brake pedal while pushing the RES/ACCEL switch, the RES/ ACCEL function is cancelled. the CRUISE light in the ...

Owner's Manual
Page 188
... not drive over the legal speed limit and do this , the set Starting and driving 5-11 speed decreases by an authorized NISSAN dealer. ● The CRUISE light in the instrument panel may result in any gear. ● Avoid quick starts. ● Avoid hard braking as much as possible. ● ...COAST/SET switch. The CRUISE light goes out. c) Push and release the COAST/SET switch. The vehicle resumes the last set the cruise control system, perform the steps in the instrument panel then blinks to follow these recommendations may blink when the CRUISE main switch is over 4,000 RPM.
... not drive over the legal speed limit and do this , the set Starting and driving 5-11 speed decreases by an authorized NISSAN dealer. ● The CRUISE light in the instrument panel may result in any gear. ● Avoid quick starts. ● Avoid hard braking as much as possible. ● ...COAST/SET switch. The CRUISE light goes out. c) Push and release the COAST/SET switch. The vehicle resumes the last set the cruise control system, perform the steps in the instrument panel then blinks to follow these recommendations may blink when the CRUISE main switch is over 4,000 RPM.
Owner's Manual
Page 286
...transmission fluid (ATF) ...8-8 Driving with automatic transmission ...5-6 Transmission selector lever lock release ...5-6 B Battery...8-10 Battery replacement (See multi-remote control system) ...3-8 Before starting the engine ...5-5 Brake Anti-lock brake system (ABS) ...5-15 Brake booster ...8-20 Brake fluid ...10-2, ...10 Parking brake check ...8-19 Parking brake operation ...5-9 Self-adjusting brakes ...8-19 Break-in schedule ...5-11 Bulb check/instrument panel ...2-6 Bulb replacement...8-24 C Cabin air filter ...8-14 Capacities and recommended fuel/ lubricants...10-2 Car phone or CB radio...
...transmission fluid (ATF) ...8-8 Driving with automatic transmission ...5-6 Transmission selector lever lock release ...5-6 B Battery...8-10 Battery replacement (See multi-remote control system) ...3-8 Before starting the engine ...5-5 Brake Anti-lock brake system (ABS) ...5-15 Brake booster ...8-20 Brake fluid ...10-2, ...10 Parking brake check ...8-19 Parking brake operation ...5-9 Self-adjusting brakes ...8-19 Break-in schedule ...5-11 Bulb check/instrument panel ...2-6 Bulb replacement...8-24 C Cabin air filter ...8-14 Capacities and recommended fuel/ lubricants...10-2 Car phone or CB radio...
Owner's Manual
Page 288
...Tachometer...2-4 Trip odometer ...2-4 General maintenance ...9-2 Glove box...2-22 H Hazard warning flasher switch ...2-17 Head restraints ...1-10 Headlight control switch...2-14 Headlights ...8-23 Heater Heater and air conditioner (automatic) (if so equipped)...4-11 Heater and air conditioner (manual)...4-3 Rear...Light Air bag warning light...1-37 Brake light (See stop light) ...8-24 Bulb check/instrument panel ...2-6 Bulb replacement...8-24 Cornering light ...2-17 Headlight control switch ...2-14 Headlights...8-23 Interior lights ...2-31 Light bulbs ...8-23 Luggage compartment lights ...2-31...
...Tachometer...2-4 Trip odometer ...2-4 General maintenance ...9-2 Glove box...2-22 H Hazard warning flasher switch ...2-17 Head restraints ...1-10 Headlight control switch...2-14 Headlights ...8-23 Heater Heater and air conditioner (automatic) (if so equipped)...4-11 Heater and air conditioner (manual)...4-3 Rear...Light Air bag warning light...1-37 Brake light (See stop light) ...8-24 Bulb check/instrument panel ...2-6 Bulb replacement...8-24 Cornering light ...2-17 Headlight control switch ...2-14 Headlights...8-23 Interior lights ...2-31 Light bulbs ...8-23 Luggage compartment lights ...2-31...


