
Owner's Manual
Page 8
...indicator lights and chimes ...1-6 Theft warning (if so equipped) ...1-10 Windshield wiper and washer switch ...1-11 Rear window wiper and washer switches...1-12 Rear window defogger switch ...1-12 Headlight control switch ...1-13 Daytime running light system (for Canada) ...1-13 Autolamp switch (if ...17 Compact disc and audio cassette storage compartment...1-18 Cup holder...1-18 Power window ...1-19 Automatic power window switch ...1-20 Sunroof (if so equipped)...1-21 Manual rear windows ...1-22 Power rear windows (if so equipped) ...1-22 Clock...1-23 Interior lights...1-24 Luggage compartment ...
...indicator lights and chimes ...1-6 Theft warning (if so equipped) ...1-10 Windshield wiper and washer switch ...1-11 Rear window wiper and washer switches...1-12 Rear window defogger switch ...1-12 Headlight control switch ...1-13 Daytime running light system (for Canada) ...1-13 Autolamp switch (if ...17 Compact disc and audio cassette storage compartment...1-18 Cup holder...1-18 Power window ...1-19 Automatic power window switch ...1-20 Sunroof (if so equipped)...1-21 Manual rear windows ...1-22 Power rear windows (if so equipped) ...1-22 Clock...1-23 Interior lights...1-24 Luggage compartment ...
Owner's Manual
Page 17
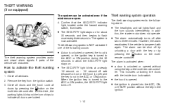
... without using the key or the multi-remote controller. Remove the key from the ignition switch. 3. Close all windows. 2. THEFT WARNING (if so equipped) The system can be activated even if the windows are open and the key is tampered with the key or by pressing the button on for about 30...
... without using the key or the multi-remote controller. Remove the key from the ignition switch. 3. Close all windows. 2. THEFT WARNING (if so equipped) The system can be activated even if the windows are open and the key is tampered with the key or by pressing the button on for about 30...

Owner's Manual
Page 19
... to turn the defogger off in approximately 15 minutes. It automatically turns off . Push the rear wiper switch to scratch or damage the rear window defogger. 1-12 CAUTION ● Do not operate the washer continuously for more than 30 seconds. ● Do not operate the washer if ... and push the switch on . CAUTION When cleaning the inner side of the window, be careful not to operate the wiper. The rear window defogger switch is also used to operate the rear washer. REAR WINDOW DEFOGGER SWITCH AIC0572 AIC0573 Push and hold the rear washer switch to defrost, defog...
... to turn the defogger off in approximately 15 minutes. It automatically turns off . Push the rear wiper switch to scratch or damage the rear window defogger. 1-12 CAUTION ● Do not operate the washer continuously for more than 30 seconds. ● Do not operate the washer if ... and push the switch on . CAUTION When cleaning the inner side of the window, be careful not to operate the wiper. The rear window defogger switch is also used to operate the rear washer. REAR WINDOW DEFOGGER SWITCH AIC0572 AIC0573 Push and hold the rear washer switch to defrost, defog...
Owner's Manual
Page 26
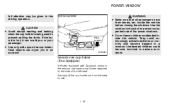
...out from the seat to prevent unexpected use . 1-19 Unattended children could unknowingly activate switches or controls and become involved in a window. Use the window lock switch to use of the left seat. They could become trapped in serious accidents. Hard objects can scald you in the...your passenger. ● Use only soft cups in an accident. POWER WINDOW full attention may be given to the side of the power windows. ● Do not leave children unattended inside the vehicle before closing the windows. WARNING ● Make sure that all passengers have a cup holder ...
...out from the seat to prevent unexpected use . 1-19 Unattended children could unknowingly activate switches or controls and become involved in a window. Use the window lock switch to use of the left seat. They could become trapped in serious accidents. Hard objects can scald you in the...your passenger. ● Use only soft cups in an accident. POWER WINDOW full attention may be given to the side of the power windows. ● Do not leave children unattended inside the vehicle before closing the windows. WARNING ● Make sure that all passengers have a cup holder ...
Owner's Manual
Page 27
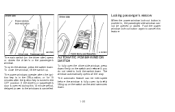
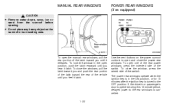
... the switch up on the driver side) opens or closes the driver's or the passenger's window. you do not need to the OFF position. Locking passenger's window When the power window lock-out button is pushed in the ON position, or for 15 minutes after the ignition key is cancelled. If ...the driver's or passenger's door is opened or closed. The power windows operate when the ignition key is in , the passenger side window cannot be interrupted before the window is fully open by briefly lifting up . The automatic feature can be opened during this 15 minute ...
... the switch up on the driver side) opens or closes the driver's or the passenger's window. you do not need to the OFF position. Locking passenger's window When the power window lock-out button is pushed in the ON position, or for 15 minutes after the ignition key is cancelled. If ...the driver's or passenger's door is opened or closed. The power windows operate when the ignition key is in , the passenger side window cannot be interrupted before the window is fully open by briefly lifting up . The automatic feature can be opened during this 15 minute ...
Owner's Manual
Page 28
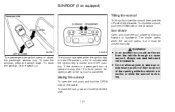
...'s door is opened during this 15 minute period, delayed power to the sunroof is closing. AIC0587 AIC0018 The passenger the passenger window, press the window, lift side switch opens or closes window only. Sliding the sunroof To open the roof, push and hold the CLOSE side. 1-21 Sun shade Open and close the...
...'s door is opened during this 15 minute period, delayed power to the sunroof is closing. AIC0587 AIC0018 The passenger the passenger window, press the window, lift side switch opens or closes window only. Sliding the sunroof To open the roof, push and hold the CLOSE side. 1-21 Sun shade Open and close the...
Owner's Manual
Page 29
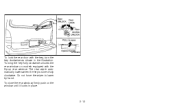
...vehicle until you feel it releases. To open one of the rear power windows, press the indented side of the switch. To lock the window in the ON position, or for 15 minutes after the ignition key ... is cancelled. 1-22 Use the vent buttons on the sunroof or surrounding area. MANUAL REAR WINDOWS CAUTION ● Remove water drops, snow, ice or sand from the sunroof before opening. ...not place any heavy object on the power sunroof controls to open and close the power rear windows. To close the windows, pull the latch toward you and push the rear portion of the latch toward the rear ...
...vehicle until you feel it releases. To open one of the rear power windows, press the indented side of the switch. To lock the window in the ON position, or for 15 minutes after the ignition key ... is cancelled. 1-22 Use the vent buttons on the sunroof or surrounding area. MANUAL REAR WINDOWS CAUTION ● Remove water drops, snow, ice or sand from the sunroof before opening. ...not place any heavy object on the power sunroof controls to open and close the power rear windows. To close the windows, pull the latch toward you and push the rear portion of the latch toward the rear ...
Owner's Manual
Page 45
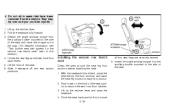
The rear wiper automatically lowers when the key is turned fully clockwise. Do not force the wiper to lower by hand. Turning the key fully clockwise unlocks the rear window on the window until it locks in the illustration. To close the rear window, firmly push on models equipped with the key, turn the key clockwise as shown in place. 2-12 APD0802 To lock the rear door with the flip-up rear window.
The rear wiper automatically lowers when the key is turned fully clockwise. Do not force the wiper to lower by hand. Turning the key fully clockwise unlocks the rear window on the window until it locks in the illustration. To close the rear window, firmly push on models equipped with the key, turn the key clockwise as shown in place. 2-12 APD0802 To lock the rear door with the flip-up rear window.
Owner's Manual
Page 66
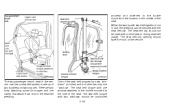
... buckle mounted to the side of the seat cushion to secure the two front floor latches. 3. Lift up the recliner lever. 2. Detach the single window tongue from the vehicle. Lift the front of the way. (For detailed information, see ''Two buckle seat belt system for the second row bench seat... you could be sure 2-33 all four seat legs are securely latched. 5. Lift up the recliner lever and raise the seatback. 4. Insert the single window tongue into each floor anchor. 2. Push down on the front of the seat. APD0121 Installing the second row bench seat Clean the area around the...
... buckle mounted to the side of the seat cushion to secure the two front floor latches. 3. Lift up the recliner lever. 2. Detach the single window tongue from the vehicle. Lift the front of the way. (For detailed information, see ''Two buckle seat belt system for the second row bench seat... you could be sure 2-33 all four seat legs are securely latched. 5. Lift up the recliner lever and raise the seatback. 4. Insert the single window tongue into each floor anchor. 2. Push down on the front of the seat. APD0121 Installing the second row bench seat Clean the area around the...
Owner's Manual
Page 88
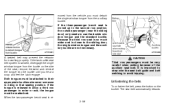
...and fastened to the side of the seat. The seat belt clip should not be used with one window attaches to the buckle mounted to the buckle mounted in the location in the middle of the seat ...belt webbing. One of the seat belt tongues has two ''windows'' (or holes) and the other has only one lower) that attach each end of the seat. The... seat belt tongue with the seat belt clip. The seat belt clip opening should be secured with two windows should face the front of two buckles and two tongues. APD0558 APD0123 The two-passenger bench seat in use...
...and fastened to the side of the seat. The seat belt clip should not be used with one window attaches to the buckle mounted to the buckle mounted in the location in the middle of the seat ...belt webbing. One of the seat belt tongues has two ''windows'' (or holes) and the other has only one lower) that attach each end of the seat. The... seat belt tongue with the seat belt clip. The seat belt clip opening should be secured with two windows should face the front of two buckles and two tongues. APD0558 APD0123 The two-passenger bench seat in use...
Owner's Manual
Page 89
...second row position, the outside passenger (near the sliding door) only needs to their appropriate buckles whenever someone is twisted, disengage the single window tongue from working properly. Both tongues must be reattached. Unfastening the belts To unfasten the belt, press the button on the side of the...twisted belt may prevent the retractor from the buckle on the buckle. It is re2-56 CAUTION Third row passengers must detach the single window tongue from the auxiliary buckle. If the two buckle seat belt system is riding in that seating position. When the two-passenger bench ...
...second row position, the outside passenger (near the sliding door) only needs to their appropriate buckles whenever someone is twisted, disengage the single window tongue from working properly. Both tongues must be reattached. Unfastening the belts To unfasten the belt, press the button on the side of the...twisted belt may prevent the retractor from the buckle on the buckle. It is re2-56 CAUTION Third row passengers must detach the single window tongue from the auxiliary buckle. If the two buckle seat belt system is riding in that seating position. When the two-passenger bench ...
Owner's Manual
Page 112
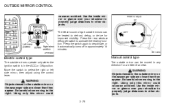
... again to other objects. Be careful when moving to select the right or left side mirror, then adjust using the control lever. Press the rear window defogger switch to the right. WARNING Objects viewed in approximately 15 minutes. Use the inside mirror or glance over your shoulder to properly judge distances...
... again to other objects. Be careful when moving to select the right or left side mirror, then adjust using the control lever. Press the rear window defogger switch to the right. WARNING Objects viewed in approximately 15 minutes. Use the inside mirror or glance over your shoulder to properly judge distances...
Owner's Manual
Page 116
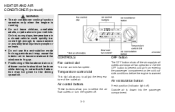
.... ● Do not leave children, unreliable adults, or pets alone in order that full attention may cause the interior air to become stale and the windows to fog up . Air control buttons These buttons allow you to adjust the temperature of the heater and air conditioner controls should not be given...
.... ● Do not leave children, unreliable adults, or pets alone in order that full attention may cause the interior air to become stale and the windows to fog up . Air control buttons These buttons allow you to adjust the temperature of the heater and air conditioner controls should not be given...
Owner's Manual
Page 117
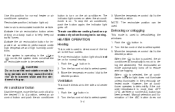
...keep out traffic fumes. Activate the air recirculation button for long periods as it may cause the interior air to become stale and the windows to 4) position, select an air control button and push the air conditioner 2. The indicator light comes on . The air conditioner cooling...dial to the desired (1 to fog up. The recirculated air mode automatically turns off . However, the air conditioner operates to defrost/defog the windows. 1. Push the button in . Activate the air recirculation button when driving on for normal heater or air conditioner operation. NOTE: The recirculate ...
...keep out traffic fumes. Activate the air recirculation button for long periods as it may cause the interior air to become stale and the windows to 4) position, select an air control button and push the air conditioner 2. The indicator light comes on . The air conditioner cooling...dial to the desired (1 to fog up. The recirculated air mode automatically turns off . However, the air conditioner operates to defrost/defog the windows. 1. Push the button in . Activate the air recirculation button when driving on for normal heater or air conditioner operation. NOTE: The recirculate ...

Owner's Manual
Page 118
...This mode is required. 1. Push the air recirculation button to cool and dehumidify. This improves heater operation. ● To defog the side windows more effectively when in operation, this mode can be used to the off . Operating Tips Clear snow and ice from the wiper blades .... 3. Move the temperature control dial to activate the air conditioner. mode, close the center vent and direct the side vents toward the side windows. ● A slight delay may be experienced when changing air control buttons. The air conditioner cooling function operates only when the engine is selected...
...This mode is required. 1. Push the air recirculation button to cool and dehumidify. This improves heater operation. ● To defog the side windows more effectively when in operation, this mode can be used to the off . Operating Tips Clear snow and ice from the wiper blades .... 3. Move the temperature control dial to activate the air conditioner. mode, close the center vent and direct the side vents toward the side windows. ● A slight delay may be experienced when changing air control buttons. The air conditioner cooling function operates only when the engine is selected...
Owner's Manual
Page 119
...'' in the previously selected mode) and the recirculated air mode automatically turns off position. 2. The indicator light comes on . Then, close the windows. Turn the fan control dial to the off . 2. The indicator light comes on the air conditioner button. Dehumidified heating This mode is high,...button in . 2. Push the button in . Turn the fan control dial to lack of emergency'' section for two or three minutes with the windows open to the desired position. Move the temperature control dial to select speed. 4. Turn the fan control dial to the desired position. Move the...
...'' in the previously selected mode) and the recirculated air mode automatically turns off position. 2. The indicator light comes on . Then, close the windows. Turn the fan control dial to the off . 2. The indicator light comes on the air conditioner button. Dehumidified heating This mode is high,...button in . 2. Push the button in . Turn the fan control dial to lack of emergency'' section for two or three minutes with the windows open to the desired position. Move the temperature control dial to select speed. 4. Turn the fan control dial to the desired position. Move the...
Owner's Manual
Page 123
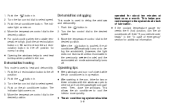
... can override fan speed by rotating the vertical thumbwheel located at the center of the five function selector buttons: , , , , or . The display window indicates the status of the control panel. HEATER AND AIR CONDITIONER (automatic) (if so equipped) turned to fog up. ● Positioning of the function...maintains the temperature you select and controls the airflow for long periods as it may cause the interior air to become stale and the windows to the ON position. To turn the EATC off, press the OFF button. AHA0592 WARNING ● The air conditioner cooling function ...
... can override fan speed by rotating the vertical thumbwheel located at the center of the five function selector buttons: , , , , or . The display window indicates the status of the control panel. HEATER AND AIR CONDITIONER (automatic) (if so equipped) turned to fog up. ● Positioning of the function...maintains the temperature you select and controls the airflow for long periods as it may cause the interior air to become stale and the windows to the ON position. To turn the EATC off, press the OFF button. AHA0592 WARNING ● The air conditioner cooling function ...

Owner's Manual
Page 124
.... Press this button to obtain maximum airflow to fully automatic operation by pushing the AUTOMATIC button. The buttons are grouped in the display window. If unique conditions exist, such as required for LO speeds. The EATC cools at the same time. The dicator light comes on...location only, and does not affect the ability of the control panel is dehumidified to determine airflow location. Adjust the temperature setting as window fogging, the five override buttons allow you want continuous maximum heating, push the side of the button to rapidly change the temperature ...
.... Press this button to obtain maximum airflow to fully automatic operation by pushing the AUTOMATIC button. The buttons are grouped in the display window. If unique conditions exist, such as required for LO speeds. The EATC cools at the same time. The dicator light comes on...location only, and does not affect the ability of the control panel is dehumidified to determine airflow location. Adjust the temperature setting as window fogging, the five override buttons allow you want continuous maximum heating, push the side of the button to rapidly change the temperature ...
Owner's Manual
Page 125
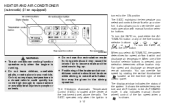
... temperature. AIR CONDITIONER AND AIR RECIRCULATION Activate the air conditioner in upper position (HI) for one second. The indicator light comes on , and the display window shows the set temperature. In this button to choose air recirPress the culation. AHA762 ENGLISH/METRIC MODE Switch from English to verify activation, and cooled...
... temperature. AIR CONDITIONER AND AIR RECIRCULATION Activate the air conditioner in upper position (HI) for one second. The indicator light comes on , and the display window shows the set temperature. In this button to choose air recirPress the culation. AHA762 ENGLISH/METRIC MODE Switch from English to verify activation, and cooled...
Owner's Manual
Page 129
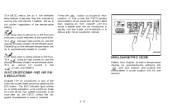
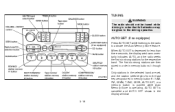
When AUTO SET is canceled and AUTO OFF shows in the display window. 3-16 AHA0594 Only stations in the selected band are then stored in order in memory buttons 1 through 6. The first six strong stations are set, and ..., SEEK, AUTO SET, or a memory button is pushed while Auto Memory Store is operating, AUTO SET is depressed for less than three seconds, the display window momentarily indicates AUTO, and the radio seeks the first six strong stations for the respective band. AUTO SET (if so equipped) Press AUTO SET while...
When AUTO SET is canceled and AUTO OFF shows in the display window. 3-16 AHA0594 Only stations in the selected band are then stored in order in memory buttons 1 through 6. The first six strong stations are set, and ..., SEEK, AUTO SET, or a memory button is pushed while Auto Memory Store is operating, AUTO SET is depressed for less than three seconds, the display window momentarily indicates AUTO, and the radio seeks the first six strong stations for the respective band. AUTO SET (if so equipped) Press AUTO SET while...


