
Owner's Manual
Page 33
2 Pre-driving checks and adjustments Key ...2-2 Door locks ...2-2 Manual door lock...2-2 Child safety sliding door lock ...2-4 Power door lock (if so equipped) ...2-5 Multi-remote control system (if so equipped)...2-7 Battery replacement ...2-8 Illuminated entry system ...2-9 Hood release ...2-10 Rear door lock...2-11 Cargo net (if so equipped) ...2-13 Luggage rack (if so equipped) ...2-14 Fuel filler lid and...
2 Pre-driving checks and adjustments Key ...2-2 Door locks ...2-2 Manual door lock...2-2 Child safety sliding door lock ...2-4 Power door lock (if so equipped) ...2-5 Multi-remote control system (if so equipped)...2-7 Battery replacement ...2-8 Illuminated entry system ...2-9 Hood release ...2-10 Rear door lock...2-11 Cargo net (if so equipped) ...2-13 Luggage rack (if so equipped) ...2-14 Fuel filler lid and...
Owner's Manual
Page 37
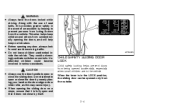
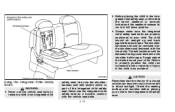
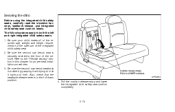
...controls. CAUTION ● Always use of an accident by merely placing your hand on a slope, ensure that it is in the LOCK position, the sliding door can be opened accidentally, especially when small children are in the event of seat belts, this provides greater... safety in the vehicle. WARNING ● Always have the doors locked while driving. They could become involved in serious accidents. APD0005 CHILD SAFETY SLIDING DOOR LOCK Child safety locking helps prevent doors from being thrown from the vehicle. This also helps keep out intruders. ...
...controls. CAUTION ● Always use of an accident by merely placing your hand on a slope, ensure that it is in the LOCK position, the sliding door can be opened accidentally, especially when small children are in the event of seat belts, this provides greater... safety in the vehicle. WARNING ● Always have the doors locked while driving. They could become involved in serious accidents. APD0005 CHILD SAFETY SLIDING DOOR LOCK Child safety locking helps prevent doors from being thrown from the vehicle. This also helps keep out intruders. ...
Owner's Manual
Page 85
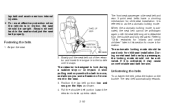
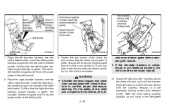
... belt portion low and snug on the buckle. During normal seat belt use by a passenger, the locking mode should not be upright. Always sit well back in this section for child seat installation. Refer to move, and allows you some freedom of the retractor and insert the tongue ... mechanism for infants and small children'' later in the seat and adjust the seat belt properly. A slow pulling motion permits the belt to ''Child restraints for child seat installation. Slowly pull the seat belt out of movement in the seat. 3. lap belt and receive serious internal injuries. ● For ...
... belt portion low and snug on the buckle. During normal seat belt use by a passenger, the locking mode should not be upright. Always sit well back in this section for child seat installation. Refer to move, and allows you some freedom of the retractor and insert the tongue ... mechanism for infants and small children'' later in the seat and adjust the seat belt properly. A slow pulling motion permits the belt to ''Child restraints for child seat installation. Slowly pull the seat belt out of movement in the seat. 3. lap belt and receive serious internal injuries. ● For ...
Owner's Manual
Page 96
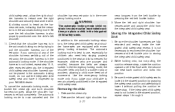
... do so could tip over or otherwise be used when installing a child restraint. ● Failure to use the retractor's locking mode will result in the child restraint not being properly secured. WARNING When installing a child restraint in the two-passenger bench seat, if it is equipped with... a locking mode retractor which must be unsecured and cause injury to the child in a sudden stop or ...
... do so could tip over or otherwise be used when installing a child restraint. ● Failure to use the retractor's locking mode will result in the child restraint not being properly secured. WARNING When installing a child restraint in the two-passenger bench seat, if it is equipped with... a locking mode retractor which must be unsecured and cause injury to the child in a sudden stop or ...
Owner's Manual
Page 97
... seat the auxilliary buckle must also be released), the automatic locking mode (child restraint mode) is in the automatic locking mode by trying to retract. Before placing the child in the child restraint, use force to tilt the child restraint from side to side, and tug it forward to each...click is allowed to follow the restraint manufacturer's instructions. 2. If the belt is not locked, repeat steps 3 through the child restraint and insert it is properly secured prior to make sure the child restraint is securely held in place. 6. Be sure to wind back into the buckle until...
... seat the auxilliary buckle must also be released), the automatic locking mode (child restraint mode) is in the automatic locking mode by trying to retract. Before placing the child in the child restraint, use force to tilt the child restraint from side to side, and tug it forward to each...click is allowed to follow the restraint manufacturer's instructions. 2. If the belt is not locked, repeat steps 3 through the child restraint and insert it is properly secured prior to make sure the child restraint is securely held in place. 6. Be sure to wind back into the buckle until...
Owner's Manual
Page 99
...remove any slack. Hook the tether strap into the large hole on the second row bench or bucket seats. Once the child restraint is properly secured to emergency locking mode when it is about one foot behind the seatback. 2-66 4. Adjust the tether strap until all of the vehicle... as the belt retracts. This indicates that the retractor is heard as the child restraint. A clicking sound is in the automatic locking mode (child restraint mode). (The lap/shoulder belt reverts back to the seat (see ''Installation at second and third row outboard...
...remove any slack. Hook the tether strap into the large hole on the second row bench or bucket seats. Once the child restraint is properly secured to emergency locking mode when it is about one foot behind the seatback. 2-66 4. Adjust the tether strap until all of the vehicle... as the belt retracts. This indicates that the retractor is heard as the child restraint. A clicking sound is in the automatic locking mode (child restraint mode). (The lap/shoulder belt reverts back to the seat (see ''Installation at second and third row outboard...

Owner's Manual
Page 100
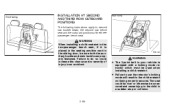
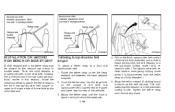
... Tethering to lap/shoulder belt tongue To attach a tether strap to make sure it is in the automatic locking mode. 8. APD0839 APD0835 INSTALLATION ON THREEPASSENGER BENCH SEAT IN SECOND ROW A child restraint with a top tether strap may be used to the seat (see ''Installation at locations where seat... prior to pull more belt webbing out of the retractor. 6. Before placing the child in the child restraint, use force to tilt the child restraint from side to side, and tug it forward to make sure the child restraint is in the automatic locking mode by trying to each use.
... Tethering to lap/shoulder belt tongue To attach a tether strap to make sure it is in the automatic locking mode. 8. APD0839 APD0835 INSTALLATION ON THREEPASSENGER BENCH SEAT IN SECOND ROW A child restraint with a top tether strap may be used to the seat (see ''Installation at locations where seat... prior to pull more belt webbing out of the retractor. 6. Before placing the child in the child restraint, use force to tilt the child restraint from side to side, and tug it forward to make sure the child restraint is in the automatic locking mode by trying to each use.

Owner's Manual
Page 101
... in place. 7. If you cannot pull any slack. 6. If the belt is not locking, repeat steps 4 through the holes. ● Child restraint anchor points are they to make sure the child restraint is heard. Installing the anchor bracket requires removing the bolt already installed at the anchor... forward to be installed at three-passenger bench seat center position'' earlier in this time, the belt retractor is in the automatic locking mode (child restraint mode). (The lap/shoulder belt reverts back to withstand only those loads imposed by trying to the provided anchor point. Check...
... in place. 7. If you cannot pull any slack. 6. If the belt is not locking, repeat steps 4 through the holes. ● Child restraint anchor points are they to make sure the child restraint is heard. Installing the anchor bracket requires removing the bolt already installed at the anchor... forward to be installed at three-passenger bench seat center position'' earlier in this time, the belt retractor is in the automatic locking mode (child restraint mode). (The lap/shoulder belt reverts back to withstand only those loads imposed by trying to the provided anchor point. Check...
Owner's Manual
Page 103
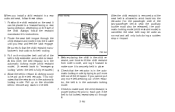
... stop or collision. 2-70 2. APD0647 Installation on front passenger seat WARNING ● Never install a rear-facing child restraint in the automatic locking mode (child restraint mode). Pull on the front passenger seat. Move the seat as far back from the instrument panel as...the belt retractor is equipped with a locking mode retractor which must not be used in the front passenger seat. A child restraint with great force. It reverts back to retract. Child restraints for belt routing. 3. Always follow the child restraint manufacturer's instructions for infants must be...
... stop or collision. 2-70 2. APD0647 Installation on front passenger seat WARNING ● Never install a rear-facing child restraint in the automatic locking mode (child restraint mode). Pull on the front passenger seat. Move the seat as far back from the instrument panel as...the belt retractor is equipped with a locking mode retractor which must not be used in the front passenger seat. A child restraint with great force. It reverts back to retract. Child restraints for belt routing. 3. Always follow the child restraint manufacturer's instructions for infants must be...
Owner's Manual
Page 104
...so equipped) WARNING ● Failure to pull more belt webbing out of these integrated child safety seats can result in your child. ● Improper use of the retractor, the belt is in the automatic locking mode. 2-71 These seats are designed for use only by trying to follow the instructions...belt out of the retractor. PD1336 that infants and small children be used as normal and will only lock during a sudden stop or crash, causing the injury or death of your child striking vehicle's interior during a sudden stop or impact. states and provinces of Canada require that the ...
...so equipped) WARNING ● Failure to pull more belt webbing out of these integrated child safety seats can result in your child. ● Improper use of the retractor, the belt is in the automatic locking mode. 2-71 These seats are designed for use only by trying to follow the instructions...belt out of the retractor. PD1336 that infants and small children be used as normal and will only lock during a sudden stop or crash, causing the injury or death of your child striking vehicle's interior during a sudden stop or impact. states and provinces of Canada require that the ...
Owner's Manual
Page 106
...the vehicle seat belts. 2-73 CAUTION Remember that the bench seatback is securely locked and the seatback release lever is part of injury to the shoulder belt tongue. Failure to properly position the child can become very hot when left in direct sunlight. Never use the vehicle seat... and belt buckle which is in full down position. ● Always make sure the integrated child safety seat belts are properly positioned on your child. ● Before placing the child in the integrated child safety seat, confirm that the interior of a closed vehicle can increase the risk or severity ...
...the vehicle seat belts. 2-73 CAUTION Remember that the bench seatback is securely locked and the seatback release lever is part of injury to the shoulder belt tongue. Failure to properly position the child can become very hot when left in direct sunlight. Never use the vehicle seat... and belt buckle which is in full down position. ● Always make sure the integrated child safety seat belts are properly positioned on your child. ● Before placing the child in the integrated child safety seat, confirm that the interior of a closed vehicle can increase the risk or severity ...
Owner's Manual
Page 107
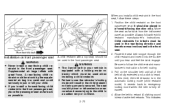
... installation procedures. 3. Refer to rock it back and forth. Pull the cushion release strap and lower the intregrated child safety seat cushion completely. 2-74 Also, check that the seatback release lever is locked by grasping it and trying to the ''Flexible seating'' section in the full down position. Be sure the second...
... installation procedures. 3. Refer to rock it back and forth. Pull the cushion release strap and lower the intregrated child safety seat cushion completely. 2-74 Also, check that the seatback release lever is locked by grasping it and trying to the ''Flexible seating'' section in the full down position. Be sure the second...
Owner's Manual
Page 109
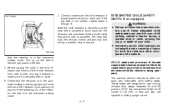
...visual indicators to confirm proper and secure latching. With the child sitting properly (straight up and back) in the automatic locking mode (child restraint mode). Confirm that the left shoulder. Place the right shoulder harness over the child's left shoulder harness tongue indicator is green. Insert the ...be seriously injured. 10. Adjust the chest clip (slightly lower than the child's shoulders) so it comfortably holds the shoulder harness in posititon on the child's shoulders. For the safety of the child and occupants of the chest clip and confirm that the right shoulder harness ...
...visual indicators to confirm proper and secure latching. With the child sitting properly (straight up and back) in the automatic locking mode (child restraint mode). Confirm that the left shoulder. Place the right shoulder harness over the child's left shoulder harness tongue indicator is green. Insert the ...be seriously injured. 10. Adjust the chest clip (slightly lower than the child's shoulders) so it comfortably holds the shoulder harness in posititon on the child's shoulders. For the safety of the child and occupants of the chest clip and confirm that the right shoulder harness ...
Owner's Manual
Page 110
...of the retractor. Use the emergency locking mode only if you cannot pull any of the shoulder harness webbing out of movement. ness tongues from the integrated child safety seat. Storing the Integrated Child Safety Seat 1. If you judge your NISSAN dealer. If the shoulder harness is... also properly positioned over the right shoulder and securely restrain the child. The automatic locking mode is now canceled and the shoulder...
...of the retractor. Use the emergency locking mode only if you cannot pull any of the shoulder harness webbing out of movement. ness tongues from the integrated child safety seat. Storing the Integrated Child Safety Seat 1. If you judge your NISSAN dealer. If the shoulder harness is... also properly positioned over the right shoulder and securely restrain the child. The automatic locking mode is now canceled and the shoulder...
Owner's Manual
Page 111
... washable. The cloth removable pads are completely dry. ● The integrated child safety seats cloth removable pads may be inspected by a NISSAN dealer for cleaning upholstery or carpets. CAUTION Failure to lock the steering wheel in premature wear or damage. 2-78 ● Periodically ...inspect the belt and metal components of the integrated child safety seat shoulder harness retractor functions....
... washable. The cloth removable pads are completely dry. ● The integrated child safety seats cloth removable pads may be inspected by a NISSAN dealer for cleaning upholstery or carpets. CAUTION Failure to lock the steering wheel in premature wear or damage. 2-78 ● Periodically ...inspect the belt and metal components of the integrated child safety seat shoulder harness retractor functions....
Owner's Manual
Page 241
... ...1-20 Automatic transmission fluid (ATF) ...7-8 Driving with automatic transmission ...4-5 B Battery...7-11 Before starting the engine ...4-5 Brake Anti-lock brake system (ABS) ...4-15 Brake booster ...7-17 Brake fluid ...7-10, 9-2 Brake light (See stop light) ...7-21 Brake pedal...car phone ...3-25 Check engine indicator light (See malfunction indicator light) ...1-9 Child restraint with top tether strap ...2-65 Child restraints for infants and small children ...2-60 Child safety sliding door lock...2-4 Cigarette lighter (accessory) and ashtray ...1-16 Cleaning exterior and interior ...6-2 ...
... ...1-20 Automatic transmission fluid (ATF) ...7-8 Driving with automatic transmission ...4-5 B Battery...7-11 Before starting the engine ...4-5 Brake Anti-lock brake system (ABS) ...4-15 Brake booster ...7-17 Brake fluid ...7-10, 9-2 Brake light (See stop light) ...7-21 Brake pedal...car phone ...3-25 Check engine indicator light (See malfunction indicator light) ...1-9 Child restraint with top tether strap ...2-65 Child restraints for infants and small children ...2-60 Child safety sliding door lock...2-4 Cigarette lighter (accessory) and ashtray ...1-16 Cleaning exterior and interior ...6-2 ...
Owner's Manual
Page 243
...1-4 1-4 1-4 8-2 indicator lights and chimes)...1-6 Inertial fuel shut off switch...5-11 Inside mirror...2-80 Instrument brightness control ...1-15 Integrated child safety seats...2-71 Interior lights ...1-24 J Jump starting...5-8, 7-12 K Key...2-2 Keyless entry system (See multi-remote control system) ... lights ...1-24 Spotlights ...1-25 Warning/indicator lights and chimes ...1-6 Lock Child safety sliding door lock ...2-4 Door locks...2-2 Fuel filler lid lock opener lever ...2-15 Power door lock...2-5 Rear door lock ...2-11 Luggage compartment lights ...1-24 Luggage rack ...2-14 Luggage (...
...1-4 1-4 1-4 8-2 indicator lights and chimes)...1-6 Inertial fuel shut off switch...5-11 Inside mirror...2-80 Instrument brightness control ...1-15 Integrated child safety seats...2-71 Interior lights ...1-24 J Jump starting...5-8, 7-12 K Key...2-2 Keyless entry system (See multi-remote control system) ... lights ...1-24 Spotlights ...1-25 Warning/indicator lights and chimes ...1-6 Lock Child safety sliding door lock ...2-4 Door locks...2-2 Fuel filler lid lock opener lever ...2-15 Power door lock...2-5 Rear door lock ...2-11 Luggage compartment lights ...1-24 Luggage rack ...2-14 Luggage (...
Owner's Manual
Page 244
... ...4-9 Parking/parking on hills ...4-13 Periodic maintenance schedules...8-5 Personal reading light...1-24 Power Power antenna ...3-20 Power door lock...2-5 Power rear windows ...1-22 Power steering fluid ...7-9, 9-2 Power support front seat ...2-28 Power windows...1-19 Precautions Maintenance precautions...control system) ...2-7 Removing and installing the second row bench seat ...2-32 Reporting safety defects (USA)...9-19 S Safety Child safety sliding door lock ...2-4 Reporting safety defects (USA)...9-19 Seat belt 2-point type without retractor...2-58 3-point type with retractor ...2-51...
... ...4-9 Parking/parking on hills ...4-13 Periodic maintenance schedules...8-5 Personal reading light...1-24 Power Power antenna ...3-20 Power door lock...2-5 Power rear windows ...1-22 Power steering fluid ...7-9, 9-2 Power support front seat ...2-28 Power windows...1-19 Precautions Maintenance precautions...control system) ...2-7 Removing and installing the second row bench seat ...2-32 Reporting safety defects (USA)...9-19 S Safety Child safety sliding door lock ...2-4 Reporting safety defects (USA)...9-19 Seat belt 2-point type without retractor...2-58 3-point type with retractor ...2-51...


