

Scheduled Maintenance Guide 3rd Printing
Page 9
The website location is presented at the web site. 9 Normal Schedule Normal Schedule The following section contains the "Normal Schedule". This schedule is at: www.ford.com/ Then go to the service pick at specific mileage intervals with exceptions noted. Additional Information Available on your vehicle, please visit the Ford Customer Service website. You'll also find important warranty information, customer assistance, technical expertise, frequently asked questions and much more about the importance of routine and dealer-performed maintenance on the Web To learn more .
The website location is presented at the web site. 9 Normal Schedule Normal Schedule The following section contains the "Normal Schedule". This schedule is at: www.ford.com/ Then go to the service pick at specific mileage intervals with exceptions noted. Additional Information Available on your vehicle, please visit the Ford Customer Service website. You'll also find important warranty information, customer assistance, technical expertise, frequently asked questions and much more about the importance of routine and dealer-performed maintenance on the Web To learn more .

Owner Guide 1st Printing
Page 26
...controls chapter for more information on setting the clock. Select a station. Please refer to select up the band (whether or not a listenable station is located there). These controls can be used to Clock in radio mode • Press to Tune adjust or Seek function for instructions on selecting a station. ...clock. to move to the next • Press frequency up to the next frequency down the band (whether or not a listenable station is located there). Hold the control to move to six preset AM stations and twelve FM stations (six in FM1 and six in radio mode. Select ...
...controls chapter for more information on setting the clock. Select a station. Please refer to select up the band (whether or not a listenable station is located there). These controls can be used to Clock in radio mode • Press to Tune adjust or Seek function for instructions on selecting a station. ...clock. to move to the next • Press frequency up to the next frequency down the band (whether or not a listenable station is located there). Hold the control to move to six preset AM stations and twelve FM stations (six in FM1 and six in radio mode. Select ...
Owner Guide 1st Printing
Page 27
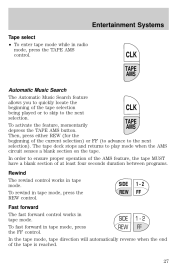
... fast forward in radio mode, press the TAPE AMS control. CLK TAPE AMS Automatic Music Search The Automatic Music Search feature allows you to quickly locate the beginning of the tape selection CLK being played or to skip to play mode when the AMS circuit senses a blank section on the tape...
... fast forward in radio mode, press the TAPE AMS control. CLK TAPE AMS Automatic Music Search The Automatic Music Search feature allows you to quickly locate the beginning of the tape selection CLK being played or to skip to play mode when the AMS circuit senses a blank section on the tape...
Owner Guide 1st Printing
Page 33
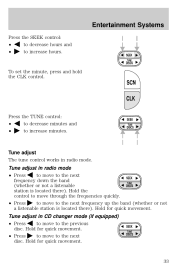
...The tune control works in radio mode • Press to move to the next frequency up the band (whether or not a listenable station is located there). Tune adjust in radio mode. Hold for quick movement. Hold for quick movement. SEEK TUNE DISCS 33 Entertainment Systems Press the SEEK control:... to decrease hours and • to the next SEEK frequency down the band TUNE (whether or not a listenable DISCS station is located there). Hold for quick movement. • Press to move to increase hours. • SEEK TUNE DISCS To set the minute, press and hold...
...The tune control works in radio mode • Press to move to the next frequency up the band (whether or not a listenable station is located there). Tune adjust in radio mode. Hold for quick movement. Hold for quick movement. SEEK TUNE DISCS 33 Entertainment Systems Press the SEEK control:... to decrease hours and • to the next SEEK frequency down the band TUNE (whether or not a listenable DISCS station is located there). Hold for quick movement. • Press to move to increase hours. • SEEK TUNE DISCS To set the minute, press and hold...

Owner Guide 1st Printing
Page 40
...Tune adjust in radio mode • Press to move to the next TUNE frequency down the band (whether or not a listenable station is located there). to fast-forward through the remaining discs. 40 Hold the control • Press to select the next disc in the Driver controls chapter...Refer to Shuffle feature for CD changer • Press to the next frequency up the band (whether or not • Press a listenable station is located there). Entertainment Systems Starting autoset memory preset 1. Press the AUTO control. 3. Setting the clock Your vehicle is in radio or CD mode (if equipped...
...Tune adjust in radio mode • Press to move to the next TUNE frequency down the band (whether or not a listenable station is located there). to fast-forward through the remaining discs. 40 Hold the control • Press to select the next disc in the Driver controls chapter...Refer to Shuffle feature for CD changer • Press to the next frequency up the band (whether or not • Press a listenable station is located there). Entertainment Systems Starting autoset memory preset 1. Press the AUTO control. 3. Setting the clock Your vehicle is in radio or CD mode (if equipped...

Owner Guide 1st Printing
Page 45
Slide the door to eject the magazine. 3. Turn the magazine (A) over. 4. Press to access the CD changer magazine. 2. Entertainment Systems CD CHANGER (IF EQUIPPED) The CD changer is located in one of the magazine. A B C 45 Using the disc holder release knob (C), pull the disc holder (B) out of the following locations: • in the trunk • in the center console • under the driver's seat 1.
Slide the door to eject the magazine. 3. Turn the magazine (A) over. 4. Press to access the CD changer magazine. 2. Entertainment Systems CD CHANGER (IF EQUIPPED) The CD changer is located in one of the magazine. A B C 45 Using the disc holder release knob (C), pull the disc holder (B) out of the following locations: • in the trunk • in the center console • under the driver's seat 1.
Owner Guide 1st Printing
Page 53
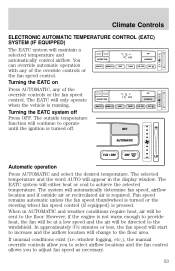
... will be directed to the windshield. If unusual conditions exist (i.e.-window fogging, etc.), the manual override controls allow you to select airflow locations and the fan control allows you to adjust fan speed as necessary. 53 Turning the EATC system off . OFF F OFF HI OUTSIDE...to achieve the selected temperature. In approximately 31⁄2 minutes or less, the fan speed will start to increase and the airflow location will maintain a selected temperature and AUTO automatically control airflow. You can override automatic operation with any of the override controls or the...
... will be directed to the windshield. If unusual conditions exist (i.e.-window fogging, etc.), the manual override controls allow you to select airflow locations and the fan control allows you to adjust fan speed as necessary. 53 Turning the EATC system off . OFF F OFF HI OUTSIDE...to achieve the selected temperature. In approximately 31⁄2 minutes or less, the fan speed will start to increase and the airflow location will maintain a selected temperature and AUTO automatically control airflow. You can override automatic operation with any of the override controls or the...

Owner Guide 1st Printing
Page 55
... can also be cooled based on the ground under the air conditioner drain while the system is directed. Manual override controls The override controls are located at any other override controls. To return to The display will cool the inside of the EATC and allow you to determine where airflow is...
... can also be cooled based on the ground under the air conditioner drain while the system is directed. Manual override controls The override controls are located at any other override controls. To return to The display will cool the inside of the EATC and allow you to determine where airflow is...

Owner Guide 1st Printing
Page 57
..., don't drive with the climate control system in the OFF or MAX A/C position. • To reduce humidity buildup inside the vehicle in vehicle and station locations. This allows the vehicle to differences in warm weather conditions, don't drive with the windows open. The outside pollutants. • If your windshield. This allows...
..., don't drive with the climate control system in the OFF or MAX A/C position. • To reduce humidity buildup inside the vehicle in vehicle and station locations. This allows the vehicle to differences in warm weather conditions, don't drive with the windows open. The outside pollutants. • If your windshield. This allows...

Owner Guide 1st Printing
Page 58
REAR WINDOW DEFROSTER The rear defroster control is located on top of the windshield. • Do not place objects over the defroster outlets. To manually turn off automatically after 10 minutes or when the ...
REAR WINDOW DEFROSTER The rear defroster control is located on top of the windshield. • Do not place objects over the defroster outlets. To manually turn off automatically after 10 minutes or when the ...
Owner Guide 1st Printing
Page 65
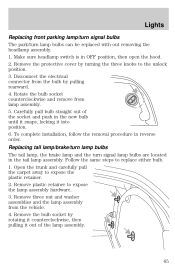
... bulb. 1. Follow the same steps to expose the plastic retainer. 2. Lights Replacing front parking lamp/turn signal bulbs The park/turn signal lamp bulbs are located in the tail lamp assembly.
... bulb. 1. Follow the same steps to expose the plastic retainer. 2. Lights Replacing front parking lamp/turn signal bulbs The park/turn signal lamp bulbs are located in the tail lamp assembly.

Owner Guide 1st Printing
Page 70
... Press and hold the rocker switches to open and close . H M Press M to set the hour. AUTO 70 H M AUXILIARY POWER POINT The auxiliary power point is located under the instrument panel on the left hand side of the front passenger foot well. Driver Controls CLOCK Press H to set the minute.
... Press and hold the rocker switches to open and close . H M Press M to set the hour. AUTO 70 H M AUXILIARY POWER POINT The auxiliary power point is located under the instrument panel on the left hand side of the front passenger foot well. Driver Controls CLOCK Press H to set the minute.

Owner Guide 1st Printing
Page 80
... the driver's visor, provides a convenient way to replace up to three hand-held transmitter 5-14 cm (2-5 inches) away from the HomeLink Universal Transceiver surface (located on the Internet at HomeLink.jci.com. federal safety standards. Prepare for programming the HomeLink Universal Transceiver by erasing the three factory default codes...
... the driver's visor, provides a convenient way to replace up to three hand-held transmitter 5-14 cm (2-5 inches) away from the HomeLink Universal Transceiver surface (located on the Internet at HomeLink.jci.com. federal safety standards. Prepare for programming the HomeLink Universal Transceiver by erasing the three factory default codes...

Owner Guide 1st Printing
Page 82
..., simply press and release the appropriate HomeLink button (the red light will activate the "training" light). 82 Locate the training button on the Internet at HomeLink.jci.com. if there is being transmitted). Driver Controls Operating the HomeLinkா...two seconds. Rolling code programming Rolling code garage door openers (or other rolling code devices) which will illuminate, indicating the signal is difficulty locating the training button. 2. After completing the "Programming" functions, follow these steps to program the HomeLink Universal Transceiver but does not ...
..., simply press and release the appropriate HomeLink button (the red light will activate the "training" light). 82 Locate the training button on the Internet at HomeLink.jci.com. if there is being transmitted). Driver Controls Operating the HomeLinkா...two seconds. Rolling code programming Rolling code garage door openers (or other rolling code devices) which will illuminate, indicating the signal is difficulty locating the training button. 2. After completing the "Programming" functions, follow these steps to program the HomeLink Universal Transceiver but does not ...

Owner Guide 1st Printing
Page 89
Driver Controls OVERDRIVE CONTROL Activating overdrive (Overdrive) is equipped with a column-shift transmission, press the Transmission Control Switch (TCS) located on the instrument cluster. The Transmission Control Indicator Light (TCIL) will (Overdrive) mode. The transmission will no longer be deactivated by pressing the Transmission Control ...
Driver Controls OVERDRIVE CONTROL Activating overdrive (Overdrive) is equipped with a column-shift transmission, press the Transmission Control Switch (TCS) located on the instrument cluster. The Transmission Control Indicator Light (TCIL) will (Overdrive) mode. The transmission will no longer be deactivated by pressing the Transmission Control ...

Owner Guide 1st Printing
Page 90
TRUNK FUEL Fuel filler door override release If the remote release is equipped with a locking fuel door. TRUNK FUEL 90 TRUNK REMOTE CONTROL The remote trunk release control is located on the door. Driver Controls FUEL DOOR RELEASE Your vehicle is inoperative, open the trunk, then pull the override release handle located inside the trunk to open the door, press the control located on the driver's door trim panel and can be operated at any time. To open the fuel filler door.
TRUNK FUEL Fuel filler door override release If the remote release is equipped with a locking fuel door. TRUNK FUEL 90 TRUNK REMOTE CONTROL The remote trunk release control is located on the door. Driver Controls FUEL DOOR RELEASE Your vehicle is inoperative, open the trunk, then pull the override release handle located inside the trunk to open the door, press the control located on the driver's door trim panel and can be operated at any time. To open the fuel filler door.

Owner Guide 1st Printing
Page 93
...advised to ambient light. The childproof locks are unlocked. To open the luggage compartment door (lid) from the outside when the doors are located on rear edge of the release handle. The rear doors can be opened from the inside , pull the illuminated "T" shaped handle and push...children and adults in the darkness of the luggage compartment following brief exposure to familiarize themselves with the operation and location of each rear door and must be located either on the trunk lid. The "T" shaped handle will glow for both doors. INTERIOR LUGGAGE COMPARTMENT RELEASE Your...
...advised to ambient light. The childproof locks are unlocked. To open the luggage compartment door (lid) from the outside when the doors are located on rear edge of the release handle. The rear doors can be opened from the inside , pull the illuminated "T" shaped handle and push...children and adults in the darkness of the luggage compartment following brief exposure to familiarize themselves with the operation and location of each rear door and must be located either on the trunk lid. The "T" shaped handle will glow for both doors. INTERIOR LUGGAGE COMPARTMENT RELEASE Your...

Owner Guide 1st Printing
Page 100
..., you can also program your dealer When pressing the controls on the keyless entry keypad, press the middle of step 1. 1 2 3 4 5 6 7 8 9 0 3. The factory-set code is located: • on the owner's wallet card in this chapter for more information. Enter the factory-set 5-digit code that operates the keyless entry system. Turn...
..., you can also program your dealer When pressing the controls on the keyless entry keypad, press the middle of step 1. 1 2 3 4 5 6 7 8 9 0 3. The factory-set code is located: • on the owner's wallet card in this chapter for more information. Enter the factory-set 5-digit code that operates the keyless entry system. Turn...

Owner Guide 1st Printing
Page 106
.... Reclining the seatback can reduce the effectiveness of the seat's safety belt in a collision or sudden stop. Refer to the following to that it is located directly behind your seatback upright and the lap belt snug and low across the hips. The purpose of a collision. 106 Seating and Safety Restraints SEATING...
.... Reclining the seatback can reduce the effectiveness of the seat's safety belt in a collision or sudden stop. Refer to the following to that it is located directly behind your seatback upright and the lap belt snug and low across the hips. The purpose of a collision. 106 Seating and Safety Restraints SEATING...

Owner Guide 1st Printing
Page 108
... snug and low across the hips. Seating and Safety Restraints To adjust the front seatback using the manual recliner: • Lift and hold the handle located on the side of the seat. • Lean against the seatback to adjust it forward. • Release the handle when the desired position has ...been reached. Never adjust the driver's seat or seatback when the vehicle is located on the inside of the seat. door mounted controls The controls for the power seats are located on the outboard side of each front door. Using the power lumbar support (if equipped) The ...
... snug and low across the hips. Seating and Safety Restraints To adjust the front seatback using the manual recliner: • Lift and hold the handle located on the side of the seat. • Lean against the seatback to adjust it forward. • Release the handle when the desired position has ...been reached. Never adjust the driver's seat or seatback when the vehicle is located on the inside of the seat. door mounted controls The controls for the power seats are located on the outboard side of each front door. Using the power lumbar support (if equipped) The ...


