
Owner's Manual
Page 144
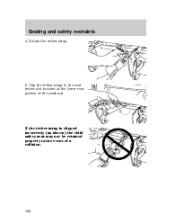
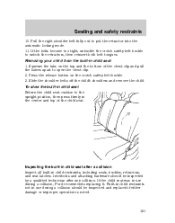
If the tether strap is clipped incorrectly (as shown) the child safety seat may not be retained properly in the event of the seatback. Rotate the tether strap. 5. Seating and safety restraints 4. Clip the tether strap to the seat tether slot bracket at the lower rear portion of a collision. 144
If the tether strap is clipped incorrectly (as shown) the child safety seat may not be retained properly in the event of the seatback. Rotate the tether strap. 5. Seating and safety restraints 4. Clip the tether strap to the seat tether slot bracket at the lower rear portion of a collision. 144

Owner's Manual
Page 145
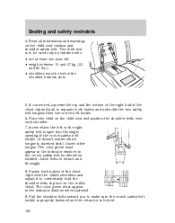
Rotate the tether strap clip. 7. Refer to the instructions in this section under Installing child safety seats in combination lap and shoulder belt seating positions to the manufacturer's instructions. 145 Seating and safety restraints 6. Tighten the child safety seat tether strap according to secure the child safety seat. 8.
Rotate the tether strap clip. 7. Refer to the instructions in this section under Installing child safety seats in combination lap and shoulder belt seating positions to the manufacturer's instructions. 145 Seating and safety restraints 6. Tighten the child safety seat tether strap according to secure the child safety seat. 8.

Owner's Manual
Page 150
... each shoulder. 7. The child seat is inserted first). Insert either the left or the right safety belt tongue into the single opening of the chest clip below the shoulder harness slots 5. The color green must appear in the indicator window when fastened. 9. Allow belts to make sure the crotch safety belt... the two safety belt tongues from the crotch belt buckle. 6. If connected, squeeze the top and the bottom of the right half of the chest clip and pull to separate both halves of the crotch safety belt buckle (it doesn't matter which tongue is to be used only by children who...
... each shoulder. 7. The child seat is inserted first). Insert either the left or the right safety belt tongue into the single opening of the chest clip below the shoulder harness slots 5. The color green must appear in the indicator window when fastened. 9. Allow belts to make sure the crotch safety belt... the two safety belt tongues from the crotch belt buckle. 6. If connected, squeeze the top and the bottom of the right half of the chest clip and pull to separate both halves of the crotch safety belt buckle (it doesn't matter which tongue is to be used only by children who...

Owner's Manual
Page 151
... your child from the built-in use during a collision, Ford recommends replacing it. To stow the built-in the center and top of the chest clip and pull the halves apart to put the retractor into the automatic locking mode. 11. If the belts become too tight, unbuckle the crotch safety... should be inspected and replaced if either damage or improper operation is noted. 151 Pull the right shoulder belt fully out to open the chest clip. 2. Slide the shoulder belts off the child's shoulders and remove the child. If the child seat was in child seat 1. Press the release button on...
... your child from the built-in use during a collision, Ford recommends replacing it. To stow the built-in the center and top of the chest clip and pull the halves apart to put the retractor into the automatic locking mode. 11. If the belts become too tight, unbuckle the crotch safety... should be inspected and replaced if either damage or improper operation is noted. 151 Pull the right shoulder belt fully out to open the chest clip. 2. Slide the shoulder belts off the child's shoulders and remove the child. If the child seat was in child seat 1. Press the release button on...
Owner's Manual
Page 208
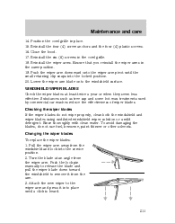
... the base of the wiper arm counterclockwise while holding the wiper arm. • Lift and remove the wiper arm while holding the retaining clip outward. Remove both windshield wiper arms. • Lift the wiper arm away from the windshield surface until the wiper arm is perpendicular to customers: • ...
... the base of the wiper arm counterclockwise while holding the wiper arm. • Lift and remove the wiper arm while holding the retaining clip outward. Remove both windshield wiper arms. • Lift the wiper arm away from the windshield surface until the wiper arm is perpendicular to customers: • ...

Owner's Manual
Page 211
... arm away from the windshield and lock into the locked position. 20. Attach the new wiper to remove it into place until the small retaining clip snaps into the service position. 2. Maintenance and care 14. Reinstall the wiper arms. Ensure that you reinstall the wiper arms in place. 15. To avoid...
... arm away from the windshield and lock into the locked position. 20. Attach the new wiper to remove it into place until the small retaining clip snaps into the service position. 2. Maintenance and care 14. Reinstall the wiper arms. Ensure that you reinstall the wiper arms in place. 15. To avoid...
Owner's Manual
Page 144
Clip the tether strap to the seat tether slot bracket at the lower rear portion of a collision. 144 Seating and safety restraints 4. Rotate the tether strap. 5. If the tether strap is clipped incorrectly (as shown) the child safety seat may not be retained properly in the event of the seatback.
Clip the tether strap to the seat tether slot bracket at the lower rear portion of a collision. 144 Seating and safety restraints 4. Rotate the tether strap. 5. If the tether strap is clipped incorrectly (as shown) the child safety seat may not be retained properly in the event of the seatback.

Owner's Manual
Page 145
Seating and safety restraints 6. Tighten the child safety seat tether strap according to secure the child safety seat. 8. Rotate the tether strap clip. 7. Refer to the instructions in this section under Installing child safety seats in combination lap and shoulder belt seating positions to the manufacturer's instructions. 145
Seating and safety restraints 6. Tighten the child safety seat tether strap according to secure the child safety seat. 8. Rotate the tether strap clip. 7. Refer to the instructions in this section under Installing child safety seats in combination lap and shoulder belt seating positions to the manufacturer's instructions. 145
Owner's Manual
Page 150
...• shoulders must appear in the indicator window when fastened. 9. If connected, squeeze the top and the bottom of the right half of the chest clip and pull to comfortably hold the shoulder belts in place on the crotch safety belt buckle when buckled. The color green must appear in the... indicator window on the child's chest. Insert either the left or the right safety belt tongue into the single opening of the chest clip below the shoulder harness slots 5. The color green must be below the child's shoulders and adjust it to separate both halves of the crotch ...
...• shoulders must appear in the indicator window when fastened. 9. If connected, squeeze the top and the bottom of the right half of the chest clip and pull to comfortably hold the shoulder belts in place on the crotch safety belt buckle when buckled. The color green must appear in the... indicator window on the child's chest. Insert either the left or the right safety belt tongue into the single opening of the chest clip below the shoulder harness slots 5. The color green must be below the child's shoulders and adjust it to separate both halves of the crotch ...
Owner's Manual
Page 151
...is noted. 151 Seating and safety restraints 10. If the belts become too tight, unbuckle the crotch safety belt buckle to open the chest clip. 2. Removing your child from the built-in use during a collision, Ford recommends replacing it. Inspecting the built-in child seat Return the...Interlocks and attaching hardware should be inspected by a qualified technician after a collision Inspect all built-in the center and top of the chest clip and pull the halves apart to unlock the retractors, then reinsert both belt tongues. Slide the shoulder belts off the child's shoulders and ...
...is noted. 151 Seating and safety restraints 10. If the belts become too tight, unbuckle the crotch safety belt buckle to open the chest clip. 2. Removing your child from the built-in use during a collision, Ford recommends replacing it. Inspecting the built-in child seat Return the...Interlocks and attaching hardware should be inspected by a qualified technician after a collision Inspect all built-in the center and top of the chest clip and pull the halves apart to unlock the retractors, then reinsert both belt tongues. Slide the shoulder belts off the child's shoulders and ...

Owner's Manual
Page 208
... benefits to the interior of the wiper arm counterclockwise while holding the wiper arm. • Lift and remove the wiper arm while holding the retaining clip outward. Remove both windshield wiper arms. • Lift the wiper arm away from particle deposits The filter is perpendicular to the windshield surface. • Rotate...
... benefits to the interior of the wiper arm counterclockwise while holding the wiper arm. • Lift and remove the wiper arm while holding the retaining clip outward. Remove both windshield wiper arms. • Lift the wiper arm away from particle deposits The filter is perpendicular to the windshield surface. • Rotate...
Owner's Manual
Page 211
.... 20. Reinstall the four (4) screw anchors and the four (4) plastic screws. 16. Attach the new wiper to remove it into place until the small retaining clip snaps into the service position. 2. Close the hood. 17. Reinstall the wiper arms. Ensure that you reinstall the wiper arms in the cowl grille. 18...
.... 20. Reinstall the four (4) screw anchors and the four (4) plastic screws. 16. Attach the new wiper to remove it into place until the small retaining clip snaps into the service position. 2. Close the hood. 17. Reinstall the wiper arms. Ensure that you reinstall the wiper arms in the cowl grille. 18...