Owner Guide 1st Printing
Page 22
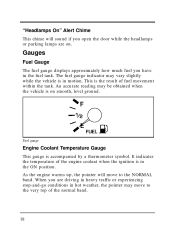
As the engine warms up, the pointer will sound if you open the door while the headlamps or parking lamps are driving in heavy traffic or experiencing stop-and-go conditions in the fuel tank. When you have in hot weather, the pointer may move ...
As the engine warms up, the pointer will sound if you open the door while the headlamps or parking lamps are driving in heavy traffic or experiencing stop-and-go conditions in the fuel tank. When you have in hot weather, the pointer may move ...
Owner Guide 1st Printing
Page 81
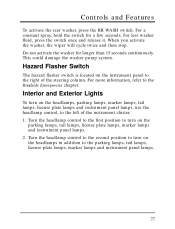
... switch is located on the parking lamps, tail lamps, license plate lamps, marker lamps and instrument panel lamps. 2. Interior and Exterior Lights To turn on the headlamps, parking lamps, marker lamps, tail lamps, license plate lamps and instrument panel lamps, use the headlamp control, to the parking lamps, tail lamps, license plate lamps, marker lamps and instrument panel lamps. 77 For less washer fluid, press...
... switch is located on the parking lamps, tail lamps, license plate lamps, marker lamps and instrument panel lamps. 2. Interior and Exterior Lights To turn on the headlamps, parking lamps, marker lamps, tail lamps, license plate lamps and instrument panel lamps, use the headlamp control, to the parking lamps, tail lamps, license plate lamps, marker lamps and instrument panel lamps. 77 For less washer fluid, press...

Owner Guide 1st Printing
Page 82
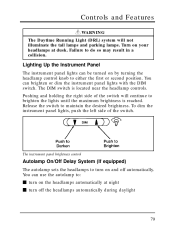
This is opened. The headlamp knob A chime will sound if any of the exterior lamps are on or off. Daytime Running Light (DRL) System (Canadian vehicles only) The Daytime Running Light (DRL) system turns the high beam headlamps on, with a reduced light output, when: Ⅵ the engine is running Ⅵ the vehicle has a fully released parking brake Ⅵ the headlamp system is in the OFF or first (parking lamps) position NOTE: You may notice that the lights flicker when the engine is turned on when the driver door is a normal condition. 78
This is opened. The headlamp knob A chime will sound if any of the exterior lamps are on or off. Daytime Running Light (DRL) System (Canadian vehicles only) The Daytime Running Light (DRL) system turns the high beam headlamps on, with a reduced light output, when: Ⅵ the engine is running Ⅵ the vehicle has a fully released parking brake Ⅵ the headlamp system is in the OFF or first (parking lamps) position NOTE: You may notice that the lights flicker when the engine is turned on when the driver door is a normal condition. 78
Owner Guide 1st Printing
Page 83
... instrument panel lights with the DIM switch. To dim the instrument panel lights, push the left side of the switch will not illuminate the tail lamps and parking...
... instrument panel lights with the DIM switch. To dim the instrument panel lights, push the left side of the switch will not illuminate the tail lamps and parking...
Owner Guide 1st Printing
Page 84
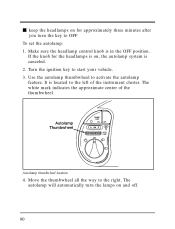
... set the autolamp: 1. Move the thumbwheel all the way to activate the autolamp feature. If the knob for approximately three minutes after you turn the lamps on , the autolamp system is in the OFF position. The white mark indicates the approximate center of the instrument cluster. Ⅵ keep the headlamps on...
... set the autolamp: 1. Move the thumbwheel all the way to activate the autolamp feature. If the knob for approximately three minutes after you turn the lamps on , the autolamp system is in the OFF position. The white mark indicates the approximate center of the instrument cluster. Ⅵ keep the headlamps on...
Owner Guide 1st Printing
Page 86
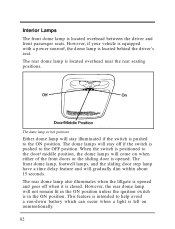
... illuminates when the liftgate is opened and goes off if the switch is pushed to the door/middle position, the dome lamps will stay illuminated if the switch is pushed to help avoid a run-down battery which can occur when a light is left on when either of ... 15 seconds. This feature is opened. The rear dome lamp is located behind the driver's seat. The front dome lamp, footwell lamps, and the sliding door step lamp have a time delay feature and will not remain lit in the ON position. Interior Lamps The front dome lamp is in the ON position unless the ignition switch...
... illuminates when the liftgate is opened and goes off if the switch is pushed to the door/middle position, the dome lamps will stay illuminated if the switch is pushed to help avoid a run-down battery which can occur when a light is left on when either of ... 15 seconds. This feature is opened. The rear dome lamp is located behind the driver's seat. The front dome lamp, footwell lamps, and the sliding door step lamp have a time delay feature and will not remain lit in the ON position. Interior Lamps The front dome lamp is in the ON position unless the ignition switch...
Owner Guide 1st Printing
Page 87
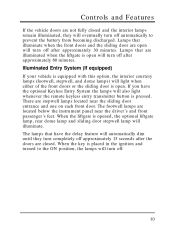
... System (If equipped) If your vehicle is equipped with this option, the interior courtesy lamps (footwell, stepwell, and dome lamps) will turn off after approximately 30 minutes. The lamps that illuminate when the front doors and the sliding door are open will light when either... delay feature will eventually turn off approximately 15 seconds after approximately 60 minutes. When the liftgate is open . Lamps that are closed and the interior lamps remain illuminated, they will automatically dim until they turn off automatically to prevent the battery from becoming discharged.
... System (If equipped) If your vehicle is equipped with this option, the interior courtesy lamps (footwell, stepwell, and dome lamps) will turn off after approximately 30 minutes. The lamps that illuminate when the front doors and the sliding door are open will light when either... delay feature will eventually turn off approximately 15 seconds after approximately 60 minutes. When the liftgate is open . Lamps that are closed and the interior lamps remain illuminated, they will automatically dim until they turn off automatically to prevent the battery from becoming discharged.
Owner Guide 1st Printing
Page 88
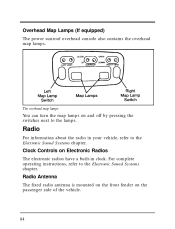
... the vehicle. 84 Radio Antenna The fixed radio antenna is mounted on the front fender on and off by pressing the switches next to the lamps. For complete operating instructions, refer to the Electronic Sound Systems chapter. Clock Controls on Electronic Radios The electronic radios have a built-in your vehicle, refer...
... the vehicle. 84 Radio Antenna The fixed radio antenna is mounted on the front fender on and off by pressing the switches next to the lamps. For complete operating instructions, refer to the Electronic Sound Systems chapter. Clock Controls on Electronic Radios The electronic radios have a built-in your vehicle, refer...
Owner Guide 1st Printing
Page 92
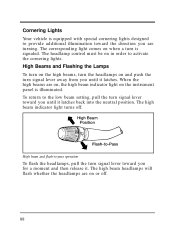
... vehicle is equipped with special cornering lights designed to provide additional illumination toward the direction you are on or off . High Beams and Flashing the Lamps To turn on the high beams, turn the headlamps on when a turn signal lever toward you for a moment and then release it. To return to...
... vehicle is equipped with special cornering lights designed to provide additional illumination toward the direction you are on or off . High Beams and Flashing the Lamps To turn on the high beams, turn the headlamps on when a turn signal lever toward you for a moment and then release it. To return to...
Owner Guide 1st Printing
Page 117
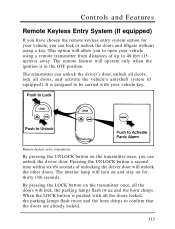
... the doors and liftgate without using a remote transmitter from distances of unlocking the driver door will lock, the parking lamps flash twice and the horn chirps. The interior lamp will operate only when the ignition is designed to 49 feet (15 meters) away. Remote keyless entry transmitter By...pressing the UNLOCK button on for your vehicle key. By pressing the LOCK button on the transmitter once, all the doors locked, the parking lamps flash twice and the horn chirps to confirm that the doors are already locked. 113 Pressing the UNLOCK button a second time within six ...
... the doors and liftgate without using a remote transmitter from distances of unlocking the driver door will lock, the parking lamps flash twice and the horn chirps. The interior lamp will operate only when the ignition is designed to 49 feet (15 meters) away. Remote keyless entry transmitter By...pressing the UNLOCK button on for your vehicle key. By pressing the LOCK button on the transmitter once, all the doors locked, the parking lamps flash twice and the horn chirps to confirm that the doors are already locked. 113 Pressing the UNLOCK button a second time within six ...
Owner Guide 1st Printing
Page 120
...) seconds. Press the LOCK button on a new remote transmitter. When an unauthorized entry occurs, the system triggers and will: Ⅵ flash the headlamps and hazard lamps Ⅵ honk the horn Ⅵ disable the starting circuit to four remote transmitters may be programmed (or reprogrammed) at the same time, they will not...
...) seconds. Press the LOCK button on a new remote transmitter. When an unauthorized entry occurs, the system triggers and will: Ⅵ flash the headlamps and hazard lamps Ⅵ honk the horn Ⅵ disable the starting circuit to four remote transmitters may be programmed (or reprogrammed) at the same time, they will not...

Owner Guide 1st Printing
Page 219
... rapid cycling of the ABS valves. Such noises are self-adjusting. Driving Brakes When the foot (service) brake pedal is depressed, the high-mount brake lamp should be felt on the driver's foot.
... rapid cycling of the ABS valves. Such noises are self-adjusting. Driving Brakes When the foot (service) brake pedal is depressed, the high-mount brake lamp should be felt on the driver's foot.
Owner Guide 1st Printing
Page 239
...and could start a fire. 235 Using a fuse with one circuit. WARNING Do not connect a trailer's hydraulic brake system directly to your trailer lamps conform to federal and local regulations. Each stop/turn circuit will operate one combination stop /turn light bulb (# 1157, 3157, 2357, or 3357)...on most trailers weighing over 1,500 lbs. (680 kg). Never add more than one trailer light bulb to operate trailer stop /turn tail lamps. Class I Trailer Tow electrical wiring provides two circuits (right hand and left hand) to one that has the specified amperage rating. Driving ...
...and could start a fire. 235 Using a fuse with one circuit. WARNING Do not connect a trailer's hydraulic brake system directly to your trailer lamps conform to federal and local regulations. Each stop/turn circuit will operate one combination stop /turn light bulb (# 1157, 3157, 2357, or 3357)...on most trailers weighing over 1,500 lbs. (680 kg). Never add more than one trailer light bulb to operate trailer stop /turn tail lamps. Class I Trailer Tow electrical wiring provides two circuits (right hand and left hand) to one that has the specified amperage rating. Driving ...
Owner Guide 1st Printing
Page 240
.../h) lower than Overdrive. If you use the speed control while you can brake gradually. If additional braking is caused by your Ford or Lincoln-Mercury dealer. Also, anticipate stops so that you are towing on very long, steep grades, the speed control may shut off automatically. This is ...into 2 (Second) or 1 (First) gear. Trailer Tow Module (If equipped) The trailer tow module on your vehicle (if equipped) allows turn/stop lamp fuse Ⅵ one SAE J1239 specified connector Ⅵ one extension harness within the rear bumper Ⅵ heavy duty battery Ⅵ full size spare If you...
.../h) lower than Overdrive. If you use the speed control while you can brake gradually. If additional braking is caused by your Ford or Lincoln-Mercury dealer. Also, anticipate stops so that you are towing on very long, steep grades, the speed control may shut off automatically. This is ...into 2 (Second) or 1 (First) gear. Trailer Tow Module (If equipped) The trailer tow module on your vehicle (if equipped) allows turn/stop lamp fuse Ⅵ one SAE J1239 specified connector Ⅵ one extension harness within the rear bumper Ⅵ heavy duty battery Ⅵ full size spare If you...
Owner Guide 1st Printing
Page 245
Roadside Emergencies Hazard Flasher Switch The hazard flasher is used when the hazard lamps are flashing. The hazard flasher switch operates the same lamps as the turn signal indicators cannot be drained to hazardous situations. The flashers work for longer than two hours or if your battery is ...of the ignition. They will work even with the key out of the brakelamps. If the flashers run for up to the right of these lamps will not start. When the hazard flasher is fully charged and in good condition. The flashers will not drain the battery excessively. The hazard ...
Roadside Emergencies Hazard Flasher Switch The hazard flasher is used when the hazard lamps are flashing. The hazard flasher switch operates the same lamps as the turn signal indicators cannot be drained to hazardous situations. The flashers work for longer than two hours or if your battery is ...of the ignition. They will work even with the key out of the brakelamps. If the flashers run for up to the right of these lamps will not start. When the hazard flasher is fully charged and in good condition. The flashers will not drain the battery excessively. The hazard ...
Owner Guide 1st Printing
Page 320
... idea to check the operation of the following lights frequently: Ⅵ headlamps Ⅵ high-mount brakelamp Ⅵ tail lamps Ⅵ brakelamps Ⅵ cornering lamps Ⅵ hazard flasher Ⅵ turn signals Ⅵ license plate lamps The alignment of your headlamps should be checked if: Ⅵ oncoming motorists frequently signal you to turn off your...
... idea to check the operation of the following lights frequently: Ⅵ headlamps Ⅵ high-mount brakelamp Ⅵ tail lamps Ⅵ brakelamps Ⅵ cornering lamps Ⅵ hazard flasher Ⅵ turn signals Ⅵ license plate lamps The alignment of your headlamps should be checked if: Ⅵ oncoming motorists frequently signal you to turn off your...
Owner Guide 1st Printing
Page 334
.... Do not use dry paper towel, chemical solvents or abrasive cleaners to clean the lamps, as these may cause scratches or crack the lamps. Do not clean plastic parts with a tar and road oil remover. Cleaning the Exterior Lamps Do not use acid-based wheel cleaners, steel wool, abrasives, fuel, or strong detergents...
.... Do not use dry paper towel, chemical solvents or abrasive cleaners to clean the lamps, as these may cause scratches or crack the lamps. Do not clean plastic parts with a tar and road oil remover. Cleaning the Exterior Lamps Do not use acid-based wheel cleaners, steel wool, abrasives, fuel, or strong detergents...
Owner Guide 1st Printing
Page 380
... ...252 see also fuses ...243 Cleaning your vehicle ...329 chrome and aluminum parts ...330 engine compartment ...331 exterior ...329 exterior lamps ...330 fabric ...332 headlamps ...330 instrument panel ...330 instrument panel lens ...332 interior ...332 plastic parts ...330 polishing ...329 ...rustproofing ...330 safety belts ...332 tail lamps ...330 upholstery and interior trim ...332 washing ...329 waxing ...329 wheels ...330 Climate control system air conditioning ...56 heating ...56 ...
... ...252 see also fuses ...243 Cleaning your vehicle ...329 chrome and aluminum parts ...330 engine compartment ...331 exterior ...329 exterior lamps ...330 fabric ...332 headlamps ...330 instrument panel ...330 instrument panel lens ...332 interior ...332 plastic parts ...330 polishing ...329 ...rustproofing ...330 safety belts ...332 tail lamps ...330 upholstery and interior trim ...332 washing ...329 waxing ...329 wheels ...330 Climate control system air conditioning ...56 heating ...56 ...
Owner Guide 1st Printing
Page 387
...-starting your vehicle attaching cables ...disconnecting cables ...255 258 258 255 ...270 ...272 K Keys positions of the ignition ...86 stuck in lock position ...86, 213 L Lamps bulb replacement specifications chart ...322 checking ...316 daytime running light system ...78 hazard flashers ...77, 241 instrument panel, dimming ...79 replacing bulbs ...316 trailer ...235...
...-starting your vehicle attaching cables ...disconnecting cables ...255 258 258 255 ...270 ...272 K Keys positions of the ignition ...86 stuck in lock position ...86, 213 L Lamps bulb replacement specifications chart ...322 checking ...316 daytime running light system ...78 hazard flashers ...77, 241 instrument panel, dimming ...79 replacing bulbs ...316 trailer ...235...
Owner Guide 1st Printing
Page 393
Index Tail lamps bulb replacement ...316, 322 cleaning ...330 Temperature control (see Climate control) ...56 Tether anchor installation (see Child restraints) ...160 Tilt steering wheel ...91 Tires ...299 ... towing) ...227 Towing your vehicle ...272 using wheel dollies ...272 with a tow truck ...272 Trailer Towing ...227 Trailer towing tips ...236 trailer brakes ...235 trailer lamps ...235 Transaxle automatic operation ...221 fluid, checking and adding (automatic) ...291 lubricant specifications ...339 Transaxle control switch ...223 389
Index Tail lamps bulb replacement ...316, 322 cleaning ...330 Temperature control (see Climate control) ...56 Tether anchor installation (see Child restraints) ...160 Tilt steering wheel ...91 Tires ...299 ... towing) ...227 Towing your vehicle ...272 using wheel dollies ...272 with a tow truck ...272 Trailer Towing ...227 Trailer towing tips ...236 trailer brakes ...235 trailer lamps ...235 Transaxle automatic operation ...221 fluid, checking and adding (automatic) ...291 lubricant specifications ...339 Transaxle control switch ...223 389


