Owner Guide 1st Printing
Page 4
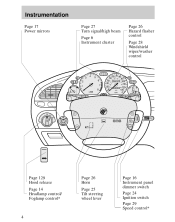
... Power mirrors Page 27 Turn signal/high beam Page 6 Instrument cluster Page 26 Hazard flasher control Page 28 Windshield wiper/washer control 3 2 NORMAL 4 5 6 7 1 0 x 1000 O/D OFF 8 55 60 70 80 50 100 120 90 140 40 ... MI RRORS Off Coast Page 129 Hood release Page 14 Headlamp control/ Foglamp control* Page 26 Horn Page 25 Tilt steering wheel lever Page 16 Instrument panel dimmer switch Page 24 Ignition switch Page 29 Speed control* 4
... Power mirrors Page 27 Turn signal/high beam Page 6 Instrument cluster Page 26 Hazard flasher control Page 28 Windshield wiper/washer control 3 2 NORMAL 4 5 6 7 1 0 x 1000 O/D OFF 8 55 60 70 80 50 100 120 90 140 40 ... MI RRORS Off Coast Page 129 Hood release Page 14 Headlamp control/ Foglamp control* Page 26 Horn Page 25 Tilt steering wheel lever Page 16 Instrument panel dimmer switch Page 24 Ignition switch Page 29 Speed control* 4
Owner Guide 1st Printing
Page 5
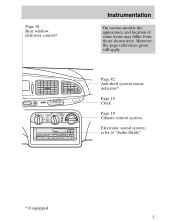
However, the page references given still apply. Page 42 Anti-theft system status indicator* I0:20 Page 18 Clock Page 19 Climate control system Electronic sound system; refer to "Audio Guide" LO PANEL A/C HI MAX A/C OFF PNL/FLR FLOOR FLR DEF DEF SIDE 1-2 POWER AUDIO VOLUME AM/FM 1 4 2 5 3 6 SCAN ANS SEEK EJECT * if equipped 5 Instrumentation Page 16 Rear window defroster control* On various models the appearance and location of some items may differ from those shown here.
However, the page references given still apply. Page 42 Anti-theft system status indicator* I0:20 Page 18 Clock Page 19 Climate control system Electronic sound system; refer to "Audio Guide" LO PANEL A/C HI MAX A/C OFF PNL/FLR FLOOR FLR DEF DEF SIDE 1-2 POWER AUDIO VOLUME AM/FM 1 4 2 5 3 6 SCAN ANS SEEK EJECT * if equipped 5 Instrumentation Page 16 Rear window defroster control* On various models the appearance and location of some items may differ from those shown here.

Owner Guide 1st Printing
Page 21
...MAX A/C OFF PNL/FLR FLOOR FLR DEF DEF Using A/C mode (if equipped) The A/C mode directs outside conditioned air to flow through the instrument panel vents. The A/C compressor only functions in the A/C mode if the outside temperature is above 10°C (50°F). Controls and features ...Using MAX A/C mode (if equipped) The MAX A/C mode recirculates the air and directs it to flow through the instrument panel vents. The A/C compressor only functions if the outside temperature is above 10°C (50°F). The A/C mode can be used for heating, ...
...MAX A/C OFF PNL/FLR FLOOR FLR DEF DEF Using A/C mode (if equipped) The A/C mode directs outside conditioned air to flow through the instrument panel vents. The A/C compressor only functions in the A/C mode if the outside temperature is above 10°C (50°F). Controls and features ...Using MAX A/C mode (if equipped) The MAX A/C mode recirculates the air and directs it to flow through the instrument panel vents. The A/C compressor only functions if the outside temperature is above 10°C (50°F). The A/C mode can be used for heating, ...
Owner Guide 1st Printing
Page 27
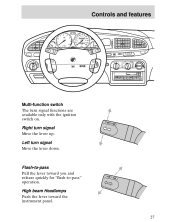
... 30 40 10 180 1 20 20 0 0 0 0 200 120 10 130 BRAKE E 1/ 2 F MPH CHECK ENGINE UNLEADED FUEL ONLY TRACTION CONTROL O/D OFF I0:20 On Res LO PANEL A/C HI MAX A/C OFF PNL/FLR FLOOR FLR DEF DEF Set Acc MI RRORS Off Coast SIDE 1-2 POWER AUDIO VOLUME AM/FM 1 4 2 5 3 6 SCAN ANS SEEK EJECT... signal functions are available only with the ignition switch on. Right turn signal Move the lever up. Flash-to-pass Pull the lever toward the instrument panel. 27
... 30 40 10 180 1 20 20 0 0 0 0 200 120 10 130 BRAKE E 1/ 2 F MPH CHECK ENGINE UNLEADED FUEL ONLY TRACTION CONTROL O/D OFF I0:20 On Res LO PANEL A/C HI MAX A/C OFF PNL/FLR FLOOR FLR DEF DEF Set Acc MI RRORS Off Coast SIDE 1-2 POWER AUDIO VOLUME AM/FM 1 4 2 5 3 6 SCAN ANS SEEK EJECT... signal functions are available only with the ignition switch on. Right turn signal Move the lever up. Flash-to-pass Pull the lever toward the instrument panel. 27
Owner Guide 1st Printing
Page 56
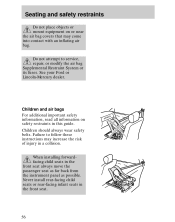
...install rear-facing child seats or rear-facing infant seats in the front seat always move the passenger seat as far back from the instrument panel as possible. Children should always wear safety belts. BAG AIR When installing forwardfacing child seats in the front seat. 56 Do not attempt... to follow these instructions may come into contact with an inflating air bag. See your Ford or Lincoln-Mercury dealer. Seating and safety restraints Do not place objects or mount equipment on safety restraints in this guide. Failure to service, repair, ...
...install rear-facing child seats or rear-facing infant seats in the front seat always move the passenger seat as far back from the instrument panel as possible. Children should always wear safety belts. BAG AIR When installing forwardfacing child seats in the front seat. 56 Do not attempt... to follow these instructions may come into contact with an inflating air bag. See your Ford or Lincoln-Mercury dealer. Seating and safety restraints Do not place objects or mount equipment on safety restraints in this guide. Failure to service, repair, ...

Owner Guide 1st Printing
Page 72
... infant seats in a seat with a combination lap and shoulder belt. When using forward-facing child seats move the passenger seat as far back from the instrument panel as possible. Be sure the belt webbing is not twisted. 72 Position the child safety seat in the front seat. AI RBAG 2. Pull down on...
... infant seats in a seat with a combination lap and shoulder belt. When using forward-facing child seats move the passenger seat as far back from the instrument panel as possible. Be sure the belt webbing is not twisted. 72 Position the child safety seat in the front seat. AI RBAG 2. Pull down on...
Owner Guide 1st Printing
Page 90
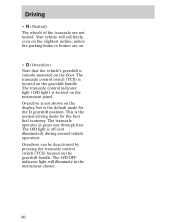
..., even on the slightest incline, unless the parking brake or brakes are not locked. The transaxle control indicator light (O/D light) is console-mounted on the instrument panel. Overdrive can be deactivated by pressing the transaxle control switch (TCS) located on the gearshift handle. The O/D light is the normal driving mode for the...
..., even on the slightest incline, unless the parking brake or brakes are not locked. The transaxle control indicator light (O/D light) is console-mounted on the instrument panel. Overdrive can be deactivated by pressing the transaxle control switch (TCS) located on the gearshift handle. The O/D light is the normal driving mode for the...

Owner Guide 1st Printing
Page 109
Blown fuses are identified by numbers on the passenger compartment fuse panel and inside the cover on the power distribution box. 109 Always replace a fuse with higher amperage rating can cause severe wire damage and could start a ... one that has the specified amperage rating. The power distribution box is located on the driver's side under the instrument panel. The circuits protected are identified by a broken wire. The passenger compartment fuse panel is located on the driver's side of the overload is replaced, it will continue to blow, have blown. Check...
Blown fuses are identified by numbers on the passenger compartment fuse panel and inside the cover on the power distribution box. 109 Always replace a fuse with higher amperage rating can cause severe wire damage and could start a ... one that has the specified amperage rating. The power distribution box is located on the driver's side under the instrument panel. The circuits protected are identified by a broken wire. The passenger compartment fuse panel is located on the driver's side of the overload is replaced, it will continue to blow, have blown. Check...
Owner Guide 1st Printing
Page 113
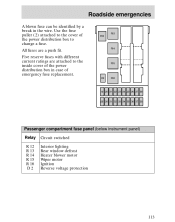
... R15 R16 19 20 21 22 23 24 25 26 27 28 29 30 31 32 33 34 35 36 37 38 Passenger compartment fuse panel (below instrument panel) Relay R 12 R 13 R 14 R 15 R 16 D2 Circuit switched Interior lighting Rear window defrost Heater blower motor Wiper motor Ignition Reverse voltage protection 113...
... R15 R16 19 20 21 22 23 24 25 26 27 28 29 30 31 32 33 34 35 36 37 38 Passenger compartment fuse panel (below instrument panel) Relay R 12 R 13 R 14 R 15 R 16 D2 Circuit switched Interior lighting Rear window defrost Heater blower motor Wiper motor Ignition Reverse voltage protection 113...

Owner Guide 1st Printing
Page 114
... motors (circuit breaker) Power windows ABS module Backup lamps Brake lamps Door locks Main light Cigar lighter Electric seats Rear window defrost Engine management system Instrument panel illumination Radio Parking lamps - C10 40 7.5 15 15 20 7.5 15 30 30 7.5 7.5 7.5 7.5 7.5 7.5 10 30 - driver's side ...Interior lighting/electric mirror adjustment/clock Parking lamps - Roadside emergencies Passenger compartment fuse panel (below instrument panel) Fuse 19 20 21 22 23 24 25 26 27 28 29 30 31 32 33 34 35 36 37 38 Ampere rating -
... motors (circuit breaker) Power windows ABS module Backup lamps Brake lamps Door locks Main light Cigar lighter Electric seats Rear window defrost Engine management system Instrument panel illumination Radio Parking lamps - C10 40 7.5 15 15 20 7.5 15 30 30 7.5 7.5 7.5 7.5 7.5 7.5 10 30 - driver's side ...Interior lighting/electric mirror adjustment/clock Parking lamps - Roadside emergencies Passenger compartment fuse panel (below instrument panel) Fuse 19 20 21 22 23 24 25 26 27 28 29 30 31 32 33 34 35 36 37 38 Ampere rating -
Owner Guide 1st Printing
Page 129
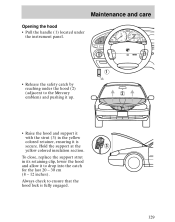
... (8 - 12 inches). Always check to ensure that the hood lock is secure. Maintenance and care Opening the hood • Pull the handle (1) located under the instrument panel. 4 55 60 70 80 50 100 120 90 140 40 60 800 0 0 1 2 3 100 160 30 40 10 180 1 20 20 0 0 0 0 200 120 10 130 3 2 NORMAL... ONLY TRACTION CONTROL O/D OFF On Res Set Acc MI RRORS Off Coast 1 • Release the safety catch by reaching under the hood (2) (adjacent to the Mercury emblem) and pushing it up. 2 • Raise the hood and support it with the strut (3) in its retaining clip, lower the hood and allow it...
... (8 - 12 inches). Always check to ensure that the hood lock is secure. Maintenance and care Opening the hood • Pull the handle (1) located under the instrument panel. 4 55 60 70 80 50 100 120 90 140 40 60 800 0 0 1 2 3 100 160 30 40 10 180 1 20 20 0 0 0 0 200 120 10 130 3 2 NORMAL... ONLY TRACTION CONTROL O/D OFF On Res Set Acc MI RRORS Off Coast 1 • Release the safety catch by reaching under the hood (2) (adjacent to the Mercury emblem) and pushing it up. 2 • Raise the hood and support it with the strut (3) in its retaining clip, lower the hood and allow it...

Owner Guide 1st Printing
Page 135
... clutch fluid systems are supplied from the same reservoir. If the level falls below the MIN mark, the brake fluid level warning light on the instrument panel will cause permanent damage to your brakes. Follow the instructions on the side of the fluid must lie between the MIN and MAX marks on...
... clutch fluid systems are supplied from the same reservoir. If the level falls below the MIN mark, the brake fluid level warning light on the instrument panel will cause permanent damage to your brakes. Follow the instructions on the side of the fluid must lie between the MIN and MAX marks on...
Owner Guide 1st Printing
Page 181
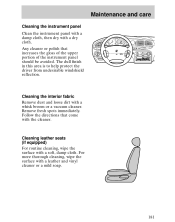
Follow the directions that increases the gloss of the upper portion of the instrument panel should be avoided. For more thorough cleaning, wipe the surface with a whisk broom or a vacuum cleaner. The dull finish in this area is to help... dirt with a leather and vinyl cleaner or a mild soap. 181 Any cleaner or polish that come with the cleaner. Maintenance and care Cleaning the instrument panel Clean the instrument panel with a damp cloth, then dry with a soft, damp cloth. Remove fresh spots immediately. Cleaning leather seats (if equipped) For routine cleaning, wipe the ...
Follow the directions that increases the gloss of the upper portion of the instrument panel should be avoided. For more thorough cleaning, wipe the surface with a whisk broom or a vacuum cleaner. The dull finish in this area is to help... dirt with a leather and vinyl cleaner or a mild soap. 181 Any cleaner or polish that come with the cleaner. Maintenance and care Cleaning the instrument panel Clean the instrument panel with a damp cloth, then dry with a soft, damp cloth. Remove fresh spots immediately. Cleaning leather seats (if equipped) For routine cleaning, wipe the ...

Owner Guide 1st Printing
Page 188
The VIN tag may be seen by looking through the windshield from the outside of the instrument panel. Capacities and specifications VEHICLE IDENTIFICATION NUMBER The vehicle identification number (VIN) is attached to a metal tag and is located on the front driver's side of the vehicle. 188
The VIN tag may be seen by looking through the windshield from the outside of the instrument panel. Capacities and specifications VEHICLE IDENTIFICATION NUMBER The vehicle identification number (VIN) is attached to a metal tag and is located on the front driver's side of the vehicle. 188
Owner Guide 1st Printing
Page 191
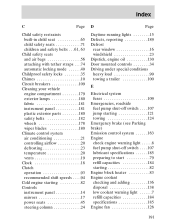
... safety locks ...35 Chimes ...10 Circuit breakers ...109 Cleaning your vehicle engine compartment ...179 exterior lamps ...180 fabric ...181 instrument panel ...181 plastic exterior parts ...180 safety belts ...182 wheels ...178 wiper blades ...180 Climate control system air conditioning ...21 ...defrosting ...23 temperature ...20 vents ...19 Clock ...18 Clutch operation ...93 recommended shift speeds ...94 Cold engine starting ...82 Controls instrument panel ...14 mirrors ...17 power seats ...45 steering column ...24 Daytime running lights ...15 Defects, reporting ...189 Defrost rear window ...
... safety locks ...35 Chimes ...10 Circuit breakers ...109 Cleaning your vehicle engine compartment ...179 exterior lamps ...180 fabric ...181 instrument panel ...181 plastic exterior parts ...180 safety belts ...182 wheels ...178 wiper blades ...180 Climate control system air conditioning ...21 ...defrosting ...23 temperature ...20 vents ...19 Clock ...18 Clutch operation ...93 recommended shift speeds ...94 Cold engine starting ...82 Controls instrument panel ...14 mirrors ...17 power seats ...45 steering column ...24 Daytime running lights ...15 Defects, reporting ...189 Defrost rear window ...
Owner Guide 1st Printing
Page 192
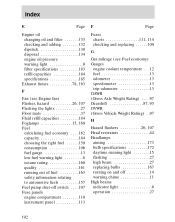
... ...8 octane rating ...160 quality ...161 running out of fuel ...163 safety information relating to automotive fuels ...157 Fuel pump shut-off switch ...107 Fuse panels engine compartment ...110 instrument panel ...113 Fuses charts ...111, 114 checking and replacing ...109 G Gas mileage (see Fuel economy) Gauges engine coolant temperature ...12 fuel ...13 odometer ...13...
... ...8 octane rating ...160 quality ...161 running out of fuel ...163 safety information relating to automotive fuels ...157 Fuel pump shut-off switch ...107 Fuse panels engine compartment ...110 instrument panel ...113 Fuses charts ...111, 114 checking and replacing ...109 G Gas mileage (see Fuel economy) Gauges engine coolant temperature ...12 fuel ...13 odometer ...13...
Owner Guide 1st Printing
Page 193
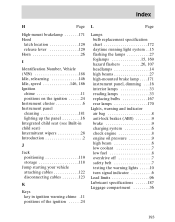
...VIN) ...188 Idle, relearning ...146 Idle, speed ...146, 186 Ignition chime ...11 positions on the ignition ...24 Instrument cluster ...6 Instrument panel cleaning ...181 lighting up the panel ...16 Integrated child seat (see Built-in child seat) Intermittent wipers ...28 Introduction ...2 J Jack positioning ...119 ... the lamps ...27 foglamps ...15, 169 hazard flashers ...26, 107 headlamps ...14 high beams ...27 high-mounted brake lamp ...171 instrument panel, dimming ...16 interior lamps ...33 reading lamps ...33 replacing bulbs ...167 rear lamps ...170 Lights, warning and indicator air bag ...
...VIN) ...188 Idle, relearning ...146 Idle, speed ...146, 186 Ignition chime ...11 positions on the ignition ...24 Instrument cluster ...6 Instrument panel cleaning ...181 lighting up the panel ...16 Integrated child seat (see Built-in child seat) Intermittent wipers ...28 Introduction ...2 J Jack positioning ...119 ... the lamps ...27 foglamps ...15, 169 hazard flashers ...26, 107 headlamps ...14 high beams ...27 high-mounted brake lamp ...171 instrument panel, dimming ...16 interior lamps ...33 reading lamps ...33 replacing bulbs ...167 rear lamps ...170 Lights, warning and indicator air bag ...


