Owner Guide 1st Printing
Page 4
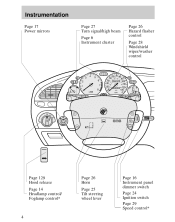
... 0 0 0 0 200 120 10 130 BRAKE E 1/ 2 F MPH CHECK ENGINE UNLEADED FUEL ONLY On Res Set Acc MI RRORS Off Coast Page 129 Hood release Page 14 Headlamp control/ Foglamp control* Page 26 Horn Page 25 Tilt steering wheel lever Page 16 Instrument panel dimmer switch Page 24 Ignition switch Page 29 Speed...
... 0 0 0 0 200 120 10 130 BRAKE E 1/ 2 F MPH CHECK ENGINE UNLEADED FUEL ONLY On Res Set Acc MI RRORS Off Coast Page 129 Hood release Page 14 Headlamp control/ Foglamp control* Page 26 Horn Page 25 Tilt steering wheel lever Page 16 Instrument panel dimmer switch Page 24 Ignition switch Page 29 Speed...
Owner Guide 1st Printing
Page 6
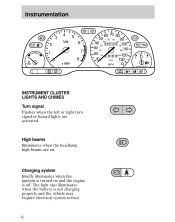
The light also illuminates when the battery is off. Charging system Briefly illuminates when the ignition is turned on . High beams Illuminates when the headlamp high beams are activated. Instrumentation 3 2 NORMAL 4 5 6 7 1 0 x 1000 8 55 60 70 80 50 100 120 90 140 40 60 800 0 0 1 2 3 100 160 30 40 10 180 1 ...
The light also illuminates when the battery is off. Charging system Briefly illuminates when the ignition is turned on . High beams Illuminates when the headlamp high beams are activated. Instrumentation 3 2 NORMAL 4 5 6 7 1 0 x 1000 8 55 60 70 80 50 100 120 90 140 40 60 800 0 0 1 2 3 100 160 30 40 10 180 1 ...

Owner Guide 1st Printing
Page 11
Air bag supplemental restraint system (SRS) warning chime For information on the safety belt warning chime, refer to the Seating and safety restraints chapter. 11 Safety belt warning chime For information on the SRS warning chime, refer to the Seating and safety restraints chapter. Key-in-ignition warning chime Sounds when the key is left in the ignition) and the driver's door is open . Instrumentation Headlamps on warning chime Sounds when the headlamps are on, the ignition is off (and the key is not in the off/lock or accessory position and the driver's door is open .
Air bag supplemental restraint system (SRS) warning chime For information on the safety belt warning chime, refer to the Seating and safety restraints chapter. 11 Safety belt warning chime For information on the SRS warning chime, refer to the Seating and safety restraints chapter. Key-in-ignition warning chime Sounds when the key is left in the ignition) and the driver's door is open . Instrumentation Headlamps on warning chime Sounds when the headlamps are on, the ignition is off (and the key is not in the off/lock or accessory position and the driver's door is open .
Owner Guide 1st Printing
Page 15
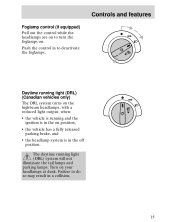
... The daytime running and the ignition is in the on position, • the vehicle has a fully released parking brake, and • the headlamp system is running light (DRL) system will not illuminate the tail lamps and parking lamps. Push the control in a collision. 15 Daytime running ...light (DRL) (Canadian vehicles only) The DRL system turns on the highbeam headlamps, with a reduced light output, when: • the vehicle is in the off position. Controls and features Foglamp control (if equipped) Pull out ...
... The daytime running and the ignition is in the on position, • the vehicle has a fully released parking brake, and • the headlamp system is running light (DRL) system will not illuminate the tail lamps and parking lamps. Push the control in a collision. 15 Daytime running ...light (DRL) (Canadian vehicles only) The DRL system turns on the highbeam headlamps, with a reduced light output, when: • the vehicle is in the off position. Controls and features Foglamp control (if equipped) Pull out ...
Owner Guide 1st Printing
Page 27
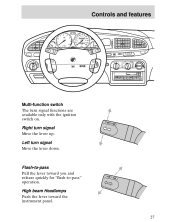
... 1 4 2 5 3 6 SCAN ANS SEEK EJECT Multi-function switch The turn signal functions are available only with the ignition switch on. Flash-to -pass" operation. High beam Headlamps Push the lever toward you and release quickly for "flash-to -pass Pull the lever toward the instrument panel. 27
... 1 4 2 5 3 6 SCAN ANS SEEK EJECT Multi-function switch The turn signal functions are available only with the ignition switch on. Flash-to -pass" operation. High beam Headlamps Push the lever toward you and release quickly for "flash-to -pass Pull the lever toward the instrument panel. 27
Owner Guide 1st Printing
Page 39
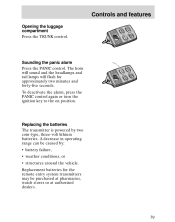
... the batteries The transmitter is powered by : • battery failure, • weather conditions, or • structures around the vehicle. The horn will sound and the headlamps and tail lamps will flash for the remote entry system transmitters may be caused by two coin-type, three-volt lithium batteries. Controls and features...
... the batteries The transmitter is powered by : • battery failure, • weather conditions, or • structures around the vehicle. The horn will sound and the headlamps and tail lamps will flash for the remote entry system transmitters may be caused by two coin-type, three-volt lithium batteries. Controls and features...

Owner Guide 1st Printing
Page 79
Make sure all Canadian InterferenceCausing Equipment standard requirements regulating the impulse electrical field strength of radio noise. Make sure the headlamps and vehicle accessories are off. 79 For more information on safety belts and their safety belts. Only use the accelerator pedal when you have buckled ...
Make sure all Canadian InterferenceCausing Equipment standard requirements regulating the impulse electrical field strength of radio noise. Make sure the headlamps and vehicle accessories are off. 79 For more information on safety belts and their safety belts. Only use the accelerator pedal when you have buckled ...
Owner Guide 1st Printing
Page 111
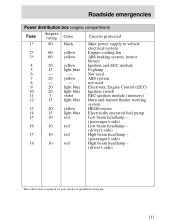
... switch EEC ignition module (memory) Horn and hazard flasher warning system HEGO sensor Electrically operated fuel pump Low beam headlamp - (passenger's side) Low beam headlamp - (driver's side) High beam headlamp - (passenger's side) High beam headlamp - (driver's side) * Have these fuses replaced by your dealer or qualified technician. 111 Roadside emergencies Power distribution box (engine...
... switch EEC ignition module (memory) Horn and hazard flasher warning system HEGO sensor Electrically operated fuel pump Low beam headlamp - (passenger's side) Low beam headlamp - (driver's side) High beam headlamp - (passenger's side) High beam headlamp - (driver's side) * Have these fuses replaced by your dealer or qualified technician. 111 Roadside emergencies Power distribution box (engine...
Owner Guide 1st Printing
Page 112
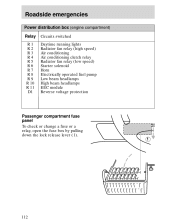
Roadside emergencies Power distribution box (engine compartment) Relay R1 R2 R3 R4 R5 R6 R7 R8 R9 R 10 R 11 D1 Circuits switched Daytime running lights Radiator fan relay (high speed) Air conditioning Air conditioning clutch relay Radiator fan relay (low speed) Starter solenoid Horn Electrically operated fuel pump Low beam headlamps High beam headlamps EEC module Reverse voltage protection Passenger compartment fuse panel To check or change a fuse or a relay, open the fuse box by pulling down the lock release lever (1). 1 112
Roadside emergencies Power distribution box (engine compartment) Relay R1 R2 R3 R4 R5 R6 R7 R8 R9 R 10 R 11 D1 Circuits switched Daytime running lights Radiator fan relay (high speed) Air conditioning Air conditioning clutch relay Radiator fan relay (low speed) Starter solenoid Horn Electrically operated fuel pump Low beam headlamps High beam headlamps EEC module Reverse voltage protection Passenger compartment fuse panel To check or change a fuse or a relay, open the fuse box by pulling down the lock release lever (1). 1 112
Owner Guide 1st Printing
Page 167
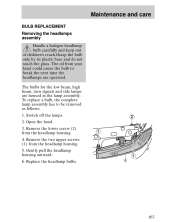
...complete lamp assembly has to break the next time the headlamps are housed in the lamp assembly. Open the hood. 3. Gently pull the headlamp housing outward. 6. Remove the lower screw (2) from the headlamp housing. 5. Switch off the lamps. 2. Replace the headlamp bulbs. 1 1 2 167 The bulbs for the ...low beam, high beam, turn signals and side lamps are operated. Maintenance and care BULB REPLACEMENT Removing the headlamps assembly Handle a halogen headlamp bulb carefully and keep out of children's reach.Grasp the bulb only by its plastic base and do not touch the ...
...complete lamp assembly has to break the next time the headlamps are housed in the lamp assembly. Open the hood. 3. Gently pull the headlamp housing outward. 6. Remove the lower screw (2) from the headlamp housing. 5. Switch off the lamps. 2. Replace the headlamp bulbs. 1 1 2 167 The bulbs for the ...low beam, high beam, turn signals and side lamps are operated. Maintenance and care BULB REPLACEMENT Removing the headlamps assembly Handle a halogen headlamp bulb carefully and keep out of children's reach.Grasp the bulb only by its plastic base and do not touch the ...
Owner Guide 1st Printing
Page 168
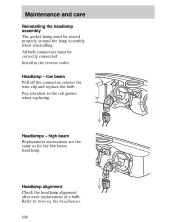
Headlamps - Refer to the tab guides when replacing. Pay attention to Aiming the headlamps. 168 Headlamp - Install in the reverse order. Headlamp alignment Check the headlamp alignment after each replacement of a bulb. high beam Replacement instructions are the same as for the low beam headlamp. low beam Pull off the connector, release the wire clip and replace the bulb. All bulb connectors must be correctly connected. Maintenance and care Reinstalling the headlamp assembly The gasket lining must be seated properly around the lamp assembly when reinstalling.
Headlamps - Refer to the tab guides when replacing. Pay attention to Aiming the headlamps. 168 Headlamp - Install in the reverse order. Headlamp alignment Check the headlamp alignment after each replacement of a bulb. high beam Replacement instructions are the same as for the low beam headlamp. low beam Pull off the connector, release the wire clip and replace the bulb. All bulb connectors must be correctly connected. Maintenance and care Reinstalling the headlamp assembly The gasket lining must be seated properly around the lamp assembly when reinstalling.
Owner Guide 1st Printing
Page 172
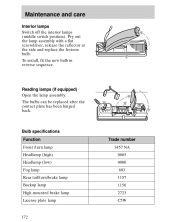
... new bulb in reverse sequence. Maintenance and care Interior lamps Switch off the interior lamps (middle switch position). Bulb specifications Function Front /turn lamp Headlamp (high) Headlamp (low) Fog lamp Rear tail/turn/brake lamp Backup lamp High-mounted brake lamp License plate lamp Trade number 3457 NA 9005 9006 893 1157...
... new bulb in reverse sequence. Maintenance and care Interior lamps Switch off the interior lamps (middle switch position). Bulb specifications Function Front /turn lamp Headlamp (high) Headlamp (low) Fog lamp Rear tail/turn/brake lamp Backup lamp High-mounted brake lamp License plate lamp Trade number 3457 NA 9005 9006 893 1157...
Owner Guide 1st Printing
Page 173
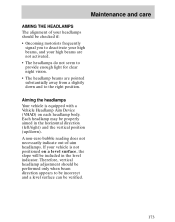
...be verified. 173 Maintenance and care AIMING THE HEADLAMPS The alignment of -aim headlamps. Aiming the headlamps Your vehicle is not positioned on each headlamp body. If your high beams are pointed substantially away from a slightly down ). Each headlamp may be included in the horizontal direction (left...enough light for clear night vision. • The headlamp beams are not activated. • The headlamps do not seem to the right position. A non-zero bubble reading does not necessarily indicate out-of your headlamps should be performed only when beam direction appears to be...
...be verified. 173 Maintenance and care AIMING THE HEADLAMPS The alignment of -aim headlamps. Aiming the headlamps Your vehicle is not positioned on each headlamp body. If your high beams are pointed substantially away from a slightly down ). Each headlamp may be included in the horizontal direction (left...enough light for clear night vision. • The headlamp beams are not activated. • The headlamps do not seem to the right position. A non-zero bubble reading does not necessarily indicate out-of your headlamps should be performed only when beam direction appears to be...
Owner Guide 1st Printing
Page 174
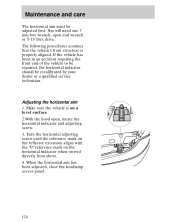
... the "0" reference mark on a level surface. 2.With the hood open end wrench or T-15 Torx drive. When the horizontal aim has been adjusted, close the headlamp access panel. 174 Make sure the vehicle is properly aligned. The following procedures assumes that the vehicle's front structure is on the horizontal indicator when...
... the "0" reference mark on a level surface. 2.With the hood open end wrench or T-15 Torx drive. When the horizontal aim has been adjusted, close the headlamp access panel. 174 Make sure the vehicle is properly aligned. The following procedures assumes that the vehicle's front structure is on the horizontal indicator when...
Owner Guide 1st Printing
Page 175
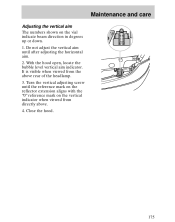
Maintenance and care Adjusting the vertical aim The numbers shown on the vertical indicator when viewed from the above . 4. It is visible when viewed from directly above rear of the headlamp. 3. Turn the vertical adjusting screw until after adjusting the horizontal aim. 2. Close the hood. 175 With the hood open, locate the bubble level vertical aim indicator. Do not adjust the vertical aim until the reference mark on the reflector extension aligns with the "0" reference mark on the vial indicate beam direction in degrees up or down. 1.
Maintenance and care Adjusting the vertical aim The numbers shown on the vertical indicator when viewed from the above . 4. It is visible when viewed from directly above rear of the headlamp. 3. Turn the vertical adjusting screw until after adjusting the horizontal aim. 2. Close the hood. 175 With the hood open, locate the bubble level vertical aim indicator. Do not adjust the vertical aim until the reference mark on the reflector extension aligns with the "0" reference mark on the vial indicate beam direction in degrees up or down. 1.
Owner Guide 1st Printing
Page 190
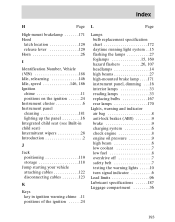
... seat folding up the seat ...70 inspection after a collision ...70 interlock safety feature ...66 operation ...65 retractors ...69 Break-in period ...2 Bulbs, replacing foglamps ...169 headlamps ...168 high-mounted brake lamp ...171 license plate lamp ...170 rear lamps ...170 specifications ...172 C Cabin air filter ...147 Capacities for refilling fluids ...184 Carbon...
... seat folding up the seat ...70 inspection after a collision ...70 interlock safety feature ...66 operation ...65 retractors ...69 Break-in period ...2 Bulbs, replacing foglamps ...169 headlamps ...168 high-mounted brake lamp ...171 license plate lamp ...170 rear lamps ...170 specifications ...172 C Cabin air filter ...147 Capacities for refilling fluids ...184 Carbon...
Owner Guide 1st Printing
Page 192
... trip odometer ...13 GAWR (Gross Axle Weight Rating) ...97 Gearshift ...87, 93 GVWR (Gross Vehicle Weight Rating) . .97 H Hazard flashers ...26, 107 Head restraints ...44 Headlamps aiming ...173 bulb specifications ...172 daytime running light ...15 flashing ...27 high beam ...27 replacing bulbs ...167 turning on and off ...14 warning chime ...11...
... trip odometer ...13 GAWR (Gross Axle Weight Rating) ...97 Gearshift ...87, 93 GVWR (Gross Vehicle Weight Rating) . .97 H Hazard flashers ...26, 107 Head restraints ...44 Headlamps aiming ...173 bulb specifications ...172 daytime running light ...15 flashing ...27 high beam ...27 replacing bulbs ...167 turning on and off ...14 warning chime ...11...
Owner Guide 1st Printing
Page 193
... the ignition ...24 Lamps bulb replacement specification chart ...172 daytime running light system . .15 flashing the lamps ...27 foglamps ...15, 169 hazard flashers ...26, 107 headlamps ...14 high beams ...27 high-mounted brake lamp ...171 instrument panel, dimming ...16 interior lamps ...33 reading lamps ...33 replacing bulbs ...167 rear lamps ...170...
... the ignition ...24 Lamps bulb replacement specification chart ...172 daytime running light system . .15 flashing the lamps ...27 foglamps ...15, 169 hazard flashers ...26, 107 headlamps ...14 high beams ...27 high-mounted brake lamp ...171 instrument panel, dimming ...16 interior lamps ...33 reading lamps ...33 replacing bulbs ...167 rear lamps ...170...
Owner Guide 1st Printing
Page 196
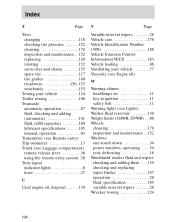
... ...176 Vehicle Identification Number (VIN) ...188 Vehicle Emission Control Information(VECI) ...163 Vehicle loading ...96 Ventilating your vehicle ...77 Viscosity (see Engne oil) W Warning chimes headlamps on ...11 key in ignition ...11 safety belt ...11 Warning lights (see Lights) Washer fluid reservoir ...130 Weight limits (GAWR, GVWR) . .96 Wheels cleaning ...178...
... ...176 Vehicle Identification Number (VIN) ...188 Vehicle Emission Control Information(VECI) ...163 Vehicle loading ...96 Ventilating your vehicle ...77 Viscosity (see Engne oil) W Warning chimes headlamps on ...11 key in ignition ...11 safety belt ...11 Warning lights (see Lights) Washer fluid reservoir ...130 Weight limits (GAWR, GVWR) . .96 Wheels cleaning ...178...

Scheduled Maintenance Guide 2nd Printing
Page 26
... TWICE A YEAR: (I.E., EVERY SPRING AND FALL) u Check radiator, heater and air-conditioning hoses for leaks or damage. u Check muffler, exhaust pipes, shields and clamps. u Check headlamp alignment. Check the air conditioning system before the warm weather season. u Check the operation of all outside key locks. u Check coolant level in the spare...
... TWICE A YEAR: (I.E., EVERY SPRING AND FALL) u Check radiator, heater and air-conditioning hoses for leaks or damage. u Check muffler, exhaust pipes, shields and clamps. u Check headlamp alignment. Check the air conditioning system before the warm weather season. u Check the operation of all outside key locks. u Check coolant level in the spare...