

Owner's Manual
Page 6
..., turn to Ford Motor Company of other related words and look them up. Box 1580, Station B, Mississauga, Ontario L4Y 4G3. 3 The Quick Index at the end of the book and search in This Guide After you have a specific question or need . We have designed the Index so that best describes the...
..., turn to Ford Motor Company of other related words and look them up. Box 1580, Station B, Mississauga, Ontario L4Y 4G3. 3 The Quick Index at the end of the book and search in This Guide After you have a specific question or need . We have designed the Index so that best describes the...

Owner's Manual
Page 21
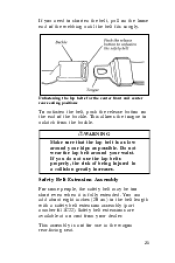
... it from the retractor in the seatback and insert the lap belt connecting pin into the narrow end of the buckle. Pull the connecting pin into the wide end of the key-slot on the end of the key-slot until you or the vehicle. To unfasten the belt, push the red release...
... it from the retractor in the seatback and insert the lap belt connecting pin into the narrow end of the buckle. Pull the connecting pin into the wide end of the key-slot on the end of the key-slot until you or the vehicle. To unfasten the belt, push the red release...
Owner's Manual
Page 23
... the buckle. 20 Pull the belt tongue over your lap until you hear a snap and feel it does not strike you need to the wide end of the key-slot and lift the shoulder belt off the connecting pin. You must be tightened separately from the stowage pocket before folding down...
... the buckle. 20 Pull the belt tongue over your lap until you hear a snap and feel it does not strike you need to the wide end of the key-slot and lift the shoulder belt off the connecting pin. You must be tightened separately from the stowage pocket before folding down...
Owner's Manual
Page 24
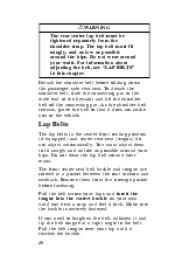
... the lap belt is not for the center front and center rear seating positions To unfasten the belt, push the release button on the loose end of being injured in the wagon rear-facing seat. 21 If you need to the belt length with a safety belt extension assembly (part number 611C22... buckle. If you do not use in a collision greatly increases. You can add about eight inches (20 cm) to shorten the belt, pull on the end of the buckle. Unfastening the lap belts for use the lap belts properly, the risk of the webbing until the belt fits snugly.
... the lap belt is not for the center front and center rear seating positions To unfasten the belt, push the release button on the loose end of being injured in the wagon rear-facing seat. 21 If you need to the belt length with a safety belt extension assembly (part number 611C22... buckle. If you do not use in a collision greatly increases. You can add about eight inches (20 cm) to shorten the belt, pull on the end of the buckle. Unfastening the lap belts for use the lap belts properly, the risk of the webbing until the belt fits snugly.

Owner's Manual
Page 25
... recommends that they work properly and are not damaged. RWARNING The use the safety belt extension only if the safety belt is located at the end of the webbing on the label. Do not use extension to make sure that all safety belt assemblies used in vehicles involved in the wagon...
... recommends that they work properly and are not damaged. RWARNING The use the safety belt extension only if the safety belt is located at the end of the webbing on the label. Do not use extension to make sure that all safety belt assemblies used in vehicles involved in the wagon...

Owner's Manual
Page 117
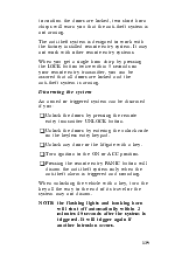
... the gearshift release button on the floor gearshift or located on " mode. Overdrive off . If this condition persists, damage could occur to "overdrive on the end of the column gearshift will be in the Index. The transaxle will return the vehicle to the transaxle. When the light is started even if...
... the gearshift release button on the floor gearshift or located on " mode. Overdrive off . If this condition persists, damage could occur to "overdrive on the end of the column gearshift will be in the Index. The transaxle will return the vehicle to the transaxle. When the light is started even if...

Owner's Manual
Page 143
... the HI position. The first seven detents are interval wipe positions, the eighth detent is the LO position, and the ninth detent is on the end of the turn the knob toward you for a moment and then release it latches. The high beam indicator light turns off . To turn the wipers...
... the HI position. The first seven detents are interval wipe positions, the eighth detent is the LO position, and the ninth detent is on the end of the turn the knob toward you for a moment and then release it latches. The high beam indicator light turns off . To turn the wipers...

Owner's Manual
Page 144
...washer fluid and wipers in heavier rain. Windshield Washer To clean the windshield, push in . For a constant spray, keep the knob pushed in the end of the turn signal lever toward or away from you until the wipers are going at varying intervals. After you release the knob, the wipers... information about the rear washer on the turn signal lever To set the interval wipers, turn the knob at the end of the wiper switch knob. See the Servicing Your Sable chapter. For example, you can set to operate at the desired interval. Variable Interval Wipers In addition to two speed...
...washer fluid and wipers in heavier rain. Windshield Washer To clean the windshield, push in . For a constant spray, keep the knob pushed in the end of the turn signal lever toward or away from you until the wipers are going at varying intervals. After you release the knob, the wipers... information about the rear washer on the turn signal lever To set the interval wipers, turn the knob at the end of the wiper switch knob. See the Servicing Your Sable chapter. For example, you can set to operate at the desired interval. Variable Interval Wipers In addition to two speed...
Owner's Manual
Page 166
... if you get a single horn chirp by pressing the LOCK button twice within 2 minutes 45 seconds after the system is triggered. u Turn ignition to the end of its travel or the system may not work with the factory installed remote entry system. u Pressing the remote entry PANIC button will trigger again...
... if you get a single horn chirp by pressing the LOCK button twice within 2 minutes 45 seconds after the system is triggered. u Turn ignition to the end of its travel or the system may not work with the factory installed remote entry system. u Pressing the remote entry PANIC button will trigger again...

Owner's Manual
Page 179
Place the mat eyelet over the pointed end of accelerator pedal, brake pedal and clutch pedal. Adjust the floor mat position to install. The positive retention floor mat Removing the Floor Mat Lift floor mat just forward of retention post and rotate rearward to disengage from the rear and rotate forward to allow proper operation of the retention post from retention post. 152 Positive Retention Driver's Side Floor Mat (If equipped) Installing the Floor Mat Position the floor mat in the footwell.
Place the mat eyelet over the pointed end of accelerator pedal, brake pedal and clutch pedal. Adjust the floor mat position to install. The positive retention floor mat Removing the Floor Mat Lift floor mat just forward of retention post and rotate rearward to disengage from the rear and rotate forward to allow proper operation of the retention post from retention post. 152 Positive Retention Driver's Side Floor Mat (If equipped) Installing the Floor Mat Position the floor mat in the footwell.

Owner's Manual
Page 190
The front crossbar does not move the rear luggage crossbar on top of the vehicle. 2. 163 To adjust the luggage rack: 1. 2. Pull the end of the cover toward the center of the vehicle to fit the item you need to exceed the gross vehicle weight rating (GVWR), which is ...
The front crossbar does not move the rear luggage crossbar on top of the vehicle. 2. 163 To adjust the luggage rack: 1. 2. Pull the end of the cover toward the center of the vehicle to fit the item you need to exceed the gross vehicle weight rating (GVWR), which is ...

Owner's Manual
Page 191
.... Make sure that the rear crossbar pins are locked in place. If the crossbar slides, push or pull until you are three loops on each end of the vehicle. There are not using the tie down loops provided. Slide the rear crossbar forward to hold luggage to 3/8"), NOT ELASTIC CORD, using...
.... Make sure that the rear crossbar pins are locked in place. If the crossbar slides, push or pull until you are three loops on each end of the vehicle. There are not using the tie down loops provided. Slide the rear crossbar forward to hold luggage to 3/8"), NOT ELASTIC CORD, using...

Owner's Manual
Page 205
... X to the next selection on the tape (display indicates "SEEK"). u Rewinding the tape To rewind the tape, press the "REW" button. At the end of the tape, the direction automatically reverses and plays the other side of the tape is reached. u Using the "SEEK" function with your cassette tape..."REW" or "FF" button) or the beginning of the tape is manually stopped (by pressing the "TAPE", "EJ", "REW" or "FF" button) or the end of the tape. NOTE: If you want to restart a currently playing tape selection, press the left (b) side to indicate rewind. The radio will show a flashing...
... X to the next selection on the tape (display indicates "SEEK"). u Rewinding the tape To rewind the tape, press the "REW" button. At the end of the tape, the direction automatically reverses and plays the other side of the tape is reached. u Using the "SEEK" function with your cassette tape..."REW" or "FF" button) or the beginning of the tape is manually stopped (by pressing the "TAPE", "EJ", "REW" or "FF" button) or the end of the tape. NOTE: If you want to restart a currently playing tape selection, press the left (b) side to indicate rewind. The radio will show a flashing...

Owner's Manual
Page 245
.... Call a doctor immediately. You will damage your vehicle to yourself. If someone 's skin, eyes, or clothing, immediately flush the area with your hands on the ends, you need to a 24-volt power supply (either two 12-volt batteries in the order they are given. Lift the battery with a carrier or with...
.... Call a doctor immediately. You will damage your vehicle to yourself. If someone 's skin, eyes, or clothing, immediately flush the area with your hands on the ends, you need to a 24-volt power supply (either two 12-volt batteries in the order they are given. Lift the battery with a carrier or with...

Owner's Manual
Page 246
... the second cable to the positive (+) terminal, as long as you use the same cable for the negative ones. Connect the other end of the discharged battery. (You can connect either jumper cable to the negative ( ) terminal of the booster battery. You could damage the vehicle's electrical... system. Check all other moving parts. Connect one end of the first jumper cable to the positive (+) terminal of the second cable to the hood of the disabled vehicle. Park the booster vehicle close...
... the second cable to the positive (+) terminal, as long as you use the same cable for the negative ones. Connect the other end of the discharged battery. (You can connect either jumper cable to the negative ( ) terminal of the booster battery. You could damage the vehicle's electrical... system. Check all other moving parts. Connect one end of the first jumper cable to the positive (+) terminal of the second cable to the hood of the disabled vehicle. Park the booster vehicle close...

Owner's Manual
Page 247
... the booster vehicle. Make sure that normally surround the battery and could seriously injure someone. Jumper cable connections Jump-Starting 1. RWARNING Do not connect the end of the second cable to charge the discharged battery. 2. 3. 220
... the booster vehicle. Make sure that normally surround the battery and could seriously injure someone. Jumper cable connections Jump-Starting 1. RWARNING Do not connect the end of the second cable to charge the discharged battery. 2. 3. 220
Owner's Manual
Page 248
Removing jumper cables 1. Remove the negative ( ) end of the jumper cable from the metallic surface on the engine or frame of the positive (+) cable from the discharged battery. 2. 3. 4. After the vehicle is ... wheel rust and tire imbalance. 221 Remove the negative ( ) cable from the booster battery. Remove the positive (+) cable from the booster battery. Remove the other end of the disabled vehicle. If you are not to be used to fully recharge the battery. Hold the steering wheel firmly and slowly move to...
Removing jumper cables 1. Remove the negative ( ) end of the jumper cable from the metallic surface on the engine or frame of the positive (+) cable from the discharged battery. 2. 3. 4. After the vehicle is ... wheel rust and tire imbalance. 221 Remove the negative ( ) cable from the booster battery. Remove the positive (+) cable from the booster battery. Remove the other end of the disabled vehicle. If you are not to be used to fully recharge the battery. Hold the steering wheel firmly and slowly move to...

Owner's Manual
Page 252
... the handle rather than push to develop maximum force to loosen wheel lug nuts. RWARNING To avoid injury, never run the engine with the tapered end of a wheel nut wrench.
... the handle rather than push to develop maximum force to loosen wheel lug nuts. RWARNING To avoid injury, never run the engine with the tapered end of a wheel nut wrench.

Owner's Manual
Page 255
... the wheel cover: 1. One of the cover. The lug nuts on the wheel cover is securely fastened so it loose by carefully inserting the tapered end of your hand. Install the wheel cover to the wheel with a valve stem logo on the back side of the windows on the wheel 7. 8. Do...
... the wheel cover: 1. One of the cover. The lug nuts on the wheel cover is securely fastened so it loose by carefully inserting the tapered end of your hand. Install the wheel cover to the wheel with a valve stem logo on the back side of the windows on the wheel 7. 8. Do...

Owner's Manual
Page 256
... the center ornament off the wheelcover with the lug wrench tip. To service the wheel or tire, remove the pedestal by carefully inserting the tapered end of the wheelcover. 2. 3. 4. Center Wheel Cover To remove the wheel cover: 1. Pry only at the outer edge. To remove the wheelcover, pry it loose by...
... the center ornament off the wheelcover with the lug wrench tip. To service the wheel or tire, remove the pedestal by carefully inserting the tapered end of the wheelcover. 2. 3. 4. Center Wheel Cover To remove the wheel cover: 1. Pry only at the outer edge. To remove the wheelcover, pry it loose by...


