

Owner's Manual
Page 9
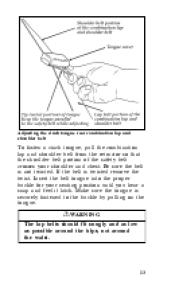
... belt is not twisted. Then adjust the seat to your movement. If it . However, if you hear a snap and feel it latch. Fastening the front seat combination lap and shoulder belt 9 Insert the belt tongue into your vehicle, close the door and lock it is, remove the twist. Combination Lap and Shoulder Belts...
... belt is not twisted. Then adjust the seat to your movement. If it . However, if you hear a snap and feel it latch. Fastening the front seat combination lap and shoulder belt 9 Insert the belt tongue into your vehicle, close the door and lock it is, remove the twist. Combination Lap and Shoulder Belts...
Owner's Manual
Page 13
Make sure the tongue is twisted remove the twist. If the belt is securely fastened to the buckle by pulling on the tongue. Be sure the belt is not twisted. Insert the ... fasten a cinch tongue, pull the combination lap and shoulder belt from the retractor so that the shoulder belt portion of the safety belt crosses your seating position until you hear a snap and feel it latch.
Make sure the tongue is twisted remove the twist. If the belt is securely fastened to the buckle by pulling on the tongue. Be sure the belt is not twisted. Insert the ... fasten a cinch tongue, pull the combination lap and shoulder belt from the retractor so that the shoulder belt portion of the safety belt crosses your seating position until you hear a snap and feel it latch.

Owner's Manual
Page 32
Push down on the child seat while you pull up on the belt to automatic locking mode 6. Grasp the shoulder portion of the belt and pull downward until all of the ... 6. 32 5. NOTE: The dual-locking mode retractor must be heard as the belt retracts. This indicates the retractor is in the automatic locking mode (child seat restraint mode). Figure 4. Pull up on the shoulder webbing. A clicking sound will be in the belt. At this time, the retractor is heard. Allow the...
Push down on the child seat while you pull up on the belt to automatic locking mode 6. Grasp the shoulder portion of the belt and pull downward until all of the ... 6. 32 5. NOTE: The dual-locking mode retractor must be heard as the belt retracts. This indicates the retractor is in the automatic locking mode (child seat restraint mode). Figure 4. Pull up on the shoulder webbing. A clicking sound will be in the belt. At this time, the retractor is heard. Allow the...

Owner's Manual
Page 40
Before placing the child into the child seat, forcibly tilt the child seat from side-to-side and in forward directions to securely tighten the child safety seat in the vehicle. If the child seat moves excessively, repeat steps 6 through 8, or properly install the child seat in place. 7. See Figure 5. 8. Grasp belt close to child seat and pull on the shoulder belt portion of the combination lap/shoulder belt, then allow the belt to retract and remove all slack to make sure that the seat is held securely in a different seating position. 40 See Figures 6 and 7.
Before placing the child into the child seat, forcibly tilt the child seat from side-to-side and in forward directions to securely tighten the child safety seat in the vehicle. If the child seat moves excessively, repeat steps 6 through 8, or properly install the child seat in place. 7. See Figure 5. 8. Grasp belt close to child seat and pull on the shoulder belt portion of the combination lap/shoulder belt, then allow the belt to retract and remove all slack to make sure that the seat is held securely in a different seating position. 40 See Figures 6 and 7.

Owner's Manual
Page 64
...completed three consecutive warm up cycle consists of engine start from a cold condition (engine at ambient temperature) and running out of fuel begins to misfire. Remove and replace the fuel cap, making sure it means that a malfunction occurred and the condition corrected itself occurs when an engine running until the engine... on if the fuel cap is not properly installed. If the Check Engine Warning Light comes on and you are driving, it is properly seated. If the light turns on and off on rare occasions while you suspect that the engine was misfiring while the last of the fuel was...
...completed three consecutive warm up cycle consists of engine start from a cold condition (engine at ambient temperature) and running out of fuel begins to misfire. Remove and replace the fuel cap, making sure it means that a malfunction occurred and the condition corrected itself occurs when an engine running until the engine... on if the fuel cap is not properly installed. If the Check Engine Warning Light comes on and you are driving, it is properly seated. If the light turns on and off on rare occasions while you suspect that the engine was misfiring while the last of the fuel was...

Owner's Manual
Page 123
...the surface with the cleaner. Enter the rear seat in front of fabric. If the fabric's color or texture is designed to allow rear seat entry/exit. Follow the directions that come with a leather and vinyl cleaner or a mild soap. Fabric Remove dust and loose dirt with a soft, damp... cloth. Rotate the safety belt boot rearward. Cleaning the Seats Leather and vinyl For routine cleaning, ...
...the surface with the cleaner. Enter the rear seat in front of fabric. If the fabric's color or texture is designed to allow rear seat entry/exit. Follow the directions that come with a leather and vinyl cleaner or a mild soap. Fabric Remove dust and loose dirt with a soft, damp... cloth. Rotate the safety belt boot rearward. Cleaning the Seats Leather and vinyl For routine cleaning, ...

Owner's Manual
Page 129
The hook is just forward of the left hand track of the driver's seat. The positive location floor mat hook 129 Positive Location Floor Mat When installing or removing the driver's side floor mat you must attach/detach the positive location grommet from the hook on the floor.
The hook is just forward of the left hand track of the driver's seat. The positive location floor mat hook 129 Positive Location Floor Mat When installing or removing the driver's side floor mat you must attach/detach the positive location grommet from the hook on the floor.
Owner's Manual
Page 239
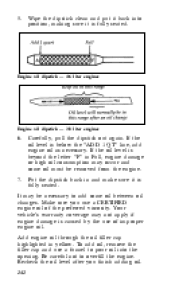
Make sure you finish adding oil. 242 Your vehicle's warranty coverage may not apply if engine damage is fully seated. 7. Be careful not to pour oil into position, making sure it back into the opening. 5. Engine oil dipstick - 4.6 liter engines Engine oil dipstick - 3.8 liter ...oil filler cap highlighted in Full, engine damage or high oil consumption may be removed from the engine. If the oil level is fully seated. If the oil level is beyond the letter "F" in yellow. To add oil, remove the filler cap and use a CERTIFIED engine oil of improper engine oil. Carefully,...
Make sure you finish adding oil. 242 Your vehicle's warranty coverage may not apply if engine damage is fully seated. 7. Be careful not to pour oil into position, making sure it back into the opening. 5. Engine oil dipstick - 4.6 liter engines Engine oil dipstick - 3.8 liter ...oil filler cap highlighted in Full, engine damage or high oil consumption may be removed from the engine. If the oil level is fully seated. If the oil level is beyond the letter "F" in yellow. To add oil, remove the filler cap and use a CERTIFIED engine oil of improper engine oil. Carefully,...
Owner's Manual
Page 259
...dipstick. NOTE: Your vehicle should not be driven if the fluid level is below the low cold reading on the dipstick, excess fluid should be removed by a qualified technician. When the vehicle has not been driven, and outside temperatures are above the top hole on the dipstick. If the ...level is fully seated. When checking fluid at high speeds or in city traffic during hot weather, or pulling a trailer, the vehicle should be within the hot notched...
...dipstick. NOTE: Your vehicle should not be driven if the fluid level is below the low cold reading on the dipstick, excess fluid should be removed by a qualified technician. When the vehicle has not been driven, and outside temperatures are above the top hole on the dipstick. If the ...level is fully seated. When checking fluid at high speeds or in city traffic during hot weather, or pulling a trailer, the vehicle should be within the hot notched...


