Owner's Manual
Page 120
... ice. Controls in wooded areas or on the tachometer denotes excessive engine speed. This prevents inaccurate temperature indications caused by the Mercedes-Benz Limited Warranty. Indicated temperatures just above the freezing point do not guarantee that purpose. bank signs etc.). 120 A delay...To help protect the engine, the fuel supply is interrupted if the engine is displayed. The road may result in the front bumper area. G ! Outside temperature indicator When moving the vehicle into colder ambient temperatures (e.g. The temperature sensor is free of the displayed...
... ice. Controls in wooded areas or on the tachometer denotes excessive engine speed. This prevents inaccurate temperature indications caused by the Mercedes-Benz Limited Warranty. Indicated temperatures just above the freezing point do not guarantee that purpose. bank signs etc.). 120 A delay...To help protect the engine, the fuel supply is interrupted if the engine is displayed. The road may result in the front bumper area. G ! Outside temperature indicator When moving the vehicle into colder ambient temperatures (e.g. The temperature sensor is free of the displayed...
Owner's Manual
Page 213
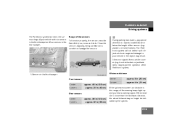
The Parktronic system will not detect such objects at close range and damage to your vehicle with six sensors in the front bumper and four sensors in the rear bumper. During parking maneuvers, pay special attention to scratch or damage the sensors. ! Ultrasonic signals from outside sources (e.g. If the obstacle... may no longer be free of dirt, ice, snow and slush. planters or trailer hitches). Range of the Parktronic system. 1 Sensors in the front bumper Front sensors Center Corners Rear sensors Center Corners approx. 48 in (120 cm) approx. 32 in (80 cm) approx. 40 in (100 cm) ...
The Parktronic system will not detect such objects at close range and damage to your vehicle with six sensors in the front bumper and four sensors in the rear bumper. During parking maneuvers, pay special attention to scratch or damage the sensors. ! Ultrasonic signals from outside sources (e.g. If the obstacle... may no longer be free of dirt, ice, snow and slush. planters or trailer hitches). Range of the Parktronic system. 1 Sensors in the front bumper Front sensors Center Corners Rear sensors Center Corners approx. 48 in (120 cm) approx. 32 in (80 cm) approx. 40 in (100 cm) ...
Owner's Manual
Page 335
... ( page 261). Twist bulb socket 1 counterclockwise and pull out. Press the clamp and remove headlamp cover. Remove rear end first. Reinstall bulb socket, push in bumper and let front end snap into socket, turn signal lamp bulb Switch off the lights.
... ( page 261). Twist bulb socket 1 counterclockwise and pull out. Press the clamp and remove headlamp cover. Remove rear end first. Reinstall bulb socket, push in bumper and let front end snap into socket, turn signal lamp bulb Switch off the lights.
Owner's Manual
Page 350
... vehicle To remove cover: Press mark on jump starting ( page 346). See notes on the battery ( page 343) or on cover in direction of front bumper i The selector lever will remain locked in position P and the key will not turn in the starter switch if the battery is supplied with lug...
... vehicle To remove cover: Press mark on jump starting ( page 346). See notes on the battery ( page 343) or on cover in direction of front bumper i The selector lever will remain locked in position P and the key will not turn in the starter switch if the battery is supplied with lug...
Owner's Manual
Page 351
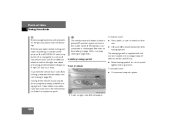
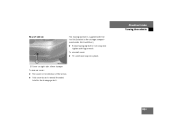
To reinstall cover: Fit cover and snap into place. 2 Cover on right side of rear bumper To remove cover: Pull cover in the direction of vehicle The towing eye bolt is supplied with lug wrench. Fold cover down to its stop and tighten with the tool kit (located in to reveal threaded hole for the towing eye bolt. 351 Screw towing eye bolt in the storage compartment under the trunk floor). Practical hints Towing the vehicle Rear of the arrow.
To reinstall cover: Fit cover and snap into place. 2 Cover on right side of rear bumper To remove cover: Pull cover in the direction of vehicle The towing eye bolt is supplied with lug wrench. Fold cover down to its stop and tighten with the tool kit (located in to reveal threaded hole for the towing eye bolt. 351 Screw towing eye bolt in the storage compartment under the trunk floor). Practical hints Towing the vehicle Rear of the arrow.