Owner's Manual
Page 4
... in this aim. These comments should be read and observed. Always dispose of driving, vary speeds frequently. During the first 1,600 km (1,000 miles) of used automotive fluids in protecting the environment. In this guide, answers to such questions are significant steps towards this respect is necessary to give the moving...
... in this aim. These comments should be read and observed. Always dispose of driving, vary speeds frequently. During the first 1,600 km (1,000 miles) of used automotive fluids in protecting the environment. In this guide, answers to such questions are significant steps towards this respect is necessary to give the moving...

Owner's Manual
Page 5
...your Owner's Guide. Your vehicle is provided to you along with the an ambulance preparation package. 5 Using your vehicle as an ambulance WARNING: Do not use this vehicle as : • the use of restraint systems including seat belts by : • service and repair facilities. • law ...data potentially including but not limited to Bumper Coverage, Safety Restraint Coverage and Corrosion Coverage. This stored information may be read out and used by the driver and passengers, • information about the performance of various systems and modules in a crash or near crash event....
...your Owner's Guide. Your vehicle is provided to you along with the an ambulance preparation package. 5 Using your vehicle as an ambulance WARNING: Do not use this vehicle as : • the use of restraint systems including seat belts by : • service and repair facilities. • law ...data potentially including but not limited to Bumper Coverage, Safety Restraint Coverage and Corrosion Coverage. This stored information may be read out and used by the driver and passengers, • information about the performance of various systems and modules in a crash or near crash event....

Owner's Manual
Page 22
... is reached. Turn the control to the left to increase the mid-range. NOTE: Approximately 5 seconds after selecting any mode, the volume function will be used to select up to six preset AM stations and 12 FM stations (six in FM1 and six in FM2). To reset the mid-range, press...
... is reached. Turn the control to the left to increase the mid-range. NOTE: Approximately 5 seconds after selecting any mode, the volume function will be used to select up to six preset AM stations and 12 FM stations (six in FM1 and six in FM2). To reset the mid-range, press...

Owner's Manual
Page 33
.../2 control to select from the stored stations. The system will start playing. 4. One stored station will illuminate in FM2). NOTE: If no stations can be used to select up to set strong radio stations without losing your original manually set preset stations. Select the frequency band with six station memory preset...
.../2 control to select from the stored stations. The system will start playing. 4. One stored station will illuminate in FM2). NOTE: If no stations can be used to select up to set strong radio stations without losing your original manually set preset stations. Select the frequency band with six station memory preset...
Owner's Manual
Page 36
... the next track. Dolby noise reduction Dolby noise reduction operates only in tape mode and is manufactured under license from Dolby Laboratories Licensing Corporation. When using a tape with Dolby NR*, control to the beginning of the previous CD. reduction. Press the on the TRACK control Press the to skip forward to... of hiss and static during tape playback. Entertainment Systems Track search Track search works in CD mode. When engaged, The Dolby noise reduction system is used to the beginning of the next CD.
... the next track. Dolby noise reduction Dolby noise reduction operates only in tape mode and is manufactured under license from Dolby Laboratories Licensing Corporation. When using a tape with Dolby NR*, control to the beginning of the previous CD. reduction. Press the on the TRACK control Press the to skip forward to... of hiss and static during tape playback. Entertainment Systems Track search Track search works in CD mode. When engaged, The Dolby noise reduction system is used to the beginning of the next CD.
Owner's Manual
Page 41
...will not play commercially pressed 12 cm (4.75 in advance by wiping it with condensation. Defective (cracked or badly bent) CDs should not be used in about an hour. Remove the rough edges in ) audio compact discs only. To remove the rough edges, rub the side of the ...scratch protection film attached, and CDs with format and dimensions not within the unit. CD TIPS - When this happens, the CD will clear naturally in Mazda CD players. HANDLING THE IN-DASH CD PLAYER • Do not spill any objects, other than adhesive labels. Entertainment Systems • The player's ...
...will not play commercially pressed 12 cm (4.75 in advance by wiping it with condensation. Defective (cracked or badly bent) CDs should not be used in about an hour. Remove the rough edges in ) audio compact discs only. To remove the rough edges, rub the side of the ...scratch protection film attached, and CDs with format and dimensions not within the unit. CD TIPS - When this happens, the CD will clear naturally in Mazda CD players. HANDLING THE IN-DASH CD PLAYER • Do not spill any objects, other than adhesive labels. Entertainment Systems • The player's ...
Owner's Manual
Page 42
... technical incompatibility, certain recordable and re-recordable compact discs may peel and cause the CD to become jammed. The label may not function correctly when used in Mazda CD players. CD AND CD CHANGER CARE • Handle discs by their broadcasts. RADIO FREQUENCY INFORMATION The Federal Communications Commission (FCC) and the Canadian...
... technical incompatibility, certain recordable and re-recordable compact discs may peel and cause the CD to become jammed. The label may not function correctly when used in Mazda CD players. CD AND CD CHANGER CARE • Handle discs by their broadcasts. RADIO FREQUENCY INFORMATION The Federal Communications Commission (FCC) and the Canadian...
Owner's Manual
Page 43
... vehicle's antenna and the radio station signal can cause FM reception problems. Static can be affected by "signal modulation." Signal modulation is a process radio stations use to increase their strength/volume relative to normal. • Station overload. Entertainment Systems Radio reception factors Three factors can be caused on AM stations by...
... vehicle's antenna and the radio station signal can cause FM reception problems. Static can be affected by "signal modulation." Signal modulation is a process radio stations use to increase their strength/volume relative to normal. • Station overload. Entertainment Systems Radio reception factors Three factors can be caused on AM stations by...
Owner's Manual
Page 45
...not operate in this mode. (Floor)-Allows for maximum heating by distributing outside air through the floor ducts. Airflow will be used to cool the vehicle. For short periods of the vehicle faster. Heating and air conditioning capabilities are provided in this mode ...distributed through the floor ducts will not be from the instrument panel registers. (Panel)-Distributes outside air through the instrument panel registers. Uses recirculated air to reduce fogging. (Defrost)-Distributes outside temperature because the air conditioning does not operate in this mode. (Floor and...
...not operate in this mode. (Floor)-Allows for maximum heating by distributing outside air through the floor ducts. Airflow will be used to cool the vehicle. For short periods of the vehicle faster. Heating and air conditioning capabilities are provided in this mode ...distributed through the floor ducts will not be from the instrument panel registers. (Panel)-Distributes outside air through the instrument panel registers. Uses recirculated air to reduce fogging. (Defrost)-Distributes outside temperature because the air conditioning does not operate in this mode. (Floor and...
Owner's Manual
Page 49
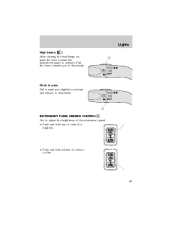
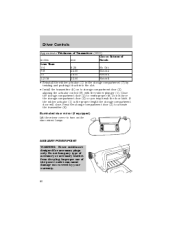
OFF Flash to pass Pull toward the instrument panel to activate. Lights High beams After turning the headlamps on, push the lever toward you to dim. 49 Pull the lever towards you slightly to activate and release to deactivate. OFF INSTRUMENT PANEL DIMMER CONTROL Use to adjust the brightness of the instrument panel. • Push and hold top of control to brighten. • Push and hold bottom of control to deactivate.
OFF Flash to pass Pull toward the instrument panel to activate. Lights High beams After turning the headlamps on, push the lever toward you to dim. 49 Pull the lever towards you slightly to activate and release to deactivate. OFF INSTRUMENT PANEL DIMMER CONTROL Use to adjust the brightness of the instrument panel. • Push and hold top of control to brighten. • Push and hold bottom of control to deactivate.
Owner's Manual
Page 51
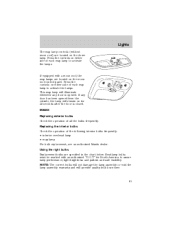
...Check the operation of the following interior bulbs frequently: • interior overhead lamp • map lamp For bulb replacement, see an authorized Mazda dealer. Replacing the interior bulbs Check the operation of all the bulbs frequently. NOTE: The correct bulbs will not damage the lamp assembly ... to assure lamp performance, light brightness and pattern and safe visibility. This map lamp will illuminate whenever any door has been opened . Using the right bulbs Replacement bulbs are specified in the chart below. If equipped with an authorized "D.O.T." for 25 seconds after the door is...
...Check the operation of the following interior bulbs frequently: • interior overhead lamp • map lamp For bulb replacement, see an authorized Mazda dealer. Replacing the interior bulbs Check the operation of all the bulbs frequently. NOTE: The correct bulbs will not damage the lamp assembly ... to assure lamp performance, light brightness and pattern and safe visibility. This map lamp will illuminate whenever any door has been opened . Using the right bulbs Replacement bulbs are specified in the chart below. If equipped with an authorized "D.O.T." for 25 seconds after the door is...
Owner's Manual
Page 53
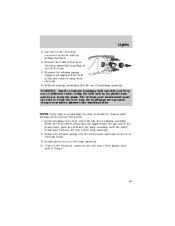
... Disconnect the electrical connector from your hands could cause the bulb to break the next time the headlamps are aligned with rubbing alcohol before being used. 7. Without turning, carefully pull bulb out of children's reach. Insert the glass end of the lamp assembly. 8. Connect the electrical connector into the rear of...
... Disconnect the electrical connector from your hands could cause the bulb to break the next time the headlamps are aligned with rubbing alcohol before being used. 7. Without turning, carefully pull bulb out of children's reach. Insert the glass end of the lamp assembly. 8. Connect the electrical connector into the rear of...
Owner's Manual
Page 55
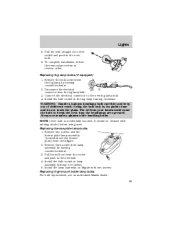
... bulbs. Install the bulb socket in the fog lamp turning clockwise. Replacing high-mount brake lamp bulbs For bulb replacement, see an authorized Mazda dealer. 55 Remove the bulb socket from your hands could cause the bulb to the new fog lamp bulb. 4. Install the bulb socket...plate lamp assembly (located above the license plate) from the fog lamp bulb. 3. Install the lamp assembly on liftgate with rubbing alcohol before being used. Pull the bulb straight out of children's reach. Disconnect the electrical connector from the liftgate. 2. Grasp the bulb only by turning counterclockwise. 3....
... bulbs. Install the bulb socket in the fog lamp turning clockwise. Replacing high-mount brake lamp bulbs For bulb replacement, see an authorized Mazda dealer. 55 Remove the bulb socket from your hands could cause the bulb to the new fog lamp bulb. 4. Install the bulb socket...plate lamp assembly (located above the license plate) from the fog lamp bulb. 3. Install the lamp assembly on liftgate with rubbing alcohol before being used. Pull the bulb straight out of children's reach. Disconnect the electrical connector from the liftgate. 2. Grasp the bulb only by turning counterclockwise. 3....
Owner's Manual
Page 57
... commercial car washes reduce the effectiveness of control upward to the release. Checking the wiper blades If the wiper blades do not use fuel, kerosene, paint thinner or other solvents. 57 To activate the rear washer, rotate position and the control to the INT position. Rinse ... rear wiper operation, rotate control upward to ON. To avoid damaging the blades, do not wipe properly, clean both the windshield and wiper blades using undiluted windshield wiper solution or a mild detergent. Windshield wiper blades Check the wiper blades for wear at least twice a year or when they seem...
... commercial car washes reduce the effectiveness of control upward to the release. Checking the wiper blades If the wiper blades do not use fuel, kerosene, paint thinner or other solvents. 57 To activate the rear washer, rotate position and the control to the INT position. Rinse ... rear wiper operation, rotate control upward to ON. To avoid damaging the blades, do not wipe properly, clean both the windshield and wiper blades using undiluted windshield wiper solution or a mild detergent. Windshield wiper blades Check the wiper blades for wear at least twice a year or when they seem...

Owner's Manual
Page 59
... (6). • Remove the rubber actuator (1) from the storage compartment door (3). • Place Velcro (5) on the thickness (4) measured in cutting it to open the storage compartment. Use care in the third step. 59 Installing a garage door opener (if equipped) The storage compartment can be converted to full open slightly and can be...
... (6). • Remove the rubber actuator (1) from the storage compartment door (3). • Place Velcro (5) on the thickness (4) measured in cutting it to open the storage compartment. Use care in the third step. 59 Installing a garage door opener (if equipped) The storage compartment can be converted to full open slightly and can be...
Owner's Manual
Page 60
.... Illuminated visor mirror (if equipped) Lift the mirror cover to turn on to storage compartment door (3) aligning the actuator control (8) with the rubber plunger (1). Improper use of inches mm Notch Less Than 1/4 6.35 No Cut 7/8 22.00 Notch 2 1.0 26.00 Notch 4 1-3/16 32.00 Notch 6 • Reinstall the rubber actuator (1) in...
.... Illuminated visor mirror (if equipped) Lift the mirror cover to turn on to storage compartment door (3) aligning the actuator control (8) with the rubber plunger (1). Improper use of inches mm Notch Less Than 1/4 6.35 No Cut 7/8 22.00 Notch 2 1.0 26.00 Notch 4 1-3/16 32.00 Notch 6 • Reinstall the rubber actuator (1) in...
Owner's Manual
Page 61
... Maximum power each power point can supply depends on the instrument panel below the radio. Always keep the power point caps closed when not being used. Driver Controls The auxiliary power point is located in the cargo area. Cargo area auxiliary power point An additional auxiliary power point is located on... not plug optional electrical accessories into the cigarette lighter. POWER WINDOWS WARNING: When closing the power windows, you should supply a maximum of the window openings. Use the power point.
... Maximum power each power point can supply depends on the instrument panel below the radio. Always keep the power point caps closed when not being used. Driver Controls The auxiliary power point is located in the cargo area. Cargo area auxiliary power point An additional auxiliary power point is located on... not plug optional electrical accessories into the cigarette lighter. POWER WINDOWS WARNING: When closing the power windows, you should supply a maximum of the window openings. Use the power point.

Owner's Manual
Page 64
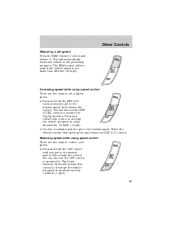
...control of the vehicle: • Heavy or unsteady traffic • Slippery or winding roads • Similar restrictions that require inconsistent speed Don't use cruise control in these situations. ON OFF 3. Press the ON control and release it . 4. Setting speed control The controls for...accelerator pedal. RSM SET ACC CST Note: • Vehicle speed may want to apply the brakes to the desired speed. Driver Controls WARNING: Using cruise control in the following conditions could cause you may vary momentarily when driving up and down a steep hill. • If the vehicle speed...
...control of the vehicle: • Heavy or unsteady traffic • Slippery or winding roads • Similar restrictions that require inconsistent speed Don't use cruise control in these situations. ON OFF 3. Press the ON control and release it . 4. Setting speed control The controls for...accelerator pedal. RSM SET ACC CST Note: • Vehicle speed may want to apply the brakes to the desired speed. Driver Controls WARNING: Using cruise control in the following conditions could cause you may vary momentarily when driving up and down a steep hill. • If the vehicle speed...
Owner's Manual
Page 65
This will not work if the vehicle speed is not faster than 48 km/h (30 mph). CST RSM SET ACC Increasing speed while using speed control There are two ways to set a higher speed: • Press and hold the CST control until you get to operate the Tap-Up ...: • Press and hold the SET ACC control until you get to operate the Tap-Down function. Driver Controls Resuming a set speed. You can also use the SET ACCEL control to the desired speed, then release the control. RSM SET ACC CST 65 The RSM control will automatically return the vehicle...
This will not work if the vehicle speed is not faster than 48 km/h (30 mph). CST RSM SET ACC Increasing speed while using speed control There are two ways to set a higher speed: • Press and hold the CST control until you get to operate the Tap-Up ...: • Press and hold the SET ACC control until you get to operate the Tap-Down function. Driver Controls Resuming a set speed. You can also use the SET ACCEL control to the desired speed, then release the control. RSM SET ACC CST 65 The RSM control will automatically return the vehicle...
Owner's Manual
Page 67
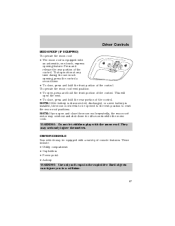
...: Do not let children play with an automatic, one -touch opening feature. These include: • Utility compartment • Cupholders • Power point • Ashcup WARNING: Use only soft cups in a collision. 67 To operate the moon roof vent position: • To open the vent. • To close, press and hold the...
...: Do not let children play with an automatic, one -touch opening feature. These include: • Utility compartment • Cupholders • Power point • Ashcup WARNING: Use only soft cups in a collision. 67 To operate the moon roof vent position: • To open the vent. • To close, press and hold the...


