Owners Manual
Page 2
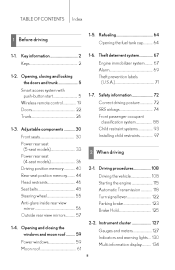
Opening and closing and locking the doors and trunk ...5 Smart access system with push-button start ...5 Wireless remote control...19 Doors...22 Trunk...26 1-3. Refueling...64 1 Before driving Opening the fuel tank cap...64 1-6. Instrument cluster ...127 Gauges and meters ...... 1-1. Key information ...2 Keys ...2 1-2. Driving procedures...108 Driving the vehicle...108 Starting the engine ...115 Automatic Transmission ...118 Turn signal lever...122 Parking brake ...123 Brake Hold...125 2-2. TABLE OF CONTENTS Index 1-5.
Opening and closing and locking the doors and trunk ...5 Smart access system with push-button start ...5 Wireless remote control...19 Doors...22 Trunk...26 1-3. Refueling...64 1 Before driving Opening the fuel tank cap...64 1-6. Instrument cluster ...127 Gauges and meters ...... 1-1. Key information ...2 Keys ...2 1-2. Driving procedures...108 Driving the vehicle...108 Starting the engine ...115 Automatic Transmission ...118 Turn signal lever...122 Parking brake ...123 Brake Hold...125 2-2. TABLE OF CONTENTS Index 1-5.
Owners Manual
Page 32
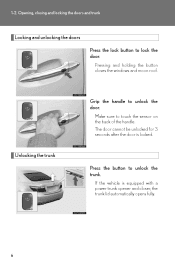
1-2. The door cannot be unlocked for 3 seconds after the door is equipped with a power trunk opener and closer, the trunk lid automatically opens fully. 6 Make sure to unlock the trunk. Unlocking the trunk Press the button to touch the sensor on the back of the handle. Opening, closing and locking the doors and trunk Locking and unlocking the doors Press the lock button to unlock the door. If the vehicle is locked. Pressing and holding the button closes the windows and moon roof. Grip the handle to lock the door.
1-2. The door cannot be unlocked for 3 seconds after the door is equipped with a power trunk opener and closer, the trunk lid automatically opens fully. 6 Make sure to unlock the trunk. Unlocking the trunk Press the button to touch the sensor on the back of the handle. Opening, closing and locking the doors and trunk Locking and unlocking the doors Press the lock button to unlock the door. If the vehicle is locked. Pressing and holding the button closes the windows and moon roof. Grip the handle to lock the door.
Owners Manual
Page 37
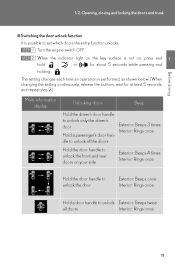
... door Interior: Rings once Hold a passenger's door handle to unlock all doors Interior: Rings once 11 1-2. Opening, closing and locking the doors and trunk n Switching the door unlock function It is performed, as shown below. (When changing the setting continuously, release the buttons, wait for about 5 ...seconds while pressing and Before driving The setting changes each time an operation is possible to unlock Exterior: Beeps twice all the doors Hold the door handle to unlock the front and rear doors...
... door Interior: Rings once Hold a passenger's door handle to unlock all doors Interior: Rings once 11 1-2. Opening, closing and locking the doors and trunk n Switching the door unlock function It is performed, as shown below. (When changing the setting continuously, release the buttons, wait for about 5 ...seconds while pressing and Before driving The setting changes each time an operation is possible to unlock Exterior: Beeps twice all the doors Hold the door handle to unlock the front and rear doors...
Owners Manual
Page 45
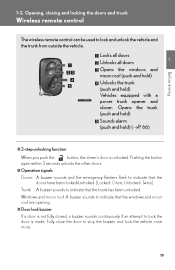
...from outside the vehicle. Windows and moon roof: A buzzer sounds to stop the buzzer, and lock the vehicle once more. 19 Pushing the button again within 3 seconds unlocks the other doors. Fully close the door to indicate that the trunk has been unlocked. n Door lock buzzer ...the windows and moon roof (push and hold) Unlocks the trunk (push and hold) Vehicles equipped with a power trunk opener and closer: Opens the trunk (push and hold) Sounds alarm (push and hold) (→P. 66) 1 Before driving n 2-step unlocking function When you push the button, the driver's door is made. ...
...from outside the vehicle. Windows and moon roof: A buzzer sounds to stop the buzzer, and lock the vehicle once more. 19 Pushing the button again within 3 seconds unlocks the other doors. Fully close the door to indicate that the trunk has been unlocked. n Door lock buzzer ...the windows and moon roof (push and hold) Unlocks the trunk (push and hold) Vehicles equipped with a power trunk opener and closer: Opens the trunk (push and hold) Sounds alarm (push and hold) (→P. 66) 1 Before driving n 2-step unlocking function When you push the button, the driver's door is made. ...
Owners Manual
Page 72
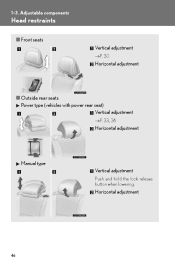
1-3. Horizontal adjustment 46 Adjustable components Head restraints n Front seats Vertical adjustment →P. 30 Horizontal adjustment n Outside rear seats Power type (vehicles with power rear seat) Vertical adjustment →P. 33, 36 Horizontal adjustment Manual type Vertical adjustment Push and hold the lock release button when lowering.
1-3. Horizontal adjustment 46 Adjustable components Head restraints n Front seats Vertical adjustment →P. 30 Horizontal adjustment n Outside rear seats Power type (vehicles with power rear seat) Vertical adjustment →P. 33, 36 Horizontal adjustment Manual type Vertical adjustment Push and hold the lock release button when lowering.
Owners Manual
Page 151
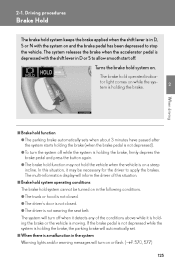
...2 When driving n Brake hold system keeps the brake applied when the shift lever is in D, S or N with the shift lever in the system Warning lights and/or warning messages will automatically set. l The driver is holding the brake, firmly depress the brake pedal and press the button again. l To turn... on . l The trunk or hood is holding the brake, the parking brake will turn the system off . If the ...
...2 When driving n Brake hold system keeps the brake applied when the shift lever is in D, S or N with the shift lever in the system Warning lights and/or warning messages will automatically set. l The driver is holding the brake, firmly depress the brake pedal and press the button again. l To turn... on . l The trunk or hood is holding the brake, the parking brake will turn the system off . If the ...
Owners Manual
Page 172
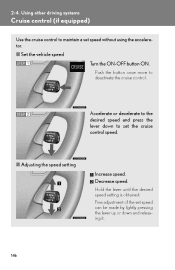
... the cruise control to set speed without using the accelerator. n Adjusting the speed setting Increase speed. Hold the lever until the desired speed setting is obtained. n Set the vehicle speed STEP 1 Turn the ON-OFF button ON. Fine adjustment of the set speed can be made by lightly pressing the lever up...
... the cruise control to set speed without using the accelerator. n Adjusting the speed setting Increase speed. Hold the lever until the desired speed setting is obtained. n Set the vehicle speed STEP 1 Turn the ON-OFF button ON. Fine adjustment of the set speed can be made by lightly pressing the lever up...

Owners Manual
Page 176
... it. 150 2-4. Using other driving systems Selecting conventional constant speed control mode Turn the ON-OFF button ON. Decrease speed. Switch to constant speed control mode. (push and hold for approximately one second) Vehicle-to-vehicle distance control mode is always reset when the engine switch is... displayed. Push the button once more to IG-ON mode. Hold the lever until the desired speed setting is switched to...
... it. 150 2-4. Using other driving systems Selecting conventional constant speed control mode Turn the ON-OFF button ON. Decrease speed. Switch to constant speed control mode. (push and hold for approximately one second) Vehicle-to-vehicle distance control mode is always reset when the engine switch is... displayed. Push the button once more to IG-ON mode. Hold the lever until the desired speed setting is switched to...
Owners Manual
Page 201
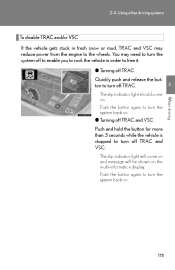
... multi-information display. The slip indicator light should come on and message will come on . 2 When driving l Turning off TRAC and VSC Push and hold the button for more than 3 seconds while the vehicle is stopped to free it. 2-4. Using other driving systems To disable TRAC and/or VSC If the vehicle... VSC may need to turn off to enable you to rock the vehicle in order to turn the system off TRAC and VSC. Push the button again to turn the system back on . l Turning off TRAC Quickly push and release the...
... multi-information display. The slip indicator light should come on and message will come on . 2 When driving l Turning off TRAC and VSC Push and hold the button for more than 3 seconds while the vehicle is stopped to free it. 2-4. Using other driving systems To disable TRAC and/or VSC If the vehicle... VSC may need to turn off to enable you to rock the vehicle in order to turn the system off TRAC and VSC. Push the button again to turn the system back on . l Turning off TRAC Quickly push and release the...

Owners Manual
Page 266
Using the audio system Using the radio Station selector Changing the program types Displays radio text messages Seeking any traffic program station Adjusting the frequency Power Volume AM/FM mode buttons Seeking the frequency Scans for receivable stations Setting station presets STEP 1 Search for desired stations by turning . to ) the station is to , and you will hear a beep. 3-3. or pressing ∧ or ∨ on STEP 2 Press and hold the button (from be set to 240
Using the audio system Using the radio Station selector Changing the program types Displays radio text messages Seeking any traffic program station Adjusting the frequency Power Volume AM/FM mode buttons Seeking the frequency Scans for receivable stations Setting station presets STEP 1 Search for desired stations by turning . to ) the station is to , and you will hear a beep. 3-3. or pressing ∧ or ∨ on STEP 2 Press and hold the button (from be set to 240
Owners Manual
Page 267
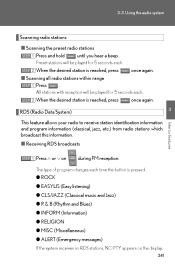
...) l ALERT (Emergency messages) If the system receives no RDS stations, NO PTY appears on during FM reception. The type of program changes each time the button is reached, press once again. 3 RDS (Radio Data System) This feature allows your radio to receive station identification information and program information (classical, jazz, etc... 1 Interior features Press ∧ or ∨ on the display. 241 3-3. Using the audio system Scanning radio stations n Scanning the preset radio stations STEP 1 Press and hold until you hear a beep.
...) l ALERT (Emergency messages) If the system receives no RDS stations, NO PTY appears on during FM reception. The type of program changes each time the button is reached, press once again. 3 RDS (Radio Data System) This feature allows your radio to receive station identification information and program information (classical, jazz, etc... 1 Interior features Press ∧ or ∨ on the display. 241 3-3. Using the audio system Scanning radio stations n Scanning the preset radio stations STEP 1 Press and hold until you hear a beep.
Owners Manual
Page 271
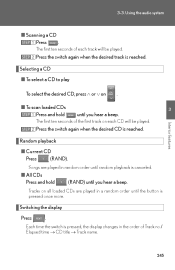
...) until you hear a beep. Interior features The first ten seconds of each CD will be played. n All CDs Press and hold STEP 2 . 3 until you hear a beep. Switching the display Press . Songs are played in the order of Track no./ Elapsed time → CD title → Track ...name. 245 The first ten seconds of the first track on all loaded CDs are played in random order until the button is reached. Press the switch again when the desired CD is canceled. Tracks on each track will be played. Random playback n Current CD Press (RAND...
...) until you hear a beep. Interior features The first ten seconds of each CD will be played. n All CDs Press and hold STEP 2 . 3 until you hear a beep. Switching the display Press . Songs are played in the order of Track no./ Elapsed time → CD title → Track ...name. 245 The first ten seconds of the first track on all loaded CDs are played in random order until the button is reached. Press the switch again when the desired CD is canceled. Tracks on each track will be played. Random playback n Current CD Press (RAND...
Owners Manual
Page 284
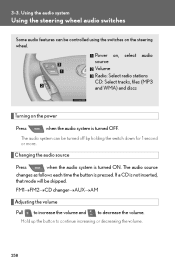
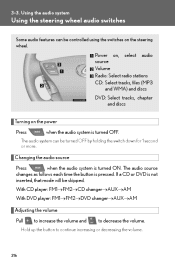
... If a CD is turned ON. Changing the audio source Press when the audio system is not inserted, that mode will be skipped. Hold up the button to decrease the volume. Using the audio system Using the steering wheel audio switches Some audio features can be controlled using the switches on... the volume Pull to increase the volume and to continue increasing or decreasing the volume. 258 The audio source changes as follows each time the button is turned OFF. 3-3. Power on, select audio source Volume Radio: Select radio stations CD: Select tracks, files (MP3 and WMA) and discs ...
... If a CD is turned ON. Changing the audio source Press when the audio system is not inserted, that mode will be skipped. Hold up the button to decrease the volume. Using the audio system Using the steering wheel audio switches Some audio features can be controlled using the switches on... the volume Pull to increase the volume and to continue increasing or decreasing the volume. 258 The audio source changes as follows each time the button is turned OFF. 3-3. Power on, select audio source Volume Radio: Select radio stations CD: Select tracks, files (MP3 and WMA) and discs ...
Owners Manual
Page 290
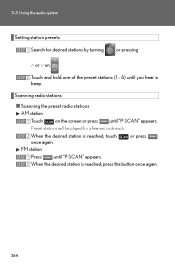
... desired stations by turning ∧ or ∨ on the screen or press STEP 2 until "P⋅SCAN" appears. When the desired station is reached, press the button once again. 264 or pressing STEP 2 Touch and hold one of the preset stations (1 - 6) until "P⋅SCAN" appears.
... desired stations by turning ∧ or ∨ on the screen or press STEP 2 until "P⋅SCAN" appears. When the desired station is reached, press the button once again. 264 or pressing STEP 2 Touch and hold one of the preset stations (1 - 6) until "P⋅SCAN" appears.
Owners Manual
Page 295
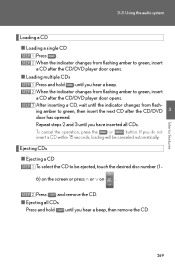
n Loading multiple CDs STEP 1 Press and hold 269 To cancel the operation, press the or button. n Ejecting all CDs. 3-3. STEP 2 When the indicator changes from flashing amber to green, then insert the next CD after the CD/DVD door has opened. ...STEP 3 After inserting a CD, wait until you have inserted all CDs Press and hold until the indicator changes from flashing...
n Loading multiple CDs STEP 1 Press and hold 269 To cancel the operation, press the or button. n Ejecting all CDs. 3-3. STEP 2 When the indicator changes from flashing amber to green, then insert the next CD after the CD/DVD door has opened. ...STEP 3 After inserting a CD, wait until you have inserted all CDs Press and hold until the indicator changes from flashing...

Owners Manual
Page 310
...2 When the indicator changes from flashing amber to green, insert a disc after the DVD player door opens. n Loading multiple discs STEP 1 Press and hold until the indicator changes from flashing amber to green, insert a disc after the DVD player door has opened. If you have inserted all discs. 3-3. ...STEP 3 After inserting a disc, wait until you have read the message. 284 To cancel the operation, press the or button. n DVD hint screen This screen appears when a DVD video, DVD audio or video CD is first selected with the engine switch in ACC or IG...
...2 When the indicator changes from flashing amber to green, insert a disc after the DVD player door opens. n Loading multiple discs STEP 1 Press and hold until the indicator changes from flashing amber to green, insert a disc after the DVD player door has opened. If you have inserted all discs. 3-3. ...STEP 3 After inserting a disc, wait until you have read the message. 284 To cancel the operation, press the or button. n DVD hint screen This screen appears when a DVD video, DVD audio or video CD is first selected with the engine switch in ACC or IG...

Owners Manual
Page 340
...AUX With DVD player: AM → FM1 → FM2 → DVD changer → AUX Adjusting the volume Press ∧ on Press and hold the button to change the audio source. Press ∧ or ∨ on to increase the volume and ∨ to scan for receivable stations. 314 Selecting ...a radio station STEP 1 STEP 2 Press to select a radio station. Press and hold the button until you hear a beep in the changer, the changer will be skipped. Using the audio system Changing the audio source Press to continue increasing...
...AUX With DVD player: AM → FM1 → FM2 → DVD changer → AUX Adjusting the volume Press ∧ on Press and hold the button to change the audio source. Press ∧ or ∨ on to increase the volume and ∨ to scan for receivable stations. 314 Selecting ...a radio station STEP 1 STEP 2 Press to select a radio station. Press and hold the button until you hear a beep in the changer, the changer will be skipped. Using the audio system Changing the audio source Press to continue increasing...
Owners Manual
Page 342
... turned ON. Changing the audio source Press when the audio system is pressed. If a CD or DVD is turned OFF. Hold up the button to decrease the volume. 3-3. Power on, select audio source Volume Radio: Select radio stations CD: Select tracks, files (MP3 and WMA) and discs DVD: Select ... system can be controlled using the switches on the power Press when the audio system is not inserted, that mode will be turned OFF by holding the switch down for 1 second or more. With CD player: FM1→FM2→CD changer→AUX→AM With DVD player: FM1→...
... turned ON. Changing the audio source Press when the audio system is pressed. If a CD or DVD is turned OFF. Hold up the button to decrease the volume. 3-3. Power on, select audio source Volume Radio: Select radio stations CD: Select tracks, files (MP3 and WMA) and discs DVD: Select ... system can be controlled using the switches on the power Press when the audio system is not inserted, that mode will be turned OFF by holding the switch down for 1 second or more. With CD player: FM1→FM2→CD changer→AUX→AM With DVD player: FM1→...
Owners Manual
Page 473
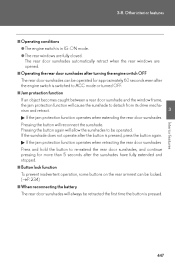
... the engine switch is pressed. 447 Pressing the button again will allow the sunshades to be operated for more than 5 seconds after the button is in IG-ON mode. n Button lock function 3 Interior features To prevent inadvertent operation, some buttons on the rear armrest can be operated. n... rear door sunshades will reconnect the sunshade. If the jam protection function operates when retracting the rear door sunshades Press and hold the button to detach from its drive mechanism and retract. The rear door sunshades automatically retract when the rear windows are fully closed....
... the engine switch is pressed. 447 Pressing the button again will allow the sunshades to be operated for more than 5 seconds after the button is in IG-ON mode. n Button lock function 3 Interior features To prevent inadvertent operation, some buttons on the rear armrest can be operated. n... rear door sunshades will reconnect the sunshade. If the jam protection function operates when retracting the rear door sunshades Press and hold the button to detach from its drive mechanism and retract. The rear door sunshades automatically retract when the rear windows are fully closed....

Owners Manual
Page 693
n Setting memory positions While holding down the SET button, press and hold button on the wireless remote control until you hear a beep. To prevent triggering of the alarm, open one of the memory buttons (1, 2, or 3). The current driving position is recorded. Linking driving position memory to the ...door unlock operation allows the memory position to be memorized and recalled with door unlock operation While holding down the desired memory button, press and hold one of the doors within 30 seconds after the beep is heard. n Linking driving position memory with ...
n Setting memory positions While holding down the SET button, press and hold button on the wireless remote control until you hear a beep. To prevent triggering of the alarm, open one of the memory buttons (1, 2, or 3). The current driving position is recorded. Linking driving position memory to the ...door unlock operation allows the memory position to be memorized and recalled with door unlock operation While holding down the desired memory button, press and hold one of the doors within 30 seconds after the beep is heard. n Linking driving position memory with ...