Owners Manual
Page 55
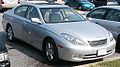
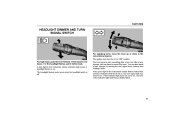
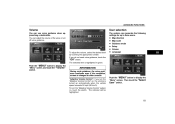
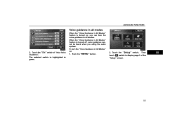
.... The headlight flasher works even when the headlight switch is off. If this indicator light does not come on . Pull it further back. If the green light in the instrument cluster indicates high beam or headlight flasher is self−cancelling after a lane change by hand. For high beam, push the...
.... The headlight flasher works even when the headlight switch is off. If this indicator light does not come on . Pull it further back. If the green light in the instrument cluster indicates high beam or headlight flasher is self−cancelling after a lane change by hand. For high beam, push the...
Owners Manual
Page 68
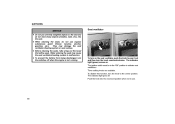
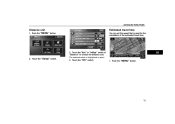
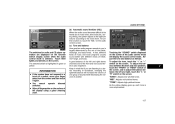
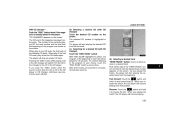
... available. They may cause the seat ventilation/heating system to pop it out and then turn the knob to activate seat ventilators. The indicator light (green) comes on. Push the knob into the seat. SWITCHES NOTICE D Do not put unevenly weighted objects on the seat and do not use . 50 Seat...
... available. They may cause the seat ventilation/heating system to pop it out and then turn the knob to activate seat ventilators. The indicator light (green) comes on. Push the knob into the seat. SWITCHES NOTICE D Do not put unevenly weighted objects on the seat and do not use . 50 Seat...

Owners Manual
Page 259
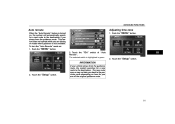
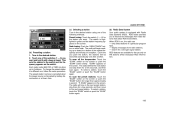
... is automatically loaded. The amber indicators at the lowest empty CD number. If you need to insert the next CD, repeat the same procedure to green, stay on the display. D Setting a single CD: 1. After insertion, the set a CD at either side of the slot start blinking and "WAIT" ...blinking indicators change to prevent CD's from getting stuck in the "ACC" or "ON" position. Insert only one or feed them in continuously, to green, stay on the display. AUDIO CD player operation (a) Inserting or ejecting CD's The ignition switch must be played. Your CD player with changer can ...
... is automatically loaded. The amber indicators at the lowest empty CD number. If you need to insert the next CD, repeat the same procedure to green, stay on the display. D Setting a single CD: 1. After insertion, the set a CD at either side of the slot start blinking and "WAIT" ...blinking indicators change to prevent CD's from getting stuck in the "ACC" or "ON" position. Insert only one or feed them in continuously, to green, stay on the display. AUDIO CD player operation (a) Inserting or ejecting CD's The ignition switch must be played. Your CD player with changer can ...
Navigation Manual
Page 39
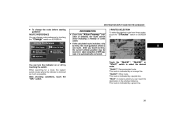
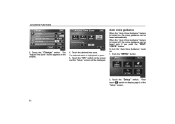
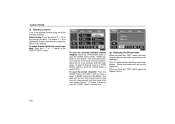
...": Other route. "Short": A route by ferry, the route guidance shows a sea route. This route is indicated by an orange line. This route is indicated by a green line. 39 You can turn the indicator on SCREEN A. When searching for a route, the system avoids routes where the indicator is automatically corrected. 3 ROUTES SELECTION...
...": Other route. "Short": A route by ferry, the route guidance shows a sea route. This route is indicated by an orange line. This route is indicated by a green line. 39 You can turn the indicator on SCREEN A. When searching for a route, the system avoids routes where the indicator is automatically corrected. 3 ROUTES SELECTION...
Navigation Manual
Page 63
... adjust the volume of the voice or turn off voice guidance. If you turn the "Adaptive Volume Control" system on , the volume is highlighted in green. "Adaptive Volume Control": If you do not need voice guidance, touch the "Off" switch. To turn the "Adaptive Volume Control" on , touch the switch. Then...
... adjust the volume of the voice or turn off voice guidance. If you turn the "Adaptive Volume Control" system on , the volume is highlighted in green. "Adaptive Volume Control": If you do not need voice guidance, touch the "Off" switch. To turn the "Adaptive Volume Control" on , touch the switch. Then...
Navigation Manual
Page 79
Push the "MENU" button. 79 Push the "MENU" button. The selected switch is used for the calculation of "Distance" to choose the distance unit. Estimated travel time You can set the speed that is highlighted in green. 4. Touch the "OK" switch. 1. Touch the "km" or "miles" switch of the estimated travel time. 2. Touch the "Setup" switch. 3. ADVANCED FUNCTIONS Distance unit 1.
Push the "MENU" button. 79 Push the "MENU" button. The selected switch is used for the calculation of "Distance" to choose the distance unit. Estimated travel time You can set the speed that is highlighted in green. 4. Touch the "OK" switch. 1. Touch the "km" or "miles" switch of the estimated travel time. 2. Touch the "Setup" switch. 3. ADVANCED FUNCTIONS Distance unit 1.
Navigation Manual
Page 81
Touch the "On" switch of "Auto Reroute". Push the "MENU" button. 3. The selected switch is highlighted in green. The new route may or may not take you back to the previous route depending on how far you are driving on roads where guidance ...
Touch the "On" switch of "Auto Reroute". Push the "MENU" button. 3. The selected switch is highlighted in green. The new route may or may not take you back to the previous route depending on how far you are driving on roads where guidance ...
Navigation Manual
Page 82
... turned on, the voice guidance can be heard only if you push the "MAP/ VOICE" button. When the "Auto Voice Guidance" feature is highlighted in green. 5. To turn the "Auto Voice Guidance" mode on the display. 4. Touch the "Change" switch. The selected switch is turned off, the voice guidance can be...
... turned on, the voice guidance can be heard only if you push the "MAP/ VOICE" button. When the "Auto Voice Guidance" feature is highlighted in green. 5. To turn the "Auto Voice Guidance" mode on the display. 4. Touch the "Change" switch. The selected switch is turned off, the voice guidance can be...
Navigation Manual
Page 83
When the "Voice Guidance in all modes When the "Voice Guidance in All Modes" feature is turned off, voice guidance cannot be heard when you can hear the voice guidance in All Modes" feature is turned on : 1. Push the "MENU" button. 3. Then switch to display page 2 of "Auto Voice Guidance". ADVANCED FUNCTIONS Voice guidance in all modes. Touch the "On" switch of the touch "Setup" screen. 83 The selected switch is highlighted in All Modes" on , you using the audio system. To turn the "Voice Guidance in green. 2. Touch the "Setup" switch.
When the "Voice Guidance in all modes When the "Voice Guidance in All Modes" feature is turned off, voice guidance cannot be heard when you can hear the voice guidance in All Modes" feature is turned on : 1. Push the "MENU" button. 3. Then switch to display page 2 of "Auto Voice Guidance". ADVANCED FUNCTIONS Voice guidance in all modes. Touch the "On" switch of the touch "Setup" screen. 83 The selected switch is highlighted in All Modes" on , you using the audio system. To turn the "Voice Guidance in green. 2. Touch the "Setup" switch.
Navigation Manual
Page 117
..., move your finger away from the screen and then touch it again. To adjust the tone, touch the "+" or "-" switch on the screen. Keep in green or yellow. To adjust the balance between the left and right stereo channels and of another. Touching the "SOUND" switch displayed on the screen. "MID...
..., move your finger away from the screen and then touch it again. To adjust the tone, touch the "+" or "-" switch on the screen. Keep in green or yellow. To adjust the balance between the left and right stereo channels and of another. Touching the "SOUND" switch displayed on the screen. "MID...
Navigation Manual
Page 119
... the screen. To select a station, touch the "SCAN" switch or push the "SCAN" button again. SCAN" appears on either side. The radio will tune in green and the station frequency appears on the screen. To select a station, touch the "SCAN" switch or push the "SCAN" button again. (d) Radio Data System Your...
... the screen. To select a station, touch the "SCAN" switch or push the "SCAN" button again. SCAN" appears on either side. The radio will tune in green and the station frequency appears on the screen. To select a station, touch the "SCAN" switch or push the "SCAN" button again. (d) Radio Data System Your...
Navigation Manual
Page 124
... the channel you touch the "TEXT" switch again, the display returns. 124 "P.SCAN" appears on the display. The radio will find the next channel in green and channel number appears on the display. Up to the next preset channel. To select channel within the current category: Push the "Ɯ" or "Ɲ...
... the channel you touch the "TEXT" switch again, the display returns. 124 "P.SCAN" appears on the display. The radio will find the next channel in green and channel number appears on the display. Up to the next preset channel. To select channel within the current category: Push the "Ɯ" or "Ɲ...
Navigation Manual
Page 129
The CD's set in green. When play of the final CD ends, play resumes. (d) Selecting a desired track "SEEK/TRACK" button: Use for a direct access to reverse the CD. The selected ...
The CD's set in green. When play of the final CD ends, play resumes. (d) Selecting a desired track "SEEK/TRACK" button: Use for a direct access to reverse the CD. The selected ...
