
Owners Manual
Page 5
... training program to do their Kawasaki Motorcycle, a Service Manual is available for superior reliability, safety and performance. The Service Manual contains detailed disassembly and maintenance information. Please read this Owner's Manual carefully before riding so that you need information. For those who plan to attain awareness of a new Kawasaki motorcycle. Keep this Owner's Manual aboard your motorcycle at all times so that all the techniques...
... training program to do their Kawasaki Motorcycle, a Service Manual is available for superior reliability, safety and performance. The Service Manual contains detailed disassembly and maintenance information. Please read this Owner's Manual carefully before riding so that you need information. For those who plan to attain awareness of a new Kawasaki motorcycle. Keep this Owner's Manual aboard your motorcycle at all times so that all the techniques...
Owners Manual
Page 11
... for High Speed Operation ...13 13 13 13 14 15 16 16 17 17 18 18 19 19 19 20 22 GENERAL INFORMATION ...Specifications ...Serial Number Locations...Location of Labels ...Location of Parts ...Meter Instruments ...Indicators ...Speedometer/Tachometer ...Display Setting...Clock...Features ...Keys ...Ignition Switch/Steering Lock ...Right Handlebar Switches...Left Handlebar Switches ...Brake Lever Adjuster...Clutch Lever Adjuster...Fuel ...Fuel Requirements ...Filling the Tank...24...
... for High Speed Operation ...13 13 13 13 14 15 16 16 17 17 18 18 19 19 19 20 22 GENERAL INFORMATION ...Specifications ...Serial Number Locations...Location of Labels ...Location of Parts ...Meter Instruments ...Indicators ...Speedometer/Tachometer ...Display Setting...Clock...Features ...Keys ...Ignition Switch/Steering Lock ...Right Handlebar Switches...Left Handlebar Switches ...Brake Lever Adjuster...Clutch Lever Adjuster...Fuel ...Fuel Requirements ...Filling the Tank...24...

Owners Manual
Page 12
... ...Starting the Engine ...Jump Starting ...Moving Off...Shifting Gears ...Braking ...Anti-lock Brake System (ABS) ...Stopping the Engine...Stopping the Motorcycle in an Emergency ...Parking ...MAINTENANCE AND ADJUSTMENT Daily Checks ... 67 68 69 69 70 71 71 72 73 76 76 77 80 82 83 85 86 88 89 90 92 94 Periodic Maintenance...Engine Oil ...Coolant...Air Cleaner ...Throttle Control System ...Idle Speed ...Clutch ...Drive Chain ...Brakes ...Brake Light Switches...Suspension System ...Front Fork ...Rear Shock Absorber ...Setting Tables ...Wheels ...Battery...Headlight ...Fuses ...General...
... ...Starting the Engine ...Jump Starting ...Moving Off...Shifting Gears ...Braking ...Anti-lock Brake System (ABS) ...Stopping the Engine...Stopping the Motorcycle in an Emergency ...Parking ...MAINTENANCE AND ADJUSTMENT Daily Checks ... 67 68 69 69 70 71 71 72 73 76 76 77 80 82 83 85 86 88 89 90 92 94 Periodic Maintenance...Engine Oil ...Coolant...Air Cleaner ...Throttle Control System ...Idle Speed ...Clutch ...Drive Chain ...Brakes ...Brake Light Switches...Suspension System ...Front Fork ...Rear Shock Absorber ...Setting Tables ...Wheels ...Battery...Headlight ...Fuses ...General...
Owners Manual
Page 17
... to changes in weight distribution and aerodynamic forces. Baggage weight should be distributed equally on a luggage rack. Do not carry passengers unless passenger footpegs are riding. Baggage and Luggage 1. Do not carry heavy or bulky items on both sides of the motorcycle. 2. Accessories 1. Do not install accessories or carry baggage that extends beyond the rear of the motorcycle. 16 SAFETY INFORMATION...
... to changes in weight distribution and aerodynamic forces. Baggage weight should be distributed equally on a luggage rack. Do not carry passengers unless passenger footpegs are riding. Baggage and Luggage 1. Do not carry heavy or bulky items on both sides of the motorcycle. 2. Accessories 1. Do not install accessories or carry baggage that extends beyond the rear of the motorcycle. 16 SAFETY INFORMATION...
Owners Manual
Page 22
... applying the brakes, use both the front and rear brakes. Use Engine Brake Riding in wet conditions. When going down long slopes, help dry and restores them to avoid skidding the rear wheel from too rapid acceleration or deceleration. The throttle should be reduced. Braking performance is power to skid and lose control. SAFETY INFORMATION 21 view mirror; you may misjudge a vehicle's distance and speed, or you...
... applying the brakes, use both the front and rear brakes. Use Engine Brake Riding in wet conditions. When going down long slopes, help dry and restores them to avoid skidding the rear wheel from too rapid acceleration or deceleration. The throttle should be reduced. Braking performance is power to skid and lose control. SAFETY INFORMATION 21 view mirror; you may misjudge a vehicle's distance and speed, or you...
Owners Manual
Page 24
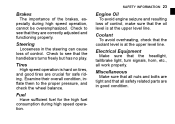
... and bolts are tight and that the headlight, tail/brake light, turn signals, horn, etc., all safety related parts are in the steering can cause loss of control. Engine Oil Coolant Steering Electrical Equipment Tires Miscellaneous Fuel Brakes To avoid engine seizure and resulting loss of control, make sure that the coolant level is at the upper level line. Check to see that they are crucial for the high fuel consumption during high speed...
... and bolts are tight and that the headlight, tail/brake light, turn signals, horn, etc., all safety related parts are in the steering can cause loss of control. Engine Oil Coolant Steering Electrical Equipment Tires Miscellaneous Fuel Brakes To avoid engine seizure and resulting loss of control, make sure that the coolant level is at the upper level line. Check to see that they are crucial for the high fuel consumption during high speed...
Owners Manual
Page 32
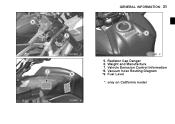
GENERAL INFORMATION 31 5. 6. 7. *8. *9. Radiator Cap Danger Weight and Manufacture Vehicle Emission Control Information Vacuum hose Routing Diagram Fuel Level *: only on California model
GENERAL INFORMATION 31 5. 6. 7. *8. *9. Radiator Cap Danger Weight and Manufacture Vehicle Emission Control Information Vacuum hose Routing Diagram Fuel Level *: only on California model
Owners Manual
Page 40
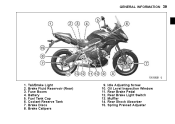
GENERAL INFORMATION 39 1. 2. 3. 4. 5. 6. 7. 8. Tail/Brake Light Brake Fluid Reservoir (Rear) Fuse Boxes Battery Fuel Tank Cap Coolant Reserve Tank Brake Discs Brake Calipers 9. 10. 11. 12. 13. 14. 15. Idle Adjusting Screw Oil Level Inspection Window Rear Brake Pedal Rear Brake Light Switch Muffler Rear Shock Absorber Spring Preload Adjuster
GENERAL INFORMATION 39 1. 2. 3. 4. 5. 6. 7. 8. Tail/Brake Light Brake Fluid Reservoir (Rear) Fuse Boxes Battery Fuel Tank Cap Coolant Reserve Tank Brake Discs Brake Calipers 9. 10. 11. 12. 13. 14. 15. Idle Adjusting Screw Oil Level Inspection Window Rear Brake Pedal Rear Brake Light Switch Muffler Rear Shock Absorber Spring Preload Adjuster
Owners Manual
Page 47
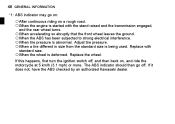
... an authorized Kawasaki dealer. Replace with the stand raised and the transmission engaged, and the rear wheel turns. ○When accelerating so abruptly that the front wheel leaves the ground. ○When the ABS has been subjected to strong electrical interference. ○When tire pressure is abnormal. If this happens, first turn the ignition switch off . Adjust tire pressure. ○When a tire different in size from the standard size is...
... an authorized Kawasaki dealer. Replace with the stand raised and the transmission engaged, and the rear wheel turns. ○When accelerating so abruptly that the front wheel leaves the ground. ○When the ABS has been subjected to strong electrical interference. ○When tire pressure is abnormal. If this happens, first turn the ignition switch off . Adjust tire pressure. ○When a tire different in size from the standard size is...
Owners Manual
Page 67
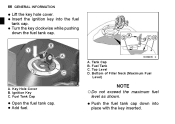
Ignition Key C. the key clockwise while pushing • Turn down into the fuel • tank cap. Tank Cap Fuel Tank Top Level Bottom of Filler Neck (Maximum Fuel Level) A. B. D. Key Hole Cover B. C. A. Fuel Tank Cap ○Do NOTE not exceed the maximum fuel level as shown. the fuel tank cap. • Open Add fuel. • the fuel tank cap down the fuel tank cap. 66 GENERAL INFORMATION the key hole cover. • Lift Insert the ignition key into • Push place with the key inserted.
Ignition Key C. the key clockwise while pushing • Turn down into the fuel • tank cap. Tank Cap Fuel Tank Top Level Bottom of Filler Neck (Maximum Fuel Level) A. B. D. Key Hole Cover B. C. A. Fuel Tank Cap ○Do NOTE not exceed the maximum fuel level as shown. the fuel tank cap. • Open Add fuel. • the fuel tank cap down the fuel tank cap. 66 GENERAL INFORMATION the key hole cover. • Lift Insert the ignition key into • Push place with the key inserted.
Owners Manual
Page 69
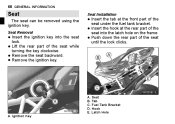
... ignition key. down the rear part of the seat while • Lift turning the key clockwise. the rear part of the seat • Push until the lock clicks. the hook at the front part of the • Insert seat into the seat • Insert lock. Fuel Tank Bracket D. A. the tab at the rear part of the • Insert seat under the fuel tank bracket. Tab C. Latch Hole A. Seat Removal Seat Installation the ignition key...
... ignition key. down the rear part of the seat while • Lift turning the key clockwise. the rear part of the seat • Push until the lock clicks. the hook at the front part of the • Insert seat into the seat • Insert lock. Fuel Tank Bracket D. A. the tab at the rear part of the • Insert seat under the fuel tank bracket. Tab C. Latch Hole A. Seat Removal Seat Installation the ignition key...

Owners Manual
Page 70
... of the • Lift seat to make sure they are securely locked. Band assembly. ○The upper hexagonal area (locknut) has left hand threads. Tool Kit B. GENERAL INFORMATION 69 the front and rear ends of the the rear visibility cannot be assured • If by moving the mirror, loosen the upper hexagonal area and turn the stay by hand...
... of the • Lift seat to make sure they are securely locked. Band assembly. ○The upper hexagonal area (locknut) has left hand threads. Tool Kit B. GENERAL INFORMATION 69 the front and rear ends of the the rear visibility cannot be assured • If by moving the mirror, loosen the upper hexagonal area and turn the stay by hand...

Owners Manual
Page 73
but is constantly overwritten and then erased when the ignition is relevant to the vehicle's running condition at the time of an accident and of an accident such information as: Vehicle speed, • This data can help provide a better ...performing at the time of the circumstances in which crashes occur. name, gender, age). Do not ride the motorcycle with helmets attached to the hooks. ○During normal riding data is recorded NOTE Event Data Recorder In common with many other than in an accident situation, that is switched off. ○At no time other vehicle...
but is constantly overwritten and then erased when the ignition is relevant to the vehicle's running condition at the time of an accident and of an accident such information as: Vehicle speed, • This data can help provide a better ...performing at the time of the circumstances in which crashes occur. name, gender, age). Do not ride the motorcycle with helmets attached to the hooks. ○During normal riding data is recorded NOTE Event Data Recorder In common with many other than in an accident situation, that is switched off. ○At no time other vehicle...
Owners Manual
Page 85
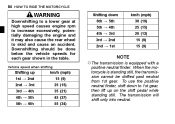
... vehicle speeds for each gear shown in the table. NOTE Shifting up on the shift pedal while standing still. The transmission will shift only into neutral. Downshifting should be shifted past neutral from 1st gear. 84 HOW TO RIDE THE MOTORCYCLE WARNING Downshifting to a lower gear at high speed causes engine rpm to increase excessively, potentially damaging the engine and it may also cause the rear wheel to 1st gear...
... vehicle speeds for each gear shown in the table. NOTE Shifting up on the shift pedal while standing still. The transmission will shift only into neutral. Downshifting should be shifted past neutral from 1st gear. 84 HOW TO RIDE THE MOTORCYCLE WARNING Downshifting to a lower gear at high speed causes engine rpm to increase excessively, potentially damaging the engine and it may also cause the rear wheel to 1st gear...
Owners Manual
Page 102
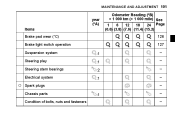
MAINTENANCE AND ADJUSTMENT 101 year (*A) Items Brake pad wear (*C) Brake light switch operation Suspension system Steering play Steering stem bearings Electrical system :1 :1 :2 :1 Odometer Reading (*B) × 1 000 km (× 1 000 mile) See 1 6 12 18 24 Page (0.6) (3.8) (7.6) (11.4) (15.2) 126 127 - - - - - ○ Spark plugs Chassis parts Condition of bolts, nuts and fasteners :1 - -
MAINTENANCE AND ADJUSTMENT 101 year (*A) Items Brake pad wear (*C) Brake light switch operation Suspension system Steering play Steering stem bearings Electrical system :1 :1 :2 :1 Odometer Reading (*B) × 1 000 km (× 1 000 mile) See 1 6 12 18 24 Page (0.6) (3.8) (7.6) (11.4) (15.2) 126 127 - - - - - ○ Spark plugs Chassis parts Condition of bolts, nuts and fasteners :1 - -
Owners Manual
Page 128
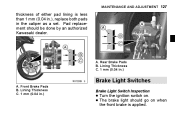
Rear Brake Pads B. Lining Thickness C. 1 mm (0.04 in.) Brake Light Switch Inspection the ignition switch on. • Turn brake light should be done by an authorized Kawasaki dealer. MAINTENANCE AND ADJUSTMENT 127 thickness of either pad lining is applied. Lining Thickness C. 1 mm (0.04 in the caliper as a set. Pad replacement should go on when • The the front brake is less than 1 mm (0.04 in.), replace both pads in .) Brake Light Switches A. A. Front Brake Pads B.
Rear Brake Pads B. Lining Thickness C. 1 mm (0.04 in.) Brake Light Switch Inspection the ignition switch on. • Turn brake light should be done by an authorized Kawasaki dealer. MAINTENANCE AND ADJUSTMENT 127 thickness of either pad lining is applied. Lining Thickness C. 1 mm (0.04 in the caliper as a set. Pad replacement should go on when • The the front brake is less than 1 mm (0.04 in.), replace both pads in .) Brake Light Switches A. A. Front Brake Pads B.

Owners Manual
Page 129
... light does not come on, adjust • If the rear brake light switch. A. A. C. D. Brake Pedal B. 12 mm (0.47 in .) Brake Light Switch Adjustment adjust the rear brake light switch, • To move the switch up or down by depressing the brake pedal. B. 128 MAINTENANCE AND ADJUSTMENT it does not, ask your authorized • If Kawasaki dealer to inspect the front Brake Pedal Travel • brake light switch. Rear Brake Light Switch Adjusting Nut Lights sooner Lights later...
... light does not come on, adjust • If the rear brake light switch. A. A. C. D. Brake Pedal B. 12 mm (0.47 in .) Brake Light Switch Adjustment adjust the rear brake light switch, • To move the switch up or down by depressing the brake pedal. B. 128 MAINTENANCE AND ADJUSTMENT it does not, ask your authorized • If Kawasaki dealer to inspect the front Brake Pedal Travel • brake light switch. Rear Brake Light Switch Adjusting Nut Lights sooner Lights later...
Owners Manual
Page 151
... brake pads, and tires. If debris or flammable materials have collected, park the vehicle outside and stop the engine. Avoid wire brushes, steel wool, and all harsh chemicals, solvents, • Avoid detergents, and household cleaning products such as ammonia-based window cleaners. all other plastic parts as in air intakes, fuel When operating the vehicle in and around the vehicle chassis, engine, and exhaust can...
... brake pads, and tires. If debris or flammable materials have collected, park the vehicle outside and stop the engine. Avoid wire brushes, steel wool, and all harsh chemicals, solvents, • Avoid detergents, and household cleaning products such as ammonia-based window cleaners. all other plastic parts as in air intakes, fuel When operating the vehicle in and around the vehicle chassis, engine, and exhaust can...
Owners Manual
Page 161
... engine, switch the ignition key to the "OFF" position and then back to • Leaving deteriorate. If the engine will not start after the motorcycle has fallen down . Ask an authorized Kawasaki dealer sumed.) • for inspection and maintenance. • • When the starter motor does not rotate, inspect as the ignition system. To start . If not, shift the transmission into neutral. In that the gear...
... engine, switch the ignition key to the "OFF" position and then back to • Leaving deteriorate. If the engine will not start after the motorcycle has fallen down . Ask an authorized Kawasaki dealer sumed.) • for inspection and maintenance. • • When the starter motor does not rotate, inspect as the ignition system. To start . If not, shift the transmission into neutral. In that the gear...
Owners Manual
Page 162
...; Inspect same amperage. If the starter motor will not start after a refresh charge, if the starter motor stops rotating the engine properly, the battery may be something wrong with a new one of the correct capacity and specifications. Ask an authorized Kawasaki dealer for inspection and maintenance. case of slow blinking of the turn signal lights, low volume of the horn sound, • In or when...
...; Inspect same amperage. If the starter motor will not start after a refresh charge, if the starter motor stops rotating the engine properly, the battery may be something wrong with a new one of the correct capacity and specifications. Ask an authorized Kawasaki dealer for inspection and maintenance. case of slow blinking of the turn signal lights, low volume of the horn sound, • In or when...