
Owners Manual
Page 5
... and possess the special tools described in this Owner's Manual aboard your motorcycle at all the techniques and skills required to do their Kawasaki Motorcycle, a Service Manual is the product of a new Kawasaki motorcycle. The Service Manual contains detailed disassembly and maintenance information. Your new motorcycle is available for superior reliability, safety and performance. Kawasaki strongly recommends that you need information. To ensure...
... and possess the special tools described in this Owner's Manual aboard your motorcycle at all the techniques and skills required to do their Kawasaki Motorcycle, a Service Manual is the product of a new Kawasaki motorcycle. The Service Manual contains detailed disassembly and maintenance information. Your new motorcycle is available for superior reliability, safety and performance. Kawasaki strongly recommends that you need information. To ensure...
Owners Manual
Page 11
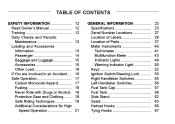
... Gear and Clothing ...Safe Riding Techniques ...Additional Considerations for High Speed Operation ...12 12 12 12 13 14 15 15 16 16 17 17 18 18 18 19 21 GENERAL INFORMATION ...Specifications ...Serial Number Locations...Location of Labels ...Location of Parts ...Meter Instruments ...Tachometer ...Multifunction Meter ...Indicator Lights ...Warning Indicator Light...Keys ...Ignition Switch/Steering Lock ...Right Handlebar Switches...Left Handlebar Switches ...Fuel Tank Cap ...Fuel Tank ...Side Stand ...Seats...
... Gear and Clothing ...Safe Riding Techniques ...Additional Considerations for High Speed Operation ...12 12 12 12 13 14 15 15 16 16 17 17 18 18 18 19 21 GENERAL INFORMATION ...Specifications ...Serial Number Locations...Location of Labels ...Location of Parts ...Meter Instruments ...Tachometer ...Multifunction Meter ...Indicator Lights ...Warning Indicator Light...Keys ...Ignition Switch/Steering Lock ...Right Handlebar Switches...Left Handlebar Switches ...Fuel Tank Cap ...Fuel Tank ...Side Stand ...Seats...

Owners Manual
Page 12
...-In ...Starting the Engine ...Jump Starting ...Moving Off...Shifting Gears ...Braking ...Anti-lock Brake System (ABS) ...Yellow ABS Indicator Light...Stopping the Engine...Stopping the Motorcycle in an Emergency ...Parking ...MAINTENANCE AND ADJUSTMENT Daily Checks ...Periodic Maintenance...Engine Oil ...Coolant...Air Cleaner ...Throttle Control System ...Idle Speed ... 67 68 70 70 71 74 77 77 79 80 82 83 83 84 86 88 91 96 99 102 106 108 Clutch ...Drive Chain ...Brakes ...Brake Light Switches...Suspension System ...Rear Shock Absorber ...Setting Table ...Wheels ...Battery...Headlight ...Fuses...
...-In ...Starting the Engine ...Jump Starting ...Moving Off...Shifting Gears ...Braking ...Anti-lock Brake System (ABS) ...Yellow ABS Indicator Light...Stopping the Engine...Stopping the Motorcycle in an Emergency ...Parking ...MAINTENANCE AND ADJUSTMENT Daily Checks ...Periodic Maintenance...Engine Oil ...Coolant...Air Cleaner ...Throttle Control System ...Idle Speed ... 67 68 70 70 71 74 77 77 79 80 82 83 83 84 86 88 91 96 99 102 106 108 Clutch ...Drive Chain ...Brakes ...Brake Light Switches...Suspension System ...Rear Shock Absorber ...Setting Table ...Wheels ...Battery...Headlight ...Fuses...

Owners Manual
Page 16
... carry passengers unless passenger footpegs are riding. Instruct any lighting components, road clearance, banking capability (i.e., lean angle), control operation, wheel travel, front fork movement, Avoid carrying baggage that impairs the performance of the motorcycle. 2. Make sure that you are installed. Accessories 1. Do not install accessories or carry baggage that extends beyond the rear of the motorcycle. Do not carry a passenger unless he...
... carry passengers unless passenger footpegs are riding. Instruct any lighting components, road clearance, banking capability (i.e., lean angle), control operation, wheel travel, front fork movement, Avoid carrying baggage that impairs the performance of the motorcycle. 2. Make sure that you are installed. Accessories 1. Do not install accessories or carry baggage that extends beyond the rear of the motorcycle. Do not carry a passenger unless he...

Owners Manual
Page 21
... drive chain after wet -weather riding to control vehicle speed and less on the throttle to prevent rust and corrosion. Rely more on the front and rear brakes. Riding at a slow speed and apply the brakes several times to help control vehicle speed by closing the Accelerate and Brake Smoothly throttle so that there is also reduced in Wet Conditions Select Correct Gear Speeds Use Both Front and Rear Brakes Use Engine Brake...
... drive chain after wet -weather riding to control vehicle speed and less on the throttle to prevent rust and corrosion. Rely more on the front and rear brakes. Riding at a slow speed and apply the brakes several times to help control vehicle speed by closing the Accelerate and Brake Smoothly throttle so that there is also reduced in Wet Conditions Select Correct Gear Speeds Use Both Front and Rear Brakes Use Engine Brake...

Owners Manual
Page 23
... line. To avoid overheating, check that all work properly. Check to the proper pressure, and check the wheel balance. Examine their overall condition, inflate them to see that the headlight, tail/brake light, turn signals, horn, etc., all safety related parts are crucial for the high fuel consumption during high speed operation, cannot be overemphasized. Brakes To avoid engine seizure and resulting loss of control, make sure that...
... line. To avoid overheating, check that all work properly. Check to the proper pressure, and check the wheel balance. Examine their overall condition, inflate them to see that the headlight, tail/brake light, turn signals, horn, etc., all safety related parts are crucial for the high fuel consumption during high speed operation, cannot be overemphasized. Brakes To avoid engine seizure and resulting loss of control, make sure that...

Owners Manual
Page 40
Muffler Tail/Brake Light Passenger's Seat Brake Fluid Reservoir (Rear) Rider's Seat Air Cleaner Rear Shock Absorber 8. 9. 10. 11. 12. 13. 14. Fuel Tank Cap Coolant Reserve Tank Brake Discs Brake Calipers Rear Brake Light Switch Rear Brake Pedal Oil Level Inspection Window GENERAL INFORMATION 39 1. 2. 3. 4. 5. 6. 7.
Muffler Tail/Brake Light Passenger's Seat Brake Fluid Reservoir (Rear) Rider's Seat Air Cleaner Rear Shock Absorber 8. 9. 10. 11. 12. 13. 14. Fuel Tank Cap Coolant Reserve Tank Brake Discs Brake Calipers Rear Brake Light Switch Rear Brake Pedal Oil Level Inspection Window GENERAL INFORMATION 39 1. 2. 3. 4. 5. 6. 7.

Owners Manual
Page 47
...continues counting. ○When the battery is operated. Trip Meter A To reset the trip meter, do the followings while the motorcycle is at the stop . The meter counts until it in. Both the hour and minute displays start blinking. Turn the ignition switch on. Push the left button ... hours and minutes, do the followings while the motorcycle is turned off. Push the left button to display the odometer. Push the right button for more than two seconds. Clock • • • ○The data is maintained by the backup power if the ignition switch is at a stop . A.
...continues counting. ○When the battery is operated. Trip Meter A To reset the trip meter, do the followings while the motorcycle is at the stop . The meter counts until it in. Both the hour and minute displays start blinking. Turn the ignition switch on. Push the left button ... hours and minutes, do the followings while the motorcycle is turned off. Push the left button to display the odometer. Push the right button for more than two seconds. Clock • • • ○The data is maintained by the backup power if the ignition switch is at a stop . A.

Owners Manual
Page 48
... and the clock starts working again when the battery is driving the motorcycle for optimum fuel-efficiency, the economical riding indicator appears on NOTE • Push the right button. Pushing and holding the button advances the hour or minute continuously. ○The clock works normally by step..... the left button momentarily advances the hour or minute step by the backup power while the ignition switch is turned off. ○When the battery is disconnected, the clock is reset to 1:00 and starts working . When the operator is connected. Push the left button to advance the...
... and the clock starts working again when the battery is driving the motorcycle for optimum fuel-efficiency, the economical riding indicator appears on NOTE • Push the right button. Pushing and holding the button advances the hour or minute continuously. ○The clock works normally by step..... the left button momentarily advances the hour or minute step by the backup power while the ignition switch is turned off. ○When the battery is disconnected, the clock is reset to 1:00 and starts working . When the operator is connected. Push the left button to advance the...

Owners Manual
Page 50
... in neutral, the neutral indicator light goes on and goes off . Indicator Lights Green Neutral Indicator Light N: When the transmission is in case of the open or short of the segments and fuel symbol will still work normally. Fuel Symbol ( B. If the ABS is displayed, the Segment (E) ) Yellow ABS Indicator Light (Only on ABS model) or : The ABS (Anti-lock Brake System) indicator light goes on when the ignition switch is...
... in neutral, the neutral indicator light goes on and goes off . Indicator Lights Green Neutral Indicator Light N: When the transmission is in case of the open or short of the segments and fuel symbol will still work normally. Fuel Symbol ( B. If the ABS is displayed, the Segment (E) ) Yellow ABS Indicator Light (Only on ABS model) or : The ABS (Anti-lock Brake System) indicator light goes on when the ignition switch is...

Owners Manual
Page 58
... key inserted. Ignition Key C. the key clockwise while pushing • Turn down into the fuel • tank cap. The key can be by turning • counterclockwiseremoved to pass. GENERAL INFORMATION 57 When the passing button is released. sition. The passing light is shut off as soon as the button is pushed, the headlight high beam (passing beam) goes on to signal the driver of the vehicle...
... key inserted. Ignition Key C. the key clockwise while pushing • Turn down into the fuel • tank cap. The key can be by turning • counterclockwiseremoved to pass. GENERAL INFORMATION 57 When the passing button is released. sition. The passing light is shut off as soon as the button is pushed, the headlight high beam (passing beam) goes on to signal the driver of the vehicle...

Owners Manual
Page 60
... certain conditions, creating the potential for serious burns. NOTICE California model only: Never fill the tank so the fuel level rises into the Evaporative Emission Control System resulting in hard starting and engine hesitation and in the tank cap. Fuel Requirement Fuel Type Use clean, fresh unleaded gasoline with a pilot light. GENERAL INFORMATION 59 WARNING Gasoline is an average of 87. Turn the ignition switch off...
... certain conditions, creating the potential for serious burns. NOTICE California model only: Never fill the tank so the fuel level rises into the Evaporative Emission Control System resulting in hard starting and engine hesitation and in the tank cap. Fuel Requirement Fuel Type Use clean, fresh unleaded gasoline with a pilot light. GENERAL INFORMATION 59 WARNING Gasoline is an average of 87. Turn the ignition switch off...

Owners Manual
Page 65
Seat Lock C. A. D. Passenger's Seat Passenger's Seat Installation Install the passanger's seat in rear of the passenger's seat into the hole on the left and right side covers. Ignition Key B. Insert the projection in front of the passenger's seat into the slots of the • Pull passenger's seat to make sure they are securely locked. • Rider's Seat Removal Remove the bolt and collar on the frame. Projection Slots Tabs Insert •...
Seat Lock C. A. D. Passenger's Seat Passenger's Seat Installation Install the passanger's seat in rear of the passenger's seat into the hole on the left and right side covers. Ignition Key B. Insert the projection in front of the passenger's seat into the slots of the • Pull passenger's seat to make sure they are securely locked. • Rider's Seat Removal Remove the bolt and collar on the frame. Projection Slots Tabs Insert •...

Owners Manual
Page 66
GENERAL INFORMATION 65 the left and right side covers to the up and rear. Rider's Seat Installation Install the rider's seat in the reverse order of the rider's seat into the slots on the frame. • Bolt and Collar C. Projections the bolts and collars on the rear of removal. Side Cover (Left Side) B. Insert the tabs on the • Remove rider's seat, and pull off the seat to • Pull the outside for detaching the projections. Pull Up and Rear A. Bolt and Collar (Left Side) B. Rider's Seat C. A.
GENERAL INFORMATION 65 the left and right side covers to the up and rear. Rider's Seat Installation Install the rider's seat in the reverse order of the rider's seat into the slots on the frame. • Bolt and Collar C. Projections the bolts and collars on the rear of removal. Side Cover (Left Side) B. Insert the tabs on the • Remove rider's seat, and pull off the seat to • Pull the outside for detaching the projections. Pull Up and Rear A. Bolt and Collar (Left Side) B. Rider's Seat C. A.
Owners Manual
Page 79
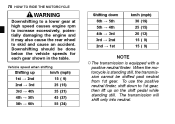
... ( 9) ○The transmission is standing still, the transmission cannot be done below the vehicle speeds for each gear shown in the table. The transmission will shift only into neutral. 78 HOW TO RIDE THE MOTORCYCLE WARNING Downshifting to a lower gear at high speed causes engine rpm to increase excessively, potentially damaging the engine and it may also cause the rear wheel to 1st gear, then lift up 1st...
... ( 9) ○The transmission is standing still, the transmission cannot be done below the vehicle speeds for each gear shown in the table. The transmission will shift only into neutral. 78 HOW TO RIDE THE MOTORCYCLE WARNING Downshifting to a lower gear at high speed causes engine rpm to increase excessively, potentially damaging the engine and it may also cause the rear wheel to 1st gear, then lift up 1st...
Owners Manual
Page 84
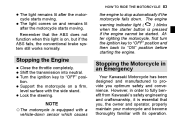
... you optimum safety and convenience. The engine ) blinks warning indicator light ( when the starter button is on a firm, • Support level surface with a vehicle-down . Stopping the Engine the throttle completely. • Close Shift the into neutral. • Turn the transmission ignition key to "ON" position before starting the engine. However, in an Emergency Your Kawasaki Motorcycle has been designed and manufactured to provide you , the owner and...
... you optimum safety and convenience. The engine ) blinks warning indicator light ( when the starter button is on a firm, • Support level surface with a vehicle-down . Stopping the Engine the throttle completely. • Close Shift the into neutral. • Turn the transmission ignition key to "ON" position before starting the engine. However, in an Emergency Your Kawasaki Motorcycle has been designed and manufactured to provide you , the owner and...

Owners Manual
Page 96
MAINTENANCE AND ADJUSTMENT 95 year (*A) Items Brake light switch operation Suspension system Lubrication of rear suspension Steering play Steering stem bearings Electrical system :1 :2 :1 : 1 Odometer Reading (*B) × 1 000 km (× 1 000 mile) See 1 6 12 18 24 Page (0.6) (3.8) (7.6) (11.4) (15.2) 118 - - - - - - ○ Spark plugs Chassis parts Condition of bolts, nuts and fasteners :1 - -
MAINTENANCE AND ADJUSTMENT 95 year (*A) Items Brake light switch operation Suspension system Lubrication of rear suspension Steering play Steering stem bearings Electrical system :1 :2 :1 : 1 Odometer Reading (*B) × 1 000 km (× 1 000 mile) See 1 6 12 18 24 Page (0.6) (3.8) (7.6) (11.4) (15.2) 118 - - - - - - ○ Spark plugs Chassis parts Condition of bolts, nuts and fasteners :1 - -

Owners Manual
Page 119
... to inspect the front the operation of the rear brake • Check light switch by depressing the brake brake light switch. A. The brake light should go on , adjust • If the rear brake light switch. Brake Pedal B. 10 mm (0.4 in.) the light does not come on after the proper pedal travel. pedal. A. Lining Thickness C. Rear Brake Pads B. Service Limit Brake Light Switches Brake Light Switch Inspection the ignition switch on. • Turn brake light should go on when • The the...
... to inspect the front the operation of the rear brake • Check light switch by depressing the brake brake light switch. A. The brake light should go on , adjust • If the rear brake light switch. Brake Pedal B. 10 mm (0.4 in.) the light does not come on after the proper pedal travel. pedal. A. Lining Thickness C. Rear Brake Pads B. Service Limit Brake Light Switches Brake Light Switch Inspection the ignition switch on. • Turn brake light should go on when • The the...

Owners Manual
Page 120
... position A. B. MAINTENANCE AND ADJUSTMENT 119 Brake Pedal Travel NOTICE To avoid damaging the electrical connections inside the switch, be sure that the switch body does not turn during adjustment. 10 mm (0.4 in.) Brake Light Switch Adjustment adjust the rear brake light switch, • To move the switch up or down by turning the adjusting nut. Rear Brake Light Switch Adjusting Nut Lights sooner Lights later the bolts to take off the chain • Remove cover.
... position A. B. MAINTENANCE AND ADJUSTMENT 119 Brake Pedal Travel NOTICE To avoid damaging the electrical connections inside the switch, be sure that the switch body does not turn during adjustment. 10 mm (0.4 in.) Brake Light Switch Adjustment adjust the rear brake light switch, • To move the switch up or down by turning the adjusting nut. Rear Brake Light Switch Adjusting Nut Lights sooner Lights later the bolts to take off the chain • Remove cover.
Owners Manual
Page 137
... around the vehicle, inspect the engine, electrical component and exhaust areas frequently. Allow the engine to seals, • Avoid brake pads, and tires. all other plastic parts as ammonia-based window cleaners. sure the engine and exhaust are • Be cool before washing. 136 MAINTENANCE AND ADJUSTMENT WARNING Build-up of painted and plastic surfaces: wash them off immediately. When operating the vehicle in conditions that allow...
... around the vehicle, inspect the engine, electrical component and exhaust areas frequently. Allow the engine to seals, • Avoid brake pads, and tires. all other plastic parts as ammonia-based window cleaners. sure the engine and exhaust are • Be cool before washing. 136 MAINTENANCE AND ADJUSTMENT WARNING Build-up of painted and plastic surfaces: wash them off immediately. When operating the vehicle in conditions that allow...