
Owners Manual
Page 6
... to do their Kawasaki Motorcycle, a Service Manual is not to attain awareness of Kawasaki's advanced engineering, exhaustive testing, and continuous striving for your motorcycle, give it whenever you will be competent mechanics and possess the special tools described in all times so that you need information. To ensure a long, trouble-free life for superior reliability, safety and performance. Those who...
... to do their Kawasaki Motorcycle, a Service Manual is not to attain awareness of Kawasaki's advanced engineering, exhaustive testing, and continuous striving for your motorcycle, give it whenever you will be competent mechanics and possess the special tools described in all times so that you need information. To ensure a long, trouble-free life for superior reliability, safety and performance. Those who...
Owners Manual
Page 8
... ...GENERAL INFORMATION ...Meter Instruments ...Tachometer ...LCD (Speedometer, Clock, Odometer, Trip Meter A/B, Fuel Gauge) ...Warning/Indicator Lights ...Key ...Ignition Switch/Steering Lock ...Left Handlebar Switches ...Dimmer Switch ...Turn Signal Switch...Horn Button ...Passing Button ...Hazard Switch ...10 14 15 18 21 21 22 Right Handlebar Switches...Engine Stop Switch ...Starter Button ...Brake/Clutch Lever Adjusters...Fuel Tank Cap ...Fuel Tank ...Fuel Requirement ...Stand...Seat...Helmet Hooks...Tool Kit/U-Shaped Lock Compartment ...Rear View Mirror ...Windshield...BREAK-IN ...HOW TO...
... ...GENERAL INFORMATION ...Meter Instruments ...Tachometer ...LCD (Speedometer, Clock, Odometer, Trip Meter A/B, Fuel Gauge) ...Warning/Indicator Lights ...Key ...Ignition Switch/Steering Lock ...Left Handlebar Switches ...Dimmer Switch ...Turn Signal Switch...Horn Button ...Passing Button ...Hazard Switch ...10 14 15 18 21 21 22 Right Handlebar Switches...Engine Stop Switch ...Starter Button ...Brake/Clutch Lever Adjusters...Fuel Tank Cap ...Fuel Tank ...Fuel Requirement ...Stand...Seat...Helmet Hooks...Tool Kit/U-Shaped Lock Compartment ...Rear View Mirror ...Windshield...BREAK-IN ...HOW TO...

Owners Manual
Page 9
... Maintenance Chart...Engine Oil ...Cooling System ...Spark Plugs...Evaporative Emission Control System (California model only) ...Valve Clearance ...Kawasaki Clean Air System ... 64 66 68 69 70 71 73 75 75 78 81 83 88 99 105 112 113 114 115 Air Cleaner ...Throttle Control System ...Engine Vacuum Synchronization ...Idle Speed ...Clutch ...Drive Chain ...Brakes ...Brake Light Switches...Front Fork...Rear Shock Absorber...Wheels ...Battery...Headlight Beam...Fuses ...General Lubrication...Cleaning Your Motorcycle ...Bolt and Nut Tightening...STORAGE ...TROUBLESHOOTING GUIDE...YOUR WARRANTY/OWNER...
... Maintenance Chart...Engine Oil ...Cooling System ...Spark Plugs...Evaporative Emission Control System (California model only) ...Valve Clearance ...Kawasaki Clean Air System ... 64 66 68 69 70 71 73 75 75 78 81 83 88 99 105 112 113 114 115 Air Cleaner ...Throttle Control System ...Engine Vacuum Synchronization ...Idle Speed ...Clutch ...Drive Chain ...Brakes ...Brake Light Switches...Front Fork...Rear Shock Absorber...Wheels ...Battery...Headlight Beam...Fuses ...General Lubrication...Cleaning Your Motorcycle ...Bolt and Nut Tightening...STORAGE ...TROUBLESHOOTING GUIDE...YOUR WARRANTY/OWNER...

Owners Manual
Page 18
Rebound Damping Force Adjuster (Rear Shock Absorber) 4. Coolant Reserve Tank 10. Rear Shock Absorber 6. Fuel Tank 8. Muffler 11. LOCATION OF PARTS 17 1. License Plate Light 2. Brake Fluid Reservoir (Rear) 5. Fuel Tank Cap 9. Rear Brake Light Switch 12. Spring Preload Adjuster (Rear Shock Absorber) 7. Rear Brake Pedal 13. Idle Adjusting Screw Oil Level Inspection Window 14. Tail/Brake Light 3.
Rebound Damping Force Adjuster (Rear Shock Absorber) 4. Coolant Reserve Tank 10. Rear Shock Absorber 6. Fuel Tank 8. Muffler 11. LOCATION OF PARTS 17 1. License Plate Light 2. Brake Fluid Reservoir (Rear) 5. Fuel Tank Cap 9. Rear Brake Light Switch 12. Spring Preload Adjuster (Rear Shock Absorber) 7. Rear Brake Pedal 13. Idle Adjusting Screw Oil Level Inspection Window 14. Tail/Brake Light 3.

Owners Manual
Page 21
... of such accessories on handling or stability, but also due to tow any other aspects of the steering assembly and can result in an unsafe riding condition. 8. Furthermore, any adverse effects on these surfaces while the motorcycle is in operation. Do not install accessories or carry baggage that you have not adversely affected any lighting components, road clearance, banking...
... of such accessories on handling or stability, but also due to tow any other aspects of the steering assembly and can result in an unsafe riding condition. 8. Furthermore, any adverse effects on these surfaces while the motorcycle is in operation. Do not install accessories or carry baggage that you have not adversely affected any lighting components, road clearance, banking...

Owners Manual
Page 27
... connected. Pushing and holding the button advance the hour or minute continuously. ○The clock works normally from the back-up power while the ignition switch is turned off. ○When the battery is disconnected, the clock resets to 1:00 and starts working . The hour • Push display stops blinking and the minute ○Pushing the MODE button...
... connected. Pushing and holding the button advance the hour or minute continuously. ○The clock works normally from the back-up power while the ignition switch is turned off. ○When the battery is disconnected, the clock resets to 1:00 and starts working . The hour • Push display stops blinking and the minute ○Pushing the MODE button...

Owners Manual
Page 29
28 GENERAL INFORMATION ○The data is maintained by the back NOTE -up power if the ignition key is turned off. ○When the trip meter reaches 999.9 (TRIP A) or 9999.9 (TRIP B) while running, the meters reset to 0.0 and continues counting. ○When the battery is disconnected, the meter display resets to 0.0.
28 GENERAL INFORMATION ○The data is maintained by the back NOTE -up power if the ignition key is turned off. ○When the trip meter reaches 999.9 (TRIP A) or 9999.9 (TRIP B) while running, the meters reset to 0.0 and continues counting. ○When the battery is disconnected, the meter display resets to 0.0.

Owners Manual
Page 35
... from the switch when it is released after turning the ignition key to "ON". Steering locked. Engine off . Ignition Switch/Steering Lock B. P (Park) Position ○The city, tail and license plate lights are on and turn signals can be used . To avoid battery discharge, always start the engine immediately after starting the engine. All electrical circuits off . One headlight goes on . NOTE All other electrical circuits cut off . The key can be used . Ignition Switch/Steering Lock OFF ON LOCK Engine off .
... from the switch when it is released after turning the ignition key to "ON". Steering locked. Engine off . Ignition Switch/Steering Lock B. P (Park) Position ○The city, tail and license plate lights are on and turn signals can be used . To avoid battery discharge, always start the engine immediately after starting the engine. All electrical circuits off . One headlight goes on . NOTE All other electrical circuits cut off . The key can be used . Ignition Switch/Steering Lock OFF ON LOCK Engine off .
Owners Manual
Page 39
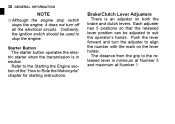
...hands. Brake/Clutch Lever Adjusters Push the lever forward and turn off all the electrical circuits. Ordinarily, the ignition switch should be adjusted to the released lever is an adjuster on the lever holder. Refer to the Starting the Engine section...brake and clutch levers. Each adjuster has 5 positions so that the released lever position can be used to stop switch stops the engine, it does not turn the adjuster to Ride the Motorcycle" chapter for starting instructions. Starter Button The starter button operates the electric starter when the transmission is in neutral...
...hands. Brake/Clutch Lever Adjusters Push the lever forward and turn off all the electrical circuits. Ordinarily, the ignition switch should be adjusted to the released lever is an adjuster on the lever holder. Refer to the Starting the Engine section...brake and clutch levers. Each adjuster has 5 positions so that the released lever position can be used to stop switch stops the engine, it does not turn the adjuster to Ride the Motorcycle" chapter for starting instructions. Starter Button The starter button operates the electric starter when the transmission is in neutral...

Owners Manual
Page 41
40 GENERAL INFORMATION To open the fuel tank cap, pull up the key hole cover. To close the cap, or the cap cannot be removed by turning it down into the fuel tank cap and turn the key to the original position. Key Hole Cover B. Ignition Key C. Insert the ignition key into place with the key inserted. Close the key hole cover. A. The key can be locked. Fuel Tank Cap Fuel Tank Cap ○The fuel tank cap cannot be closed NOTE without the...
40 GENERAL INFORMATION To open the fuel tank cap, pull up the key hole cover. To close the cap, or the cap cannot be removed by turning it down into the fuel tank cap and turn the key to the original position. Key Hole Cover B. Ignition Key C. Insert the ignition key into place with the key inserted. Close the key hole cover. A. The key can be locked. Fuel Tank Cap Fuel Tank Cap ○The fuel tank cap cannot be closed NOTE without the...
Owners Manual
Page 65
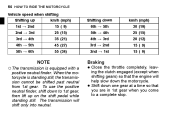
...gear, then lift up 1st → 2nd 2nd → 3rd 3rd → 4th 4th → 5th 5th → 6th km/h (mph) 15 ( 9) 25 (15) 35 (21) 45 (27) 55 (34) Shifting down the motorcycle. To use the positive neutral finder, shift down one gear at a time so that the engine will shift only into neutral. The transmission...20 (12) 15 ( 9) 15 ( 9) ○The transmission is standing still, the transmission cannot be shifted past neutral from 1st gear. Shift down to a complete stop. 64 HOW TO RIDE THE MOTORCYCLE Vehicle speed when shifting Shifting up on the shift pedal while standing still.
...gear, then lift up 1st → 2nd 2nd → 3rd 3rd → 4th 4th → 5th 5th → 6th km/h (mph) 15 ( 9) 25 (15) 35 (21) 45 (27) 55 (34) Shifting down the motorcycle. To use the positive neutral finder, shift down one gear at a time so that the engine will shift only into neutral. The transmission...20 (12) 15 ( 9) 15 ( 9) ○The transmission is standing still, the transmission cannot be shifted past neutral from 1st gear. Shift down to a complete stop. 64 HOW TO RIDE THE MOTORCYCLE Vehicle speed when shifting Shifting up on the shift pedal while standing still.
Owners Manual
Page 70
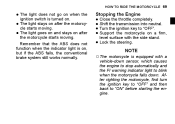
... blink when the motorcycle falls down. Stopping the Engine the throttle completely. • Close Shift the into neutral. • Turn the transmission key to "OFF". • Support ignition the motorcycle on a firm, • level surface with a vehicle-down sensor, which causes the engine to stop automatically and the FI warning indicator light to "ON" before starting the engine. Lock the steering. • ○The motorcycle is equipped with...
... blink when the motorcycle falls down. Stopping the Engine the throttle completely. • Close Shift the into neutral. • Turn the transmission key to "OFF". • Support ignition the motorcycle on a firm, • level surface with a vehicle-down sensor, which causes the engine to stop automatically and the FI warning indicator light to "ON" before starting the engine. Lock the steering. • ○The motorcycle is equipped with...

Owners Manual
Page 80
... the air valve cap. Steering ...Action smooth but not loose from lock to lock. Throttle ...Throttle grip play 2 ∼ 3 mm (0.08 ∼ 0.12 in .). Electrical Equipment ...All lights (Headlight, City Light, Tail/Brake Lights, Turn Signal Lights, License Plate Light, Warning/Indicator Lights) and horn work. Coolant level between level lines (when engine is cold). Nuts, Bolts, Fasteners Check that steering and suspension components, axles, and all controls are properly tightened or fastened. No brake fluid leakage. Coolant ...No coolant leakage. Brakes ...Brake pad wear...
... the air valve cap. Steering ...Action smooth but not loose from lock to lock. Throttle ...Throttle grip play 2 ∼ 3 mm (0.08 ∼ 0.12 in .). Electrical Equipment ...All lights (Headlight, City Light, Tail/Brake Lights, Turn Signal Lights, License Plate Light, Warning/Indicator Lights) and horn work. Coolant level between level lines (when engine is cold). Nuts, Bolts, Fasteners Check that steering and suspension components, axles, and all controls are properly tightened or fastened. No brake fluid leakage. Coolant ...No coolant leakage. Brakes ...Brake pad wear...

Owners Manual
Page 82
... level line. Fuel: Have sufficient fuel for the high fuel consumption during high speed operation, cannot be overemphasized. Engine Oil: To avoid engine seizure and resulting loss of control. Electrical Equipment: Make sure that the oil level is hard on tires, and good tires are in the steering can cause loss of control, make sure that the headlight, tail/brake light, turn signal lights, license plate light, horn, etc., all safety related parts are...
... level line. Fuel: Have sufficient fuel for the high fuel consumption during high speed operation, cannot be overemphasized. Engine Oil: To avoid engine seizure and resulting loss of control. Electrical Equipment: Make sure that the oil level is hard on tires, and good tires are in the steering can cause loss of control, make sure that the headlight, tail/brake light, turn signal lights, license plate light, horn, etc., all safety related parts are...

Owners Manual
Page 95
inspect Suspensions: Front forks/rear shock absorber operation (damping and smooth stroke) inspect *Odometer Reading km × 1 000 (mile × 1 000) 1 6 12 18 24 30 36 (0.6) (3.75) (7.5) (11.25) (15) (18.75) (22.5) See Page Every year • • • • • • • • • • • • • • • • • 135 136 138, 141 94 MAINTENANCE AND ADJUSTMENT Frequency Whichever comes first Operation (Chassis Items) Brake operation (effectiveness, play, drag) inspect Brake light switch operation -
inspect Suspensions: Front forks/rear shock absorber operation (damping and smooth stroke) inspect *Odometer Reading km × 1 000 (mile × 1 000) 1 6 12 18 24 30 36 (0.6) (3.75) (7.5) (11.25) (15) (18.75) (22.5) See Page Every year • • • • • • • • • • • • • • • • • 135 136 138, 141 94 MAINTENANCE AND ADJUSTMENT Frequency Whichever comes first Operation (Chassis Items) Brake operation (effectiveness, play, drag) inspect Brake light switch operation -
Owners Manual
Page 100
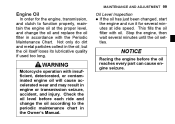
... can cause engine seizure. Engine Oil Oil Level Inspection If the oil has just been changed, start the engine and run it for the engine, transmission, and clutch to the periodic maintenance chart in engine or transmission seizure, accident, and injury. WARNING Motorcycle operation with insufficient, deteriorated, or contaminated engine oil will cause accelerated wear and may result in the Owner's Manual. This fills the oil filter with the Periodic Maintenance Chart. Not...
... can cause engine seizure. Engine Oil Oil Level Inspection If the oil has just been changed, start the engine and run it for the engine, transmission, and clutch to the periodic maintenance chart in engine or transmission seizure, accident, and injury. WARNING Motorcycle operation with insufficient, deteriorated, or contaminated engine oil will cause accelerated wear and may result in the Owner's Manual. This fills the oil filter with the Periodic Maintenance Chart. Not...

Owners Manual
Page 131
... rear wheel to inspect the • Rotate drive chain for damaged rollers, and inspect the sprockets for il- Good Teeth B. Damaged Teeth there is an endless type and should not be cut for wear limits. placed by an authorized Kawasaki dealer. 130 MAINTENANCE AND ADJUSTMENT WARNING For safety, use only the standard chain. Worn Teeth C. have the • If drive chain...
... rear wheel to inspect the • Rotate drive chain for damaged rollers, and inspect the sprockets for il- Good Teeth B. Damaged Teeth there is an endless type and should not be cut for wear limits. placed by an authorized Kawasaki dealer. 130 MAINTENANCE AND ADJUSTMENT WARNING For safety, use only the standard chain. Worn Teeth C. have the • If drive chain...

Owners Manual
Page 137
... not, adjust the rear brake • If light switch. The brake light should go on after the proper pedal travel. • • • A. Inspection Turn the ignition key to inspect the front brake light switch. Brake Pedal B. 10 mm (0.39 in accordance with the Periodic Maintenance Chart. Brake Light Switches the operation of the rear brake • Check light switch by depressing the brake pedal. The brake light should go on . Brake Pedal Travel 10...
... not, adjust the rear brake • If light switch. The brake light should go on after the proper pedal travel. • • • A. Inspection Turn the ignition key to inspect the front brake light switch. Brake Pedal B. 10 mm (0.39 in accordance with the Periodic Maintenance Chart. Brake Light Switches the operation of the rear brake • Check light switch by depressing the brake pedal. The brake light should go on . Brake Pedal Travel 10...

Owners Manual
Page 138
Rear Brake Light Switch Adjusting Nut Lights sooner Lights later • Connect the connector. C. A. D. B. Connector A. MAINTENANCE AND ADJUSTMENT 137 Adjustment Disconnect the connector. • adjust the rear brake light switch, • To move the switch up or down by turning the switch body.
Rear Brake Light Switch Adjusting Nut Lights sooner Lights later • Connect the connector. C. A. D. B. Connector A. MAINTENANCE AND ADJUSTMENT 137 Adjustment Disconnect the connector. • adjust the rear brake light switch, • To move the switch up or down by turning the switch body.
Owners Manual
Page 163
... collected, park the vehicle outside and stop the engine. Allow the engine to seals, • Avoid brake pads, and tires. sure the engine and exhaust are • Be cool before washing. Gasoline, brake fluid, and coolant will damage the finish of painted and plastic surfaces: wash them off immediately. Use care when washing the windshield, headlight lens, and other abrasive pads or brushes. water can cause mechanical problems and...
... collected, park the vehicle outside and stop the engine. Allow the engine to seals, • Avoid brake pads, and tires. sure the engine and exhaust are • Be cool before washing. Gasoline, brake fluid, and coolant will damage the finish of painted and plastic surfaces: wash them off immediately. Use care when washing the windshield, headlight lens, and other abrasive pads or brushes. water can cause mechanical problems and...