

Owners Manual
Page 11
... Gear and Clothing ...Safe Riding Techniques ...Additional Considerations for High Speed Operation ...12 12 12 12 13 14 15 15 16 16 17 17 18 18 18 19 21 GENERAL INFORMATION ...Specifications ...Serial Number Locations...Location of Labels ...Location of Parts ...Meter Instruments ...Tachometer ...Multifunction Meter ...Indicator Lights ...Warning Indicator Light...Keys ...Ignition Switch/Steering Lock ...Right Handlebar Switches...Left Handlebar Switches ...Fuel Tank Cap ...Fuel Tank ...Side Stand ...Seats...
... Gear and Clothing ...Safe Riding Techniques ...Additional Considerations for High Speed Operation ...12 12 12 12 13 14 15 15 16 16 17 17 18 18 18 19 21 GENERAL INFORMATION ...Specifications ...Serial Number Locations...Location of Labels ...Location of Parts ...Meter Instruments ...Tachometer ...Multifunction Meter ...Indicator Lights ...Warning Indicator Light...Keys ...Ignition Switch/Steering Lock ...Right Handlebar Switches...Left Handlebar Switches ...Fuel Tank Cap ...Fuel Tank ...Side Stand ...Seats...

Owners Manual
Page 12
...-In ...Starting the Engine ...Jump Starting ...Moving Off...Shifting Gears ...Braking ...Anti-lock Brake System (ABS) ...Yellow ABS Indicator Light...Stopping the Engine...Stopping the Motorcycle in an Emergency ...Parking ...MAINTENANCE AND ADJUSTMENT Daily Checks ...Periodic Maintenance...Engine Oil ...Coolant...Air Cleaner ...Throttle Control System ...Idle Speed ... 65 65 67 67 68 71 74 74 76 77 79 80 80 81 83 85 88 93 96 99 103 105 Clutch ...Drive Chain ...Brakes ...Brake Light Switches...Suspension System ...Rear Shock Absorber ...Setting Table ...Wheels ...Battery...Headlight ...Fuses...
...-In ...Starting the Engine ...Jump Starting ...Moving Off...Shifting Gears ...Braking ...Anti-lock Brake System (ABS) ...Yellow ABS Indicator Light...Stopping the Engine...Stopping the Motorcycle in an Emergency ...Parking ...MAINTENANCE AND ADJUSTMENT Daily Checks ...Periodic Maintenance...Engine Oil ...Coolant...Air Cleaner ...Throttle Control System ...Idle Speed ... 65 65 67 67 68 71 74 74 76 77 79 80 80 81 83 85 88 93 96 99 103 105 Clutch ...Drive Chain ...Brakes ...Brake Light Switches...Suspension System ...Rear Shock Absorber ...Setting Table ...Wheels ...Battery...Headlight ...Fuses...

Owners Manual
Page 16
.... Do not install accessories or carry baggage that you are installed. Instruct any lighting components, road clearance, banking capability (i.e., lean angle), control operation, wheel travel, front fork movement, SAFETY INFORMATION 15 4. Make sure that impairs the performance of the motorcycle. 2. Recheck baggage security as often as possible (not while the motorcycle is in weight distribution and aerodynamic forces...
.... Do not install accessories or carry baggage that you are installed. Instruct any lighting components, road clearance, banking capability (i.e., lean angle), control operation, wheel travel, front fork movement, SAFETY INFORMATION 15 4. Make sure that impairs the performance of the motorcycle. 2. Recheck baggage security as often as possible (not while the motorcycle is in weight distribution and aerodynamic forces...
Owners Manual
Page 19
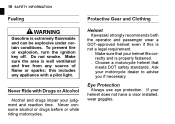
... prevent fire or explosion, turn the ignition key off. Ask your judgment and reaction time. Always use eye protection. Never consume alcohol or drugs before or while riding motorcycles. Do not smoke. Make sure that meets DOT safety standards. Helmet Eye Protection Never Ride with a pilot light. this is extremely flammable and can be explosive under certain conditions...
... prevent fire or explosion, turn the ignition key off. Ask your judgment and reaction time. Always use eye protection. Never consume alcohol or drugs before or while riding motorcycles. Do not smoke. Make sure that meets DOT safety standards. Helmet Eye Protection Never Ride with a pilot light. this is extremely flammable and can be explosive under certain conditions...

Owners Manual
Page 21
... brakes several times to help control vehicle speed by closing the Accelerate and Brake Smoothly throttle so that there is also reduced in Wet Conditions Select Correct Gear Speeds Use Both Front and Rear Brakes Use Engine Brake Ride Prudently When going up steep slopes, shift to a lower gear so that the engine can act as sudden acceleration, braking or turning may cause the motorcycle to skid and lose control. Braking performance is power...
... brakes several times to help control vehicle speed by closing the Accelerate and Brake Smoothly throttle so that there is also reduced in Wet Conditions Select Correct Gear Speeds Use Both Front and Rear Brakes Use Engine Brake Ride Prudently When going up steep slopes, shift to a lower gear so that the engine can act as sudden acceleration, braking or turning may cause the motorcycle to skid and lose control. Braking performance is power...

Owners Manual
Page 23
... control, make sure that they are correctly adjusted and functioning properly. Engine Oil Coolant Steering Electrical Equipment Tires Miscellaneous Fuel 22 SAFETY INFORMATION The importance of the brakes, especially during high speed operation. Looseness in good condition. Check to see that the oil level is at the upper level line. Make sure that all nuts and bolts are tight and that the headlight, tail/brake light, turn signals, horn, etc., all safety...
... control, make sure that they are correctly adjusted and functioning properly. Engine Oil Coolant Steering Electrical Equipment Tires Miscellaneous Fuel 22 SAFETY INFORMATION The importance of the brakes, especially during high speed operation. Looseness in good condition. Check to see that the oil level is at the upper level line. Make sure that all nuts and bolts are tight and that the headlight, tail/brake light, turn signals, horn, etc., all safety...

Owners Manual
Page 39
Muffler Tail/Brake Light Passenger's Seat Brake Fluid Reservoir (Rear) Rider's Seat Air Cleaner Rear Shock Absorber 8. 9. 10. 11. 12. 13. 14. Fuel Tank Cap Coolant Reserve Tank Brake Discs Brake Calipers Rear Brake Light Switch Rear Brake Pedal Oil Level Inspection Window 38 GENERAL INFORMATION 1. 2. 3. 4. 5. 6. 7.
Muffler Tail/Brake Light Passenger's Seat Brake Fluid Reservoir (Rear) Rider's Seat Air Cleaner Rear Shock Absorber 8. 9. 10. 11. 12. 13. 14. Fuel Tank Cap Coolant Reserve Tank Brake Discs Brake Calipers Rear Brake Light Switch Rear Brake Pedal Oil Level Inspection Window 38 GENERAL INFORMATION 1. 2. 3. 4. 5. 6. 7.

Owners Manual
Page 45
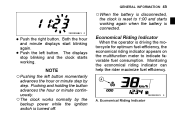
...; Push two seconds. Both the hour and minute displays start blinking. ○The data is maintained by the backup NOTE power if the ignition switch is turned off. ○When the trip meter reaches 9999.9 while running, the meters reset to 0.0 and continues counting. ○When the battery is disconnected, the meter display resets to display the... the left button to advance the minutes. 44 GENERAL INFORMATION the right button and hold it is reset. Push the left button to 0.0, and then starts counting when the vehicle is operated.
...; Push two seconds. Both the hour and minute displays start blinking. ○The data is maintained by the backup NOTE power if the ignition switch is turned off. ○When the trip meter reaches 9999.9 while running, the meters reset to 0.0 and continues counting. ○When the battery is disconnected, the meter display resets to display the... the left button to advance the minutes. 44 GENERAL INFORMATION the right button and hold it is reset. Push the left button to 0.0, and then starts counting when the vehicle is operated.
Owners Manual
Page 46
... the clock starts working again when the battery is connected. A. Both the hour • Push and minute displays start blinking • again. Economical Riding Indicator advances the hour or minute step by the backup power while the ignition switch is turned off. the... right button. Economical Riding Indicator GENERAL INFORMATION 45 ○When the battery is disconnected, the clock is reset to indicate favorable fuel...
... the clock starts working again when the battery is connected. A. Both the hour • Push and minute displays start blinking • again. Economical Riding Indicator advances the hour or minute step by the backup power while the ignition switch is turned off. the... right button. Economical Riding Indicator GENERAL INFORMATION 45 ○When the battery is disconnected, the clock is reset to indicate favorable fuel...
Owners Manual
Page 48
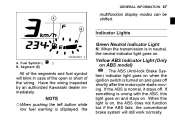
Segment (E) ) Yellow ABS Indicator Light (Only on ABS model) : The ABS (Anti-lock Brake System) indicator light goes on when the ignition switch is on . All of the wiring. Have the wiring inspected by an authorized Kawasaki dealer immediately. ○When NOTE pushing the left button while low fuel warning is normal, it stays off shortly after the motorcycle starts moving. Fuel Symbol ( B. When this light goes on and...
Segment (E) ) Yellow ABS Indicator Light (Only on ABS model) : The ABS (Anti-lock Brake System) indicator light goes on when the ignition switch is on . All of the wiring. Have the wiring inspected by an authorized Kawasaki dealer immediately. ○When NOTE pushing the left button while low fuel warning is normal, it stays off shortly after the motorcycle starts moving. Fuel Symbol ( B. When this light goes on and...

Owners Manual
Page 62
...; Insert the tabs in gear and the side stand is down. Insert the projection in the reverse order of the bracket. This switch is designed so that the engine does not start if the transmission is equipped with a side stand switch. Seat Lock C. Pull up the front of seat, and remove the passenger's seat by inserting the ignition key into the slots of...
...; Insert the tabs in gear and the side stand is down. Insert the projection in the reverse order of the bracket. This switch is designed so that the engine does not start if the transmission is equipped with a side stand switch. Seat Lock C. Pull up the front of seat, and remove the passenger's seat by inserting the ignition key into the slots of...

Owners Manual
Page 64
Bolt and Collar (Left Side) B. Rider's Seat C. C. Rider's Seat Tabs Slots Insert • the collars and tighten the • Install bolts. Pull Up and Rear Rider's Seat Installation Install the rider's seat in the reverse order of the rider's seat into the slots on the frame. GENERAL INFORMATION 63 A. the left and right side covers, • Install collars and tighten the bolts. D. Insert the tabs on the rear of removal. B. A.
Bolt and Collar (Left Side) B. Rider's Seat C. C. Rider's Seat Tabs Slots Insert • the collars and tighten the • Install bolts. Pull Up and Rear Rider's Seat Installation Install the rider's seat in the reverse order of the rider's seat into the slots on the frame. GENERAL INFORMATION 63 A. the left and right side covers, • Install collars and tighten the bolts. D. Insert the tabs on the rear of removal. B. A.

Owners Manual
Page 66
... with many other vehicle manufacturers, Kawasaki has equipped this motorcycle with understanding of this manual. The purpose of how a vehicle's systems were performing during a short period GENERAL INFORMATION 65 A. Tool Kit Tool Kit Compartment The tool kit compartment is to record data, only in accident situation, that can be helpful in making roadside repairs, adjustments, and some maintenance procedures explained...
... with many other vehicle manufacturers, Kawasaki has equipped this motorcycle with understanding of this manual. The purpose of how a vehicle's systems were performing during a short period GENERAL INFORMATION 65 A. Tool Kit Tool Kit Compartment The tool kit compartment is to record data, only in accident situation, that can be helpful in making roadside repairs, adjustments, and some maintenance procedures explained...

Owners Manual
Page 76
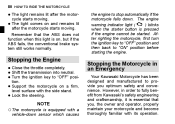
... standing still. The transmission will shift only into neutral. Downshifting should be shifted past neutral from 1st gear. Vehicle speed when shifting Shifting down to skid and cause an accident. HOW TO RIDE THE MOTORCYCLE 75 WARNING Downshifting to a lower gear at high speed causes engine rpm to increase excessively, potentially damaging the engine and it may also cause the rear wheel to 1st gear, then lift up 1st →...
... standing still. The transmission will shift only into neutral. Downshifting should be shifted past neutral from 1st gear. Vehicle speed when shifting Shifting down to skid and cause an accident. HOW TO RIDE THE MOTORCYCLE 75 WARNING Downshifting to a lower gear at high speed causes engine rpm to increase excessively, potentially damaging the engine and it may also cause the rear wheel to 1st gear, then lift up 1st →...
Owners Manual
Page 81
... motor• The cycle starts moving . the engine to stop automatically if the motorcycle falls down sensor which causes The engine ) blinks warning indicator light ( when the starter button is equipped with the side stand. • Lock the steering. After righting the motorcycle, first turn the ignition key to "OFF" position and then back to "OFF" posi• tion. However, in an Emergency Your Kawasaki...
... motor• The cycle starts moving . the engine to stop automatically if the motorcycle falls down sensor which causes The engine ) blinks warning indicator light ( when the starter button is equipped with the side stand. • Lock the steering. After righting the motorcycle, first turn the ignition key to "OFF" position and then back to "OFF" posi• tion. However, in an Emergency Your Kawasaki...

Owners Manual
Page 92
MAINTENANCE AND ADJUSTMENT 91 year (*A) Items Drive chain slack (*C) Drive chain wear (*C) Drive chain guide wear Brake system Brake fluid level Brake fluid (front and rear) Brake hose/rubber parts of brake master cylinder and caliper Brake pad wear (*C) Brake light switch operation :1 :0.5 :2 :4 Odometer Reading (*B) × 1 000 km (× 1 000 mile) See 1 6 12 18 24 Page (0.6) (3.8) (7.6) (11.4) (15.2) : every 1 000 km (600 mile) 108 - - - 112 - : every 48 000 km (30 000 mile) - 113 115
MAINTENANCE AND ADJUSTMENT 91 year (*A) Items Drive chain slack (*C) Drive chain wear (*C) Drive chain guide wear Brake system Brake fluid level Brake fluid (front and rear) Brake hose/rubber parts of brake master cylinder and caliper Brake pad wear (*C) Brake light switch operation :1 :0.5 :2 :4 Odometer Reading (*B) × 1 000 km (× 1 000 mile) See 1 6 12 18 24 Page (0.6) (3.8) (7.6) (11.4) (15.2) : every 1 000 km (600 mile) 108 - - - 112 - : every 48 000 km (30 000 mile) - 113 115

Owners Manual
Page 95
Contact your local authorities for approved disposal methods or possible recycling. 94 MAINTENANCE AND ADJUSTMENT Oil and/or Oil Filter Change oil change and oil filter replace• The ment should be done by an authorized Kawasaki dealer. Engine Oil Drain Bolt Tightening Torque Engine Oil Drain Bolt: 19.6 N·m (2.00 kgf·m, 14.5 ft·lb) WARNING Engine oil is a toxic substance. A. Dispose of used oil properly.
Contact your local authorities for approved disposal methods or possible recycling. 94 MAINTENANCE AND ADJUSTMENT Oil and/or Oil Filter Change oil change and oil filter replace• The ment should be done by an authorized Kawasaki dealer. Engine Oil Drain Bolt Tightening Torque Engine Oil Drain Bolt: 19.6 N·m (2.00 kgf·m, 14.5 ft·lb) WARNING Engine oil is a toxic substance. A. Dispose of used oil properly.

Owners Manual
Page 116
... Brake Light Switches Brake Light Switch Inspection the ignition switch on. • Turn brake light should go on when • The the front brake is applied. A. Lining Thickness C. brake light switch. Brake Pedal B. 10 mm (0.4 in.) the light does not come on after the proper pedal travel. Rear Brake Pads B. MAINTENANCE AND ADJUSTMENT 115 it does not, ask your authorized • If Kawasaki dealer to inspect the front the operation of the rear brake...
... Brake Light Switches Brake Light Switch Inspection the ignition switch on. • Turn brake light should go on when • The the front brake is applied. A. Lining Thickness C. brake light switch. Brake Pedal B. 10 mm (0.4 in.) the light does not come on after the proper pedal travel. Rear Brake Pads B. MAINTENANCE AND ADJUSTMENT 115 it does not, ask your authorized • If Kawasaki dealer to inspect the front the operation of the rear brake...

Owners Manual
Page 117
... avoid damaging the electrical connections inside the switch, be sure that the switch body does not turn during adjustment. 10 mm (0.4 in.) Brake Light Switch Adjustment adjust the rear brake light switch, • To move the switch up or down by turning the adjusting nut. C. Standard 2nd position A. Rear Brake Light Switch Adjusting Nut Lights sooner Lights later the bolts to take off the chain • Remove cover. Suspension System Rear Shock Absorber Spring Preload Adjustment The...
... avoid damaging the electrical connections inside the switch, be sure that the switch body does not turn during adjustment. 10 mm (0.4 in.) Brake Light Switch Adjustment adjust the rear brake light switch, • To move the switch up or down by turning the adjusting nut. C. Standard 2nd position A. Rear Brake Light Switch Adjusting Nut Lights sooner Lights later the bolts to take off the chain • Remove cover. Suspension System Rear Shock Absorber Spring Preload Adjustment The...
Owners Manual
Page 134
... pressure washers; all other plastic parts as ammonia-based window cleaners. Gasoline, brake fluid, and coolant will damage the finish of painted and plastic surfaces: wash them off immediately. sure the engine and exhaust are • Be cool before washing. MAINTENANCE AND ADJUSTMENT 133 WARNING Build-up of debris or flammable materials. Use care when washing the windshield, headlight lens, and other abrasive pads...
... pressure washers; all other plastic parts as ammonia-based window cleaners. Gasoline, brake fluid, and coolant will damage the finish of painted and plastic surfaces: wash them off immediately. sure the engine and exhaust are • Be cool before washing. MAINTENANCE AND ADJUSTMENT 133 WARNING Build-up of debris or flammable materials. Use care when washing the windshield, headlight lens, and other abrasive pads...
