

Owners Manual
Page 8
... ADJUSTMENT...Periodic Maintenance Chart ...Engine Oil...Cooling System ...Spark Plug ...Air Cleaner ...Throttle Cable...Throttle Body Assy ...Clutch ...Valve Clearance ...8 11 11 16 19 20 21 23 23 25 26 27 28 28 29 30 32 33 33 38 43 47 54 60 61 71 81 Exhaust System ...Drive Chain...Adjustable Ergonomics...Footpeg ...Brakes ...Steering ...Front Suspension ...Rear Suspension (UNI-TRAK®)...Wheels ...Hoses Inspection ...Tightening Torques of Nuts and Bolts...Cleaning Your...
... ADJUSTMENT...Periodic Maintenance Chart ...Engine Oil...Cooling System ...Spark Plug ...Air Cleaner ...Throttle Cable...Throttle Body Assy ...Clutch ...Valve Clearance ...8 11 11 16 19 20 21 23 23 25 26 27 28 28 29 30 32 33 33 38 43 47 54 60 61 71 81 Exhaust System ...Drive Chain...Adjustable Ergonomics...Footpeg ...Brakes ...Steering ...Front Suspension ...Rear Suspension (UNI-TRAK®)...Wheels ...Hoses Inspection ...Tightening Torques of Nuts and Bolts...Cleaning Your...

Owners Manual
Page 30
... for about 20 minutes within 3/4 throttle opening . 3. Change the engine oil, oil filter and front fork/rear shock absorber oil to obtain the proper operating clearances in procedure as follows. 1. Be sure to fully check the tightness of nuts and bolts, oil leakage, coolant leakage and any following parts have been replaced, the same break-in the engine and transmission, which are necessary for about...
... for about 20 minutes within 3/4 throttle opening . 3. Change the engine oil, oil filter and front fork/rear shock absorber oil to obtain the proper operating clearances in procedure as follows. 1. Be sure to fully check the tightness of nuts and bolts, oil leakage, coolant leakage and any following parts have been replaced, the same break-in the engine and transmission, which are necessary for about...

Owners Manual
Page 31
.... DO NOT run the engine in a well-ventilated area. Engine Engine Oil ...No leakage Level correct Coolant ...No leakage Level correct (engine cold) Radiator Cap ...Properly installed Spark Plug ...Correctly torqued Cylinder Head Cover ...Correctly torqued Clutch ...Functions properly Air Cleaner ...Clean Apply oil to a safe operating condition. 30 GENERAL INFORMATION j Daily Pre-Ride Checks Check the following items each day before operation. WARNING Failure to perform these checks will...
.... DO NOT run the engine in a well-ventilated area. Engine Engine Oil ...No leakage Level correct Coolant ...No leakage Level correct (engine cold) Radiator Cap ...Properly installed Spark Plug ...Correctly torqued Cylinder Head Cover ...Correctly torqued Clutch ...Functions properly Air Cleaner ...Clean Apply oil to a safe operating condition. 30 GENERAL INFORMATION j Daily Pre-Ride Checks Check the following items each day before operation. WARNING Failure to perform these checks will...
Owners Manual
Page 39
... used too long. 38 MAINTENANCE AND ADJUSTMENT Engine Oil In order for the engine, transmission and clutch to settle. Check the engine oil level with insufficient, deteriorated, or contaminated engine oil will fluctuate depending on the lower right side of the engine. Because of the engine oil level, follow the Oil Level Inspection procedures closely. • • gine speed. Do not run it for several minutes for...
... used too long. 38 MAINTENANCE AND ADJUSTMENT Engine Oil In order for the engine, transmission and clutch to settle. Check the engine oil level with insufficient, deteriorated, or contaminated engine oil will fluctuate depending on the lower right side of the engine. Because of the engine oil level, follow the Oil Level Inspection procedures closely. • • gine speed. Do not run it for several minutes for...

Owners Manual
Page 42
... tighten its bolts to extend the life of your vehicle. Oil Filter Element B. MAINTENANCE AND ADJUSTMENT 41 the oil filter cap with good • Fill quality engine oil specified in the table. Recommended Engine Oil Castrol "Power1 Racing 4T" 5W-40 or "Kawasaki Performance 4-Stroke Full Synthetic Oil*" 10W-40 or "Kawasaki Performance 4-Stroke Semi-Synthetic Oil*" 10W-40 or "Kawasaki Performance 4-Stroke Motorcycle Oil*" 10W-40 *Kawasaki Performance Oils and Lubricants have been specifically engineered for...
... tighten its bolts to extend the life of your vehicle. Oil Filter Element B. MAINTENANCE AND ADJUSTMENT 41 the oil filter cap with good • Fill quality engine oil specified in the table. Recommended Engine Oil Castrol "Power1 Racing 4T" 5W-40 or "Kawasaki Performance 4-Stroke Full Synthetic Oil*" 10W-40 or "Kawasaki Performance 4-Stroke Semi-Synthetic Oil*" 10W-40 or "Kawasaki Performance 4-Stroke Motorcycle Oil*" 10W-40 *Kawasaki Performance Oils and Lubricants have been specifically engineered for...
Owners Manual
Page 62
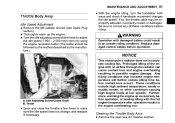
... seat (see Spark Plug • Remove section). A. Furthermore, warming the engine up the engine. • Thoroughly the idle adjusting screw/choke knob to make • Open sure the idle speed does not change, and readjust if necessary. MAINTENANCE AND ADJUSTMENT 61 Throttle Body Assy Idle Speed Adjustment the left radiator shroud (see Air Cleaner section). Replace damaged control cables before coolant loss occurs. NOTICE This motorcycle's radiator does not incorporate cooling fan...
... seat (see Spark Plug • Remove section). A. Furthermore, warming the engine up the engine. • Thoroughly the idle adjusting screw/choke knob to make • Open sure the idle speed does not change, and readjust if necessary. MAINTENANCE AND ADJUSTMENT 61 Throttle Body Assy Idle Speed Adjustment the left radiator shroud (see Air Cleaner section). Replace damaged control cables before coolant loss occurs. NOTICE This motorcycle's radiator does not incorporate cooling fan...

Owners Manual
Page 80
... the release shaft lever lightly forward. B. C. the clutch spring bolts to the contact • Apply area of the push rod holder, both surface of the Tightening Torque Clutch Spring Bolts: 8.8 N·m (0.90 kgf·m, 78 in .) B. Install the push rod, push rod holder, needle bearing and adjusting washer. Release Shaft Lever Push forward Position Distance Cable Bracket the clutch pressure plate and springs...
... the release shaft lever lightly forward. B. C. the clutch spring bolts to the contact • Apply area of the push rod holder, both surface of the Tightening Torque Clutch Spring Bolts: 8.8 N·m (0.90 kgf·m, 78 in .) B. Install the push rod, push rod holder, needle bearing and adjusting washer. Release Shaft Lever Push forward Position Distance Cable Bracket the clutch pressure plate and springs...

Owners Manual
Page 98
... handlebar pad. • Remove the handlebar for drive chains. C. Wipe off any time the chain appears dry with a high quality lubricant for damage or cracks. • Check the handlebar clamp bolts, the clamps • Remove and the handlebar. Handlebar Holder Handlebar Clamp Bolts Handlebar Clamps Handlebar The footpeg position can be changed to suit the rider's preference. B. MAINTENANCE AND...
... handlebar pad. • Remove the handlebar for drive chains. C. Wipe off any time the chain appears dry with a high quality lubricant for damage or cracks. • Check the handlebar clamp bolts, the clamps • Remove and the handlebar. Handlebar Holder Handlebar Clamp Bolts Handlebar Clamps Handlebar The footpeg position can be changed to suit the rider's preference. B. MAINTENANCE AND...

Owners Manual
Page 102
... Position • • Inspect the brake fluid level in the front and rear brake reservoirs and change the brake fluid in the brake lines diminish braking performance and can be adjusted to either side with brake fluid DOT4 in the brake lines or the brake may be defective. Locknut NOTE MAINTENANCE AND ADJUSTMENT 101 Brakes Disc and disc pad wear is automatically compensated for and has no effect...
... Position • • Inspect the brake fluid level in the front and rear brake reservoirs and change the brake fluid in the brake lines diminish braking performance and can be adjusted to either side with brake fluid DOT4 in the brake lines or the brake may be defective. Locknut NOTE MAINTENANCE AND ADJUSTMENT 101 Brakes Disc and disc pad wear is automatically compensated for and has no effect...

Owners Manual
Page 110
... are fully extended. Air Pressure Adjustment • • • ○When using the air valve adapter (Part/No. 57001 -0725), apply grease to the specific value. A lower oil level will make the fork rebound more slowly. Be sure that the front wheel is the softest setting. Turning the adjuster 11 clicks counterclockwise from the front fork top plug, and install the air valve adapter...
... are fully extended. Air Pressure Adjustment • • • ○When using the air valve adapter (Part/No. 57001 -0725), apply grease to the specific value. A lower oil level will make the fork rebound more slowly. Be sure that the front wheel is the softest setting. Turning the adjuster 11 clicks counterclockwise from the front fork top plug, and install the air valve adapter...

Owners Manual
Page 136
.... the air pressure (see Air Pressure Adjust• Adjust ment). Be sure that the front tire does not touch the fender when the fork is greatly affected by pumping the lever until the pads are against the disc. Tightening Torque Air Valve Plug: 0.2 N·m (0.020 kgf·m, 1.8 in·lb) WARNING After servicing, it takes several applications of the brake lever before the brake pads contact...
.... the air pressure (see Air Pressure Adjust• Adjust ment). Be sure that the front tire does not touch the fender when the fork is greatly affected by pumping the lever until the pads are against the disc. Tightening Torque Air Valve Plug: 0.2 N·m (0.020 kgf·m, 1.8 in·lb) WARNING After servicing, it takes several applications of the brake lever before the brake pads contact...

Owners Manual
Page 137
... A. the seat down and up by an authorized • If Kawasaki dealer. ○Tighten the two clamp bolts alternately two times to achieve progressive springing characteristics. Clean the sliding surface after each ride. inspect the rear shock absorber for oil • Visually leakage. However, a linkage system is used to ensure even tightening torque. it does not smoothly or noise is...
... A. the seat down and up by an authorized • If Kawasaki dealer. ○Tighten the two clamp bolts alternately two times to achieve progressive springing characteristics. Clean the sliding surface after each ride. inspect the rear shock absorber for oil • Visually leakage. However, a linkage system is used to ensure even tightening torque. it does not smoothly or noise is...

Owners Manual
Page 151
... plastic parts as in and around the vehicle, inspect the engine, electrical component and exhaust areas frequently. a mild neutral detergent (designed for build-up of debris or flammable material in air intakes, throttle body assy, brake components, electrical components, muffler outlets, and fuel tank openings. Do not park or store the vehicle in an enclosed space prior to inspecting for motor• Mix cycles or automobiles) and...
... plastic parts as in and around the vehicle, inspect the engine, electrical component and exhaust areas frequently. a mild neutral detergent (designed for build-up of debris or flammable material in air intakes, throttle body assy, brake components, electrical components, muffler outlets, and fuel tank openings. Do not park or store the vehicle in an enclosed space prior to inspecting for motor• Mix cycles or automobiles) and...

Owners Manual
Page 161
... service codes remain in the ECU. NOTE Service Code Table Service Code 11 12 13 14 21 25 31 41 Orange FI Warning Indicator Light Problems Throttle sensor malfunction, wiring open or short Intake air pressure sensor malfunction, wiring open or short Intake air temperature sensor malfunction, wiring open or short Water temperature sensor malfunction, wiring open or short Crankshaft sensor malfunction, wiring open or short Gear position switch malfunction, wiring open or short Vehicle-down sensor malfunction, wiring open or short Fuel...
... service codes remain in the ECU. NOTE Service Code Table Service Code 11 12 13 14 21 25 31 41 Orange FI Warning Indicator Light Problems Throttle sensor malfunction, wiring open or short Intake air pressure sensor malfunction, wiring open or short Intake air temperature sensor malfunction, wiring open or short Water temperature sensor malfunction, wiring open or short Crankshaft sensor malfunction, wiring open or short Gear position switch malfunction, wiring open or short Vehicle-down sensor malfunction, wiring open or short Fuel...

Owners Manual
Page 163
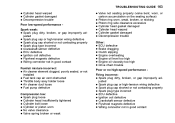
... return spring broken Kick ratchet gear not engaging Improper installation of vehicle-down of a fuel injector Starting failure or difficulties - 162 TROUBLESHOOTING GUIDE TROUBLESHOOTING GUIDE ○This troubleshooting guide is meant simply as a quick guide to assist you in tank Fuel tank cap air vent obstructed Fuel line clogged Break down of a fuel pump Break down sensor Spark missing or weak: Spark plug dirty, broken, or gap improperly adjusted Spark plug cap or high-tension wiring defective Spark plug cap not...
... return spring broken Kick ratchet gear not engaging Improper installation of vehicle-down of a fuel injector Starting failure or difficulties - 162 TROUBLESHOOTING GUIDE TROUBLESHOOTING GUIDE ○This troubleshooting guide is meant simply as a quick guide to assist you in tank Fuel tank cap air vent obstructed Fuel line clogged Break down of a fuel pump Break down sensor Spark missing or weak: Spark plug dirty, broken, or gap improperly adjusted Spark plug cap or high-tension wiring defective Spark plug cap not...
Owners Manual
Page 164
... • ECU Brake • Clutch dragging • Engineslipping overheating • Engine oil level too high • Engine oil viscosity • Drive chain trouble too high • Poor or no high-speed performance Other: j Firing incorrect: Spark plug dirty, broken, or gap improperly adjusted Spark plug cap or high-tension wiring defective Spark plug cap shorted or not contacting properly Spark plug type incorrect ECU defective Ignition coil defective Crankshaft sensor defective Flywheel magneto defective Wiring connector not...
... • ECU Brake • Clutch dragging • Engineslipping overheating • Engine oil level too high • Engine oil viscosity • Drive chain trouble too high • Poor or no high-speed performance Other: j Firing incorrect: Spark plug dirty, broken, or gap improperly adjusted Spark plug cap or high-tension wiring defective Spark plug cap shorted or not contacting properly Spark plug type incorrect ECU defective Ignition coil defective Crankshaft sensor defective Flywheel magneto defective Wiring connector not...

Owners Manual
Page 165
164 TROUBLESHOOTING GUIDE Fuel/air mixture incorrect: Air cleaner element clogged, poorly sealed, or not installed Fuel contaminated with water or foreign matter Fuel tank cap air vent obstructed Throttle body assy holder loose Air cleaner duct loose Fuel line clogged Fuel pump defective j oil level too high • Engine oil viscosity too high • Engine bearing worn or damaged • Crankshaft Drive chain trouble • Compression low: Spark plug loose Cylinder head insufficiently tightened Cylinder bolt loose Cylinder or piston...
164 TROUBLESHOOTING GUIDE Fuel/air mixture incorrect: Air cleaner element clogged, poorly sealed, or not installed Fuel contaminated with water or foreign matter Fuel tank cap air vent obstructed Throttle body assy holder loose Air cleaner duct loose Fuel line clogged Fuel pump defective j oil level too high • Engine oil viscosity too high • Engine bearing worn or damaged • Crankshaft Drive chain trouble • Compression low: Spark plug loose Cylinder head insufficiently tightened Cylinder bolt loose Cylinder or piston...

Owners Manual
Page 167
... too low • Kick ratchet gear not properly disengaging from • kick gear • Kick shaft idle gear worn or chipped Transmission noise: Drive chain noise: Drive chain slack improperly adjusted Drive chain worn Rear and/or engine sprocket(s) worn Drive chain inefficiently lubricated Rear wheel misaligned Frame noise abnormal Front fork noise: level or viscosity too low • Oil Front fork air pressure incorrect • Rear shock absorber noise: Shock absorber damaged • • Disc brake noise: Pad installed incorrectly
... too low • Kick ratchet gear not properly disengaging from • kick gear • Kick shaft idle gear worn or chipped Transmission noise: Drive chain noise: Drive chain slack improperly adjusted Drive chain worn Rear and/or engine sprocket(s) worn Drive chain inefficiently lubricated Rear wheel misaligned Frame noise abnormal Front fork noise: level or viscosity too low • Oil Front fork air pressure incorrect • Rear shock absorber noise: Shock absorber damaged • • Disc brake noise: Pad installed incorrectly

Owners Manual
Page 179
... rear brake function Fuel tank installation All control cable routings Engine mounting bolt torque Engine sprocket installation Shift pedal bolt torque Engine oil level UNI-TRAK® lever rod nut torque UNI-TRAK® lever nut torque Rear shock absorber nut torque Swingarm pivot shaft nut torque Rear axle nut torque Rear sprocket nut torque Rear brake pedal operation Seat installation Front and rear wheel spoke torque Front and rear tire air pressure Front fork air pressure Drive chain slack Coolant level Oil...
... rear brake function Fuel tank installation All control cable routings Engine mounting bolt torque Engine sprocket installation Shift pedal bolt torque Engine oil level UNI-TRAK® lever rod nut torque UNI-TRAK® lever nut torque Rear shock absorber nut torque Swingarm pivot shaft nut torque Rear axle nut torque Rear sprocket nut torque Rear brake pedal operation Seat installation Front and rear wheel spoke torque Front and rear tire air pressure Front fork air pressure Drive chain slack Coolant level Oil...
Owners Manual
Page 181
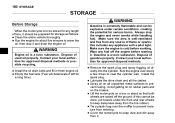
... all the cables. Cover the motorcycle to prevent rusting. Clean the entire vehicle thoroughly. the spark plug and spray fogging oil di• Remove rectly into the cylinder. Contact your local authorities for approved disposal methods. WARNING Gasoline is cold before starting it and drain the engine oil. this cannot be done, put boards under certain conditions, creating the potential for serious burns...
... all the cables. Cover the motorcycle to prevent rusting. Clean the entire vehicle thoroughly. the spark plug and spray fogging oil di• Remove rectly into the cylinder. Contact your local authorities for approved disposal methods. WARNING Gasoline is cold before starting it and drain the engine oil. this cannot be done, put boards under certain conditions, creating the potential for serious burns...
