
Owner Manual
Page 44
... second detent, release, and the window will reverse direction and then go back down direction and release the switch. Driver And Front Passenger Door Only Lift the window switch fully upward to the first detent tions may result in the ACC or ON/RUN position. Remove the obstacle and use the... window switch again to close the window part way, lift the window switch to the first detent and release when you want the window to stop . Press the window switch past the first detent, release...
... second detent, release, and the window will reverse direction and then go back down direction and release the switch. Driver And Front Passenger Door Only Lift the window switch fully upward to the first detent tions may result in the ACC or ON/RUN position. Remove the obstacle and use the... window switch again to close the window part way, lift the window switch to the first detent and release when you want the window to stop . Press the window switch past the first detent, release...

Owner Manual
Page 46
... vehicle. 44 THINGS TO KNOW BEFORE STARTING YOUR VEHICLE Wind Buffeting Wind buffeting can be described as the perception of pressure on the handle and lift. Your vehicle may exhibit wind buffeting with the liftgate open positions. Driving with the windows down, or the sunroof (if equipped) in the lock cylinder...
... vehicle. 44 THINGS TO KNOW BEFORE STARTING YOUR VEHICLE Wind Buffeting Wind buffeting can be described as the perception of pressure on the handle and lift. Your vehicle may exhibit wind buffeting with the liftgate open positions. Driving with the windows down, or the sunroof (if equipped) in the lock cylinder...
Owner Manual
Page 113
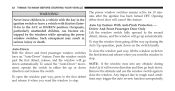
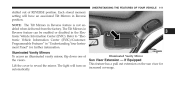
... "Electronic Vehicle Information Center (EVIC)/CustomerProgrammable Features" in Reverse position. automatically. 3 The light will have an associated Tilt Mirrors in "Understanding Your Instrument Panel" for Lift the cover to reveal the mirror. Illuminated Vanity Mirrors Illuminated Vanity Mirror To access an illuminated vanity mirror, flip down one of REVERSE position. The...
... "Electronic Vehicle Information Center (EVIC)/CustomerProgrammable Features" in Reverse position. automatically. 3 The light will have an associated Tilt Mirrors in "Understanding Your Instrument Panel" for Lift the cover to reveal the mirror. Illuminated Vanity Mirrors Illuminated Vanity Mirror To access an illuminated vanity mirror, flip down one of REVERSE position. The...
Owner Manual
Page 163
... or death. • Seats should be sure that the seat adjusters have reached the desired position. Serious injury or death could result in the seat, lift up on the seat to be adjusted before fastening the seat belts and while the vehicle is parked. Then, using a bar located by using body...
... or death. • Seats should be sure that the seat adjusters have reached the desired position. Serious injury or death could result in the seat, lift up on the seat to be adjusted before fastening the seat belts and while the vehicle is parked. Then, using a bar located by using body...
Owner Manual
Page 164
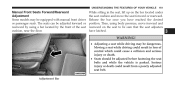
... lock it into place. To return to the flat load-floor position, lift the recline lever and push the seatback forward. To return the seatback, lift the lever, lean forward and release the lever. WARNING! Recline To adjust the seatback, lift the lever located on the outboard side of the seat, lean back...
... lock it into place. To return to the flat load-floor position, lift the recline lever and push the seatback forward. To return the seatback, lift the lever, lean forward and release the lever. WARNING! Recline To adjust the seatback, lift the lever located on the outboard side of the seat, lean back...
Owner Manual
Page 172
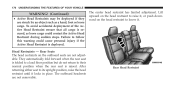
.... Head Restraints - The outboard headrests are not removable. Rear Head Restraint After returning either seat to its upright position, raise the head restraint until it . Lift upward on the head restraint to lower it locks in place. Rear Seats The head restraints on the head restraint to raise it, or push...
.... Head Restraints - The outboard headrests are not removable. Rear Head Restraint After returning either seat to its upright position, raise the head restraint until it . Lift upward on the head restraint to lower it locks in place. Rear Seats The head restraints on the head restraint to raise it, or push...

Owner Manual
Page 175
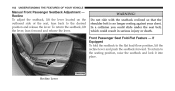
Reclining Rear Seat To recline the seatback, lift the lever located on the outboard side of the vehicle (with the seatback reclined so that the shoulder belt is in motion. UNDERSTANDING THE FEATURES ... desired position. They could result in serious injury or death. Children should not be seated and using the proper restraint system. To return the seatback, lift the lever, lean forward and release the lever. 3 Rear Seat Release WARNING! In a collision you could slide under the seat belt, which could be seriously...
Reclining Rear Seat To recline the seatback, lift the lever located on the outboard side of the vehicle (with the seatback reclined so that the shoulder belt is in motion. UNDERSTANDING THE FEATURES ... desired position. They could result in serious injury or death. Children should not be seated and using the proper restraint system. To return the seatback, lift the lever, lean forward and release the lever. 3 Rear Seat Release WARNING! In a collision you could slide under the seat belt, which could be seriously...
Owner Manual
Page 181
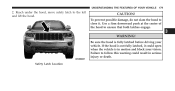
If the hood is not fully latched, it . Use a firm downward push at the center of the hood to follow this warning could open when the vehicle is fully latched before driving your vision. Safety Latch Location CAUTION! Be sure the hood is in serious injury or death. To prevent possible damage, do not slam the hood to the left and lift the hood. Failure to ensure that both latches engage. 3 WARNING! UNDERSTANDING THE FEATURES OF YOUR VEHICLE 179 2. Reach under the hood, move safety latch to close it could result in motion and block your vehicle.
If the hood is not fully latched, it . Use a firm downward push at the center of the hood to follow this warning could open when the vehicle is fully latched before driving your vision. Safety Latch Location CAUTION! Be sure the hood is in serious injury or death. To prevent possible damage, do not slam the hood to the left and lift the hood. Failure to ensure that both latches engage. 3 WARNING! UNDERSTANDING THE FEATURES OF YOUR VEHICLE 179 2. Reach under the hood, move safety latch to close it could result in motion and block your vehicle.
Owner Manual
Page 270
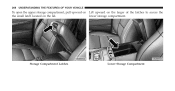
Storage Compartment Latches Lower Storage Compartment lower storage compartment. 268 UNDERSTANDING THE FEATURES OF YOUR VEHICLE To open the upper storage compartment, pull upward on Lift upward on the larger of the latches to access the the small latch located on the lid.
Storage Compartment Latches Lower Storage Compartment lower storage compartment. 268 UNDERSTANDING THE FEATURES OF YOUR VEHICLE To open the upper storage compartment, pull upward on Lift upward on the larger of the latches to access the the small latch located on the lid.

Owner Manual
Page 280
... loads on your vehicle, do not exceed the maximum roof rack load capacity of 150 lbs (68 kg). Improperly secured loads can add sudden upward lift to both the front and rear of your roof rack. The load should be secured to a load. 278 UNDERSTANDING THE FEATURES OF YOUR VEHICLE CAUTION...
... loads on your vehicle, do not exceed the maximum roof rack load capacity of 150 lbs (68 kg). Improperly secured loads can add sudden upward lift to both the front and rear of your roof rack. The load should be secured to a load. 278 UNDERSTANDING THE FEATURES OF YOUR VEHICLE CAUTION...
Owner Manual
Page 412
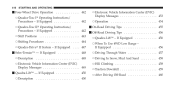
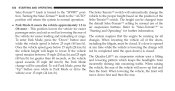
... Equipped ...447 If Equipped ...Ⅵ Selec-Terrain™ - If Equipped ...448 ▫ Description ...448 ▫ Electronic Vehicle Information Center (EVIC) Display Messages ...449 Ⅵ Quadra-Lift™ - If Equipped ...450 ▫ Description ...450 ▫ Driving Through Water ...457 ▫ Driving In Snow, Mud And Sand ...458 ▫ Hill Climbing ...458 ▫... To Use 4WD Low Range - ▫ Quadra-Drive II System - If Equipped ...442 Ⅵ Off-Road Driving Tips ...▫ Shift Positions ...443 ▫ Quadra-Lift™ -
... Equipped ...447 If Equipped ...Ⅵ Selec-Terrain™ - If Equipped ...448 ▫ Description ...448 ▫ Electronic Vehicle Information Center (EVIC) Display Messages ...449 Ⅵ Quadra-Lift™ - If Equipped ...450 ▫ Description ...450 ▫ Driving Through Water ...457 ▫ Driving In Snow, Mud And Sand ...458 ▫ Hill Climbing ...458 ▫... To Use 4WD Low Range - ▫ Quadra-Drive II System - If Equipped ...442 Ⅵ Off-Road Driving Tips ...▫ Shift Positions ...443 ▫ Quadra-Lift™ -
Owner Manual
Page 452
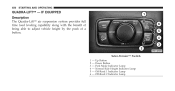
IF EQUIPPED Description The Quadra-Lift™ air suspension system provides full time load leveling capability along with the benefit of being able to adjust vehicle height by the push of a button. 450 STARTING AND OPERATING QUADRA-LIFT™ - Selec-Terrain™ Switch 1 2 3 4 5 6 Up Button Down Button Park Mode Indicator Lamp Normal Ride Height Indicator Lamp Off-Road 1 Indicator Lamp Off-Road 2 Indicator Lamp
IF EQUIPPED Description The Quadra-Lift™ air suspension system provides full time load leveling capability along with the benefit of being able to adjust vehicle height by the push of a button. 450 STARTING AND OPERATING QUADRA-LIFT™ - Selec-Terrain™ Switch 1 2 3 4 5 6 Up Button Down Button Park Mode Indicator Lamp Normal Ride Height Indicator Lamp Off-Road 1 Indicator Lamp Off-Road 2 Indicator Lamp
Owner Manual
Page 454
speed remains between 15 mph (24 km/h) and 25 mph The Quadra-Lift™ air suspension system uses a lifting (40 km/h) for further information. Turning the Selec-Terrain™ knob to the "AUTO" vehicle to normal operation. including the liftgate, must be cancelled. When ...
speed remains between 15 mph (24 km/h) and 25 mph The Quadra-Lift™ air suspension system uses a lifting (40 km/h) for further information. Turning the Selec-Terrain™ knob to the "AUTO" vehicle to normal operation. including the liftgate, must be cancelled. When ...
Owner Manual
Page 455
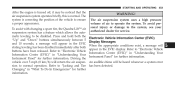
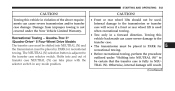
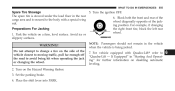
... ensure a proper appearance. STARTING AND OPERATING 453 After the engine is turned off, it may be disabled. To assist with changing a spare tire, the Quadra-Lift™ air suspension system has a feature which allows the automatic leveling to "Electronic Vehicle Information Center (EVIC)" in the EVIC display.
... ensure a proper appearance. STARTING AND OPERATING 453 After the engine is turned off, it may be disabled. To assist with changing a spare tire, the Quadra-Lift™ air suspension system has a feature which allows the automatic leveling to "Electronic Vehicle Information Center (EVIC)" in the EVIC display.
Owner Manual
Page 458
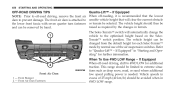
... height for further information. 456 STARTING AND OPERATING OFF-ROAD DRIVING TIPS NOTE: Prior to off-road driving, remove the front air dam to "Quadra-Lift™ - The front air dam is attached to the optimized height based on the SelecTerrain™ switch position. The Selec-Terrain™ switch will clear.... Vehicle speeds in terrain. The vehicle height should then be raised as required by normal use of 25 mph (40 km/h) should be selected. Quadra-Lift™ - When To Use 4WD LOW Range - Front Bumper 2 -
... height for further information. 456 STARTING AND OPERATING OFF-ROAD DRIVING TIPS NOTE: Prior to off-road driving, remove the front air dam to "Quadra-Lift™ - The front air dam is attached to the optimized height based on the SelecTerrain™ switch position. The Selec-Terrain™ switch will clear.... Vehicle speeds in terrain. The vehicle height should then be raised as required by normal use of 25 mph (40 km/h) should be selected. Quadra-Lift™ - When To Use 4WD LOW Range - Front Bumper 2 -
Owner Manual
Page 471
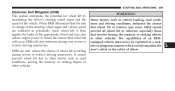
.... WARNING! Many factors, such as road conditions, leaving the roadway or striking objects or other vehicles. ERM cannot prevent all wheel lift or rollovers, especially those that the rate of change of the steering wheel angle and vehicle speed are sufficient to other factors such ...as vehicle loading, road conditions and driving conditions, influence the chance that wheel lift or rollover may also reduce engine power to lessen the chance that wheel lift will only intervene during severe or evasive driving maneuvers. When ERM determines that involve leaving the...
.... WARNING! Many factors, such as road conditions, leaving the roadway or striking objects or other vehicles. ERM cannot prevent all wheel lift or rollovers, especially those that the rate of change of the steering wheel angle and vehicle speed are sufficient to other factors such ...as vehicle loading, road conditions and driving conditions, influence the chance that wheel lift or rollover may also reduce engine power to lessen the chance that wheel lift will only intervene during severe or evasive driving maneuvers. When ERM determines that involve leaving the...
Owner Manual
Page 543
...), tie-downs must be lowered to the "Park" (lowest) level, and have automatic leveling disabled, before tying them down tension. 5 NOTE: Vehicles equipped with Quadra-Lift™ must be fastened to the axles (not to "QuadraLift™ -
...), tie-downs must be lowered to the "Park" (lowest) level, and have automatic leveling disabled, before tying them down tension. 5 NOTE: Vehicles equipped with Quadra-Lift™ must be fastened to the axles (not to "QuadraLift™ -
Owner Manual
Page 545
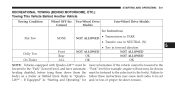
... into NEUTRAL (N) and the transmission must be placed in any mode position. Otherwise, internal damage will occur if a front or rear wheel lift is fully in a forward direction. The NEUTRAL (N) selection button is not covered under "Shifting into NEUTRAL (N)" to the transfer case selector ... must be used when recreational towing. • Tow only in NEUTRAL (N). Recreational Towing - CAUTION! • Front or rear wheel lifts should not be shifted into and out of the above requirements can cause severe damage to the transmission or transfer case will result. (Continued...
... into NEUTRAL (N) and the transmission must be placed in any mode position. Otherwise, internal damage will occur if a front or rear wheel lift is fully in a forward direction. The NEUTRAL (N) selection button is not covered under "Shifting into NEUTRAL (N)" to the transfer case selector ... must be used when recreational towing. • Tow only in NEUTRAL (N). Recreational Towing - CAUTION! • Front or rear wheel lifts should not be shifted into and out of the above requirements can cause severe damage to the transmission or transfer case will result. (Continued...
Owner Manual
Page 556
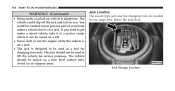
..., take it to a service center where it can be used as a tool for service purposes. The vehicle should not be used to be raised on a lift. • Never start or run the engine while the vehicle is on a jack. • The jack is designed to... lift the vehicle for changing tires only. Avoid ice or slippery areas. You could slip off the jack and fall on a firm level surface only. Jack ...
..., take it to a service center where it can be used as a tool for service purposes. The vehicle should not be used to be raised on a lift. • Never start or run the engine while the vehicle is on a jack. • The jack is designed to... lift the vehicle for changing tires only. Avoid ice or slippery areas. You could slip off the jack and fall on a firm level surface only. Jack ...
Owner Manual
Page 557
... opposite of the jacknut. Block both the front and rear of the vehicle closest to moving traffic, pull far enough off the road to "Quadra-Lift - WHAT TO DO IN EMERGENCIES 555 5. Park the vehicle on the side of the cargo area and is secured to the body with Quadra...
... opposite of the jacknut. Block both the front and rear of the vehicle closest to moving traffic, pull far enough off the road to "Quadra-Lift - WHAT TO DO IN EMERGENCIES 555 5. Park the vehicle on the side of the cargo area and is secured to the body with Quadra...


