

Owner Manual
Page 73
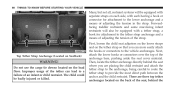
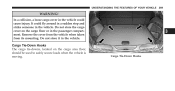
... and SABIC air bags on both sides of the SABIC. Supplemental Side Air Bag Inflatable Curtain (SABIC) Label Location NOTE: • Air Bag covers may deploy. The area where the SABIC is equipped with left and right Supplemental Side Air Bag Inflatable Curtain (SABIC), do not stack luggage or... other cargo up high enough to deploy the Supplemental Seat-Mounted Side Air Bags and SABIC air bags during deployment could cause you to be severely injured...
... and SABIC air bags on both sides of the SABIC. Supplemental Side Air Bag Inflatable Curtain (SABIC) Label Location NOTE: • Air Bag covers may deploy. The area where the SABIC is equipped with left and right Supplemental Side Air Bag Inflatable Curtain (SABIC), do not stack luggage or... other cargo up high enough to deploy the Supplemental Seat-Mounted Side Air Bags and SABIC air bags during deployment could cause you to be severely injured...
Owner Manual
Page 90
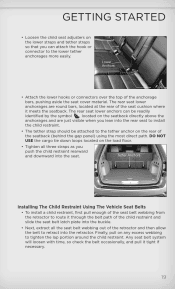
First, loosen the child seat adjusters on the lower straps and on the load floor. Do not use the cargo tie downs located on the tether strap so that you are three top tether anchorages located on the back of the seat, behind the Top ... of the tether can more easily attach the hooks or connectors to the lower anchorage and a means of the anchorage bars, pushing aside the seat cover material. 88 THINGS TO KNOW BEFORE STARTING YOUR VEHICLE Many, but not all, restraint systems will also be equipped with a tether strap, a hook for attachment...
First, loosen the child seat adjusters on the lower straps and on the load floor. Do not use the cargo tie downs located on the tether strap so that you are three top tether anchorages located on the back of the seat, behind the Top ... of the tether can more easily attach the hooks or connectors to the lower anchorage and a means of the anchorage bars, pushing aside the seat cover material. 88 THINGS TO KNOW BEFORE STARTING YOUR VEHICLE Many, but not all, restraint systems will also be equipped with a tether strap, a hook for attachment...
Owner Manual
Page 108
106 UNDERSTANDING THE FEATURES OF YOUR VEHICLE Ⅵ Cargo Area Features ...269 Ⅵ Rear Window Features ...275 ▫ Rechargeable Flashlight ...269 ▫ Cargo Storage Bins ...270 ▫ Rear Window Wiper/Washer ...275 ▫ Rear Window Defroster ...276 ▫ Retractable Cargo Area Cover - Ⅵ Roof Luggage Rack - If Equipped ...277 If Equipped ...271 ▫ Cargo Tie-Down Hooks ...273
106 UNDERSTANDING THE FEATURES OF YOUR VEHICLE Ⅵ Cargo Area Features ...269 Ⅵ Rear Window Features ...275 ▫ Rechargeable Flashlight ...269 ▫ Cargo Storage Bins ...270 ▫ Rear Window Wiper/Washer ...275 ▫ Rear Window Defroster ...276 ▫ Retractable Cargo Area Cover - Ⅵ Roof Luggage Rack - If Equipped ...277 If Equipped ...271 ▫ Cargo Tie-Down Hooks ...273
Owner Manual
Page 273
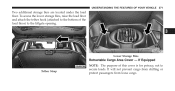
Tether Strap If Equipped NOTE: The purpose of the load floor) to secure loads. It will not prevent cargo from shifting or protect passengers from loose cargo. To access the lower storage bins, raise the load floor and attach the tether hook (attached to the bottom of this cover is for privacy, not to the liftgate opening. 3 Lower Storage Bins Retractable Cargo Area Cover - UNDERSTANDING THE FEATURES OF YOUR VEHICLE 271 Two additional storage bins are located under the load floor.
Tether Strap If Equipped NOTE: The purpose of the load floor) to secure loads. It will not prevent cargo from shifting or protect passengers from loose cargo. To access the lower storage bins, raise the load floor and attach the tether hook (attached to the bottom of this cover is for privacy, not to the liftgate opening. 3 Lower Storage Bins Retractable Cargo Area Cover - UNDERSTANDING THE FEATURES OF YOUR VEHICLE 271 Two additional storage bins are located under the load floor.
Owner Manual
Page 274
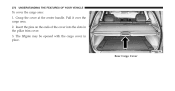
Rear Cargo Cover Insert the pins on the ends of the cover into the slots in place. Grasp the cover at the center handle. Pull it over the cargo area. 2. 272 UNDERSTANDING THE FEATURES OF YOUR VEHICLE To cover the cargo area: 1. The liftgate may be opened with the cargo cover in the pillar trim cover. 3.
Rear Cargo Cover Insert the pins on the ends of the cover into the slots in place. Grasp the cover at the center handle. Pull it over the cargo area. 2. 272 UNDERSTANDING THE FEATURES OF YOUR VEHICLE To cover the cargo area: 1. The liftgate may be opened with the cargo cover in the pillar trim cover. 3.

Owner Manual
Page 275
Remove the cover from the vehicle when taken from its mounting. Cargo Tie-Down Hooks The cargo tie-downs, located on the cargo floor or in the vehicle. Do not store it in the passenger compartment. UNDERSTANDING THE FEATURES OF YOUR VEHICLE 273 WARNING! Do not store the cargo cover on the cargo area floor, should be used to safely secure loads when the vehicle is moving. 3 Cargo Tie-Down Hooks In a collision, a loose cargo cover in the vehicle could fly around in a sudden stop and strike someone in the vehicle. It could cause injury.
Remove the cover from the vehicle when taken from its mounting. Cargo Tie-Down Hooks The cargo tie-downs, located on the cargo floor or in the vehicle. Do not store it in the passenger compartment. UNDERSTANDING THE FEATURES OF YOUR VEHICLE 273 WARNING! Do not store the cargo cover on the cargo area floor, should be used to safely secure loads when the vehicle is moving. 3 Cargo Tie-Down Hooks In a collision, a loose cargo cover in the vehicle could fly around in a sudden stop and strike someone in the vehicle. It could cause injury.
Owner Manual
Page 564
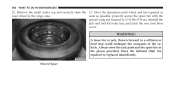
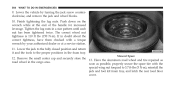
... nut torqued to 3.7 ft-lbs (5 N·m), reinstall the jack and tool kit foam tray, and latch the rear load floor cover. Always stow the jack parts and the spare tire in the cargo area. Stowed Spare soon as road wheel in the places provided. A loose tire or jack, thrown forward in a collision...
... nut torqued to 3.7 ft-lbs (5 N·m), reinstall the jack and tool kit foam tray, and latch the rear load floor cover. Always stow the jack parts and the spare tire in the cargo area. Stowed Spare soon as road wheel in the places provided. A loose tire or jack, thrown forward in a collision...
Owner Manual
Page 666
664 INDEX Cargo Area Cover ...271 Cargo Area Features ...269 Cargo Compartment ...269 Light ...270 Cargo Light ...270 Cargo Tie-Downs ...273 Cellular Phone ...120,395 Center High Mounted Stop Light ...627 Certification Label ...523 Chains, Tire ...498 Changing A Flat Tire ...553 Chart, Tire ...
664 INDEX Cargo Area Cover ...271 Cargo Area Features ...269 Cargo Compartment ...269 Light ...270 Cargo Light ...270 Cargo Tie-Downs ...273 Cellular Phone ...120,395 Center High Mounted Stop Light ...627 Certification Label ...523 Chains, Tire ...498 Changing A Flat Tire ...553 Chart, Tire ...
Owner Manual
Page 677
... System ...29 Replacement Bulbs ...622 Replacement Keys ...19 Replacement Parts ...581 Replacement Tires ...497 Reporting Safety Defects ...656 Restraints, Child ...81 Restraints, Occupant ...49 Retractable Cargo Area Cover ...271 Roll Over Warning ...5 Rotation, Tires ...500 10
... System ...29 Replacement Bulbs ...622 Replacement Keys ...19 Replacement Parts ...581 Replacement Tires ...497 Reporting Safety Defects ...656 Restraints, Child ...81 Restraints, Occupant ...49 Retractable Cargo Area Cover ...271 Roll Over Warning ...5 Rotation, Tires ...500 10
User Guide
Page 21
DO NOT USE the cargo tie down loops located on the load floor. • Tighten all the seat belt webbing out of the anchorage bars, pushing aside the seat cover material. Finally, pull on any excess webbing to tighten the lap portion around the child restraint. Any seat belt system will loosen with...
DO NOT USE the cargo tie down loops located on the load floor. • Tighten all the seat belt webbing out of the anchorage bars, pushing aside the seat cover material. Finally, pull on any excess webbing to tighten the lap portion around the child restraint. Any seat belt system will loosen with...

User Guide
Page 86
NOTE: • Do not exceed the maximum power of the power outlet can cause damage not covered by switching the power outlet right rear quarter panel fuse in the fuse panel. 84 Do not insert any other object in the ON/RUN ... battery and powered at 12 Volts. Improper use of 160 Watts (13 Amps) at all the time by your new vehicle warranty. • The rear cargo power outlet can be switched to be replaced. • Power outlets are designed for accessory plugs only. If the 160 Watt (13 Amp) power rating...
NOTE: • Do not exceed the maximum power of the power outlet can cause damage not covered by switching the power outlet right rear quarter panel fuse in the fuse panel. 84 Do not insert any other object in the ON/RUN ... battery and powered at 12 Volts. Improper use of 160 Watts (13 Amps) at all the time by your new vehicle warranty. • The rear cargo power outlet can be switched to be replaced. • Power outlets are designed for accessory plugs only. If the 160 Watt (13 Amp) power rating...
User Guide
Page 109
... position and return it and the tools to 3.7 ft-lbs (5 N·m), reinstall the jack and tool kit foam tray, and latch the rear load floor cover. 107 Lightly tighten the nuts. 9. Finish tightening the lug nuts. Push down on the vehicle and install the lug nuts with the special wing nut... torqued to the proper positions in the cargo area. 13. Remove the small center cap and securely store the road wheel in the foam tray. 12. Raise the vehicle by turning the jack...
... position and return it and the tools to 3.7 ft-lbs (5 N·m), reinstall the jack and tool kit foam tray, and latch the rear load floor cover. 107 Lightly tighten the nuts. 9. Finish tightening the lug nuts. Push down on the vehicle and install the lug nuts with the special wing nut... torqued to the proper positions in the cargo area. 13. Remove the small center cap and securely store the road wheel in the foam tray. 12. Raise the vehicle by turning the jack...
User Guide
Page 137
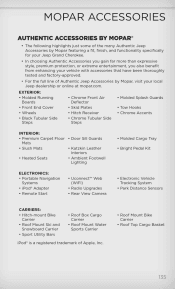
...of the many Authentic Jeep Accessories by Mopar, visit your vehicle with accessories that have been thoroughly tested and factory-approved. • For the full line of Apple, Inc. 135 EXTERIOR: • Molded Running Boards • Front End Cover • Wheels •...Water Sports Carrier • Roof Mount Bike Carrier • Roof Top Cargo Basket iPod® is a registered trademark of Authentic Jeep Accessories by Mopar featuring a fit, finish, and functionality specifically for your Jeep Grand Cherokee. • In choosing Authentic Accessories you gain far more than expressive...
...of the many Authentic Jeep Accessories by Mopar, visit your vehicle with accessories that have been thoroughly tested and factory-approved. • For the full line of Apple, Inc. 135 EXTERIOR: • Molded Running Boards • Front End Cover • Wheels •...Water Sports Carrier • Roof Mount Bike Carrier • Roof Top Cargo Basket iPod® is a registered trademark of Authentic Jeep Accessories by Mopar featuring a fit, finish, and functionality specifically for your Jeep Grand Cherokee. • In choosing Authentic Accessories you gain far more than expressive...
Owner Manual SRT
Page 73
... be adversely affected and/or objects could be pushed into the roof of the vehicle may deploy. WARNING! (Continued) • Do not use accessory seat covers or place objects between you , causing serious injury. • If your vehicle is located should remain free from any reason. 2 WARNING! • If your vehicle... drill into you and the side air bags; The area where the SABIC is equipped with SABIC air bags, do not stack luggage or other cargo up high enough to your vehicle is equipped with the Advanced Front Air Bags.
... be adversely affected and/or objects could be pushed into the roof of the vehicle may deploy. WARNING! (Continued) • Do not use accessory seat covers or place objects between you , causing serious injury. • If your vehicle is located should remain free from any reason. 2 WARNING! • If your vehicle... drill into you and the side air bags; The area where the SABIC is equipped with SABIC air bags, do not stack luggage or other cargo up high enough to your vehicle is equipped with the Advanced Front Air Bags.

Owner Manual SRT
Page 90
... Automatic Locking Retractor (ALR) to secure a Child Restraint System (CRS). Improper installation of the strap. These types of the anchorage bars, pushing aside the seat cover material. First, loosen the child seat adjusters on the lower straps and on the tether strap so that you fold the gap panel down hooks... and the child restraint. WARNING! They are not visible until you can lead to failure of the seat, behind the seat. Do not use the cargo tie down . Forwardfacing toddler restraints and some rear-facing infant restraints will be badly injured or killed.
... Automatic Locking Retractor (ALR) to secure a Child Restraint System (CRS). Improper installation of the strap. These types of the anchorage bars, pushing aside the seat cover material. First, loosen the child seat adjusters on the lower straps and on the tether strap so that you fold the gap panel down hooks... and the child restraint. WARNING! They are not visible until you can lead to failure of the seat, behind the seat. Do not use the cargo tie down . Forwardfacing toddler restraints and some rear-facing infant restraints will be badly injured or killed.

Owner Manual SRT
Page 107
... Features ...265 3 Express ...253 ▫ Closing Power Shade - If Equipped ...268 ▫ Cargo Tie-Down Hooks ...269 Ⅵ Rear Window Features ...271 ▫ Rear Window Wiper/Washer ...271 ▫ Rear Window Defroster ...272 Ⅵ Roof Luggage Rack ...259 Ⅵ Cupholders ...261 Ⅵ Storage ...262 ▫ Glove Compartment ...262 ▫ Door Storage ...263 ▫ Center Console ...263 ▫ Rechargeable Flashlight ...265 ▫ Cargo Storage Bins ...266 ▫ Retractable Cargo Area Cover - UNDERSTANDING THE FEATURES OF YOUR VEHICLE 105 ▫ Closing Power Shade -
... Features ...265 3 Express ...253 ▫ Closing Power Shade - If Equipped ...268 ▫ Cargo Tie-Down Hooks ...269 Ⅵ Rear Window Features ...271 ▫ Rear Window Wiper/Washer ...271 ▫ Rear Window Defroster ...272 Ⅵ Roof Luggage Rack ...259 Ⅵ Cupholders ...261 Ⅵ Storage ...262 ▫ Glove Compartment ...262 ▫ Door Storage ...263 ▫ Center Console ...263 ▫ Rechargeable Flashlight ...265 ▫ Cargo Storage Bins ...266 ▫ Retractable Cargo Area Cover - UNDERSTANDING THE FEATURES OF YOUR VEHICLE 105 ▫ Closing Power Shade -
Owner Manual SRT
Page 270
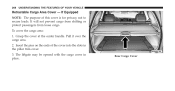
268 UNDERSTANDING THE FEATURES OF YOUR VEHICLE Retractable Cargo Area Cover - Grasp the cover at the center handle. Pull it over the cargo area. 2. Rear Cargo Cover If Equipped NOTE: The purpose of the cover into the slots in place. It will not prevent cargo from shifting or protect passengers from loose cargo. Insert the pins on the ends of this cover is for privacy, not to secure loads. To cover the cargo area: 1. The liftgate may be opened with the cargo cover in the pillar trim cover. 3.
268 UNDERSTANDING THE FEATURES OF YOUR VEHICLE Retractable Cargo Area Cover - Grasp the cover at the center handle. Pull it over the cargo area. 2. Rear Cargo Cover If Equipped NOTE: The purpose of the cover into the slots in place. It will not prevent cargo from shifting or protect passengers from loose cargo. Insert the pins on the ends of this cover is for privacy, not to secure loads. To cover the cargo area: 1. The liftgate may be opened with the cargo cover in the pillar trim cover. 3.
Owner Manual SRT
Page 271
In a collision, a loose cargo cover in the passenger compartment. Do not store the cargo cover on the cargo area floor, should be used to safely secure loads when the vehicle is moving. 3 Cargo Tie-Down Hooks Do not store it in the vehicle. Remove the cover from the vehicle when taken from its mounting. It could cause injury. UNDERSTANDING THE FEATURES OF YOUR VEHICLE 269 WARNING! Cargo Tie-Down Hooks The cargo tie-downs, located on the cargo floor or in the vehicle could fly around in a sudden stop and strike someone in the vehicle.
In a collision, a loose cargo cover in the passenger compartment. Do not store the cargo cover on the cargo area floor, should be used to safely secure loads when the vehicle is moving. 3 Cargo Tie-Down Hooks Do not store it in the vehicle. Remove the cover from the vehicle when taken from its mounting. It could cause injury. UNDERSTANDING THE FEATURES OF YOUR VEHICLE 269 WARNING! Cargo Tie-Down Hooks The cargo tie-downs, located on the cargo floor or in the vehicle could fly around in a sudden stop and strike someone in the vehicle.
Owner Manual SRT
Page 506
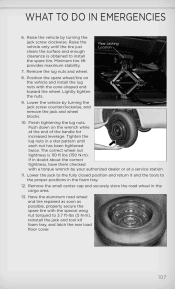
... lbs (150 N·m). 504 WHAT TO DO IN EMERGENCIES 9. Remove the small center cap and securely store the 13. Tighten the lug nuts in the cargo area. Lower the jack to the fully closed position and return it and the tools to 3.7 ft-lbs (5 N·m), reinstall the jack and tool kit... foam tray, and latch the rear load floor cover. soon as road wheel in a star pattern until each nut has been tightened twice. If in the foam tray. 12.
... lbs (150 N·m). 504 WHAT TO DO IN EMERGENCIES 9. Remove the small center cap and securely store the 13. Tighten the lug nuts in the cargo area. Lower the jack to the fully closed position and return it and the tools to 3.7 ft-lbs (5 N·m), reinstall the jack and tool kit... foam tray, and latch the rear load floor cover. soon as road wheel in a star pattern until each nut has been tightened twice. If in the foam tray. 12.
Owner Manual SRT
Page 597
... Calibration, Compass ...318 Camera, Rear ...233 Capacities, Fluid ...562 Caps, Filler Fuel ...475 Radiator (Coolant Pressure) ...537 Car Washes ...545 Carbon Monoxide Warning ...95,475 Cargo (Vehicle Loading) ...479 Cargo Area Cover ...268 Cargo Area Features ...265 Cargo Compartment ...265 Light ...266 Cargo Light ...266 Cargo Tie-Downs ...269 Cellular Phone ...117,394 10
... Calibration, Compass ...318 Camera, Rear ...233 Capacities, Fluid ...562 Caps, Filler Fuel ...475 Radiator (Coolant Pressure) ...537 Car Washes ...545 Carbon Monoxide Warning ...95,475 Cargo (Vehicle Loading) ...479 Cargo Area Cover ...268 Cargo Area Features ...265 Cargo Compartment ...265 Light ...266 Cargo Light ...266 Cargo Tie-Downs ...269 Cellular Phone ...117,394 10