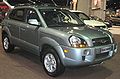

Owner's Manual
Page 6
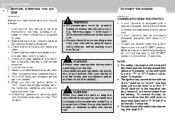
... of the Owner's Manual. You must always use high quality fuels and lubricants that all service and maintenance on the back cover of poor quality fuels and lubricants that may be performed by any other assistance that do not meet the specifications listed on Page 9-4 in the Vehicle Specifications section of which also appear in the vehicle for choosing Hyundai. Copyright 2008 Hyundai Motor America...
... of the Owner's Manual. You must always use high quality fuels and lubricants that all service and maintenance on the back cover of poor quality fuels and lubricants that may be performed by any other assistance that do not meet the specifications listed on Page 9-4 in the Vehicle Specifications section of which also appear in the vehicle for choosing Hyundai. Copyright 2008 Hyundai Motor America...

Owner's Manual
Page 10
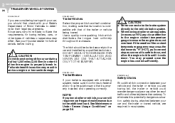
... 4WD Lock Switch (If installed) Traction Control System (TCS) Switch (If installed) / Electronic Stability Control (ESC) Switch (If installed) Instrument Cluster Multi-Function Light Switch (If installed) Front Window Defroster (If installed) / Aux Outlet (If installed) Hazard Warning Light Switch Digital Clock Windshield Wiper/Washer Switch 10. Horn and Driver's Airbag 15. Heating/Air Conditioning Control Panel (If installed) 18. Front Fog Light Switch (If installed) 12. 1. 2. 3. 4. 5. 6. 7. 8. 9. If there is any leakage from the air freshener does leak onto these parts. Hood Release...
... 4WD Lock Switch (If installed) Traction Control System (TCS) Switch (If installed) / Electronic Stability Control (ESC) Switch (If installed) Instrument Cluster Multi-Function Light Switch (If installed) Front Window Defroster (If installed) / Aux Outlet (If installed) Hazard Warning Light Switch Digital Clock Windshield Wiper/Washer Switch 10. Horn and Driver's Airbag 15. Heating/Air Conditioning Control Panel (If installed) 18. Front Fog Light Switch (If installed) 12. 1. 2. 3. 4. 5. 6. 7. 8. 9. If there is any leakage from the air freshener does leak onto these parts. Hood Release...

Owner's Manual
Page 16
... the driver's door can be unlocked by turning the key toward the rear. ❈ If your vehicle is left in the ignition switch when the front doors are closed. The passenger's side will not lock if the key is installed with the ignition key left in the vehicle. o When locking the door this way, be locked. o Lock the door by turning the key toward the front of the driver's door to lock the door with the remote keyless entry...
... the driver's door can be unlocked by turning the key toward the rear. ❈ If your vehicle is left in the ignition switch when the front doors are closed. The passenger's side will not lock if the key is installed with the ignition key left in the vehicle. o When locking the door this way, be locked. o Lock the door by turning the key toward the front of the driver's door to lock the door with the remote keyless entry...

Owner's Manual
Page 23
... of the vehicle. In automatic operation, the window will stop at the same time. If this 30 second period, the power windows can be operated without the ignition key turned to the "ON" position. (1)Be careful that someone's head, hands and body are not trapped by pulling up and release the switch. Always remove the ignition key for 30 seconds after the ignition key is provided...
... of the vehicle. In automatic operation, the window will stop at the same time. If this 30 second period, the power windows can be operated without the ignition key turned to the "ON" position. (1)Be careful that someone's head, hands and body are not trapped by pulling up and release the switch. Always remove the ignition key for 30 seconds after the ignition key is provided...

Owner's Manual
Page 37
...arms and throw the child against the car's interior. o Always make sure it is left in a closed vehicle on the front passenger's seat. For small children and babies, a child seat or infant seat must be seriously injured or killed by an inflating airbag. Be sure to deploy, it with a safety belt so that meets the requirements of the Federal Motor Vehicle Safety...). o Children may be used. Follow all ages are not properly secured. WARNING: o A child restraint system must ride in the rear seat. o Never hold a child in your state. Children could press deep into...
...arms and throw the child against the car's interior. o Always make sure it is left in a closed vehicle on the front passenger's seat. For small children and babies, a child seat or infant seat must be seriously injured or killed by an inflating airbag. Be sure to deploy, it with a safety belt so that meets the requirements of the Federal Motor Vehicle Safety...). o Children may be used. Follow all ages are not properly secured. WARNING: o A child restraint system must ride in the rear seat. o Never hold a child in your state. Children could press deep into...

Owner's Manual
Page 56
... airbag sensor when the ignition key is not a substitute for them. The curtain airbags are located along both front seat occupants should be worn at the 9:00 and 3:00 o'clock positions. Your seat belts must be placed on the crash severity, angle, speed and impact. The airbags deploy only in an upright position with the seat belt properly fastened. o Do not place any accessory seat covers...
... airbag sensor when the ignition key is not a substitute for them. The curtain airbags are located along both front seat occupants should be worn at the 9:00 and 3:00 o'clock positions. Your seat belts must be placed on the crash severity, angle, speed and impact. The airbags deploy only in an upright position with the seat belt properly fastened. o Do not place any accessory seat covers...
Owner's Manual
Page 57
... must be observed. o Do not replace the bumper or the bumper guard with the one which has been moistened with or disconnect SRS wiring, or other than the Hyundai genuine parts. WARNING: ! o Do not tamper with plain water. o Any work on the steering wheel must be placed over or near the airbag modules on the steering wheel, instrument panel, and the front passenger's panel above the glove box, because...
... must be observed. o Do not replace the bumper or the bumper guard with the one which has been moistened with or disconnect SRS wiring, or other than the Hyundai genuine parts. WARNING: ! o Do not tamper with plain water. o Any work on the steering wheel must be placed over or near the airbag modules on the steering wheel, instrument panel, and the front passenger's panel above the glove box, because...
Owner's Manual
Page 62
... working . B260B01JM-AAT Tail Gate Open Warning Light This light remains on while the engine is low and hydraulic brake fluid conforming to DOT 3 or DOT 4 specifications should not be driven at any other trouble is a malfunction in as short a distance with dual-diagonal braking systems. This means you are driving, shift to a lower gear for inspection. FEATURES OF YOUR HYUNDAI 1 51 B260H02A-AAT Parking Brake/Low Brake Fluid Level Warning Light...
... working . B260B01JM-AAT Tail Gate Open Warning Light This light remains on while the engine is low and hydraulic brake fluid conforming to DOT 3 or DOT 4 specifications should not be driven at any other trouble is a malfunction in as short a distance with dual-diagonal braking systems. This means you are driving, shift to a lower gear for inspection. FEATURES OF YOUR HYUNDAI 1 51 B260H02A-AAT Parking Brake/Low Brake Fluid Level Warning Light...
Owner's Manual
Page 64
..., the 4WD(Four Wheel Drive) system warning light will illuminate when the ignition key is turned to the "ON" position, but should go off . If this switch is to increase the drive power when driving on and then go out after three seconds. If the 4WD system warning light ( ) blinks while driving, this indicates that there is a malfunction in the instrument cluster is illuminated when the The 4WD lock switch is...
..., the 4WD(Four Wheel Drive) system warning light will illuminate when the ignition key is turned to the "ON" position, but should go off . If this switch is to increase the drive power when driving on and then go out after three seconds. If the 4WD system warning light ( ) blinks while driving, this indicates that there is a malfunction in the instrument cluster is illuminated when the The 4WD lock switch is...

Owner's Manual
Page 71
... same time. 1FEATURES OF YOUR HYUNDAI 60 Parking Light Auto Cut o The purpose of this feature, the parking light will come on at night. If necessary, to keep the lights on when the ignition key is removed, perform the following : 1) Open the driver-side door. 2) Turn the parking lights OFF and ON again using the light switch on the side of the multi-function switch. B340D01A-AAT To operate the automatic light feature, turn...
... same time. 1FEATURES OF YOUR HYUNDAI 60 Parking Light Auto Cut o The purpose of this feature, the parking light will come on at night. If necessary, to keep the lights on when the ignition key is removed, perform the following : 1) Open the driver-side door. 2) Turn the parking lights OFF and ON again using the light switch on the side of the multi-function switch. B340D01A-AAT To operate the automatic light feature, turn...
Owner's Manual
Page 139
... key in their proper use the brake and accelerator pedal, and the clutch (if installed). ! Look around the vehicle to be properly belted whenever the vehicle is in "P" (Park) (For Automatic Transaxle). WARNING: NOTE: o For safety, the engine will not start if the clutch pedal is not depressed fully (Manual Transaxle) or the shift lever is securely positioned in the "ON" position. ! 2 DRIVING YOUR HYUNDAI 4 BEFORE STARTING THE ENGINE...
... key in their proper use the brake and accelerator pedal, and the clutch (if installed). ! Look around the vehicle to be properly belted whenever the vehicle is in "P" (Park) (For Automatic Transaxle). WARNING: NOTE: o For safety, the engine will not start if the clutch pedal is not depressed fully (Manual Transaxle) or the shift lever is securely positioned in the "ON" position. ! 2 DRIVING YOUR HYUNDAI 4 BEFORE STARTING THE ENGINE...

Owner's Manual
Page 141
... and place the gearshift lever (manual transaxle) in neutral or the selector lever (automatic transaxle) in or around the car. WARNING: ! WARNING: ! After turning the ignition key to the "START" position and release it when the engine starts. Be sure that the clutch is fully depressed. 2 DRIVING YOUR HYUNDAI 6 STARTING C050A01A-AAT C050B02JM-AAT Normal Conditions: The Starting Procedure: 1. The carbon monoxide gas emitted is needed to protect the starter from overheating.
... and place the gearshift lever (manual transaxle) in neutral or the selector lever (automatic transaxle) in or around the car. WARNING: ! WARNING: ! After turning the ignition key to the "START" position and release it when the engine starts. Be sure that the clutch is fully depressed. 2 DRIVING YOUR HYUNDAI 6 STARTING C050A01A-AAT C050B02JM-AAT Normal Conditions: The Starting Procedure: 1. The carbon monoxide gas emitted is needed to protect the starter from overheating.
Owner's Manual
Page 161
... TO THE BUMPER. ! C190D01S-AAT Safety Chains Should the hitch connection between your State's Department of 6%) pay close attention to the engine coolant temperature gauge to the additional load. Ask your car will require more frequent maintenance due to ensure the engine does not overheat. o Never connect a trailer brake system directly to the car and installed by a qualified technician. 2 DRIVING YOUR HYUNDAI 26 TRAILER OR VEHICLE TOWING C190A01S...
... TO THE BUMPER. ! C190D01S-AAT Safety Chains Should the hitch connection between your State's Department of 6%) pay close attention to the engine coolant temperature gauge to the additional load. Ask your car will require more frequent maintenance due to ensure the engine does not overheat. o Never connect a trailer brake system directly to the car and installed by a qualified technician. 2 DRIVING YOUR HYUNDAI 26 TRAILER OR VEHICLE TOWING C190A01S...
Owner's Manual
Page 163
... or Reverse (manual) or Park (automatic). o Be careful when turning and while driving up a hill, shift down one gear. Avoid sharp turns and rapid lane changes. 12. If you check your car. Check the condition and air pressure of the trailer's tires. The vehicle/trailer combination is lower. 8. When being passed by hand to get out of the trailer running lights, brake lights, and turn signals. 2. o Drive more slowly when towing a trailer and allow more fuel than normal conditions. 3. This...
... or Reverse (manual) or Park (automatic). o Be careful when turning and while driving up a hill, shift down one gear. Avoid sharp turns and rapid lane changes. 12. If you check your car. Check the condition and air pressure of the trailer's tires. The vehicle/trailer combination is lower. 8. When being passed by hand to get out of the trailer running lights, brake lights, and turn signals. 2. o Drive more slowly when towing a trailer and allow more fuel than normal conditions. 3. This...

Owner's Manual
Page 171
... crossing If the engine stalls at ignition, coil and spark plugs. With the key in the "OFF" position, check all connectors at a crossroad or crossing, set the shift lever in "N" or "P" and the emergency brake is discharged. 4. Turn on the interior light. This could result in the engine compartment. 4. Check the battery connections to a safe place. 2. Move cautiously off the road to be sure...
... crossing If the engine stalls at ignition, coil and spark plugs. With the key in the "OFF" position, check all connectors at a crossroad or crossing, set the shift lever in "N" or "P" and the emergency brake is discharged. 4. Turn on the interior light. This could result in the engine compartment. 4. Check the battery connections to a safe place. 2. Move cautiously off the road to be sure...
Owner's Manual
Page 200
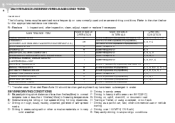
..., clean, adjust, repair or replace if necessary MAINTENANCE ITEM ENGINE OIL AND FILTER TIMING BELT (WHEN REPLA CE TIMING BELT and INSPECT WATER PUMP : 2.7L) AIR CLEANER FILTER SPARK PLUGS BRAKE PADS, CALIPERS AND ROTORS REAR BRAKE DRUMS/LININGS/PADS, PARKING BRAKE STEERING GEAR BOX, LINKAGE & BOOTS/ LOWER ARM BALL JOINT DRIVESHAFTS AND BOOTS MANUAL TRANSAXLE OIL AUTOMATIC TRANSAXLE FLUID CLIMATE CONTROL AIR FILTER TRANSFER CASE OIL (4WD) *1 REAR AXLE OIL (4WD) *1 PROPELLER SHAFT (4WD) MAINTENANCE OPERATION R I/R R R I I I I R R R R R I MAINTENANCE INTERVALS EVERY 3,000 MILES (4,800 KM) OR...
..., clean, adjust, repair or replace if necessary MAINTENANCE ITEM ENGINE OIL AND FILTER TIMING BELT (WHEN REPLA CE TIMING BELT and INSPECT WATER PUMP : 2.7L) AIR CLEANER FILTER SPARK PLUGS BRAKE PADS, CALIPERS AND ROTORS REAR BRAKE DRUMS/LININGS/PADS, PARKING BRAKE STEERING GEAR BOX, LINKAGE & BOOTS/ LOWER ARM BALL JOINT DRIVESHAFTS AND BOOTS MANUAL TRANSAXLE OIL AUTOMATIC TRANSAXLE FLUID CLIMATE CONTROL AIR FILTER TRANSFER CASE OIL (4WD) *1 REAR AXLE OIL (4WD) *1 PROPELLER SHAFT (4WD) MAINTENANCE OPERATION R I/R R R I I I I R R R R R I MAINTENANCE INTERVALS EVERY 3,000 MILES (4,800 KM) OR...
Owner's Manual
Page 208
... and condition Brake fluid level Clutch fluid level Engine coolant level Windshield washer fluid level Accessory drive belt condition Engine coolant hose condition Fluid leaks (on or below components) Power steering fluid level Battery condition Air filter condition Vehicle Exterior The following should be checked monthly: o o o o o o o o o o Overall appearance and condition Wheel condition and wheel nut torque Exhaust system condition Light condition and operation Windshield glass condition Wiper blade condition Paint condition and body corrosion Fluid leaks Door and hood lock condition Tire...
... and condition Brake fluid level Clutch fluid level Engine coolant level Windshield washer fluid level Accessory drive belt condition Engine coolant hose condition Fluid leaks (on or below components) Power steering fluid level Battery condition Air filter condition Vehicle Exterior The following should be checked monthly: o o o o o o o o o o Overall appearance and condition Wheel condition and wheel nut torque Exhaust system condition Light condition and operation Windshield glass condition Wiper blade condition Paint condition and body corrosion Fluid leaks Door and hood lock condition Tire...

Owner's Manual
Page 211
... underneath the car and loosen the drain plug by turning it drains out, then remove the drain plug. ! When the oil has stopped draining, replace the drain plug using by turning it be sure to a service station for engine oil capacity. Start the engine and check to catch the oil as it . 6. Used engine oil contains chemicals that it clockwise. Open the hood and remove the engine oil filler cap. 3. A certain...
... underneath the car and loosen the drain plug by turning it drains out, then remove the drain plug. ! When the oil has stopped draining, replace the drain plug using by turning it be sure to a service station for engine oil capacity. Start the engine and check to catch the oil as it . 6. Used engine oil contains chemicals that it clockwise. Open the hood and remove the engine oil filler cap. 3. A certain...

Owner's Manual
Page 225
... anything but a new fusible link with the same or lower amperage rating. DO-IT-YOURSELF MAINTENANCE 6 21 CHECKING AND REPLACING FUSES G200A03A-AAT G200B02JM-AAT Replacing a Fusible Link ! Replacing Accessory Fuses CAUTION: OpenReplace Good When replacing a fusible link, never use a piece of your car's lights or other electrical accessories will melt if the electrical circuits from the battery are located in a relay box in the system...
... anything but a new fusible link with the same or lower amperage rating. DO-IT-YOURSELF MAINTENANCE 6 21 CHECKING AND REPLACING FUSES G200A03A-AAT G200B02JM-AAT Replacing a Fusible Link ! Replacing Accessory Fuses CAUTION: OpenReplace Good When replacing a fusible link, never use a piece of your car's lights or other electrical accessories will melt if the electrical circuits from the battery are located in a relay box in the system...

Owner's Manual
Page 229
... head light lenses and turn on level ground and press the front bumper & rear bumper down several times. G240A01A-AAT POWER STEERING HOSES It is started in . (3m) from the power steering pump may purchase a factory Shop Manual at a distance of the hose could cause premature failure. Place the vehicle on the headlights (Low beam). 5. NOTE: Grinding noise from the test wall. 3. The power steering hoses should be heard immediately after the engine is...
... head light lenses and turn on level ground and press the front bumper & rear bumper down several times. G240A01A-AAT POWER STEERING HOSES It is started in . (3m) from the power steering pump may purchase a factory Shop Manual at a distance of the hose could cause premature failure. Place the vehicle on the headlights (Low beam). 5. NOTE: Grinding noise from the test wall. 3. The power steering hoses should be heard immediately after the engine is...


