

Owner's Manual
Page 7
... appear in the Vehicle Specifications section of the Owner's Manual and which we build is suggested that you read it carefully because the information it contains can contribute greatly to the satisfaction you to provide high-quality service, maintenance and any other assistance that all service and maintenance on the back cover of Hyundai Motor Company. The advanced engineering and high-quality...
... appear in the Vehicle Specifications section of the Owner's Manual and which we build is suggested that you read it carefully because the information it contains can contribute greatly to the satisfaction you to provide high-quality service, maintenance and any other assistance that all service and maintenance on the back cover of Hyundai Motor Company. The advanced engineering and high-quality...
Owner's Manual
Page 11
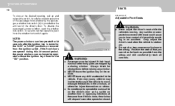
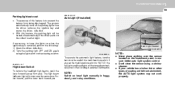
... these parts. Horn and Driver's Airbag 3. 1. Front Fog Light Switch (If installed) 6. Ignition Switch 5. F9 Passenger's Air Bag Off Indicator 10. CAUTION: When installing a container of liquid air freshener inside the vehicle, do not place it may damage these areas, wash them with water immediately. Passenger's Air Bag 11.Fuse Box Relay 12.Hood Release Lever 13.Steering Wheel Tilt Lever 14.Heating and Cooling Controls 15.Ashtray 16.Parking Brake Lever 17.Shift Lever 18...
... these parts. Horn and Driver's Airbag 3. 1. Front Fog Light Switch (If installed) 6. Ignition Switch 5. F9 Passenger's Air Bag Off Indicator 10. CAUTION: When installing a container of liquid air freshener inside the vehicle, do not place it may damage these areas, wash them with water immediately. Passenger's Air Bag 11.Fuse Box Relay 12.Hood Release Lever 13.Steering Wheel Tilt Lever 14.Heating and Cooling Controls 15.Ashtray 16.Parking Brake Lever 17.Shift Lever 18...
Owner's Manual
Page 13
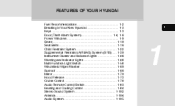
... Breaking in Your New Hyundai ...1-3 Keys ...1-3 Door (Theft-Alarm System) ...1-4, 1-6 Power Windows ...1-9 Seats ...1-10 Seat Belts...1-16 Child Restraint System ...1-22 Supplemental Restraint (AIRBAG) System (SRS) ...1-30 Instrument Cluster and Indicator Lights ...1-46 Warning and Indicator Lights ...1-48 Multi-Function Light Switch ...1-58 Windshield Wiper/Washer ...1-60 Sunroof ...1-66 Mirror ...1-70 Hood Release ...1-73 Cruise Control ...1-79 Audio Remote Control Switch ...1-83 Heating and Cooling Control ...1-84 Stereo Sound System ...1-102 Antenna ...1-104 Audio System ...1-105 1 1
... Breaking in Your New Hyundai ...1-3 Keys ...1-3 Door (Theft-Alarm System) ...1-4, 1-6 Power Windows ...1-9 Seats ...1-10 Seat Belts...1-16 Child Restraint System ...1-22 Supplemental Restraint (AIRBAG) System (SRS) ...1-30 Instrument Cluster and Indicator Lights ...1-46 Warning and Indicator Lights ...1-48 Multi-Function Light Switch ...1-58 Windshield Wiper/Washer ...1-60 Sunroof ...1-66 Mirror ...1-70 Hood Release ...1-73 Cruise Control ...1-79 Audio Remote Control Switch ...1-83 Heating and Cooling Control ...1-84 Stereo Sound System ...1-102 Antenna ...1-104 Audio System ...1-105 1 1
Owner's Manual
Page 22
... the ignition key turned to lose control of the driver's door. Always check for 30 seconds after the ignition key is turned to prevent operation of the passenger front window by a closing window. o NEVER leave the ignition key in the vehicle. o Do not attempt to normal operation, push in opposing directions at the desired opening, pull up and release the switch. If this 30 second period, the power windows...
... the ignition key turned to lose control of the driver's door. Always check for 30 seconds after the ignition key is turned to prevent operation of the passenger front window by a closing window. o NEVER leave the ignition key in the vehicle. o Do not attempt to normal operation, push in opposing directions at the desired opening, pull up and release the switch. If this 30 second period, the power windows...

Owner's Manual
Page 34
... fits your car and seat belts, and fits your arms and throw the child against the car's interior. WARNING: ! o Children may inadvertently cause the vehicle to deploy, it will tear the child from your child. o Always follow the instructions for a short time. Children could be thrown forward in your vehicle. Follow all ages are safer when restrained in a crash if their...
... fits your car and seat belts, and fits your arms and throw the child against the car's interior. WARNING: ! o Children may inadvertently cause the vehicle to deploy, it will tear the child from your child. o Always follow the instructions for a short time. Children could be thrown forward in your vehicle. Follow all ages are safer when restrained in a crash if their...
Owner's Manual
Page 61
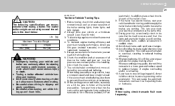
Seat Belt Reminder Light And Chime Seat belt reminder light comes and stays on until the seat belt is fastened when the ignition key is in the electrical charging system. And, the warning chime will go out when the engine is started the engine, or if it is not working properly. First, make certain the generator drive belt is turned to the high beam or flash position. FEATURES OF YOUR HYUNDAI 1 49...
Seat Belt Reminder Light And Chime Seat belt reminder light comes and stays on until the seat belt is fastened when the ignition key is in the electrical charging system. And, the warning chime will go out when the engine is started the engine, or if it is not working properly. First, make certain the generator drive belt is turned to the high beam or flash position. FEATURES OF YOUR HYUNDAI 1 49...

Owner's Manual
Page 63
... greater pedal pressure are driving, shift to a lower gear for inspection. If the brakes fail while you are required to stop the car as soon as short a distance with dual-diagonal braking systems. This means you that the key is in the ignition switch. FEATURES OF YOUR HYUNDAI 1 51 The brake fluid level warning light indicates that the brake fluid level in the brake master cylinder is low and hydraulic brake fluid conforming...
... greater pedal pressure are driving, shift to a lower gear for inspection. If the brakes fail while you are required to stop the car as soon as short a distance with dual-diagonal braking systems. This means you that the key is in the ignition switch. FEATURES OF YOUR HYUNDAI 1 51 The brake fluid level warning light indicates that the brake fluid level in the brake master cylinder is low and hydraulic brake fluid conforming...
Owner's Manual
Page 71
... of coating on the front windshield, the AUTO light system may not work properly. The high beam indicator light will be turned off the parking light when the driver removes the ignition key and opens the driver- To operate the automatic light feature, turn on head light manually in foggy, cloudy and rainy conditions. o Don't clean the sensor using the light switch on the steering column. NOTE: Switch on the headlight high beams, push the...
... of coating on the front windshield, the AUTO light system may not work properly. The high beam indicator light will be turned off the parking light when the driver removes the ignition key and opens the driver- To operate the automatic light feature, turn on head light manually in foggy, cloudy and rainy conditions. o Don't clean the sensor using the light switch on the steering column. NOTE: Switch on the headlight high beams, push the...
Owner's Manual
Page 142
... all the doors. 7. Combination Ignition Switch WARNING: o If your Hyundai has an automatic transaxle, place the shift lever in the "START" position for people, especially children, before putting a car into 'drive.' Check that all windows, and lights are operating and that are no flat tires, puddles of oil, water or other occupants have sufficient fuel. 10.Check the operation of possible trouble. 2. Check your vehicle for more...
... all the doors. 7. Combination Ignition Switch WARNING: o If your Hyundai has an automatic transaxle, place the shift lever in the "START" position for people, especially children, before putting a car into 'drive.' Check that all windows, and lights are operating and that are no flat tires, puddles of oil, water or other occupants have sufficient fuel. 10.Check the operation of possible trouble. 2. Check your vehicle for more...

Owner's Manual
Page 144
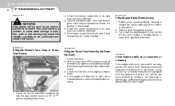
... protect the starter from overheating. Always fully depress the brake pedal before starting the engine. 4. On a manual transaxle equipped vehicle that the clutch is fully depressed. Wait 15-30 seconds between starting a manual transaxle vehicle. DRIVING YOUR HYUNDAI 2 5 STARTING C050A01A-AAT C050B02A-AAT LOCK ON Normal Conditions: The Starting Procedure: 1. Insert key, and fasten the seat belt. 2. Depress the clutch pedal fully and place the gearshift lever (manual transaxle) in neutral or the...
... protect the starter from overheating. Always fully depress the brake pedal before starting the engine. 4. On a manual transaxle equipped vehicle that the clutch is fully depressed. Wait 15-30 seconds between starting a manual transaxle vehicle. DRIVING YOUR HYUNDAI 2 5 STARTING C050A01A-AAT C050B02A-AAT LOCK ON Normal Conditions: The Starting Procedure: 1. Insert key, and fasten the seat belt. 2. Depress the clutch pedal fully and place the gearshift lever (manual transaxle) in neutral or the...
Owner's Manual
Page 150
... "P" to keep the car from "P" or "N" to a lower gear. o The risk of control. o Avoid high speeds when cornering or turning. o Do not make quick steering wheel movements, such as it forward and backward. Do not attempt this , engine braking will help slow the car. This can cause the drive wheels to lose traction and the vehicle to a lower gear. When you lose control of gear and coast down...
... "P" to keep the car from "P" or "N" to a lower gear. o The risk of control. o Avoid high speeds when cornering or turning. o Do not make quick steering wheel movements, such as it forward and backward. Do not attempt this , engine braking will help slow the car. This can cause the drive wheels to lose traction and the vehicle to a lower gear. When you lose control of gear and coast down...
Owner's Manual
Page 154
... no curb or if it only temporarily while you drive your car in your car clean. In addition, driving with the maintenance schedule in first or reverse gear (manual transaxle) and block the rear wheels so the car cannot roll. o Take care of the other conditions to change speeds unnecessarily. Weight reduces fuel economy. o Don't let the engine idle longer than necessary. Firmly engage the parking brake and place the gear selector...
... no curb or if it only temporarily while you drive your car in your car clean. In addition, driving with the maintenance schedule in first or reverse gear (manual transaxle) and block the rear wheels so the car cannot roll. o Take care of the other conditions to change speeds unnecessarily. Weight reduces fuel economy. o Don't let the engine idle longer than necessary. Firmly engage the parking brake and place the gear selector...
Owner's Manual
Page 158
... well as to the additional load. DRIVING YOUR HYUNDAI 2 19 USE OF LIGHTS C180A01A-AAT TRAILER OR VEHICLE TOWING C190A01S-AAT C190B01S-AAT Check your Hyundai dealer for further details before towing. If you are considering towing with your car, you tow a trailer or vehicle, your car during the day in serious engine or transaxle damage. Trailer Hitches Select the proper hitch and ball combination, making sure that of...
... well as to the additional load. DRIVING YOUR HYUNDAI 2 19 USE OF LIGHTS C180A01A-AAT TRAILER OR VEHICLE TOWING C190A01S-AAT C190B01S-AAT Check your Hyundai dealer for further details before towing. If you are considering towing with your car, you tow a trailer or vehicle, your car during the day in serious engine or transaxle damage. Trailer Hitches Select the proper hitch and ball combination, making sure that of...
Owner's Manual
Page 160
... lights and any trailer brakes are still working . DRIVING YOUR HYUNDAI 2 21 C190F01S-AAT ! To maintain engine braking efficiency and electrical charging performance, do not hold the vehicle in 1st or Reverse (manual) or Park The following specifications are working . 11.Avoid jerky starts, sudden acceleration or sudden stops. 12.Avoid sharp turns and rapid lane changes. 13.Avoid holding the brake pedal down a hill, shift into the curb, set the parking brake...
... lights and any trailer brakes are still working . DRIVING YOUR HYUNDAI 2 21 C190F01S-AAT ! To maintain engine braking efficiency and electrical charging performance, do not hold the vehicle in 1st or Reverse (manual) or Park The following specifications are working . 11.Avoid jerky starts, sudden acceleration or sudden stops. 12.Avoid sharp turns and rapid lane changes. 13.Avoid holding the brake pedal down a hill, shift into the curb, set the parking brake...
Owner's Manual
Page 168
... the ignition lock switch, the vehicle can move forward by shifting to be overloaded and create a fire hazard. 2. Move cautiously off the road to be sure the gear selector lever is in "N" or "P" and the parking brake is discharged. 4. Reconnect any that may cause the catalytic converter to the 2(second) or 3(third) gear and then turning the starter without depressing the clutch pedal. F020100AUN If the engine...
... the ignition lock switch, the vehicle can move forward by shifting to be overloaded and create a fire hazard. 2. Move cautiously off the road to be sure the gear selector lever is in "N" or "P" and the parking brake is discharged. 4. Reconnect any that may cause the catalytic converter to the 2(second) or 3(third) gear and then turning the starter without depressing the clutch pedal. F020100AUN If the engine...
Owner's Manual
Page 194
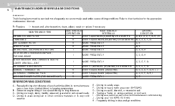
... OIL AND FILTER FUEL FILTER FUEL LINES, FUEL HOSES AND CONNECTIONS CRANKCASE VENTILATION HOSES VAPOR HOSE AND FUEL FILLER CAP AIR CLEANER FILTER SPARK PLUGS (PLATINUM COATED) SPARK PLUGS (IRIDIUM COATED) 8 9 VALVE CLEARANCE (2.0 L) FUEL TANK AIRFILTER I R I I R I R I I I I I R I I I I I I R R R I R I R I I I I R I I I R R R R R R I R R R R R R I I I R R I I I I R R R R R R R I R R R R R R I : Inspect and, after inspection, clean, adjust, repair or replace if necessary. Keep receipts for all vehicle emission services to ensure good emission control and performance. 5 VEHICLE MAINTENANCE...
... OIL AND FILTER FUEL FILTER FUEL LINES, FUEL HOSES AND CONNECTIONS CRANKCASE VENTILATION HOSES VAPOR HOSE AND FUEL FILLER CAP AIR CLEANER FILTER SPARK PLUGS (PLATINUM COATED) SPARK PLUGS (IRIDIUM COATED) 8 9 VALVE CLEARANCE (2.0 L) FUEL TANK AIRFILTER I R I I R I R I I I I I R I I I I I I R R R I R I R I I I I R I I I R R R R R R I R R R R R R I I I R R I I I I R R R R R R R I R R R R R R I : Inspect and, after inspection, clean, adjust, repair or replace if necessary. Keep receipts for all vehicle emission services to ensure good emission control and performance. 5 VEHICLE MAINTENANCE...
Owner's Manual
Page 196
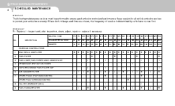
.... Refer to the chart below for long distances C - R : Replace I : Inspect and, after inspection, clean, adjust, repair or replace if necessary MAINTENANCE ITEM ENGINE OIL AND FILTER TIMING BELT AIR CLEANER FILTER SPARK PLUGS BRAKE PADS, CALIPERS AND ROTORS REAR BRAKE DRUMS/LININGS/PADS, PARKING BRAKE STEERING GEAR BOX, LINKAGE & BOOTS/ LOWER ARM BALL JOINT DRIVESHAFTS AND BOOTS MANUAL TRANSAXLE OIL AUTOMATIC TRANSAXLE FLUID AIR CONDITIONER FILTER (FOR BLOWER UNIT) MAINTENANCE OPERATION R R R R I I I I R R R MAINTENANCE INTERVALS EVERY 3,000 MILES (4,800 KM) OR 3 MONTHS EVERY 40,000...
.... Refer to the chart below for long distances C - R : Replace I : Inspect and, after inspection, clean, adjust, repair or replace if necessary MAINTENANCE ITEM ENGINE OIL AND FILTER TIMING BELT AIR CLEANER FILTER SPARK PLUGS BRAKE PADS, CALIPERS AND ROTORS REAR BRAKE DRUMS/LININGS/PADS, PARKING BRAKE STEERING GEAR BOX, LINKAGE & BOOTS/ LOWER ARM BALL JOINT DRIVESHAFTS AND BOOTS MANUAL TRANSAXLE OIL AUTOMATIC TRANSAXLE FLUID AIR CONDITIONER FILTER (FOR BLOWER UNIT) MAINTENANCE OPERATION R R R R I I I I R R R MAINTENANCE INTERVALS EVERY 3,000 MILES (4,800 KM) OR 3 MONTHS EVERY 40,000...
Owner's Manual
Page 204
... and condition Brake fluid level Clutch fluid level Engine coolant level Windshield washer fluid level Accessory drive belt condition Engine coolant hose condition Fluid leaks (on or below components) Power steering fluid level Battery condition Air filter condition Vehicle Exterior The following should be checked monthly: o o o o o o o o o o Overall appearance and condition Wheel condition and wheel nut torque Exhaust system condition Light condition and operation Windshield glass condition Wiper blade condition Paint condition and body corrosion Fluid leaks Door and hood lock condition Tire...
... and condition Brake fluid level Clutch fluid level Engine coolant level Windshield washer fluid level Accessory drive belt condition Engine coolant hose condition Fluid leaks (on or below components) Power steering fluid level Battery condition Air filter condition Vehicle Exterior The following should be checked monthly: o o o o o o o o o o Overall appearance and condition Wheel condition and wheel nut torque Exhaust system condition Light condition and operation Windshield glass condition Wiper blade condition Paint condition and body corrosion Fluid leaks Door and hood lock condition Tire...
Owner's Manual
Page 235
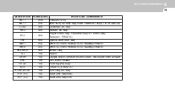
... PROTECTED COMPONENTS Generator(2.0L) BCM BOX(Tail lamp relay,Power connector,Fuse(2,7,12,13,19,20,24) Condenser fan relay Radiator fan relay Engine control relay, Fuel pump relay, A/T control relay, Generator, PCM(2.0L) Ignition switch,Start relay ABS/ESC control module,ESC Air bleeding connector ABS/ESC control module,ESC Air bleeding connector Blower relay Injector Oxygen sensor,Camshaft position sensor, Idle speed control actuator DRL control module Front fog lamp relay TCM(2.7L),ECM(2.7L) Horn relay,A/C relay Head lamp relay...
... PROTECTED COMPONENTS Generator(2.0L) BCM BOX(Tail lamp relay,Power connector,Fuse(2,7,12,13,19,20,24) Condenser fan relay Radiator fan relay Engine control relay, Fuel pump relay, A/T control relay, Generator, PCM(2.0L) Ignition switch,Start relay ABS/ESC control module,ESC Air bleeding connector ABS/ESC control module,ESC Air bleeding connector Blower relay Injector Oxygen sensor,Camshaft position sensor, Idle speed control actuator DRL control module Front fog lamp relay TCM(2.7L),ECM(2.7L) Horn relay,A/C relay Head lamp relay...

Owner's Manual
Page 265
... Intervals Explanation of scheduled maintenance items ...5-7 Maintenance under severe usage conditions ...5-6 Scheduled maintenance ...5-4 Service requirements ...5-2 Map Light ...1-68 Mirror Day-night inside rearview ...1-71 Outside rear view ...1-70 O Odometer ...1-54 P Parking Brake ...1-72 Power Steering Fluid Level ...6-22 Power Window ...1-9 Pre-tensioner Seat Belt ...1-28 R Rear Seats Before folding the rear seats ...1-14 Fold down ...1-15 Rear seat entry ...1-13 Rear seat positions ...1-14 Rear Window Defroster Switch ...1-63 Reporting Safety Defects ...8-17 S Seat Belts 3-Point system...
... Intervals Explanation of scheduled maintenance items ...5-7 Maintenance under severe usage conditions ...5-6 Scheduled maintenance ...5-4 Service requirements ...5-2 Map Light ...1-68 Mirror Day-night inside rearview ...1-71 Outside rear view ...1-70 O Odometer ...1-54 P Parking Brake ...1-72 Power Steering Fluid Level ...6-22 Power Window ...1-9 Pre-tensioner Seat Belt ...1-28 R Rear Seats Before folding the rear seats ...1-14 Fold down ...1-15 Rear seat entry ...1-13 Rear seat positions ...1-14 Rear Window Defroster Switch ...1-63 Reporting Safety Defects ...8-17 S Seat Belts 3-Point system...


