Owner's Manual
Page 56
...causes the turn signals on the right side of the car to blink. HGK2079 To indicate a lane change and makes for a burnedout fuse or bulb or see your Hyundai dealer. As the turn is a malfunction in the system. Check for diver correspond to low volt situation. Pushing upwards on the lever causes...than usual, goes on but does not blink, or does not go on the left side of the car to blink. FEATURES OF YOUR HYUNDAI 1 45 MULTI-FUNCTION LIGHT SWITCH B340A01A-AAT B340B01A-AAT COMBINATION TURN SIGNAL, HEADLIGHT AND HIGH-BEAM SWITCH Turn Signal Operation Pulling down to a point where it begins...
...causes the turn signals on the right side of the car to blink. HGK2079 To indicate a lane change and makes for a burnedout fuse or bulb or see your Hyundai dealer. As the turn is a malfunction in the system. Check for diver correspond to low volt situation. Pushing upwards on the lever causes...than usual, goes on but does not blink, or does not go on the left side of the car to blink. FEATURES OF YOUR HYUNDAI 1 45 MULTI-FUNCTION LIGHT SWITCH B340A01A-AAT B340B01A-AAT COMBINATION TURN SIGNAL, HEADLIGHT AND HIGH-BEAM SWITCH Turn Signal Operation Pulling down to a point where it begins...
Owner's Manual
Page 139
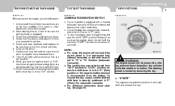
... "N" Position (Automatic transaxle). Check that are operating and that all other indications of warning lights and all bulbs when key is in neutral and depress the clutch pedal fully. Close all appropriate warning lights are not needed. 9. o If your Hyundai is not in their proper positions. 6. Do not hold the key in "P" (Park) (For...
... "N" Position (Automatic transaxle). Check that are operating and that all other indications of warning lights and all bulbs when key is in neutral and depress the clutch pedal fully. Close all appropriate warning lights are not needed. 9. o If your Hyundai is not in their proper positions. 6. Do not hold the key in "P" (Park) (For...
Owner's Manual
Page 190
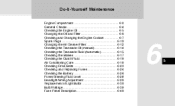
... ...6-19 Checking Drive Belts ...6-23 Checking and Replacing Fuses ...6-24 Checking the Battery ...6-26 Power Steering Fluid Level ...6-28 Headlight Aiming Adjustment ...6-29 Replacement of Light Bulbs ...6-30 Bulb Wattage ...6-39 Fuse Panel Description ...6-40 6 6
... ...6-19 Checking Drive Belts ...6-23 Checking and Replacing Fuses ...6-24 Checking the Battery ...6-26 Power Steering Fluid Level ...6-28 Headlight Aiming Adjustment ...6-29 Replacement of Light Bulbs ...6-30 Bulb Wattage ...6-39 Fuse Panel Description ...6-40 6 6

Owner's Manual
Page 219
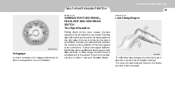
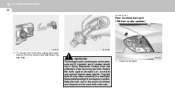
...page 6-38 for the wattage description. Headlight and Front Turn Signal Light 1. Wear eye protection. 2. Allow the bulb to replace the burned-out bulb with petroleum products, such as oil, gasoline, etc. Always grasp the bulb by its plastic base, avoid touching the glass. ! Be sure...) "L" Distance between the headlights and the wall that the lights are tested against : 118 in the back of the headlight. 6 DO-IT-YOURSELFMAINTENANCE 30 REPLACEMENT OF LIGHT BULBS SPECIFICATION: "H" Horizontal center line of headlights from the bulb base in . (3,000 mm) G260A02A-AAT G270A01GK-AAT Before...
...page 6-38 for the wattage description. Headlight and Front Turn Signal Light 1. Wear eye protection. 2. Allow the bulb to replace the burned-out bulb with petroleum products, such as oil, gasoline, etc. Always grasp the bulb by its plastic base, avoid touching the glass. ! Be sure...) "L" Distance between the headlights and the wall that the lights are tested against : 118 in the back of the headlight. 6 DO-IT-YOURSELFMAINTENANCE 30 REPLACEMENT OF LIGHT BULBS SPECIFICATION: "H" Horizontal center line of headlights from the bulb base in . (3,000 mm) G260A02A-AAT G270A01GK-AAT Before...
Owner's Manual
Page 221
... of the reach of children and dispose of the used bulb with care. Protect the bulb against abrasions or scratches and against liquids when lighted. 6 DO-IT-YOURSELFMAINTENANCE 32 G270B01GK-GAT Rear Combination Light (Without woofer speaker) (1) (4) (2) HGK5036 G270A03O (3) 11.To replace the front turn signal light bulb, remove from the bulb holder and install the new...
... of the reach of children and dispose of the used bulb with care. Protect the bulb against abrasions or scratches and against liquids when lighted. 6 DO-IT-YOURSELFMAINTENANCE 32 G270B01GK-GAT Rear Combination Light (Without woofer speaker) (1) (4) (2) HGK5036 G270A03O (3) 11.To replace the front turn signal light bulb, remove from the bulb holder and install the new...

Owner's Manual
Page 222
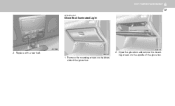
Install the new bulb. To detach the rear combination light hit it counterclockwise. (1) Stop/Tail light (2) Back-up light, turn the knob by hand. 5. DO-IT-YOURSELF MAINTENANCE 6 33 3. To remove the cover of the rear luggage trim, turn signal light, side mark light), take it out from the bulb holder by turning it strongly by hand to the counterclockwise. 4. To replace the rear combination light (stop/ tail light, back-up light (3) Turn signal light (4) Side mark light 6. HGK5042 Remove the nut (8mm) with a spanner. (1) (4) (2) (3) HGK5041 HGK5044 HGK5043-1 2.
Install the new bulb. To detach the rear combination light hit it counterclockwise. (1) Stop/Tail light (2) Back-up light, turn the knob by hand. 5. DO-IT-YOURSELF MAINTENANCE 6 33 3. To remove the cover of the rear luggage trim, turn signal light, side mark light), take it out from the bulb holder by turning it strongly by hand to the counterclockwise. 4. To replace the rear combination light (stop/ tail light, back-up light (3) Turn signal light (4) Side mark light 6. HGK5042 Remove the nut (8mm) with a spanner. (1) (4) (2) (3) HGK5041 HGK5044 HGK5043-1 2.

Owner's Manual
Page 224
Remove the nut (8mm) with a wrench. 8. HGK5043-1 7. To replace the rear combination light (stop/ tail light, back-up light (3) Turn signal light (4) Side mark light 9. Install the new bulb. To detach the rear combination light hit it strongly by turning it counterclockwise. (1) Stop/Tail light (2) Back-up light, turn the knob by hand to the counterclockwise. 6. To remove the cover of the rear luggae trim, turn signal light, side mark light), take it out from the bulb holder by hand. DO-IT-YOURSELF MAINTENANCE 6 35 (4) (1) (2) (3) HGK5041 HGK5042 HGK5044 5.
Remove the nut (8mm) with a wrench. 8. HGK5043-1 7. To replace the rear combination light (stop/ tail light, back-up light (3) Turn signal light (4) Side mark light 9. Install the new bulb. To detach the rear combination light hit it strongly by turning it counterclockwise. (1) Stop/Tail light (2) Back-up light, turn the knob by hand to the counterclockwise. 6. To remove the cover of the rear luggae trim, turn signal light, side mark light), take it out from the bulb holder by hand. DO-IT-YOURSELF MAINTENANCE 6 35 (4) (1) (2) (3) HGK5041 HGK5042 HGK5044 5.

Owner's Manual
Page 225
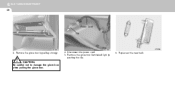
Remove the cover with a flat-blade screwdriver. HGK5045 HGK5047 1. Disconnect the power cord. Open the tail gate. 2. 6 DO-IT-YOURSELFMAINTENANCE 36 G270C01GK-AAT G270G01GK-AAT Luggage Compartment Light Map Light HGK5046 3. HTB284 4. Remove the cover with a flat-blade screwdriver. 1. Replace with a new bulb.
Remove the cover with a flat-blade screwdriver. HGK5045 HGK5047 1. Disconnect the power cord. Open the tail gate. 2. 6 DO-IT-YOURSELFMAINTENANCE 36 G270C01GK-AAT G270G01GK-AAT Luggage Compartment Light Map Light HGK5046 3. HTB284 4. Remove the cover with a flat-blade screwdriver. 1. Replace with a new bulb.
Owner's Manual
Page 226
Remove the mounting screws on the upside of the glove box. HGK2111 2. Replace with a new bulb. Open the glove box and remove the mounting screws on the downside of the glove box. 1. DO-IT-YOURSELF MAINTENANCE 6 37 G270H01GK-GAT Glove Box Illuminated Light HGK5048 HGK2112 2.
Remove the mounting screws on the upside of the glove box. HGK2111 2. Replace with a new bulb. Open the glove box and remove the mounting screws on the downside of the glove box. 1. DO-IT-YOURSELF MAINTENANCE 6 37 G270H01GK-GAT Glove Box Illuminated Light HGK5048 HGK2112 2.
Owner's Manual
Page 227
Replace with a new bulb. CAUTION: Be careful not to damage the glove box when pulling the glove box. Disconnect the power cord. 5. 6 DO-IT-YOURSELFMAINTENANCE 38 Power Cord Clip HGK5052 HGK5053 HTB284 3. Remove the glove box illuminated light by pulling strongly. ! 4. Remove the glove box by pushing the clip. 6.
Replace with a new bulb. CAUTION: Be careful not to damage the glove box when pulling the glove box. Disconnect the power cord. 5. 6 DO-IT-YOURSELFMAINTENANCE 38 Power Cord Clip HGK5052 HGK5053 HTB284 3. Remove the glove box illuminated light by pulling strongly. ! 4. Remove the glove box by pushing the clip. 6.

Owner's Manual
Page 228
.../Low) 2 Map Light 3 Front Position Light 4 Front Fog Light (If installed) 5 Front Turn Signal Light/ Front Side Marker Light 6 Front Door Edge Warning Light 7 Luggage Compartment Light 2.4 (LED) W2.1 X 9.5d 3.5 (LED) 5 27 27/8 27 5 BA15s BA15d BA15s W2.1 X 9.5d S8.5 / 8.5 10 Combination 11 Light W2.1 X 9.5d 12 S8.5 / 8.5 13 License Plate Light DO-IT-YOURSELF MAINTENANCE 6 39 BULB WATTAGE G280A04GK...
.../Low) 2 Map Light 3 Front Position Light 4 Front Fog Light (If installed) 5 Front Turn Signal Light/ Front Side Marker Light 6 Front Door Edge Warning Light 7 Luggage Compartment Light 2.4 (LED) W2.1 X 9.5d 3.5 (LED) 5 27 27/8 27 5 BA15s BA15d BA15s W2.1 X 9.5d S8.5 / 8.5 10 Combination 11 Light W2.1 X 9.5d 12 S8.5 / 8.5 13 License Plate Light DO-IT-YOURSELF MAINTENANCE 6 39 BULB WATTAGE G280A04GK...
Owner's Manual
Page 256
... ...2-11 Checking the brakes ...6-17 Fluid ...6-18 Pedal clearance ...6-23 Pedal free-play ...6-23 Practices ...2-11 Breaking-In your new Hyundai ...1-3 Bulbs Wattage ...6-39 C Care of Cassette tapes ...1-123 Care of Disc ...1-123 Cassette Tape Player Operation (H250, H280, J290) ...1-91...110, 1-118 Child Restraint System ...1-20 ~ 1-24 Cigarette Lighter ...1-51 Clutch Checking fluid ...6-19 Pedal free-play ...6-22 Combination Light Auto Light ...1-46 Headlight flasher ...1-47 Headlight switch ...1-46 High-beam switch ...1-46 Lane change signal ...1-45 Turn signal operation ...1-45 Compact ...
... ...2-11 Checking the brakes ...6-17 Fluid ...6-18 Pedal clearance ...6-23 Pedal free-play ...6-23 Practices ...2-11 Breaking-In your new Hyundai ...1-3 Bulbs Wattage ...6-39 C Care of Cassette tapes ...1-123 Care of Disc ...1-123 Cassette Tape Player Operation (H250, H280, J290) ...1-91...110, 1-118 Child Restraint System ...1-20 ~ 1-24 Cigarette Lighter ...1-51 Clutch Checking fluid ...6-19 Pedal free-play ...6-22 Combination Light Auto Light ...1-46 Headlight flasher ...1-47 Headlight switch ...1-46 High-beam switch ...1-46 Lane change signal ...1-45 Turn signal operation ...1-45 Compact ...

Owner's Manual
Page 257
......6-2 Coolant ...6-7 Coolant temperature gauge ...1-40 If the engine overheats ...3-4 Number ...8-2 Oil ...6-5 Starting ...2-4 Engine Exhaust Can Be Dangerous ...2-2 F Floor mat Anchor ...1-64 Front Fog Light Switch ...1-49 Front Seats Adjustable front seats ...1-9 Adjustable headrests ...1-11 Adjusting seatback angle ...1-10 Adjusting seat forward and rearward ...1-10 Lumbar support control ...1-11 Seat... ...1-60 Fuses Fuse Panel Description ...6-40 G General Everyday Checks ...6-4 Glove box ...1-56 H Hazard Warning System ...1-50 Headlight Aiming Adjustment ...6-29 Headlight Bulb ...6-30
......6-2 Coolant ...6-7 Coolant temperature gauge ...1-40 If the engine overheats ...3-4 Number ...8-2 Oil ...6-5 Starting ...2-4 Engine Exhaust Can Be Dangerous ...2-2 F Floor mat Anchor ...1-64 Front Fog Light Switch ...1-49 Front Seats Adjustable front seats ...1-9 Adjustable headrests ...1-11 Adjusting seatback angle ...1-10 Adjusting seat forward and rearward ...1-10 Lumbar support control ...1-11 Seat... ...1-60 Fuses Fuse Panel Description ...6-40 G General Everyday Checks ...6-4 Glove box ...1-56 H Hazard Warning System ...1-50 Headlight Aiming Adjustment ...6-29 Headlight Bulb ...6-30


