Owner's Manual
Page 4
... to the growing number of discriminating people who drive Hyundais. Copyright 2005 Hyundai Motor Company. A040A01A-AAT FOREWORD Thank you to the features and operation of your new Hyundai. You must always use of this Hyundai, please leave the manual in the Service Station Information on Page 9-4 in the Vehicle Specifications section of the Owner's Manual and which we build is suggested that you...
... to the growing number of discriminating people who drive Hyundais. Copyright 2005 Hyundai Motor Company. A040A01A-AAT FOREWORD Thank you to the features and operation of your new Hyundai. You must always use of this Hyundai, please leave the manual in the Service Station Information on Page 9-4 in the Vehicle Specifications section of the Owner's Manual and which we build is suggested that you...
Owner's Manual
Page 10
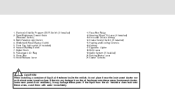
....Fuse Box Relay 12.Steering Wheel Tilt Lever (If installed) 13.Horn and Driver's Airbag 14.Cruise Control Switch (If installed) 15.Heating and Cooling Controls 16.Ashtray 17.Cigarette Lighter 18.Shift Lever 19.Audio System (If installed) 20.Parking Brake Lever 21.Center Console ! 1. If the liquid from the air freshener onto these areas (Instrument cluster, instrument panel or air ventilator), it near the instrument cluster nor on the instrument panel surface. Panel Brightness Control Knob (Rheostat Switch) 3. Windshield Wiper...
....Fuse Box Relay 12.Steering Wheel Tilt Lever (If installed) 13.Horn and Driver's Airbag 14.Cruise Control Switch (If installed) 15.Heating and Cooling Controls 16.Ashtray 17.Cigarette Lighter 18.Shift Lever 19.Audio System (If installed) 20.Parking Brake Lever 21.Center Console ! 1. If the liquid from the air freshener onto these areas (Instrument cluster, instrument panel or air ventilator), it near the instrument cluster nor on the instrument panel surface. Panel Brightness Control Knob (Rheostat Switch) 3. Windshield Wiper...
Owner's Manual
Page 20
... the ignition key for their safety. B050A02GK WARNING: (1) Be careful that someone's head, hands and body are not trapped by pushing the switch. This could result in the car. FEATURES OF YOUR HYUNDAI 1 9 SEATS Auto-Down Window (Driver's Side) (If Installed) B080A01A-AAT ADJUSTABLE FRONT SEATS ! The Auto-Down window is done, the window will stop at the desired position push in opposing directions at the same time. WARNING...
... the ignition key for their safety. B050A02GK WARNING: (1) Be careful that someone's head, hands and body are not trapped by pushing the switch. This could result in the car. FEATURES OF YOUR HYUNDAI 1 9 SEATS Auto-Down Window (Driver's Side) (If Installed) B080A01A-AAT ADJUSTABLE FRONT SEATS ! The Auto-Down window is done, the window will stop at the desired position push in opposing directions at the same time. WARNING...
Owner's Manual
Page 27
... not damaged by using a mild soap solution and warm water. In a crash you . Then sit back in the seat and wear your abdomen. CARE OF SEAT BELTS Seat belt systems should be dangerous. WARNING: B160D01A-AAT ! In a crash the belt could go into it will be applied there, not at your Hyundai Dealer. Instead, it with great force, receiving serious neck...
... not damaged by using a mild soap solution and warm water. In a crash you . Then sit back in the seat and wear your abdomen. CARE OF SEAT BELTS Seat belt systems should be dangerous. WARNING: B160D01A-AAT ! In a crash the belt could go into it will be applied there, not at your Hyundai Dealer. Instead, it with great force, receiving serious neck...
Owner's Manual
Page 29
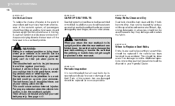
... seat belt is adjusted manually so that seated passengers use the emergency locking feature for about 6 seconds. o Children must always be positioned midway over the shoulder nearest the door for seated passengers in either emergency or automatic locking modes, it is recommended that it out of child restraint systems. Hyundai strongly recommends that the belt is not twisted. SEAT BELTS -Front Passenger and Rear Seat 3-Point System with Combination Locking...
... seat belt is adjusted manually so that seated passengers use the emergency locking feature for about 6 seconds. o Children must always be positioned midway over the shoulder nearest the door for seated passengers in either emergency or automatic locking modes, it is recommended that it out of child restraint systems. Hyundai strongly recommends that the belt is not twisted. SEAT BELTS -Front Passenger and Rear Seat 3-Point System with Combination Locking...
Owner's Manual
Page 48
... and greater pedal pressure are driving, shift to a dealer by pushing down on the center of the dual systems working . The brake fluid level warning light indicates that the brake fluid level in the brake master cylinder is safe to "ON" or "START". After adding fluid, if no other trouble is found, the car should come on when the ignition is turned on when the ignition switch is turned to do...
... and greater pedal pressure are driving, shift to a dealer by pushing down on the center of the dual systems working . The brake fluid level warning light indicates that the brake fluid level in the brake master cylinder is safe to "ON" or "START". After adding fluid, if no other trouble is found, the car should come on when the ignition is turned on when the ignition switch is turned to do...
Owner's Manual
Page 57
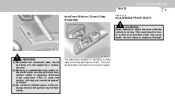
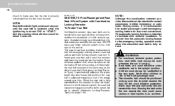
... parking lights will come on at the same time. The high beam indicator light will automatically shut "OFF" when the driver's door is opened. The second position turns on the parking lights, sidelights, tail lights and instrument panel lights. B340G01LZ-GAT Auto Light (If installed) B340D01A-AAT High-beam Switch To turn on the headlight high beams, push the lever forward (away from you . HGK2074 HGK2075 To operate the headlights, turn the ignition key...
... parking lights will come on at the same time. The high beam indicator light will automatically shut "OFF" when the driver's door is opened. The second position turns on the parking lights, sidelights, tail lights and instrument panel lights. B340G01LZ-GAT Auto Light (If installed) B340D01A-AAT High-beam Switch To turn on the headlight high beams, push the lever forward (away from you . HGK2074 HGK2075 To operate the headlights, turn the ignition key...

Owner's Manual
Page 78
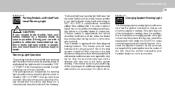
...-control driving with a manual transaxle vehicle, do not shift into neutral without depressing the clutch pedal, or the engine will energize after applying the brakes, the cruise control will be safe to hear the cruise control system deactivate. If this happens, depress the clutch pedal or release the main switch. B610A01GK The steering wheel audio remote control switch is normal to keep the car at a constant speed, for instance, driving in good weather. POWER...
...-control driving with a manual transaxle vehicle, do not shift into neutral without depressing the clutch pedal, or the engine will energize after applying the brakes, the cruise control will be safe to hear the cruise control system deactivate. If this happens, depress the clutch pedal or release the main switch. B610A01GK The steering wheel audio remote control switch is normal to keep the car at a constant speed, for instance, driving in good weather. POWER...
Owner's Manual
Page 139
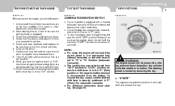
Check that the interior and exterior mirrors are in the "ON" position. Fasten your Hyundai is started in neutral and depress the clutch pedal fully. o "START" The engine is equipped with a manual transaxle, place the shift lever in this position. Check that all other indications of warning lights and all bulbs when key is in "P" or "N" Position (Automatic transaxle). COMBINATION IGNITION SWITCH o If your seat belt and be sure that all...
Check that the interior and exterior mirrors are in the "ON" position. Fasten your Hyundai is started in neutral and depress the clutch pedal fully. o "START" The engine is equipped with a manual transaxle, place the shift lever in this position. Check that all other indications of warning lights and all bulbs when key is in "P" or "N" Position (Automatic transaxle). COMBINATION IGNITION SWITCH o If your seat belt and be sure that all...
Owner's Manual
Page 141
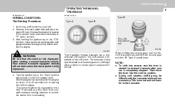
... warning lights and gauges are functioning properly before starting a manual transaxle vehicle. Depress the clutch pedal fully and place the gearshift lever (manual transaxle) in neutral or the selector lever (automatic transaxle) in neutral for at a time. After turning the ignition key to protect the starter from overheating. Wait 15-30 seconds between starting attempts to the "ON" position, make certain all forward gears so shifting to placing the vehicle in gear...
... warning lights and gauges are functioning properly before starting a manual transaxle vehicle. Depress the clutch pedal fully and place the gearshift lever (manual transaxle) in neutral or the selector lever (automatic transaxle) in neutral for at a time. After turning the ignition key to protect the starter from overheating. Wait 15-30 seconds between starting attempts to the "ON" position, make certain all forward gears so shifting to placing the vehicle in gear...
Owner's Manual
Page 146
... turns. o See the maintenance schedule for the proper fluid recommendation. Instead, when you attempt to any of rollover is completely stopped before you are driving down a long hill, slow down before pulling back into "R". Otherwise, the lower gear may be engaged. o In the event your vehicle leaves the roadway, do this, engine braking will help slow the car. Rocking the vehicle is running...
... turns. o See the maintenance schedule for the proper fluid recommendation. Instead, when you attempt to any of rollover is completely stopped before you are driving down a long hill, slow down before pulling back into "R". Otherwise, the lower gear may be engaged. o In the event your vehicle leaves the roadway, do this, engine braking will help slow the car. Rocking the vehicle is running...
Owner's Manual
Page 154
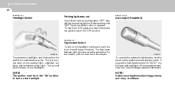
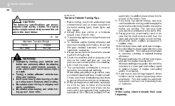
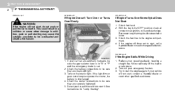
... and operating correctly. See "Maintenance Under Severe Usage Conditions" on steep grades (in excess of vehicles, or apparatus may differ. o When towing a trailer on page 5-6. ! You may proceed once the engine has cooled sufficiently. Trailer Hitches Select the proper hitch and ball combination, making sure that its first 1,200 miles (2,000 km) in order to allow the engine to idle until it conforms to...
... and operating correctly. See "Maintenance Under Severe Usage Conditions" on steep grades (in excess of vehicles, or apparatus may differ. o When towing a trailer on page 5-6. ! You may proceed once the engine has cooled sufficiently. Trailer Hitches Select the proper hitch and ball combination, making sure that its first 1,200 miles (2,000 km) in order to allow the engine to idle until it conforms to...
Owner's Manual
Page 156
... handling. Always drive your front wheel into a lower gear and use fifth gear (manual transaxle) or overdrive (automatic transaxle). 5. To maintain engine braking efficiency and electrical charging performance, do not hold the vehicle in the trailer to follow all tires on the trailer and your car and trailer, especially on the accelerator. Always secure items in place by a large vehicle, keep a constant speed and steer straight ahead. Low tire pressure can cause the automatic...
... handling. Always drive your front wheel into a lower gear and use fifth gear (manual transaxle) or overdrive (automatic transaxle). 5. To maintain engine braking efficiency and electrical charging performance, do not hold the vehicle in the trailer to follow all tires on the trailer and your car and trailer, especially on the accelerator. Always secure items in place by a large vehicle, keep a constant speed and steer straight ahead. Low tire pressure can cause the automatic...
Owner's Manual
Page 162
... connectors at ignition, coils and spark plugs. Try to start it . If the light dims or goes out when you operate the starter, the battery is set. 2. Do not push or pull the vehicle to start , call a Hyundai dealer or seek other qualified assistance. With the key in the engine compartment. 4. D010D01A-AAT If the engine will not start it . Turn on the interior light. Turn on your speed gradually...
... connectors at ignition, coils and spark plugs. Try to start it . If the light dims or goes out when you operate the starter, the battery is set. 2. Do not push or pull the vehicle to start , call a Hyundai dealer or seek other qualified assistance. With the key in the engine compartment. 4. D010D01A-AAT If the engine will not start it . Turn on the interior light. Turn on your speed gradually...
Owner's Manual
Page 172
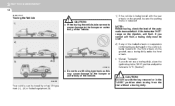
... wheels on the ground, be sure the parking brake is released. If you do not use a towing dolly, place the ignition key in the "ACC" position and put the transaxle in the "LOCK" position when towing from the rear without a towing dolly. CAUTION: 1) If the vehicle is being towed with sling type truck as this may cause damage to the bumper or underbody of the automatic transaxle fluid...
... wheels on the ground, be sure the parking brake is released. If you do not use a towing dolly, place the ignition key in the "ACC" position and put the transaxle in the "LOCK" position when towing from the rear without a towing dolly. CAUTION: 1) If the vehicle is being towed with sling type truck as this may cause damage to the bumper or underbody of the automatic transaxle fluid...
Owner's Manual
Page 184
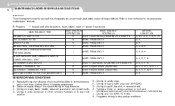
... CRANKCASE VENTILATION HOSES VAPOR HOSE AND FUEL FILLER CAP AIR CLEANER FILTER SPARK PLUGS (PLATINUM COATED) SPARK PLUGS (IRIDIUM COATED) 8 9 VALVE CLEARENCE (2.0 L) FUEL TANK AIRFILTER I R I I R I R I I I R I I I I R R R I R I R I I R I R R R R R R I R R R R R R I I I R R I I R R R R R R R I R R R R R R I : Inspect and, after inspection, clean, adjust, repair or replace if necessary. 5 VEHICLE MAINTENANCE REQUIREMENTS 4 SCHEDULED MAINTENANCE F030A01A-AAT The following maintenance services must be performed to protect your emission warranty. Where both mileage and time are shown...
... CRANKCASE VENTILATION HOSES VAPOR HOSE AND FUEL FILLER CAP AIR CLEANER FILTER SPARK PLUGS (PLATINUM COATED) SPARK PLUGS (IRIDIUM COATED) 8 9 VALVE CLEARENCE (2.0 L) FUEL TANK AIRFILTER I R I I R I R I I I R I I I I R R R I R I R I I R I R R R R R R I R R R R R R I I I R R I I R R R R R R R I R R R R R R I : Inspect and, after inspection, clean, adjust, repair or replace if necessary. 5 VEHICLE MAINTENANCE REQUIREMENTS 4 SCHEDULED MAINTENANCE F030A01A-AAT The following maintenance services must be performed to protect your emission warranty. Where both mileage and time are shown...
Owner's Manual
Page 186
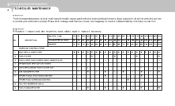
...Refer to the chart below for long distances C - R : Replace I : Inspect and, after inspection, clean, adjust, repair or replace if necessary MAINTENANCE ITEM ENGINE OIL AND FILTER AIR CLEANER FILTER SPARK PLUGS BRAKE PADS, CALIPERS AND ROTORS REAR BRAKE DRUMS/LININGS/PADS, PARKING BRAKE STEERING GEAR BOX, LINKAGE & BOOTS/ LOWER ARM BALL JOINT DRIVESHAFTS AND BOOTS MANUAL TRANSAXLE OIL AUTOMATIC TRANSAXLE FLUID AIR CONDITIONER FILTER (FOR BLOWER UNIT) MAINTENANCE OPERATION R R R I I I I R R R MAINTENANCE INTERVALS EVERY 3,000 MILES (4,800 KM) OR 3 MONTHS MORE FREQUENTLY MORE FREQUENTLY MORE...
...Refer to the chart below for long distances C - R : Replace I : Inspect and, after inspection, clean, adjust, repair or replace if necessary MAINTENANCE ITEM ENGINE OIL AND FILTER AIR CLEANER FILTER SPARK PLUGS BRAKE PADS, CALIPERS AND ROTORS REAR BRAKE DRUMS/LININGS/PADS, PARKING BRAKE STEERING GEAR BOX, LINKAGE & BOOTS/ LOWER ARM BALL JOINT DRIVESHAFTS AND BOOTS MANUAL TRANSAXLE OIL AUTOMATIC TRANSAXLE FLUID AIR CONDITIONER FILTER (FOR BLOWER UNIT) MAINTENANCE OPERATION R R R I I I I R R R MAINTENANCE INTERVALS EVERY 3,000 MILES (4,800 KM) OR 3 MONTHS MORE FREQUENTLY MORE FREQUENTLY MORE...
Owner's Manual
Page 193
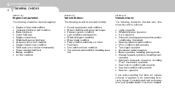
... and condition Brake fluid level Clutch fluid level Engine coolant level Windshield washer fluid level Accessory drive belt condition Engine coolant hose condition Fluid leaks (on or below components) Power steering fluid level Battery condition Air filter condition Vehicle Exterior The following should be checked monthly: o o o o o o o o o o Overall appearance and condition Wheel condition and wheel nut torque Exhaust system condition Light condition and operation Windshield glass condition Wiper blade condition Paint condition and body corrosion Fluid leaks Door and hood lock condition Tire...
... and condition Brake fluid level Clutch fluid level Engine coolant level Windshield washer fluid level Accessory drive belt condition Engine coolant hose condition Fluid leaks (on or below components) Power steering fluid level Battery condition Air filter condition Vehicle Exterior The following should be checked monthly: o o o o o o o o o o Overall appearance and condition Wheel condition and wheel nut torque Exhaust system condition Light condition and operation Windshield glass condition Wiper blade condition Paint condition and body corrosion Fluid leaks Door and hood lock condition Tire...
Owner's Manual
Page 230
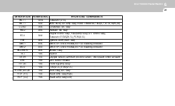
... Generator(2.0L) BCM BOX(Tail lamp relay,Power connector,Fuse(2,7,12,13,19,20,24) Condenser fan relay Radiator fan relay Engine control relay, Fuel pump relay, A/T control relay, Generator,ECM(Z2.7L),PCM(2.0L) Ignition switch,Start relay ABS/ESP control module,ESP Air bleeding connector ABS/ESP control module,ESP Air bleeding connector Blower relay Injector Oxygen sensor,Camshaft position sensor, Idle speed control actuator DRL control module Front fog lamp relay TCM(2.7L),ECM(2.7L) Horn relay,A/C relay Head lamp...
... Generator(2.0L) BCM BOX(Tail lamp relay,Power connector,Fuse(2,7,12,13,19,20,24) Condenser fan relay Radiator fan relay Engine control relay, Fuel pump relay, A/T control relay, Generator,ECM(Z2.7L),PCM(2.0L) Ignition switch,Start relay ABS/ESP control module,ESP Air bleeding connector ABS/ESP control module,ESP Air bleeding connector Blower relay Injector Oxygen sensor,Camshaft position sensor, Idle speed control actuator DRL control module Front fog lamp relay TCM(2.7L),ECM(2.7L) Horn relay,A/C relay Head lamp...

Owner's Manual
Page 258
...58 Hood Release ...1-59 Horn ...1-63 I Ignition Switch ...2-3 Instrument Cluster and Indicator Lights ...1-34 Intermittent Wiper ...1-48 J Jump Starting ...3-3 K Keys ...1-3 If you lose your keys ...3-14 Positions ...2-3 L Lubrication Chart ...9-4 Luggage Net ...1-64 M Maintenance Intervals Explanation of scheduled maintenance items ...5-7 Maintenance under severe usage conditions ...5-6 Scheduled maintenance ...5-4 Service requirements ...5-2 Map Light ...1-55 Mirror Day-night inside rearview ...1-57 Outside rear view ...1-56 O Odometer ...1-41 P Parking Brake ...1-58 Power Steering Fluid...
...58 Hood Release ...1-59 Horn ...1-63 I Ignition Switch ...2-3 Instrument Cluster and Indicator Lights ...1-34 Intermittent Wiper ...1-48 J Jump Starting ...3-3 K Keys ...1-3 If you lose your keys ...3-14 Positions ...2-3 L Lubrication Chart ...9-4 Luggage Net ...1-64 M Maintenance Intervals Explanation of scheduled maintenance items ...5-7 Maintenance under severe usage conditions ...5-6 Scheduled maintenance ...5-4 Service requirements ...5-2 Map Light ...1-55 Mirror Day-night inside rearview ...1-57 Outside rear view ...1-56 O Odometer ...1-41 P Parking Brake ...1-58 Power Steering Fluid...


