Owner's Manual
Page 190
... Checking the Transaxle Fluid (Automatic) ...6-15 Checking the Brakes ...6-17 Checking the Clutch Fluid ...6-19 Air Conditioning Care ...6-19 Checking Drive Belts ...6-23 Checking and Replacing Fuses ...6-24 Checking the Battery ...6-26 Power Steering Fluid Level ...6-28 Headlight Aiming Adjustment ...6-29 Replacement of Light Bulbs ...6-30 Bulb Wattage ...6-39 Fuse Panel Description ...6-40 6 6
... Checking the Transaxle Fluid (Automatic) ...6-15 Checking the Brakes ...6-17 Checking the Clutch Fluid ...6-19 Air Conditioning Care ...6-19 Checking Drive Belts ...6-23 Checking and Replacing Fuses ...6-24 Checking the Battery ...6-26 Power Steering Fluid Level ...6-28 Headlight Aiming Adjustment ...6-29 Replacement of Light Bulbs ...6-30 Bulb Wattage ...6-39 Fuse Panel Description ...6-40 6 6
Owner's Manual
Page 218
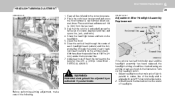
... Draw the vertical line (through the center of each headlight beam pattern) and the horizontal line (through the center... body repair and the headlight assembly has been replaced, the headlight aiming should be checked ...using an aiming screen as shown in the illustration. 2. And then, draw the parallel line at a distance of 118 in the illustration show the center of headlights. Place the vehicle on the headlights. 5. DO-IT-YOURSELF MAINTENANCE 6 29 HEADLIGHT... Headlight Assembly Replacement 0.827 in . (21 mm) under...
... Draw the vertical line (through the center of each headlight beam pattern) and the horizontal line (through the center... body repair and the headlight assembly has been replaced, the headlight aiming should be checked ...using an aiming screen as shown in the illustration. 2. And then, draw the parallel line at a distance of 118 in the illustration show the center of headlights. Place the vehicle on the headlights. 5. DO-IT-YOURSELF MAINTENANCE 6 29 HEADLIGHT... Headlight Assembly Replacement 0.827 in . (21 mm) under...

Owner's Manual
Page 219
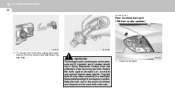
...in the back of the headlight. HGK5023 4. Headlight and Front Turn Signal Light 1. Wear eye protection. 2. Always grasp the bulb by its plastic base, avoid touching the glass. ! Open the engine hood. 3. See page 6-38 for the wattage description. Be sure to replace the burned-out bulb with... the bulb to cool. CAUTION: Keep the lamps out of the same number and wattage rating. 6 DO-IT-YOURSELFMAINTENANCE 30 REPLACEMENT OF LIGHT BULBS SPECIFICATION: "H" Horizontal center line of headlights from the bulb base in . (3,000 mm) G260A02A-AAT G270A01GK-AAT Before attempting to...
...in the back of the headlight. HGK5023 4. Headlight and Front Turn Signal Light 1. Wear eye protection. 2. Always grasp the bulb by its plastic base, avoid touching the glass. ! Open the engine hood. 3. See page 6-38 for the wattage description. Be sure to replace the burned-out bulb with... the bulb to cool. CAUTION: Keep the lamps out of the same number and wattage rating. 6 DO-IT-YOURSELFMAINTENANCE 30 REPLACEMENT OF LIGHT BULBS SPECIFICATION: "H" Horizontal center line of headlights from the bulb base in . (3,000 mm) G260A02A-AAT G270A01GK-AAT Before attempting to...

Owner's Manual
Page 220
Disconnect the connector from the replacement bulb and install the new bulb by matching the plastic base with the headlight hole. Push the bulb spring to promptly dispose of the headlight. 7. Remove the protective cap from the bulb base in the back of the old bulb. 10.Check for proper headlight aim. Reattach the bulb spring and reconnect the connector. 9. DO-IT-YOURSELF MAINTENANCE 6 31 HGK5024 HGK5026 HGK5027 5. Use the protective cap and carton to remove the headlight bulb. 8. Turn the plastic cover counterclockwise and remove it. 6.
Disconnect the connector from the replacement bulb and install the new bulb by matching the plastic base with the headlight hole. Push the bulb spring to promptly dispose of the headlight. 7. Remove the protective cap from the bulb base in the back of the old bulb. 10.Check for proper headlight aim. Reattach the bulb spring and reconnect the connector. 9. DO-IT-YOURSELF MAINTENANCE 6 31 HGK5024 HGK5026 HGK5027 5. Use the protective cap and carton to remove the headlight bulb. 8. Turn the plastic cover counterclockwise and remove it. 6.
Owner's Manual
Page 221
6 DO-IT-YOURSELFMAINTENANCE 32 G270B01GK-GAT Rear Combination Light (Without woofer speaker) (1) (4) (2) HGK5036 G270A03O (3) 11.To replace the front turn signal light bulb, remove from the bulb holder and install the new bulb. ! Turn the bulb on only when installing...abrasions or scratches and against liquids when lighted. HGK5037 This halogen bulb contains gas under pressure and if impacted could shatter, resulting in a headlight. Keep the bulb out of the reach of children and dispose of the used bulb with care. Replace the headlight if damaged or cracked. WARNING: 1.
6 DO-IT-YOURSELFMAINTENANCE 32 G270B01GK-GAT Rear Combination Light (Without woofer speaker) (1) (4) (2) HGK5036 G270A03O (3) 11.To replace the front turn signal light bulb, remove from the bulb holder and install the new bulb. ! Turn the bulb on only when installing...abrasions or scratches and against liquids when lighted. HGK5037 This halogen bulb contains gas under pressure and if impacted could shatter, resulting in a headlight. Keep the bulb out of the reach of children and dispose of the used bulb with care. Replace the headlight if damaged or cracked. WARNING: 1.


