
Owner's Manual
Page 3
... P. 230 Bluetooth® HandsFreeLink® P. 254 General Information on the Audio System P. 232 Compass * P. 277 Features Driving When Driving P. 291 Fuel Economy P. 321 Braking P. 308 Accessories and Modifications P. 322 Parking Your Vehicle P. 312 Maintenance Maintenance Under the Hood P. 335 Replacing Light Bulbs P. 347 Checking and Maintaining Tires P. 362 Battery P. 371 Heating...
... P. 230 Bluetooth® HandsFreeLink® P. 254 General Information on the Audio System P. 232 Compass * P. 277 Features Driving When Driving P. 291 Fuel Economy P. 321 Braking P. 308 Accessories and Modifications P. 322 Parking Your Vehicle P. 312 Maintenance Maintenance Under the Hood P. 335 Replacing Light Bulbs P. 347 Checking and Maintaining Tires P. 362 Battery P. 371 Heating...
Owner's Manual
Page 4
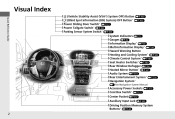
...) ❙ Heated Mirror Button * (P147) ❙ Audio System (P194) ❙ Rear Entertainment System * (P236) ❙ Navigation System * () See Navigation System Manual Quick Reference Guide ❙ Accessory Power Sockets (P175) ❙ Cool Box Switch * (P172) ❙ Center Pocket (P172) ❙ Auxiliary Input Jack (P195) ❙ Driving Position Memory System Buttons * (P148) 2
...) ❙ Heated Mirror Button * (P147) ❙ Audio System (P194) ❙ Rear Entertainment System * (P236) ❙ Navigation System * () See Navigation System Manual Quick Reference Guide ❙ Accessory Power Sockets (P175) ❙ Cool Box Switch * (P172) ❙ Center Pocket (P172) ❙ Auxiliary Input Jack (P195) ❙ Driving Position Memory System Buttons * (P148) 2

Owner's Manual
Page 7
❙ Accessory Power Socket (P175) ❙ AC Power Outlet * (P176) ❙ Auxiliary Input Jacks * (P236) ❙ Coat Hooks (P177) ❙ Seat Belt (Installing a Child Seat) (P62) ❙ ...
❙ Accessory Power Socket (P175) ❙ AC Power Outlet * (P176) ❙ Auxiliary Input Jacks * (P236) ❙ Coat Hooks (P177) ❙ Seat Belt (Installing a Child Seat) (P62) ❙ ...

Owner's Manual
Page 33
... very serious injuries in a crash. • Two people should sit upright, well back in the seat, and remain in a crash. • Do not put any accessories on . The beeper will also periodically sound and the indicator will remain on the seat belts. This is because the weight sensors in the seat...
... very serious injuries in a crash. • Two people should sit upright, well back in the seat, and remain in a crash. • Do not put any accessories on . The beeper will also periodically sound and the indicator will remain on the seat belts. This is because the weight sensors in the seat...
Owner's Manual
Page 48
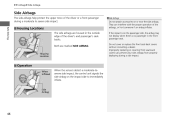
... detect a moderate-tosevere side impact, the control unit signals the side airbag on the impact side to severe side impact. 1 Side Airbags Do not attach accessories on the passenger side, the airbag may not deploy when there is on or near the side airbags. Side Airbag 46 Do not cover or...
... detect a moderate-tosevere side impact, the control unit signals the side airbag on the impact side to severe side impact. 1 Side Airbags Do not attach accessories on the passenger side, the airbag may not deploy when there is on or near the side airbags. Side Airbag 46 Do not cover or...

Owner's Manual
Page 86
Consequently, SERVICE DUE NOW and SERVICE PAST DUE follow. Message ● / (information) button to ACCESSORY (q from ON (w . (The driver's door is closed.) Appears when you open the driver's door while the ignition key is due soon. Appears when the ignition ...
Consequently, SERVICE DUE NOW and SERVICE PAST DUE follow. Message ● / (information) button to ACCESSORY (q from ON (w . (The driver's door is closed.) Appears when you open the driver's door while the ignition key is due soon. Appears when the ignition ...
Owner's Manual
Page 119
... twice. 4 Press and hold the front of (P with the brake pedal depressed. Release the switch after you hear one click. 5 Turn the ignition switch to ACCESSORY (q within 20 seconds. uCustomization is completed. *1: Default setting Continued 117 Off Move the shift lever to (P with the brake pedal depressed. Park Lock Mode Move...
... twice. 4 Press and hold the front of (P with the brake pedal depressed. Release the switch after you hear one click. 5 Turn the ignition switch to ACCESSORY (q within 20 seconds. uCustomization is completed. *1: Default setting Continued 117 Off Move the shift lever to (P with the brake pedal depressed. Park Lock Mode Move...

Owner's Manual
Page 120
... be closed at this stage. Keep pressing the switch for another five Release the switch. You will hear a click twice. 4 5 Release the switch. seconds to ACCESSORY (q within 20 seconds. Turn the ignition switch to ON (w . Turn the ignition switch to ON (w .
... be closed at this stage. Keep pressing the switch for another five Release the switch. You will hear a click twice. 4 5 Release the switch. seconds to ACCESSORY (q within 20 seconds. Turn the ignition switch to ON (w . Turn the ignition switch to ON (w .

Owner's Manual
Page 123
... need to unlock the tailgate before you press the tailgate button to open it from fully opening or closing. Installing aftermarket components other than genuine Honda accessories on the power tailgate may not open . • The shift lever is in a strong wind. • The tailgate or the roof is in and out...
... need to unlock the tailgate before you press the tailgate button to open it from fully opening or closing. Installing aftermarket components other than genuine Honda accessories on the power tailgate may not open . • The shift lever is in a strong wind. • The tailgate or the roof is in and out...
Owner's Manual
Page 142
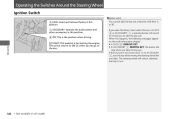
... moving the steering wheel left and right. When this position. (w ON: This is the position when driving. (e START: This position is in LOCK (0 or ACCESSORY (q , a warning buzzer will stop when you open the driver's door when the key is for starting the engine. If you take the key out. If... unless the shift lever is in this happens, the following messages appear on the multi-information display *: • In LOCK (0 : REMOVE KEY. • In ACCESSORY (q : REMOVE KEY The buzzer will sound to remind you let go of the key. You cannot take the key out. The steering wheel will unlock...
... moving the steering wheel left and right. When this position. (w ON: This is the position when driving. (e START: This position is in LOCK (0 or ACCESSORY (q , a warning buzzer will stop when you open the driver's door when the key is for starting the engine. If you take the key out. If... unless the shift lever is in this happens, the following messages appear on the multi-information display *: • In LOCK (0 : REMOVE KEY. • In ACCESSORY (q : REMOVE KEY The buzzer will sound to remind you let go of the key. You cannot take the key out. The steering wheel will unlock...
Owner's Manual
Page 147
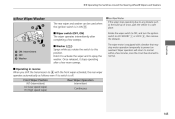
... wiper stops operating due to any obstacle such as the build-up of snow, park the vehicle in reverse When you rotate the switch to ACCESSORY (q or LOCK (0 , then remove the obstacle.
... wiper stops operating due to any obstacle such as the build-up of snow, park the vehicle in reverse When you rotate the switch to ACCESSORY (q or LOCK (0 , then remove the obstacle.

Owner's Manual
Page 177
...amps). Continued 175 This can be used simultaneously, the combined power rating of the accessories should not exceed 120 watts (10 amps). The accessory power socket is in ACCESSORY (q or ON (w . ■ Accessory power socket(s) (console panel) Open the cover to use it . Controls To ...prevent battery drain, only use the power socket with the engine run. ■ Accessory power socket (cargo area) Open the cover to use it . 1 Accessory Power Sockets NOTICE Do not insert an automotive type cigarette lighter element. uu Interior Lights/Interior Convenience...
...amps). Continued 175 This can be used simultaneously, the combined power rating of the accessories should not exceed 120 watts (10 amps). The accessory power socket is in ACCESSORY (q or ON (w . ■ Accessory power socket(s) (console panel) Open the cover to use it . Controls To ...prevent battery drain, only use the power socket with the engine run. ■ Accessory power socket (cargo area) Open the cover to use it . 1 Accessory Power Sockets NOTICE Do not insert an automotive type cigarette lighter element. uu Interior Lights/Interior Convenience...
Owner's Manual
Page 198
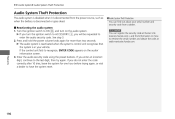
Turn the ignition switch to ON (w , and turn the ignition switch to ACCESSORY (q , you do not enter the code correctly after 10 tries, leave the system ...is disconnected or goes dead. 1 Audio System Theft Protection You can register the security code at radio-navicode.honda.com. 196 Features If the control unit fails to recognize, ENTER CODE appears on how to enter the audio...3. If you will be requested to retrieve the serial number and obtain the code at Owner Link (owners.honda.com.), and find out about your serial number and security code from the power source, such as when the...
Turn the ignition switch to ON (w , and turn the ignition switch to ACCESSORY (q , you do not enter the code correctly after 10 tries, leave the system ...is disconnected or goes dead. 1 Audio System Theft Protection You can register the security code at radio-navicode.honda.com. 196 Features If the control unit fails to recognize, ENTER CODE appears on how to enter the audio...3. If you will be requested to retrieve the serial number and obtain the code at Owner Link (owners.honda.com.), and find out about your serial number and security code from the power source, such as when the...
Owner's Manual
Page 199
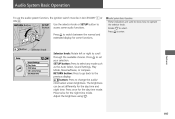
Press to operate the selector knob. SETUP button: Press to enter. Press once for some audio functions. The brightness can be in ACCESSORY (q or ON (w . Audio System Basic Operation To use the audio system function, the ignition switch must be set your selection. to select any mode such ...
Press to operate the selector knob. SETUP button: Press to enter. Press once for some audio functions. The brightness can be in ACCESSORY (q or ON (w . Audio System Basic Operation To use the audio system function, the ignition switch must be set your selection. to select any mode such ...
Owner's Manual
Page 239
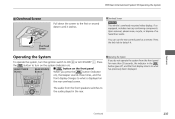
... indicator in the rear. You can use the rear control panel as hazardous waste. Press the button to turn the ignition switch to ON (w or ACCESSORY (q . uu Rear Entertainment System * u Operating the System ■ Overhead Screen Pull down the screen to the first or second detent until it...
... indicator in the rear. You can use the rear control panel as hazardous waste. Press the button to turn the ignition switch to ON (w or ACCESSORY (q . uu Rear Entertainment System * u Operating the System ■ Overhead Screen Pull down the screen to the first or second detent until it...
Owner's Manual
Page 258
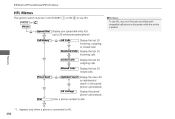
... your Bluetoothcompatible cell phone to use HFL, you must be in the paired phone's phonebook. Display the last 20 incoming calls. an alphabetical search in ACCESSORY (q or ON (w to the system while the vehicle is connected to 20 entries per paired phone) All Calls Call History*1 Display the last 20 incoming...
... your Bluetoothcompatible cell phone to use HFL, you must be in the paired phone's phonebook. Display the last 20 incoming calls. an alphabetical search in ACCESSORY (q or ON (w to the system while the vehicle is connected to 20 entries per paired phone) All Calls Call History*1 Display the last 20 incoming...
Owner's Manual
Page 279
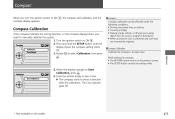
...; Driving near power lines or stations • Crossing a bridge • Passing a large vehicle, or driving near a large object that can cause a magnetic disturbance • When accessories such as antennas and roof racks are mounted by magnets 1 Compass Calibration Calibrate the compass in two circles. Compass * When you need to manually calibrate...
...; Driving near power lines or stations • Crossing a bridge • Passing a large vehicle, or driving near a large object that can cause a magnetic disturbance • When accessories such as antennas and roof racks are mounted by magnets 1 Compass Calibration Calibrate the compass in two circles. Compass * When you need to manually calibrate...
Owner's Manual
Page 281
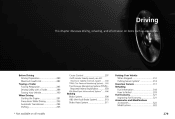
... When Stopped ...312 Parking Sensor System * ...313 Rearview Camera ...317 Refueling Fuel Information ...318 How to Refuel ...319 Fuel Economy...321 Improving Fuel Economy...321 Accessories and Modifications Accessories ...322 Modifications...322 * Not available on items such as accessories. Driving This chapter discusses driving, refueling, and information on all models 279
... When Stopped ...312 Parking Sensor System * ...313 Rearview Camera ...317 Refueling Fuel Information ...318 How to Refuel ...319 Fuel Economy...321 Improving Fuel Economy...321 Accessories and Modifications Accessories ...322 Modifications...322 * Not available on items such as accessories. Driving This chapter discusses driving, refueling, and information on all models 279
Owner's Manual
Page 285
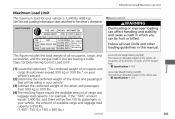
... of available cargo and luggage load capacity is 1,340 lbs (608 kg). This figure includes the total weight of all occupants, cargo, and accessories, and the tongue load if you can be five 150 lb. For example, if the "XXX" amount equals 1,400 lbs. Steps for your... lbs. (1,400 - 750 (5 x 150) = 650 lbs.) Continued Gross Vehicle Weight Rating (GVWR): The maximum allowable weight of the vehicle, all occupants, all accessories, all cargo, and the tongue load. 2 Specifications P. 412 Gross Axle Weight Rating (GAWR): The maximum allowable weight of the vehicle axle. 2 Specifications P. 412 ...
... of available cargo and luggage load capacity is 1,340 lbs (608 kg). This figure includes the total weight of all occupants, cargo, and accessories, and the tongue load if you can be five 150 lb. For example, if the "XXX" amount equals 1,400 lbs. Steps for your... lbs. (1,400 - 750 (5 x 150) = 650 lbs.) Continued Gross Vehicle Weight Rating (GVWR): The maximum allowable weight of the vehicle, all occupants, all accessories, all cargo, and the tongue load. 2 Specifications P. 412 Gross Axle Weight Rating (GAWR): The maximum allowable weight of the vehicle axle. 2 Specifications P. 412 ...
Owner's Manual
Page 286
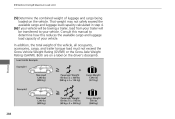
... luggage and cargo being loaded on the driver's doorjamb. Consult this manual to your vehicle. In addition, the total weight of the vehicle, all occupants, accessories, cargo, and trailer tongue load must not exceed the Gross Vehicle Weight Rating (GVWR) or the Gross Axle Weight Rating (GAWR).
... luggage and cargo being loaded on the driver's doorjamb. Consult this manual to your vehicle. In addition, the total weight of the vehicle, all occupants, accessories, cargo, and trailer tongue load must not exceed the Gross Vehicle Weight Rating (GVWR) or the Gross Axle Weight Rating (GAWR).
