Owner's Manual
Page 85
... cooler. To adjust the outside temperature displayed. Gauges Outside Temperature Indicator On EX and EX-L models This indicator displays the outside temperature in the front bumper. To see the new outside temperature indicator, press and hold the Select/ Reset knob for 1 second each: 0, 1, 2, 3, 4, 5, 5, 4, 3, 2, 1, 0 (U.S.) or 0, 1, 2, 3, 3, 2, 1, 0 (Canada). This can be stabilized before doing...
... cooler. To adjust the outside temperature displayed. Gauges Outside Temperature Indicator On EX and EX-L models This indicator displays the outside temperature in the front bumper. To see the new outside temperature indicator, press and hold the Select/ Reset knob for 1 second each: 0, 1, 2, 3, 4, 5, 5, 4, 3, 2, 1, 0 (U.S.) or 0, 1, 2, 3, 3, 2, 1, 0 (Canada). This can be stabilized before doing...
Owner's Manual
Page 93
models), or in the front bumper. It does this by heat reflection from the road surface, engine heat, and the exhaust from surrounding traffic. CONTINUED 87 Multi-Information Display Outside Temperature ...
models), or in the front bumper. It does this by heat reflection from the road surface, engine heat, and the exhaust from surrounding traffic. CONTINUED 87 Multi-Information Display Outside Temperature ...
Owner's Manual
Page 308
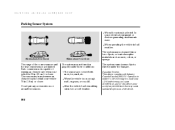
... are limited. When the vehicle is on a rough road, on grass, or on or around the sensors. The system may not function properly under the bumper. After the vehicle has been sitting out in (50 cm) or closer. Each corner sensor is capable of sensing an obstacle only when your vehicle...
... are limited. When the vehicle is on a rough road, on grass, or on or around the sensors. The system may not function properly under the bumper. After the vehicle has been sitting out in (50 cm) or closer. Each corner sensor is capable of sensing an obstacle only when your vehicle...
Owner's Manual
Page 380
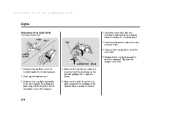
...only HOLE BOLT TAB 6. UNDER COVER 9. Remove the electrical connector from the bumper by pulling its inner edge first, then the whole assembly out of the bumper. 4. Remove the undercover bolt located under the front bumper. 2. Remove the bulb from the fog light assembly by pushing on the... fog lights to lock it one-quarter turn counterclockwise. 374 CONNECTOR BULB 1. Insert the new bulb into the bumper. Push up the undercover. 3. Push the electrical connector onto the new bulb. 8. Reinstall the fog light assembly into the assembly and ...
...only HOLE BOLT TAB 6. UNDER COVER 9. Remove the electrical connector from the bumper by pulling its inner edge first, then the whole assembly out of the bumper. 4. Remove the undercover bolt located under the front bumper. 2. Remove the bulb from the fog light assembly by pushing on the... fog lights to lock it one-quarter turn counterclockwise. 374 CONNECTOR BULB 1. Insert the new bulb into the bumper. Push up the undercover. 3. Push the electrical connector onto the new bulb. 8. Reinstall the fog light assembly into the assembly and ...
Owner's Manual
Page 425
Emergency Towing The steering system can be damaged if the steering wheel is locked. Trying to support the vehicle's weight. The bumpers are not designed to lif t or tow your vehicle by the bumpers will cause serious damage. Leave the ignition switch in the ACCESSORY (I) position, and make sure the steering wheel turns f reely bef ore you begin towing. Taking Care of the Unexpected 419
Emergency Towing The steering system can be damaged if the steering wheel is locked. Trying to support the vehicle's weight. The bumpers are not designed to lif t or tow your vehicle by the bumpers will cause serious damage. Leave the ignition switch in the ACCESSORY (I) position, and make sure the steering wheel turns f reely bef ore you begin towing. Taking Care of the Unexpected 419