Owner's Manual
Page 85
... displayed, you start your vehicle speed is under 19 mph (30 km/h). This can be stabilized before doing this procedure. models ( 3°C in the front bumper. To adjust the outside temperature in U.S. Gauges Outside Temperature Indicator On EX and EX-L models This indicator displays the outside temperature indicator, press and hold...
... displayed, you start your vehicle speed is under 19 mph (30 km/h). This can be stabilized before doing this procedure. models ( 3°C in the front bumper. To adjust the outside temperature in U.S. Gauges Outside Temperature Indicator On EX and EX-L models This indicator displays the outside temperature indicator, press and hold...
Owner's Manual
Page 93
... your trip, the sensor is not fully acclimatized, therefore it may take several minutes until the proper temperature is displayed. models), or in the front bumper. System Messages If there is a problem with one or more messages. The temperature reading can be affected by interrupting the current display with your vehicle...
... your trip, the sensor is not fully acclimatized, therefore it may take several minutes until the proper temperature is displayed. models), or in the front bumper. System Messages If there is a problem with one or more messages. The temperature reading can be affected by interrupting the current display with your vehicle...
Owner's Manual
Page 308
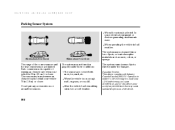
... road, on grass, or on or around the sensors. Operation is subject to the following two conditions: (1) this device may not function properly under the bumper. The rear center sensor senses an obstacle that may not sense thin or low objects, or sonic-absorptive materials such as snow, cotton, or sponge...
... road, on grass, or on or around the sensors. Operation is subject to the following two conditions: (1) this device may not function properly under the bumper. The rear center sensor senses an obstacle that may not sense thin or low objects, or sonic-absorptive materials such as snow, cotton, or sponge...
Owner's Manual
Page 380
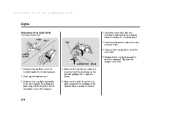
Push the electrical connector onto the new bulb. 8. UNDER COVER 9. Remove the undercover bolt located under the front bumper. 2. Lights Replacing a Fog Light Bulb Touring models only HOLE BOLT TAB 6. Remove the electrical connector from the bulb by pushing on the fog lights to ... the undercover. 3. Remove the fog light assembly from the fog light assembly by pulling its inner edge first, then the whole assembly out of the bumper. 4. Remove the bulb from the bumper by turning it onequarter turn clockwise to test the new bulb. Insert the new bulb into the...
Push the electrical connector onto the new bulb. 8. UNDER COVER 9. Remove the undercover bolt located under the front bumper. 2. Lights Replacing a Fog Light Bulb Touring models only HOLE BOLT TAB 6. Remove the electrical connector from the bulb by pushing on the fog lights to ... the undercover. 3. Remove the fog light assembly from the fog light assembly by pulling its inner edge first, then the whole assembly out of the bumper. 4. Remove the bulb from the bumper by turning it onequarter turn clockwise to test the new bulb. Insert the new bulb into the...
Owner's Manual
Page 425
Trying to support the vehicle's weight. Emergency Towing The steering system can be damaged if the steering wheel is locked. Taking Care of the Unexpected 419 Leave the ignition switch in the ACCESSORY (I) position, and make sure the steering wheel turns f reely bef ore you begin towing. The bumpers are not designed to lif t or tow your vehicle by the bumpers will cause serious damage.
Trying to support the vehicle's weight. Emergency Towing The steering system can be damaged if the steering wheel is locked. Taking Care of the Unexpected 419 Leave the ignition switch in the ACCESSORY (I) position, and make sure the steering wheel turns f reely bef ore you begin towing. The bumpers are not designed to lif t or tow your vehicle by the bumpers will cause serious damage.